Search
Account Search
Account Search
Overview
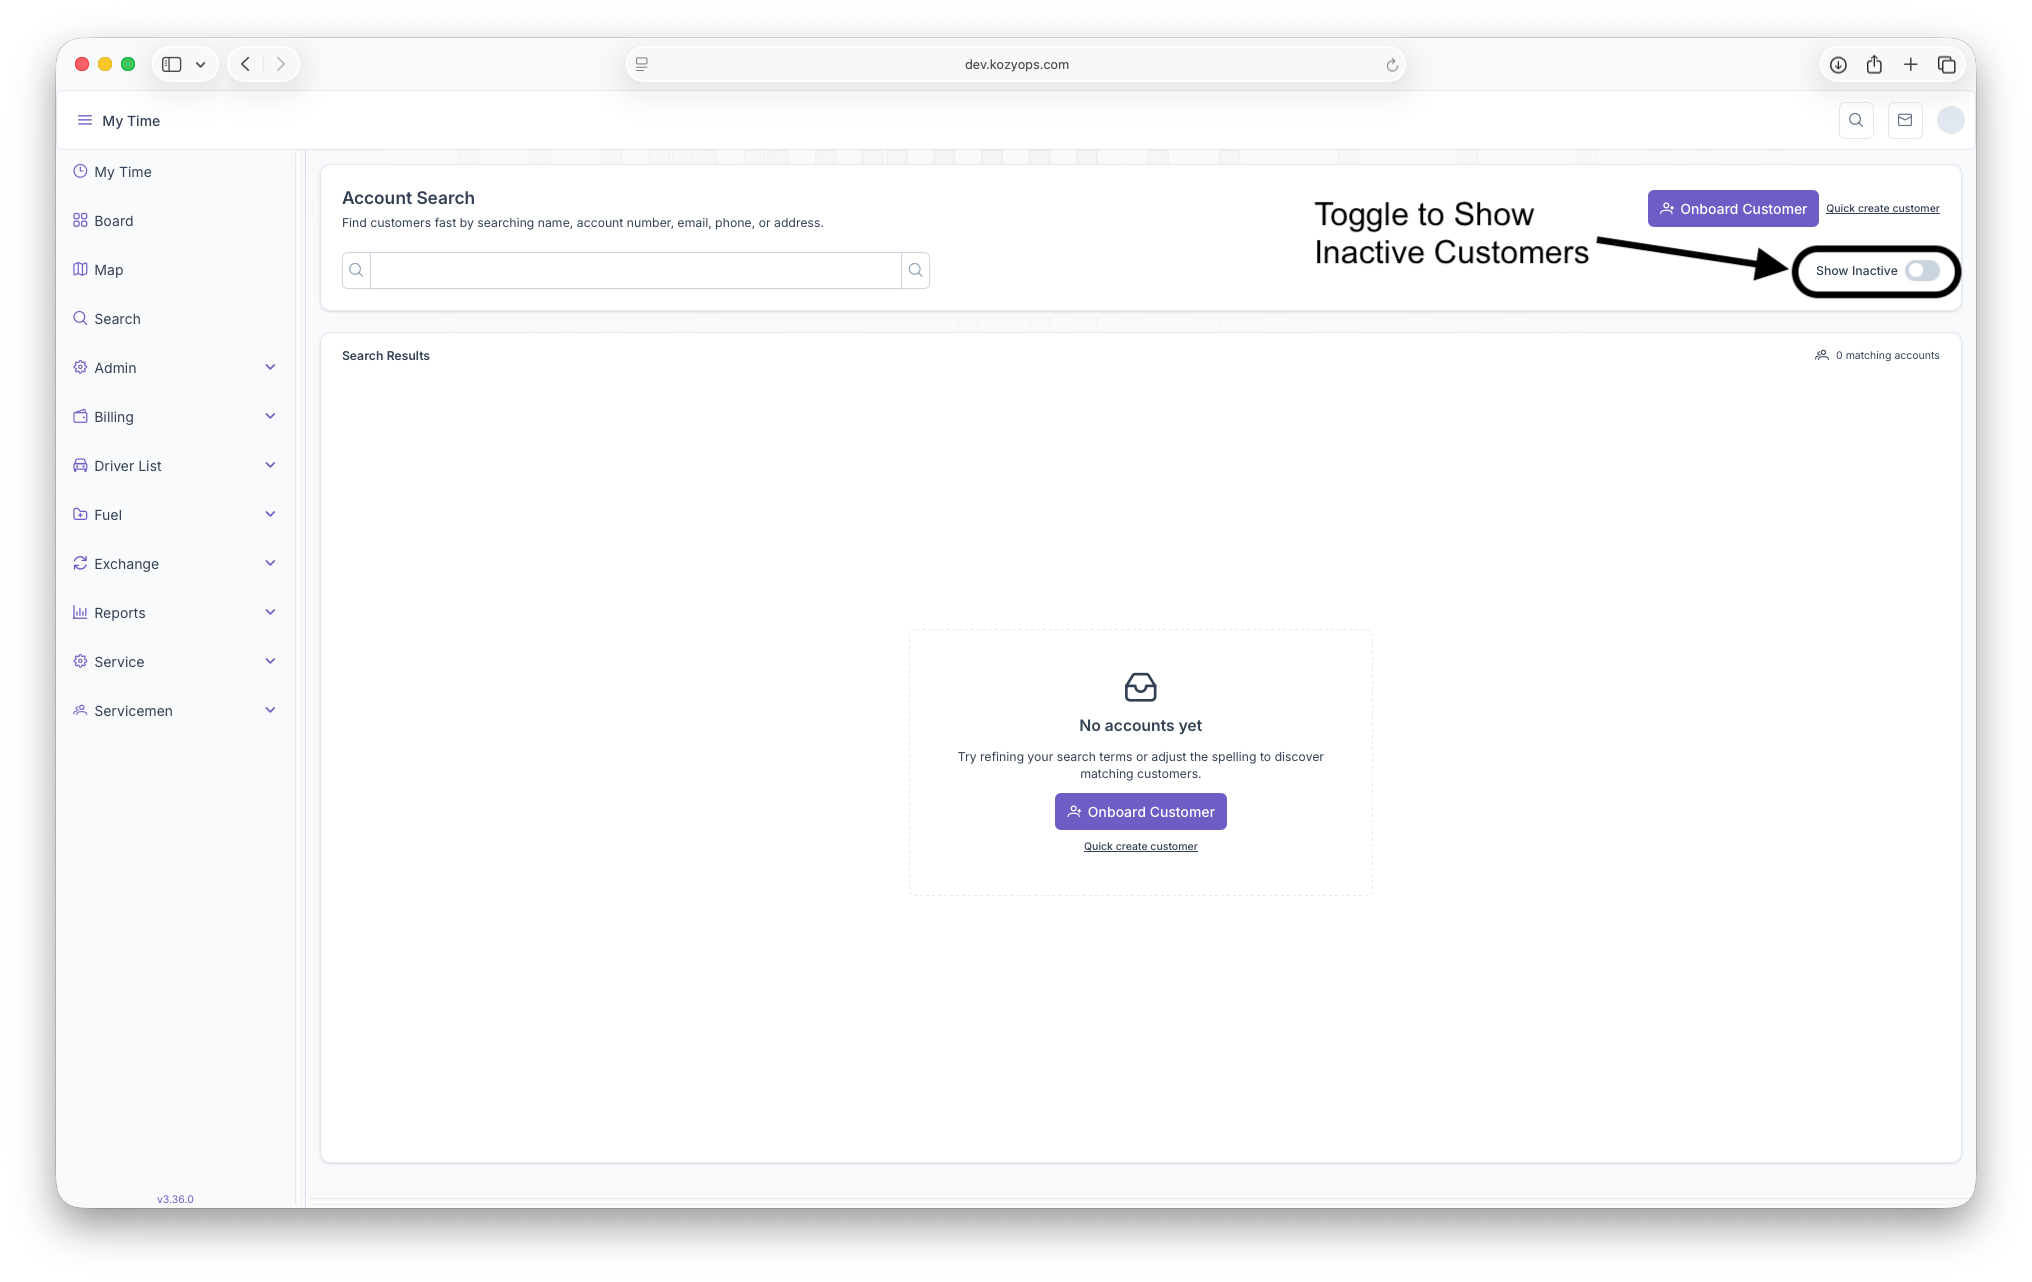
Account Search helps you locate customer records by any identifying detail such as name, account number, email, phone number, or address. The page is split into two primary sections:
- Search Panel at the top for entering search terms.
- Search Results below, showing matching accounts and their details.
Performing a Search
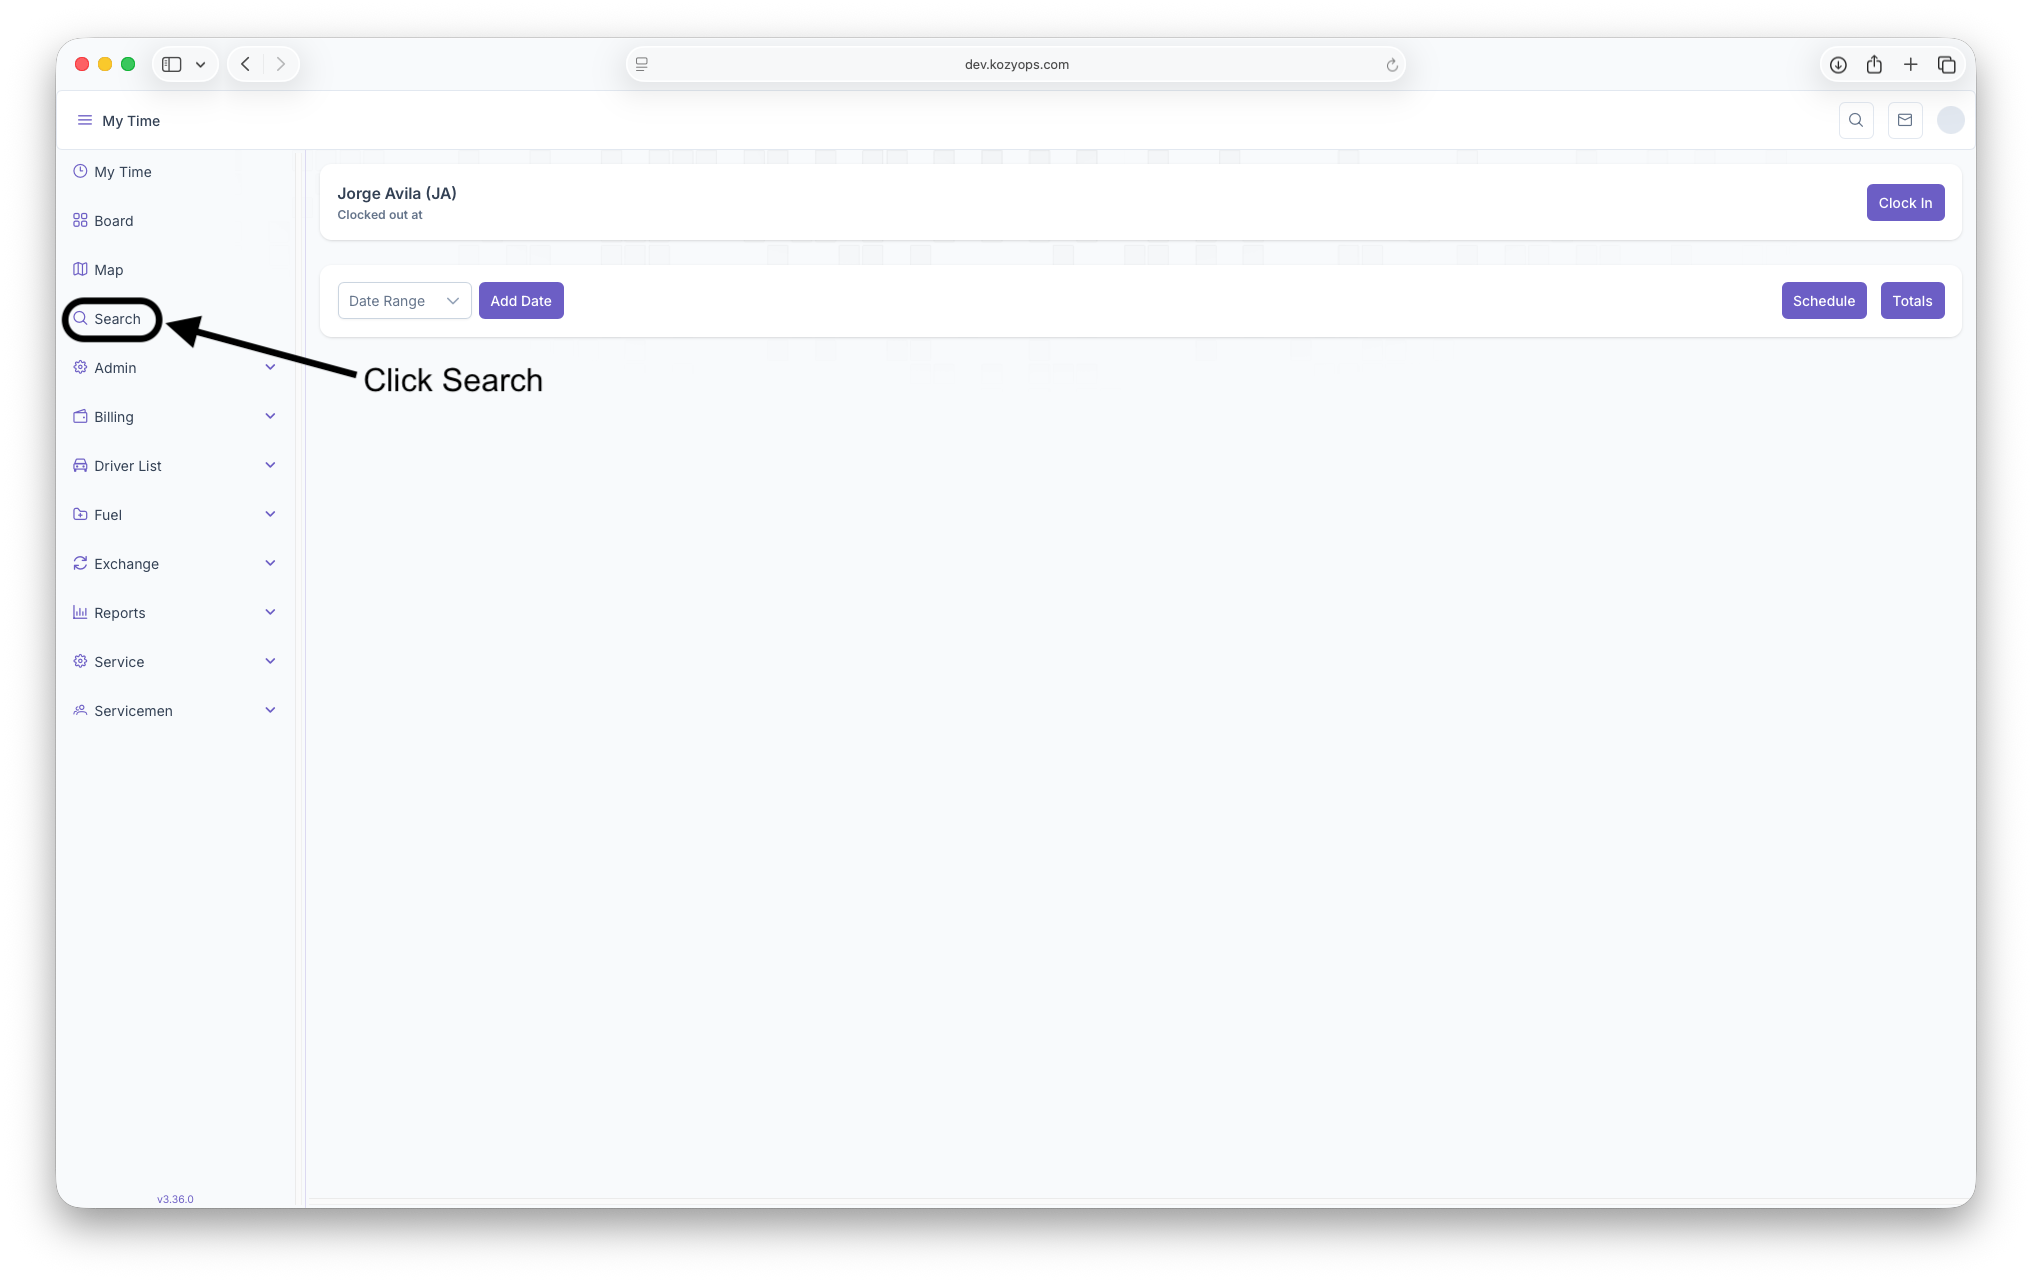
- Open the Account Search page from the navigation menu.


- Toggle "Show Inactive" to also populate inactive Customers
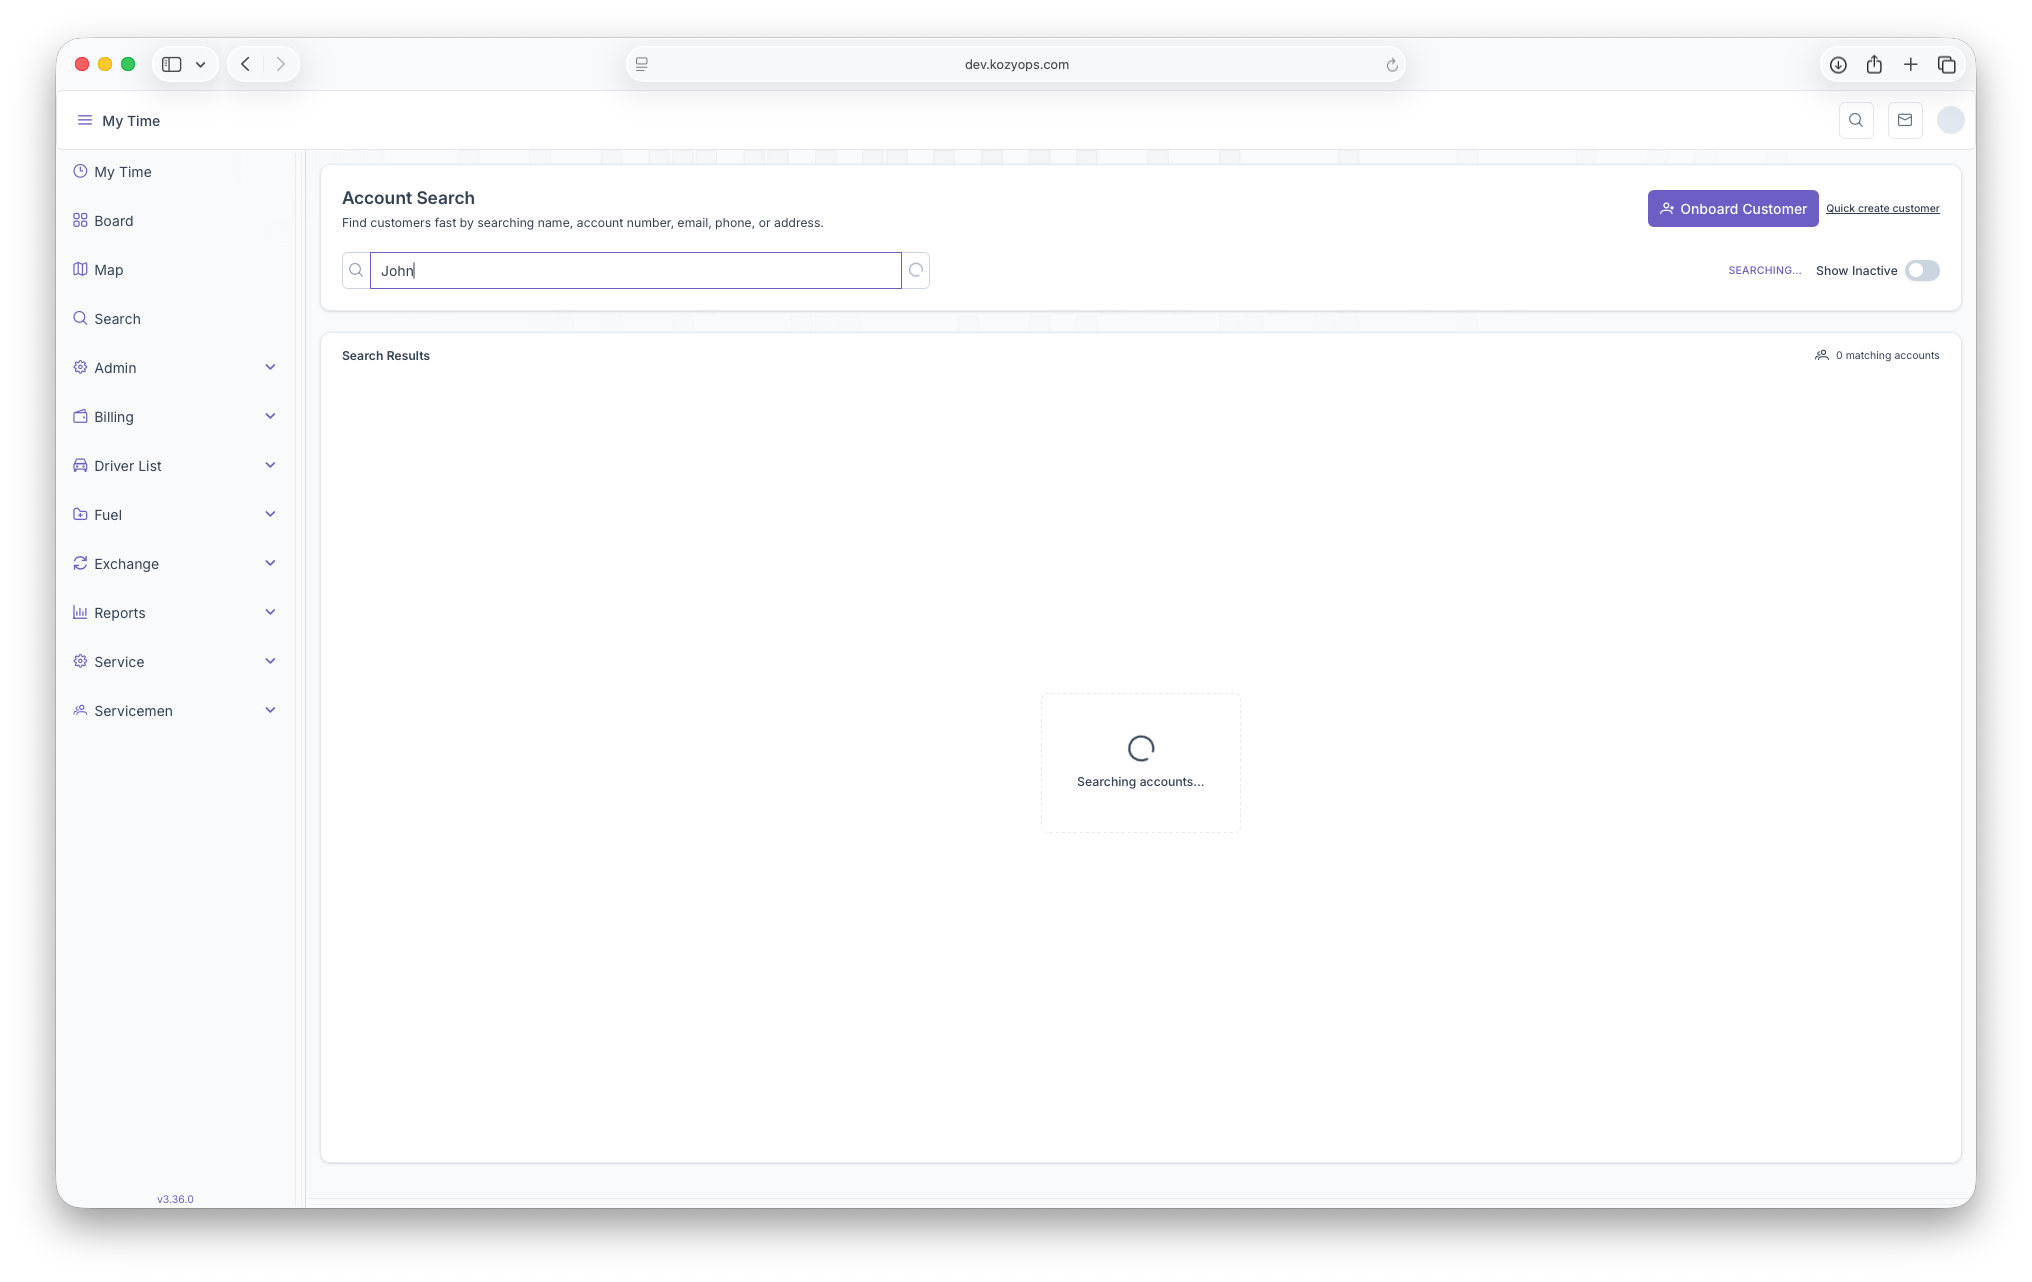
- Enter any keyword in the search field. You can type:
- Customer first or last name
- Account number
- Company name
- Phone number (with or without formatting)
- Email address
- Street, city, state, or ZIP code
- Results update automatically as you type. A "Searching..." message appears while the system looks up matches.
Creating a New Customer
- Use the Quick Create Customer or Onboard Customer buttons in the header to open the new customer workflow.
Understanding Search Results
The results table appears once matches are found. Each row represents a customer account with the following information:
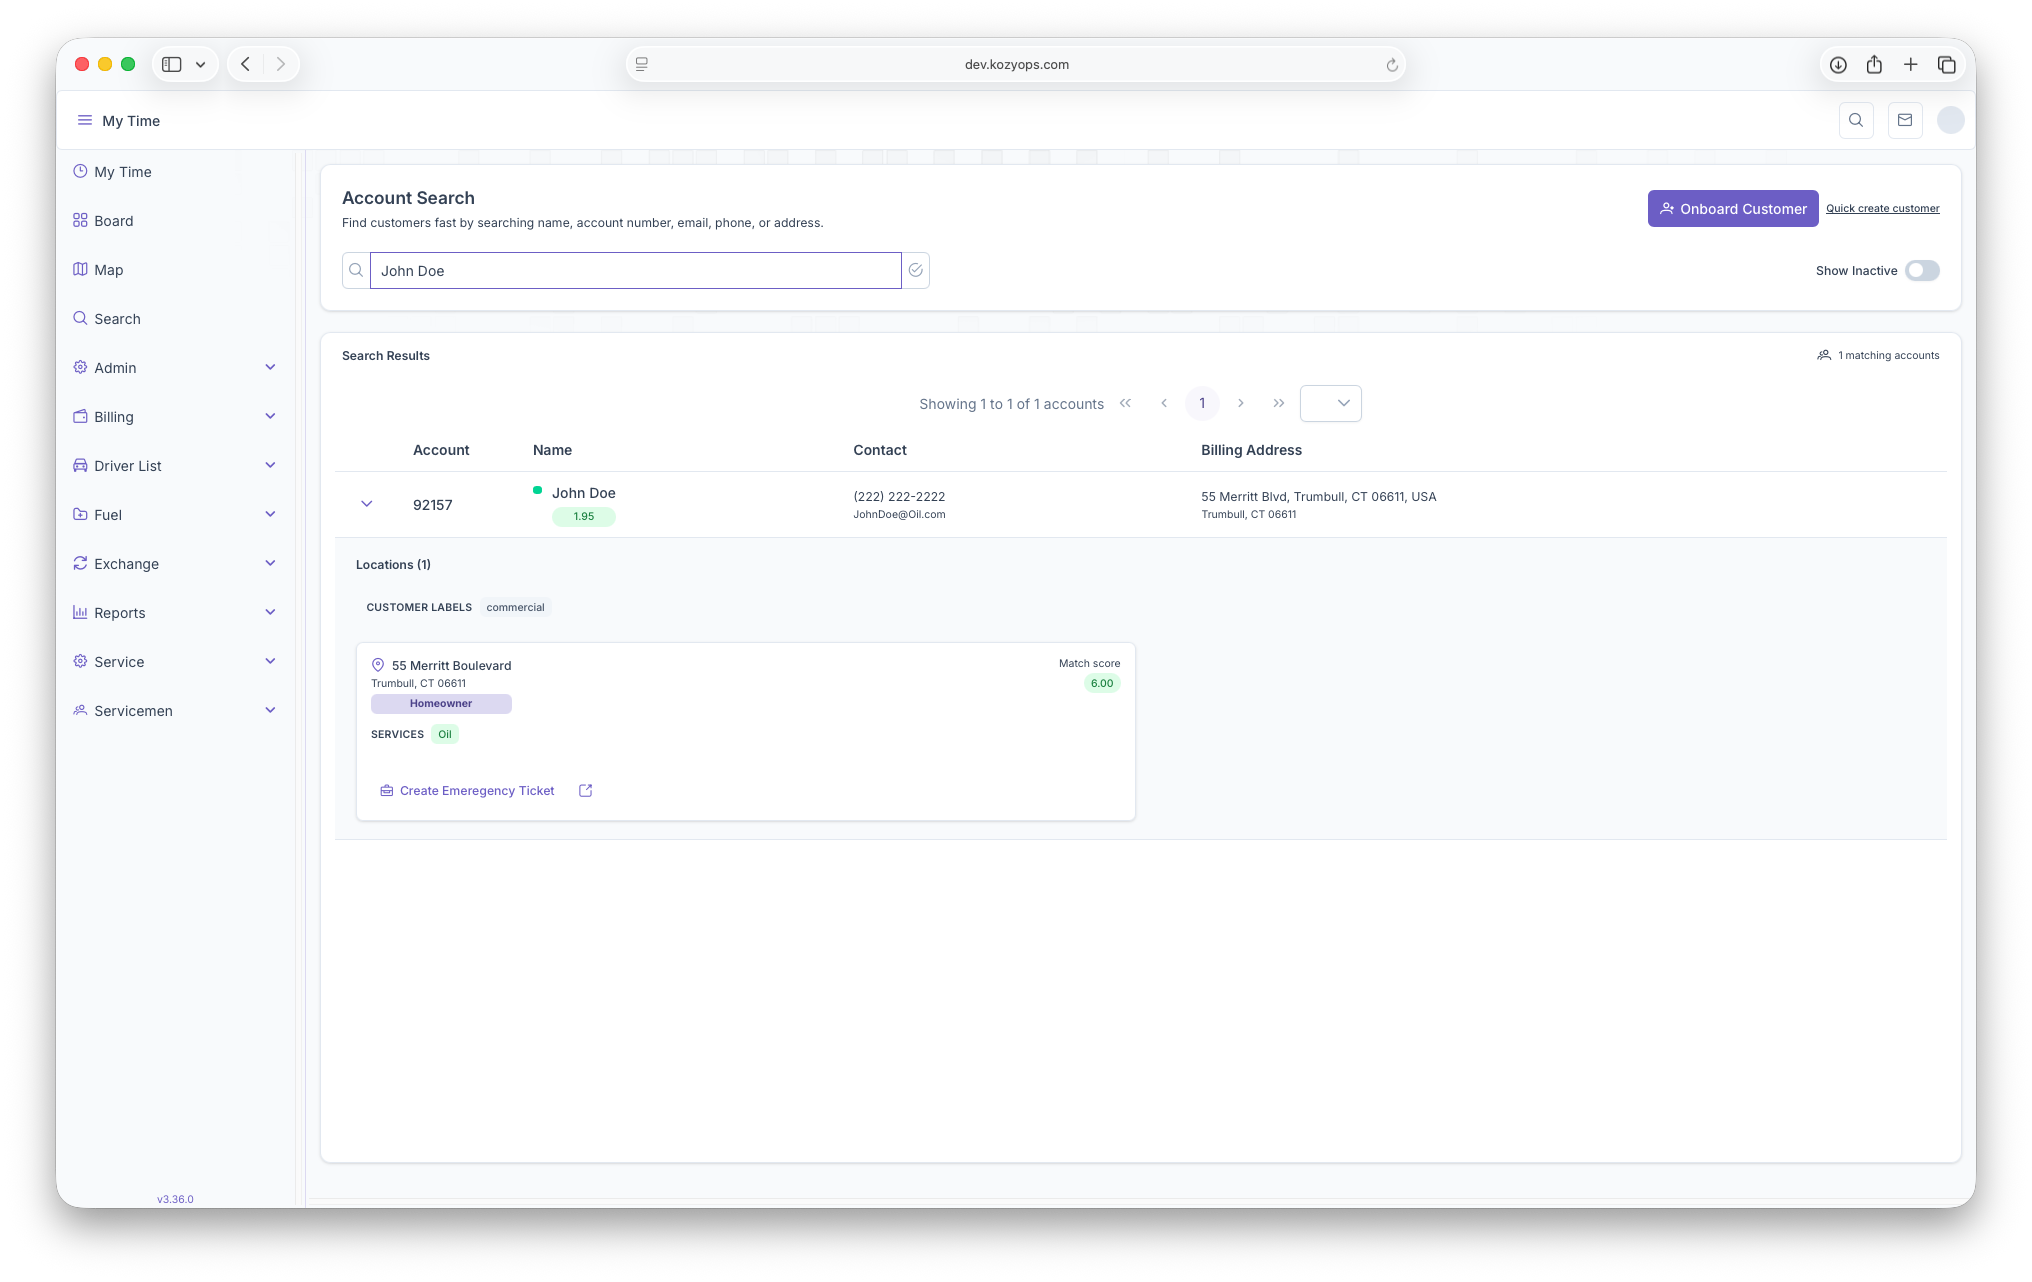
- Account: Account number and associated company name when available.
- Name: Primary contact's full name and an optional match score badge that indicates relevance (higher is better).
- Contact: Primary phone number (formatted automatically) and the first email address on file. "No email on file" appears if none is stored.
- Address: Main service address for the account.
- Labels: Customer tags that help categorize the account. "No labels" shows when none are assigned.
- Actions: Open the account in a new tab using the external-link icon.
Selection and Highlighting
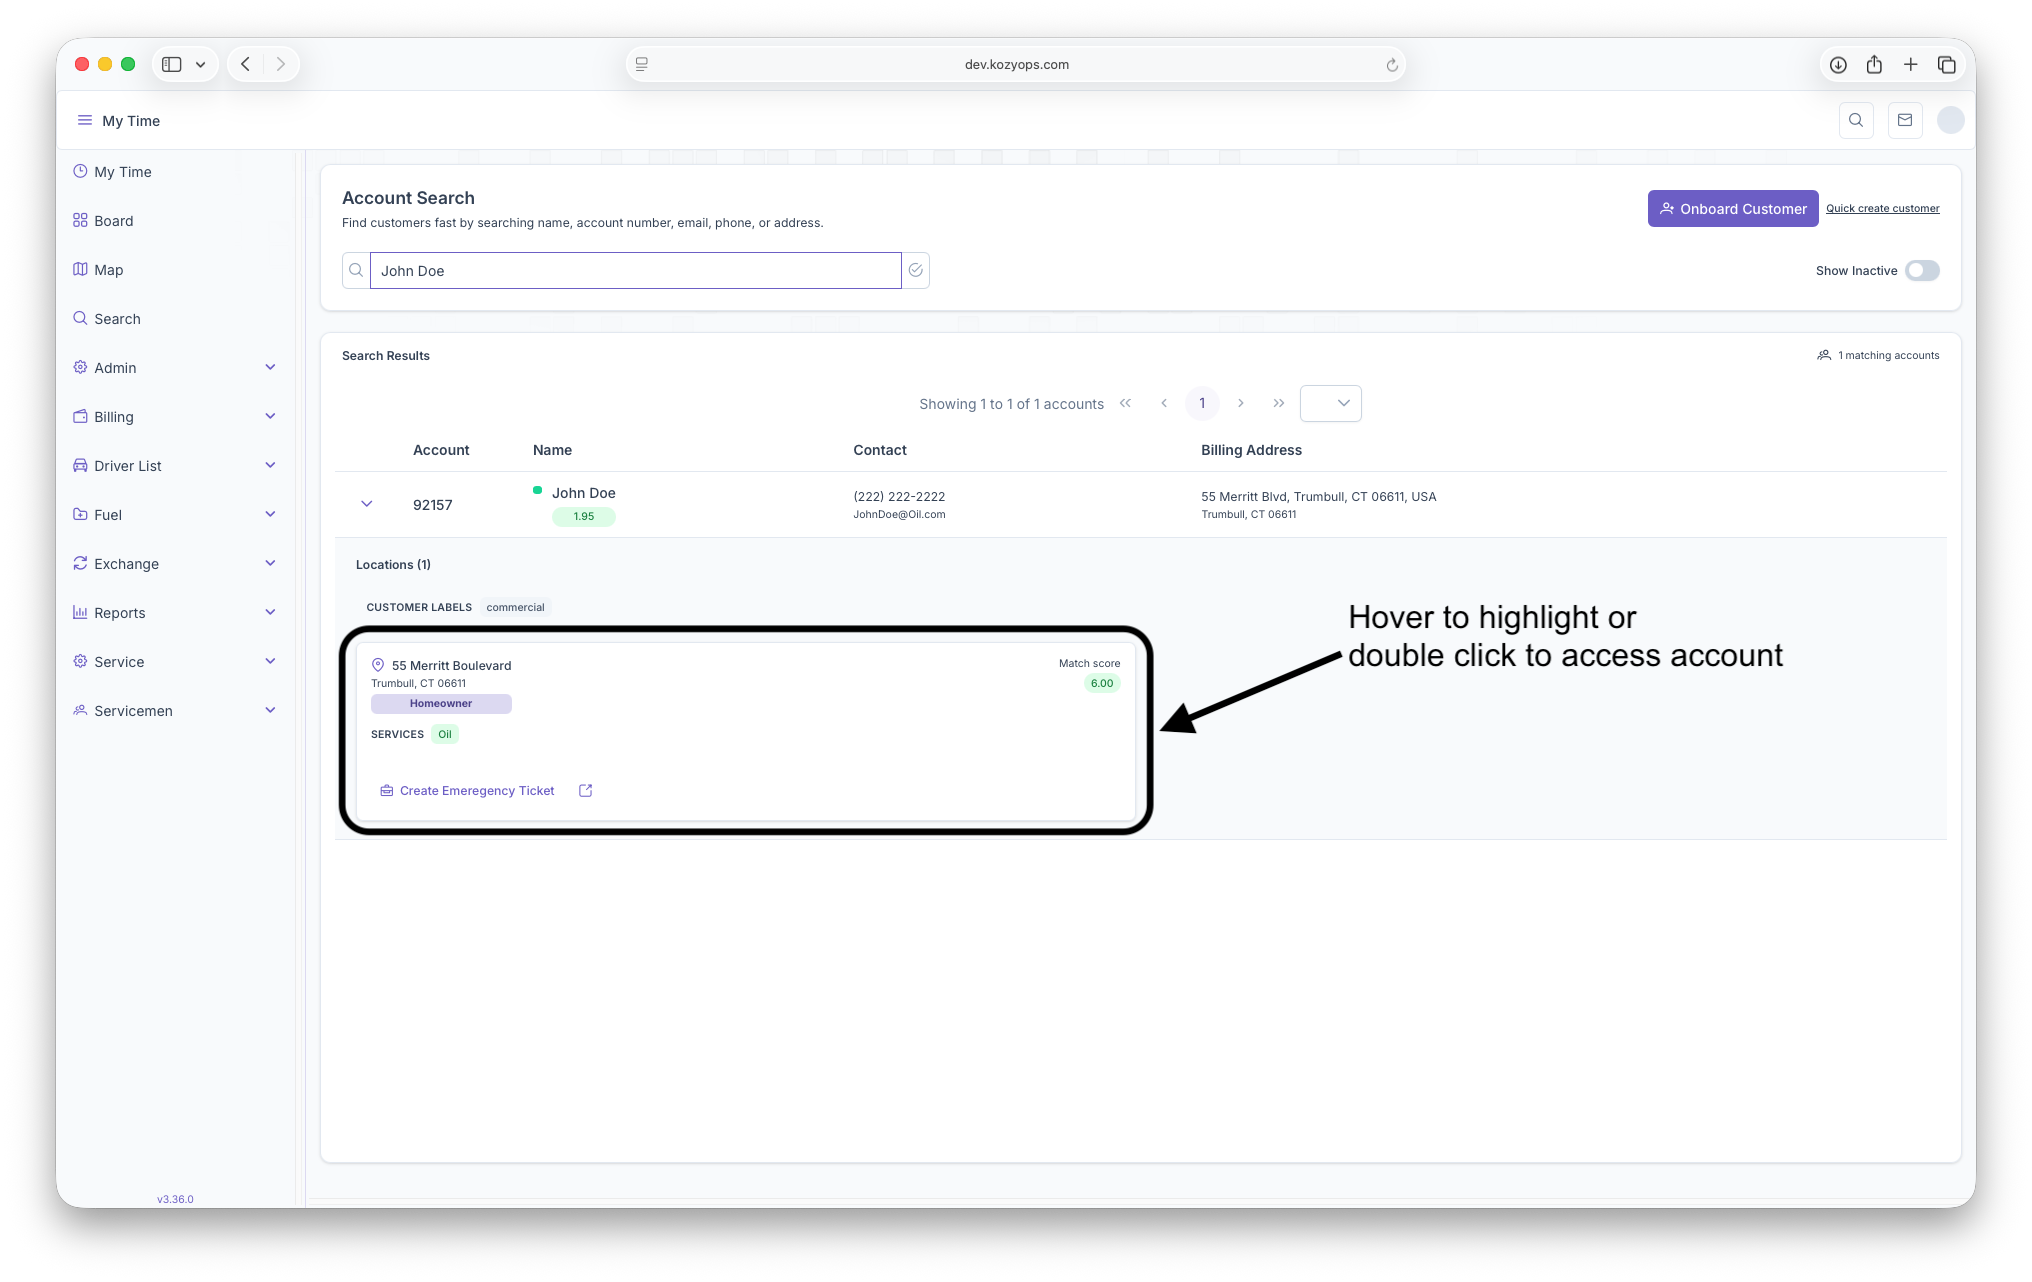
- Click anywhere on a row to select it. The selected row is highlighted for context.
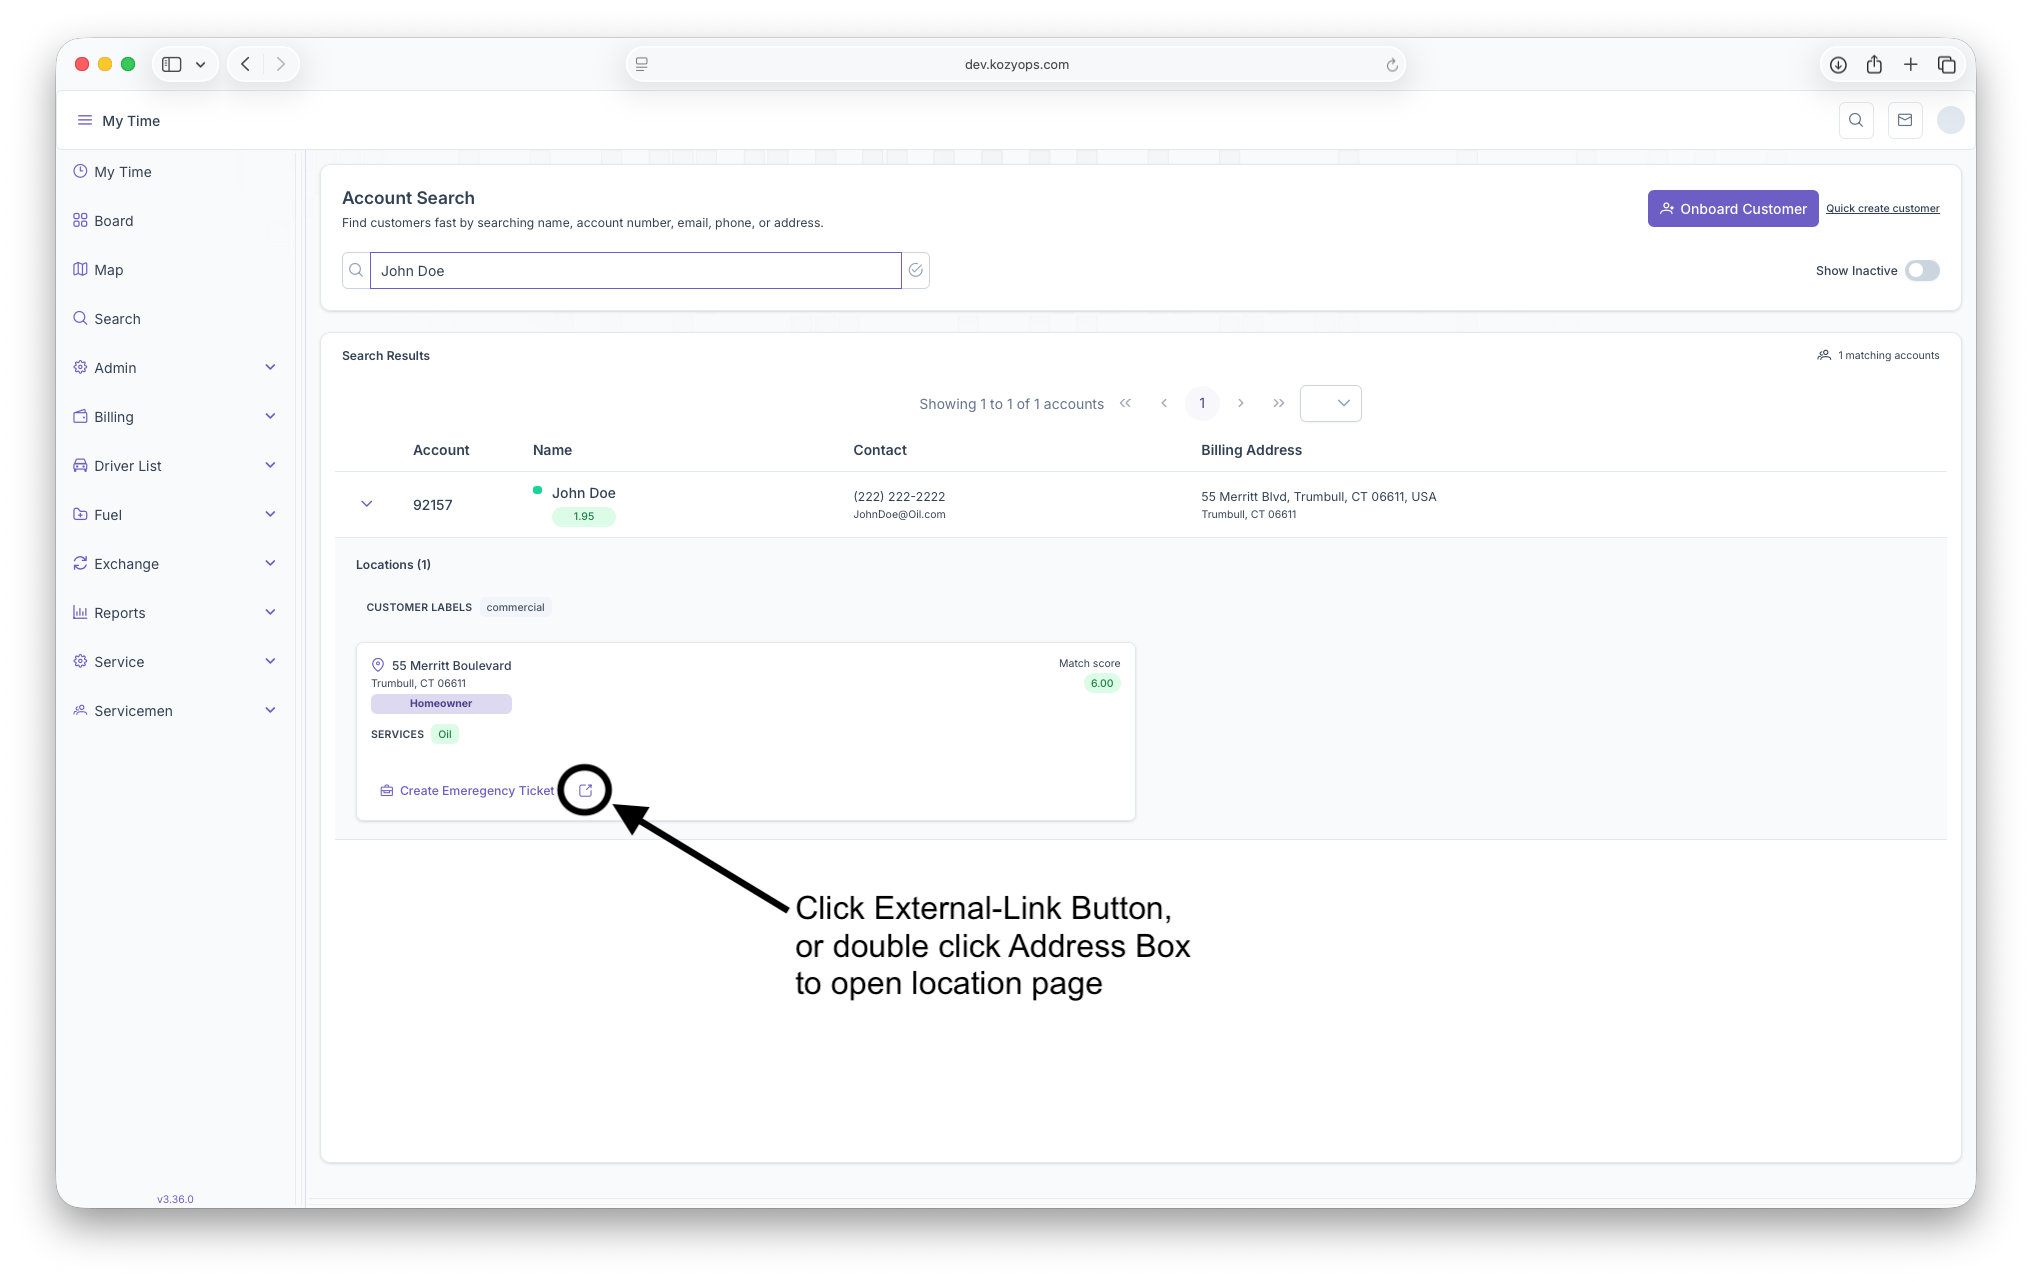
- Double-click a row (or use the external-link icon) to open the full account view in a new tab.
- Middle-click (or Ctrl+click) also opens the account without losing your search context.
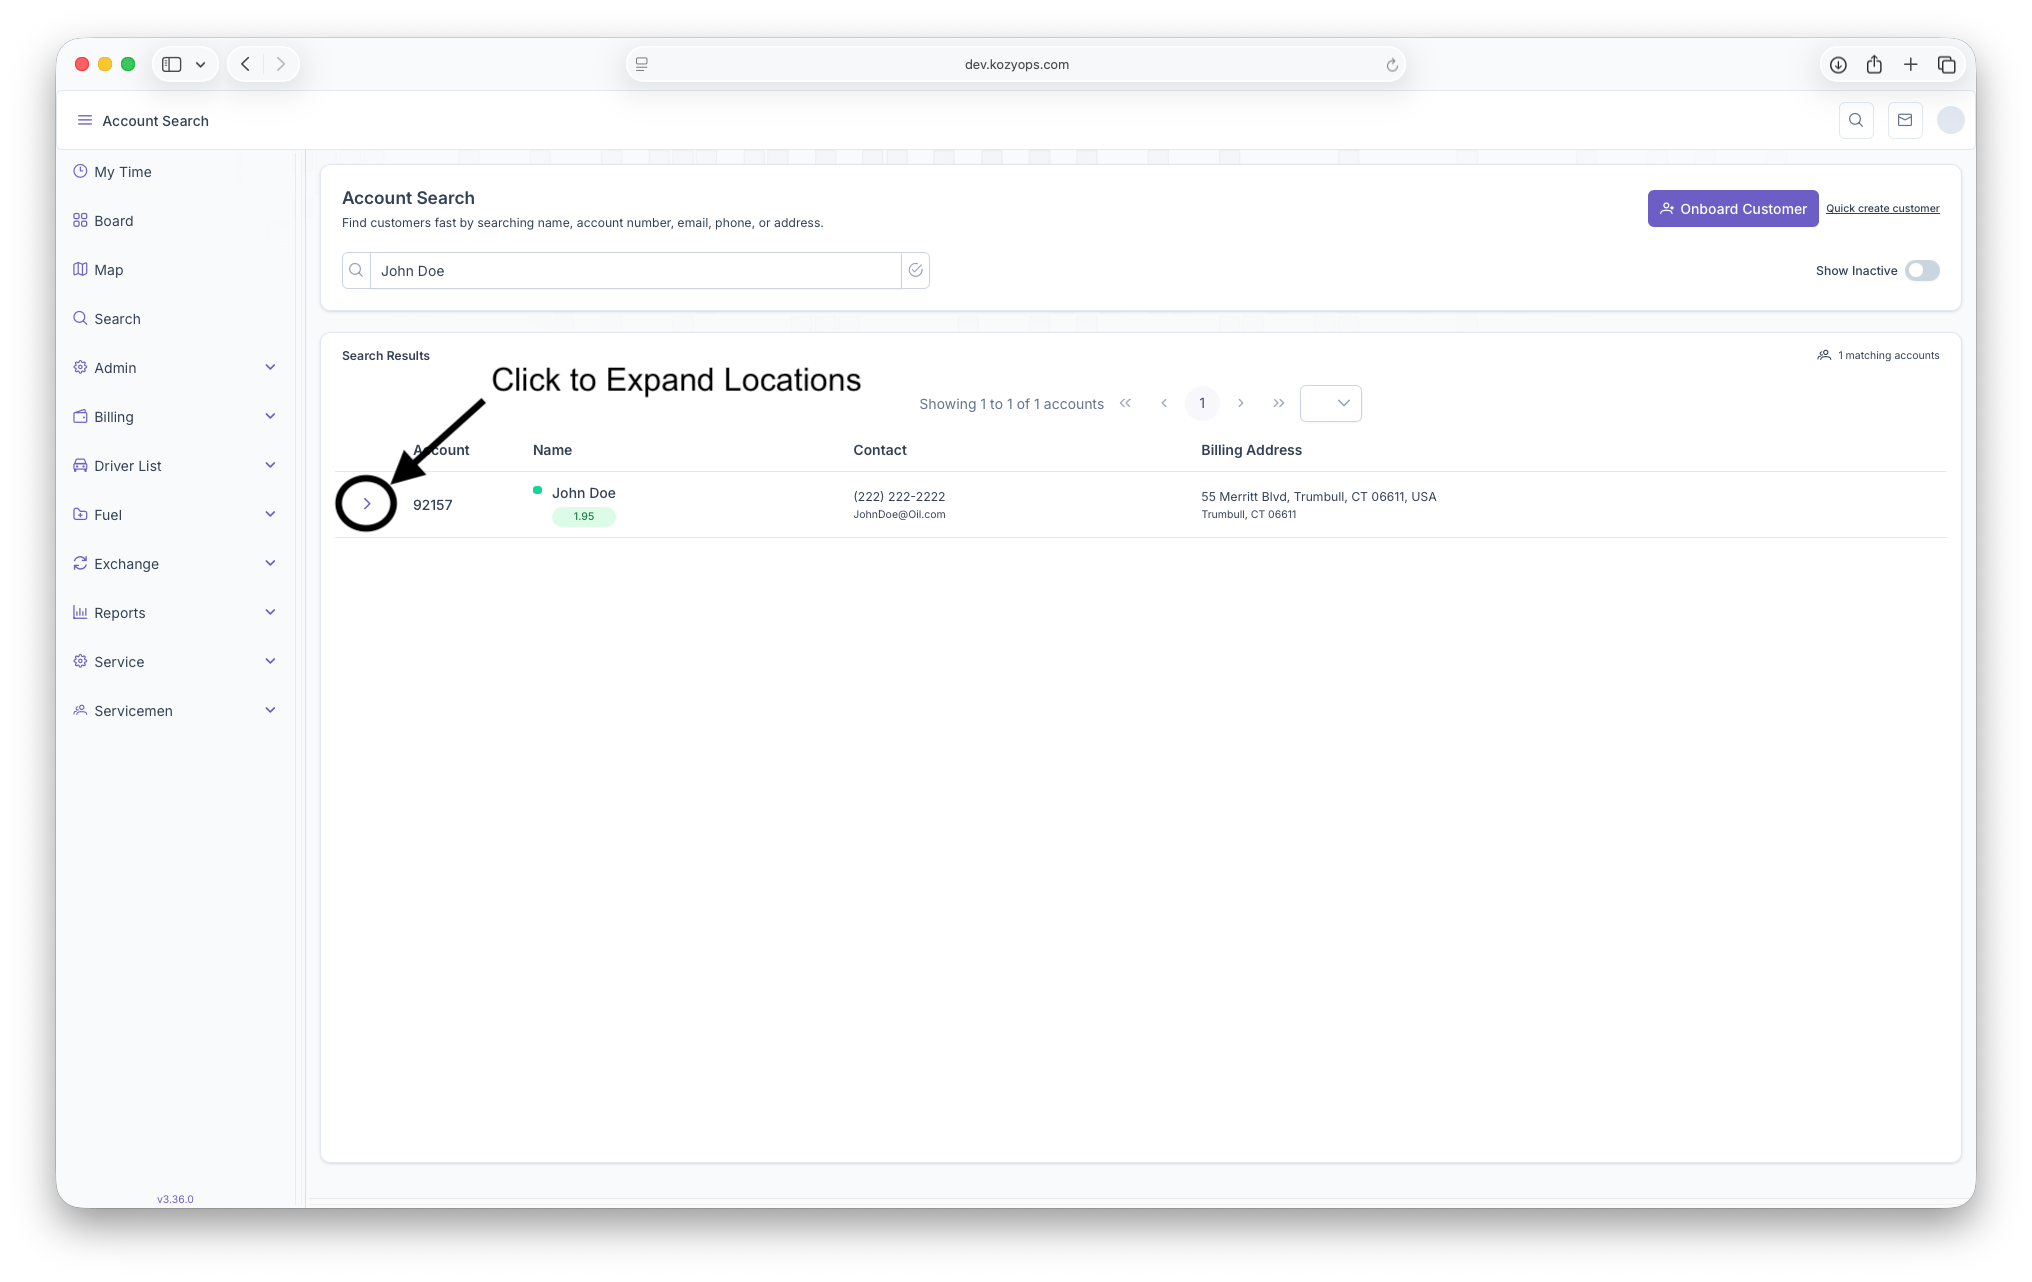
Viewing Account Locations
If an account has multiple locations, a chevron button appears in the first column.
- Select the chevron to expand the account.
- The expanded panel lists every location with:
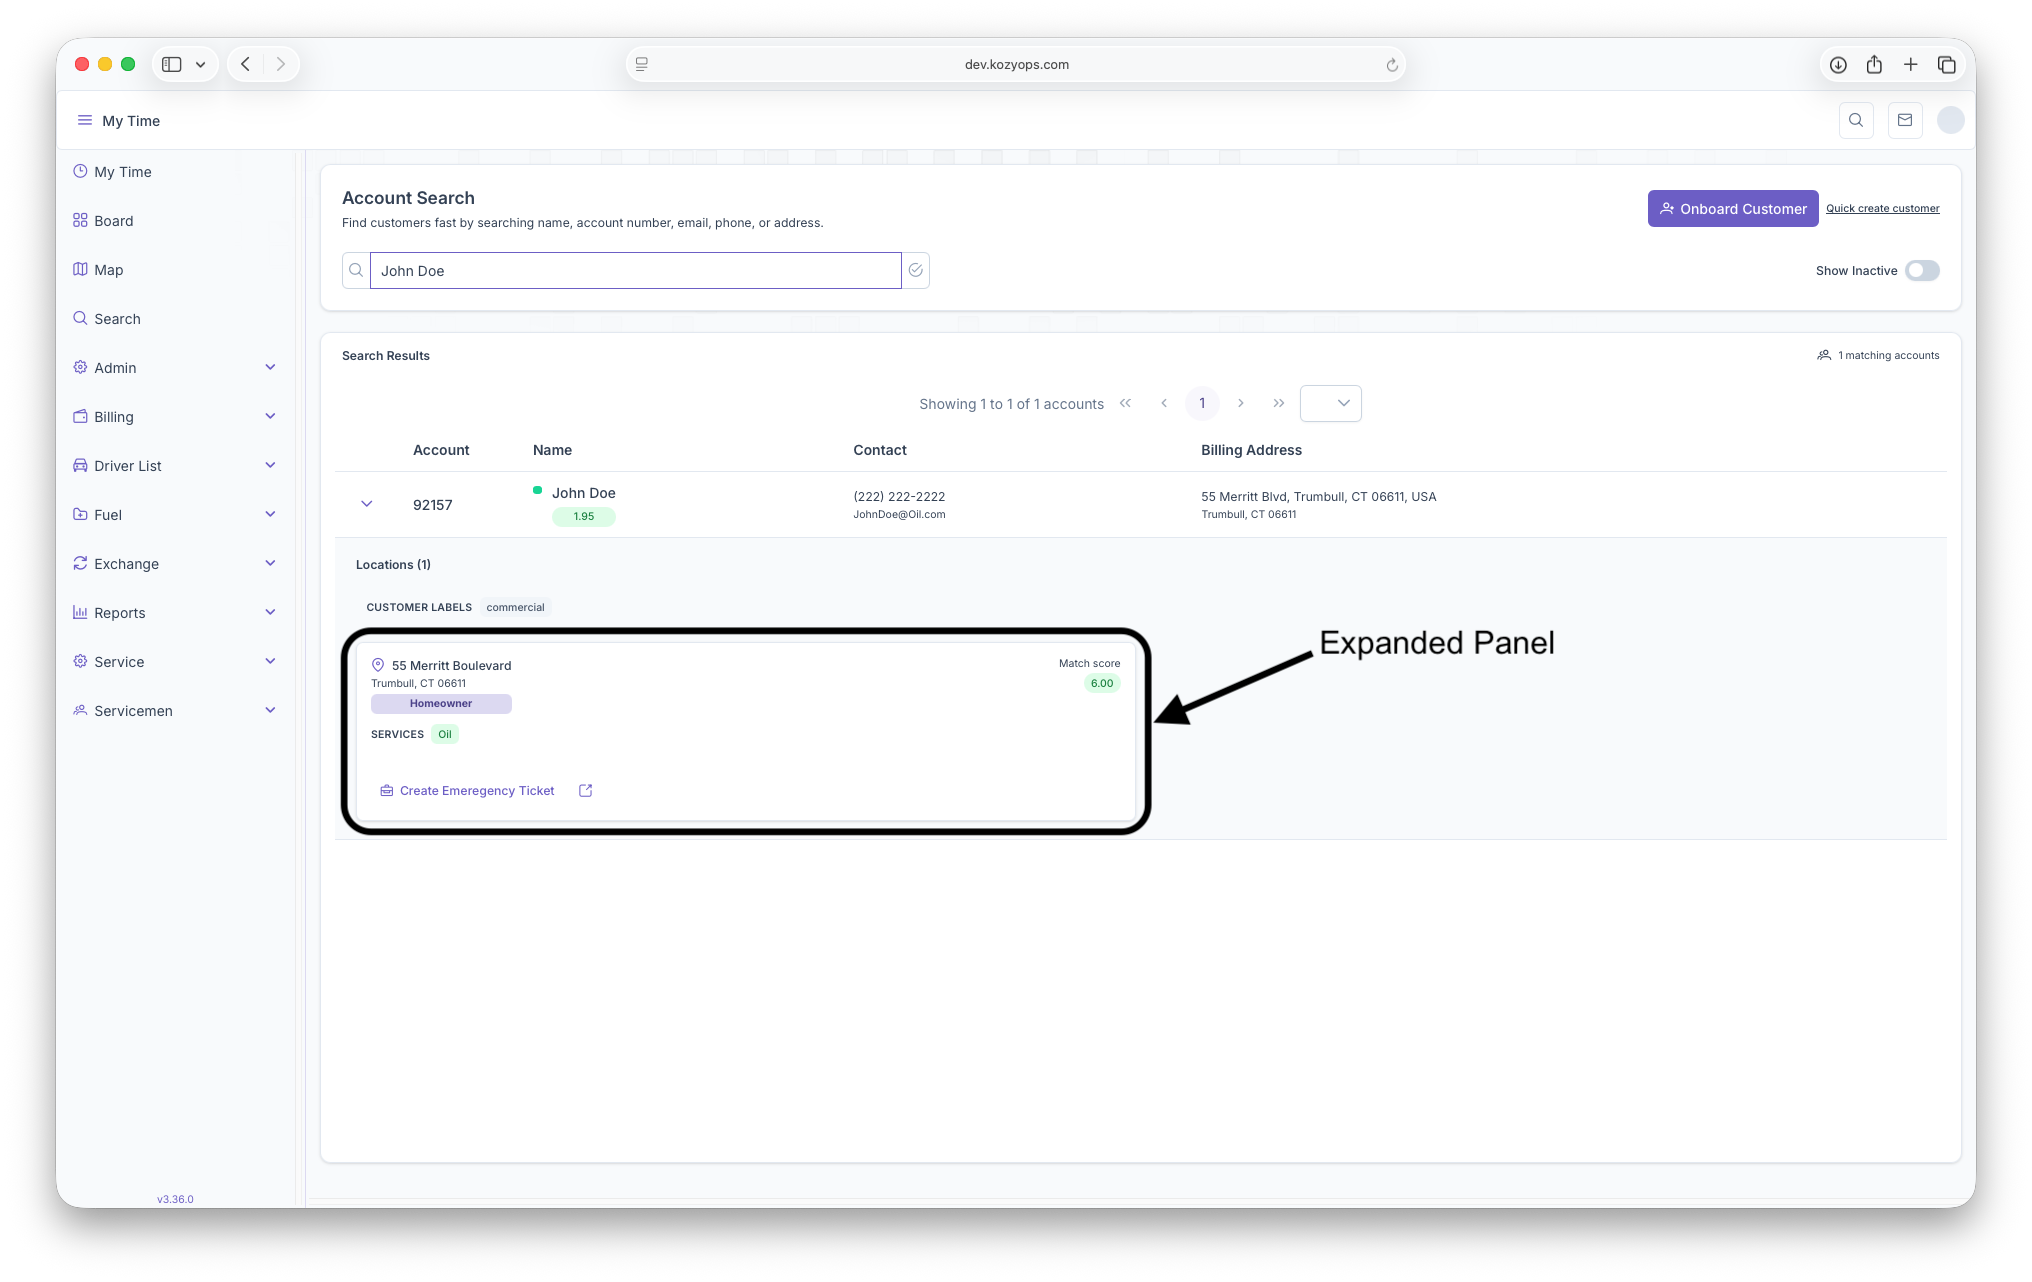
- Street address lines and city/state/ZIP
- Relationship tag (for example, "Billing" or "Service"), when available
- Match score badge for the specific location
- Service indicators showing whether oil and/or propane services are active
- Use the external-link button within a location card to open that specific location page when an ID is available.
Creating a Service Visit (Realm Levels Below 10)
Users with the appropriate realm level can start a new service visit from an expanded location:

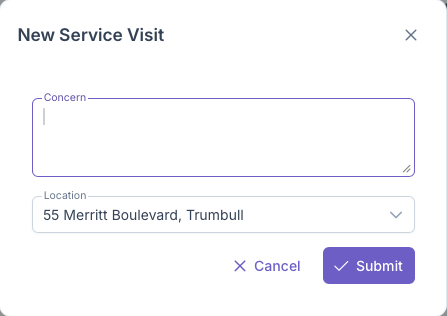
- Select Create Emergency Ticket within the desired location card.
- A dialog opens requesting:
- Concern: Describe the customer's issue or request.
- Location: Choose the relevant customer location from the dropdown. Options load automatically.
- Choose Submit to create the visit or Cancel to close the dialog.
The dialog indicates loading states (spinner on the Submit button) when a visit is being created.
Tips for Effective Searching
- Enter multiple terms (for example, street name plus city) to narrow the results list.
- Use parts of a phone number or email if you do not have the full value.
- Expand accounts to view location-level service details before opening the full record.
- If no results appear, adjust spelling or try an alternate identifier.
Empty and Loading States
- When no accounts match, the page displays an empty state with quick access to Create Customer.
- While the system searches, a spinner appears in the results area to confirm the request is in progress.
What you can search by
You can enter one or more words in any order. Search is case-insensitive and ignores punctuation.
- Name
- First and/or last name
- Account number
- Type the digits (e.g.,
123456)
- Type the digits (e.g.,
- Phone number
- Type any part of the number; digits only also work (e.g.,
617555,5551212,1234) - Last 4 or last 6 digits will match at a higher confidence
- Type any part of the number; digits only also work (e.g.,
- Email address
- Full email (e.g.,
alex@example.com) or parts (e.g.,alex example)
- Full email (e.g.,
- Address
- Street, city, state, ZIP (any combination)
- Examples:
123 Main,Boston MA,10001
- Labels and related info
- Customer labels (e.g.,
VIP,COD) - Location labels
- Promotions (by name)
- Taxes (by tax name)
- Services (by service type)
- Relationship type to a location:
homeowner,tenant,priceCustomer,fuelCustomer,serviceCustomer
- Customer labels (e.g.,
Tip: Combine terms to narrow results. For example: acme john boston 02110.
How matching works
The system uses a blend of matching methods to catch both exact and “close” matches:
- Smart text search across customer and location info (company, people, addresses, labels, promotions, taxes, services)
- Prefix matching for partial words (e.g.,
alexmatches “Alexander”) - Fuzzy matching for near matches (helpful for typos)
- Number-aware matching for phones and accounts
- Any digit sequence in your query is checked against phone numbers
- Account numbers match on exact or starting digits
- Special handling for
oil.mast_123456style account entries
If your query is empty or only spaces, no results are returned.
Ranking - why some results appear first
Results are scored and sorted so the most relevant show up first. In addition to text relevance, we boost:
- Exact or strong account matches
- Exact account digits: biggest boost
- Account starts with your digits: medium boost
- Customers with active services: small boost
- Within each customer, their locations are ordered by:
- How well the location text matches your search (address, labels, promos, taxes, services)
- Relationship type (e.g., Homeowner ranks higher than ServiceCustomer)
- Whether the location has active services
What the results show
Each result is a Customer with:
- Company, first and last name
- Account number
- Primary address fields
- Phone numbers and emails
- Customer labels
- Locations related to the customer, each with:
- Relationship type (Homeowner, Tenant, etc.)
- Labels, Taxes, Promotions, Services
- Service count (how many active services at that location)
Note: Only current relationships and active services are shown. Deleted records are excluded.
Examples
- Search by name:
alex fox,acme corp - Search by address:
123 main,southbury ct,10001 - Search by phone:
5551212,617555,-1212 - Search by email:
alex@example.com,alex example - Search by account:
123456,oil.mast_123456 - Search by labels or activity:
vip,cod,homeowner,promotion spring special,service heating
Tips for better results
- Enter multiple terms to narrow down (e.g.,
acme john 02110) - For phone numbers, it’s fine to type only the digits you know
- For account numbers, type the full number when possible; partials still help
- If you’re not seeing results, simplify your terms or try a different piece of info (phone, email, or address)
Troubleshooting
- “No results”
- Check for typos, try fewer words, or search by a different field (phone digits, email, account)
- “Too many results”
- Add more terms (e.g., city and ZIP), or include a phone/email piece you know
- “Wrong order”
- Exact account matches and active-service customers are boosted; add more specific terms to re-rank
If you have questions or think a record is missing, contact your administrator—some data (deleted, inactive, or non-current relationships) is intentionally hidden from search.
Customer Account
Overview
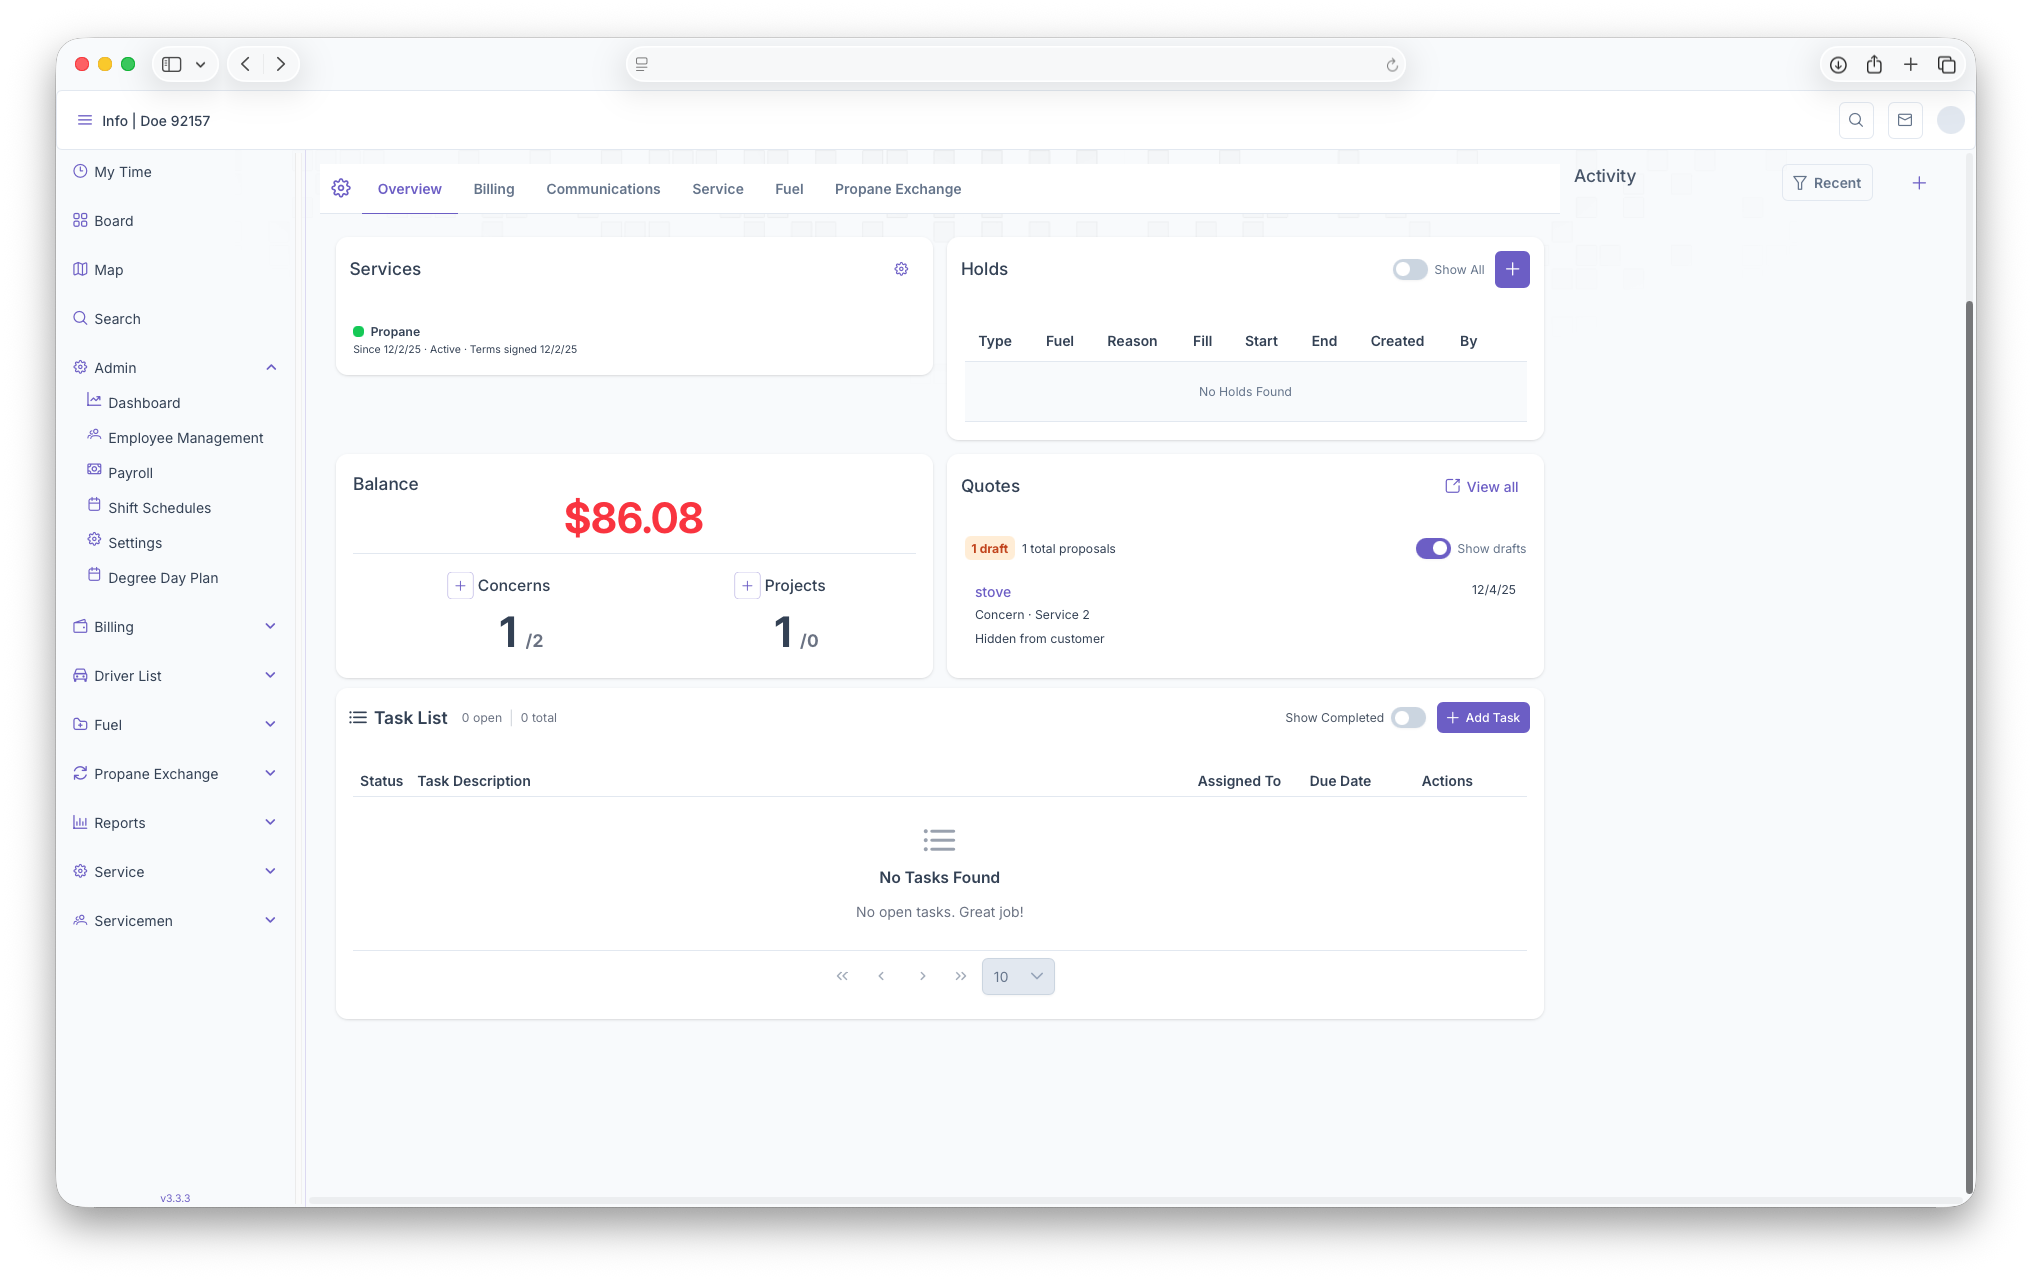
The Customer Account Page is where you can access all information on The Customer. See Account Search on how to reach Customer Account page. The page will start off by showing an image of the customer home followed by Customer information, Account Number, Phone, Email, Address, etc. From here the page shows an Overview of the account, Billing, Communications, Service, Fuel and Propane Exchange. The account can also be edited by clicking on the gear under the Profile Picture. A more detailed look into the customers information can bee seen on the Customer Account page. A full look into an account can be seen on the Customer Account book.
-
Overview
-
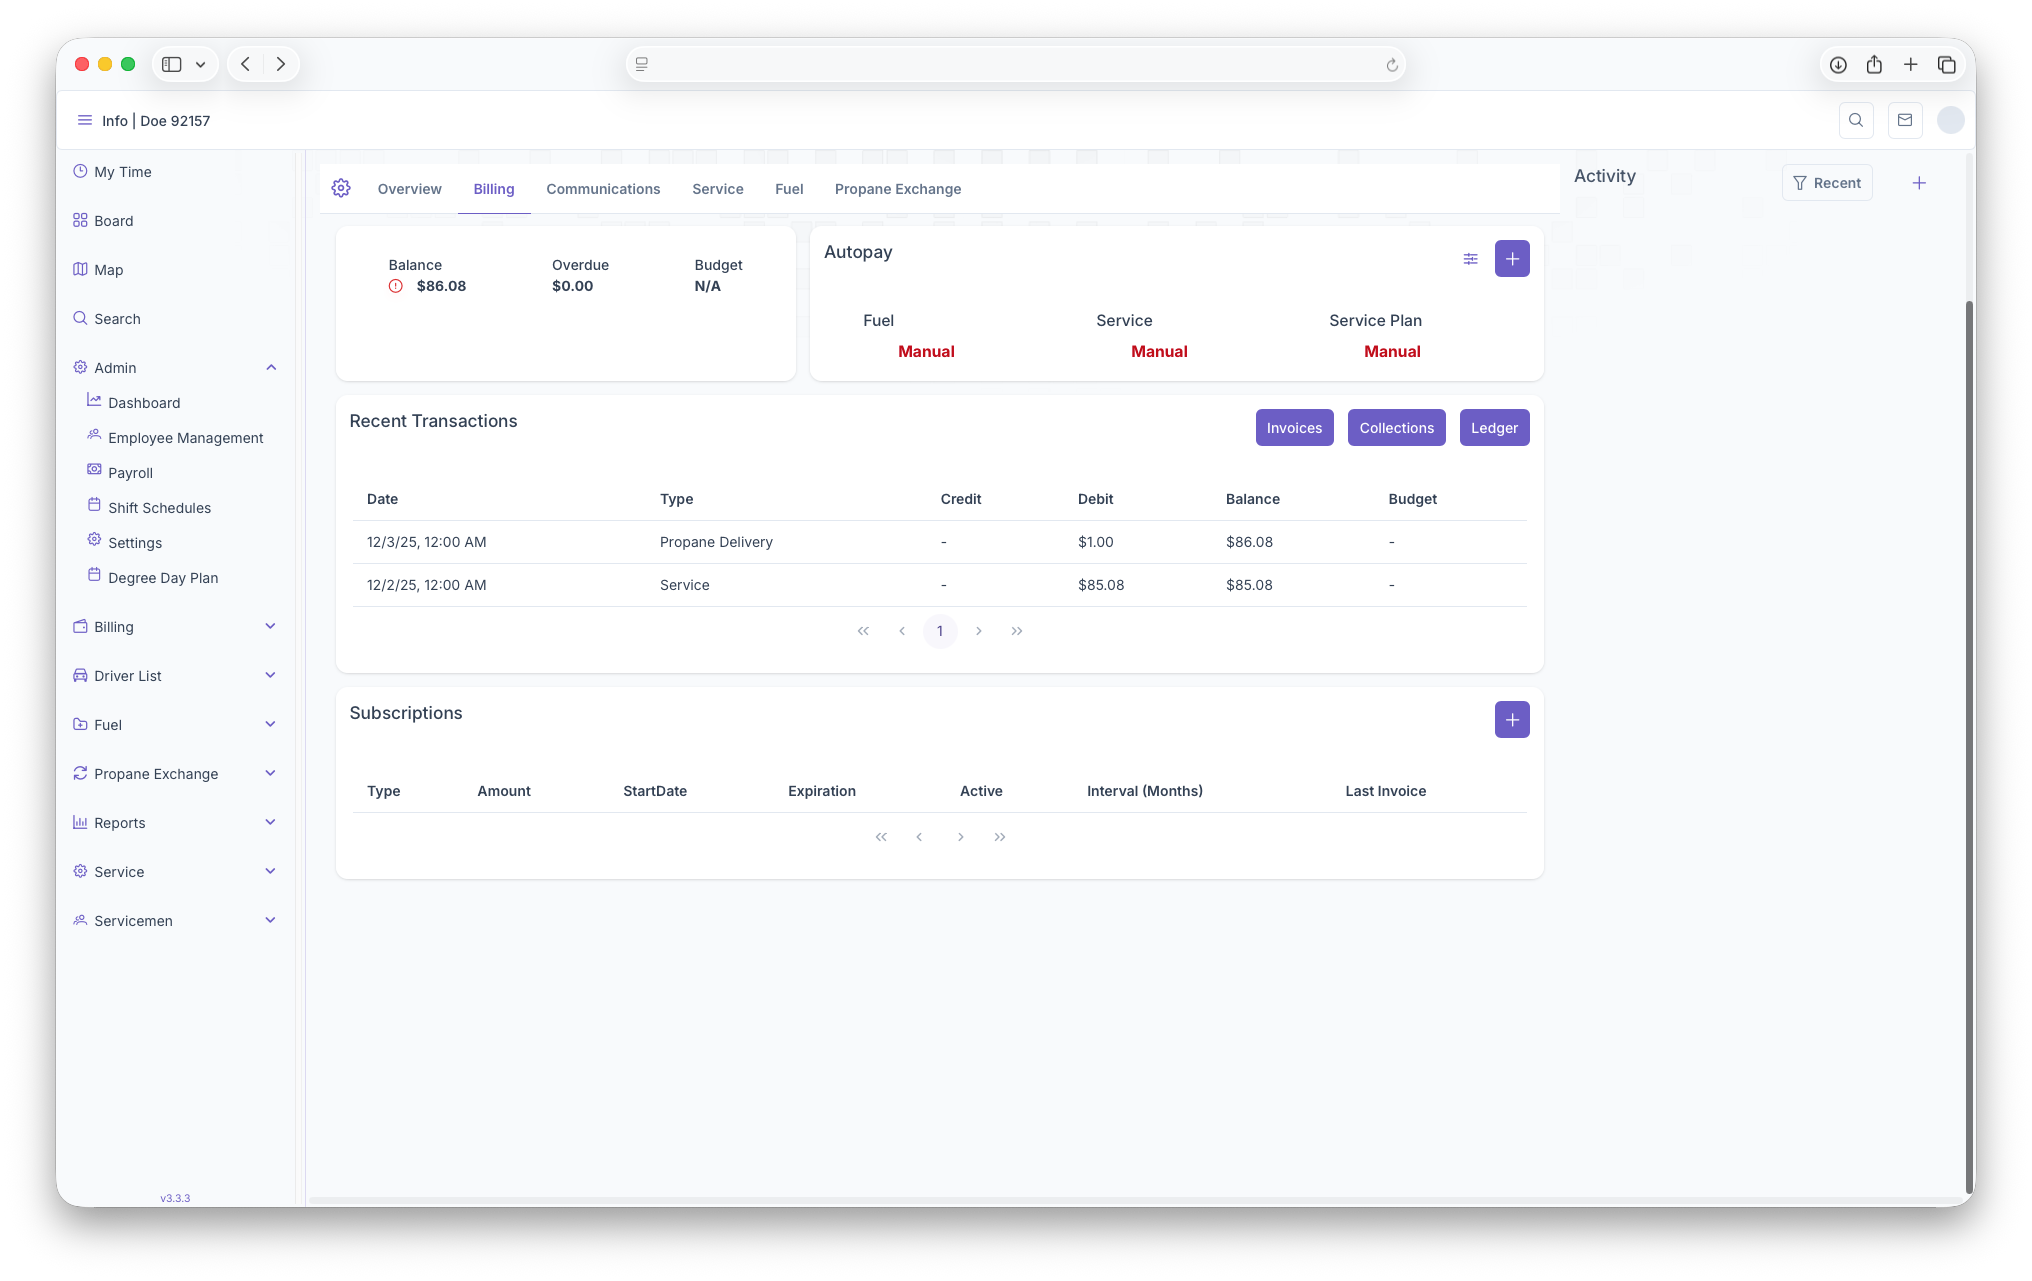
Billing
- Balance: Shows the Balance on the account, how much is Overdue and the Customers Budget
- Autopay: Shows how each service is being paid for whether entered manually or automatically. Adding credit cards can be done here for the customer
- Recent Transactions: Shows any transactions that have gone through. Invoices, Collections and Ledger for the customer can be seen here as well
- Subscriptions: This shows any subscriptions the customer has and also allows for any edits. New subscriptions can also be added here

-
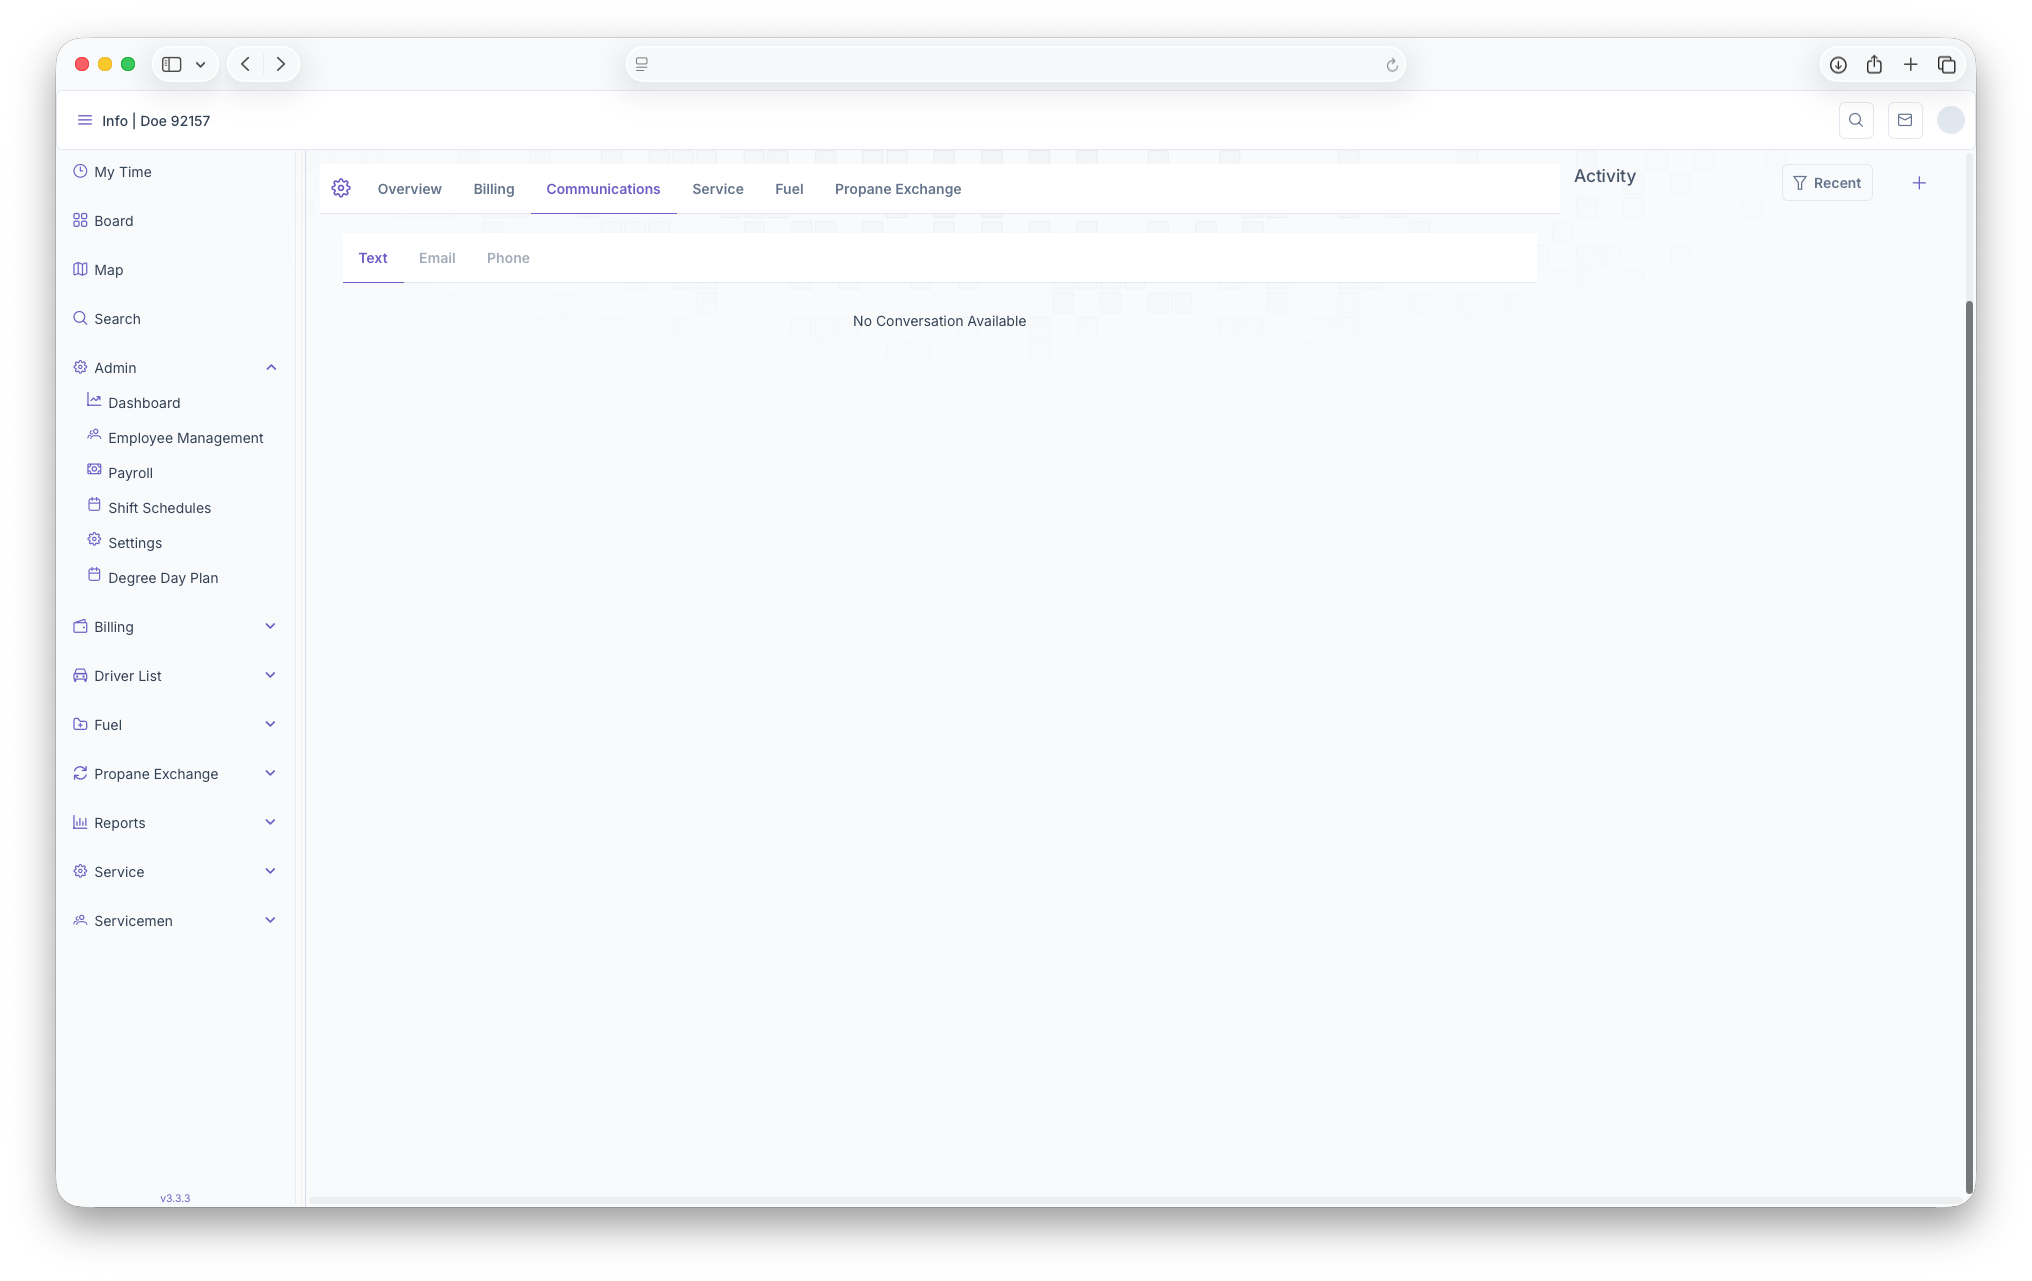
Communications
- Text: Shows any communcations the Customer has received via Text
- Email: Shows any communcations the Customer has received via Email
- Phone: Shows any communcations the Customer has received via Phone

-
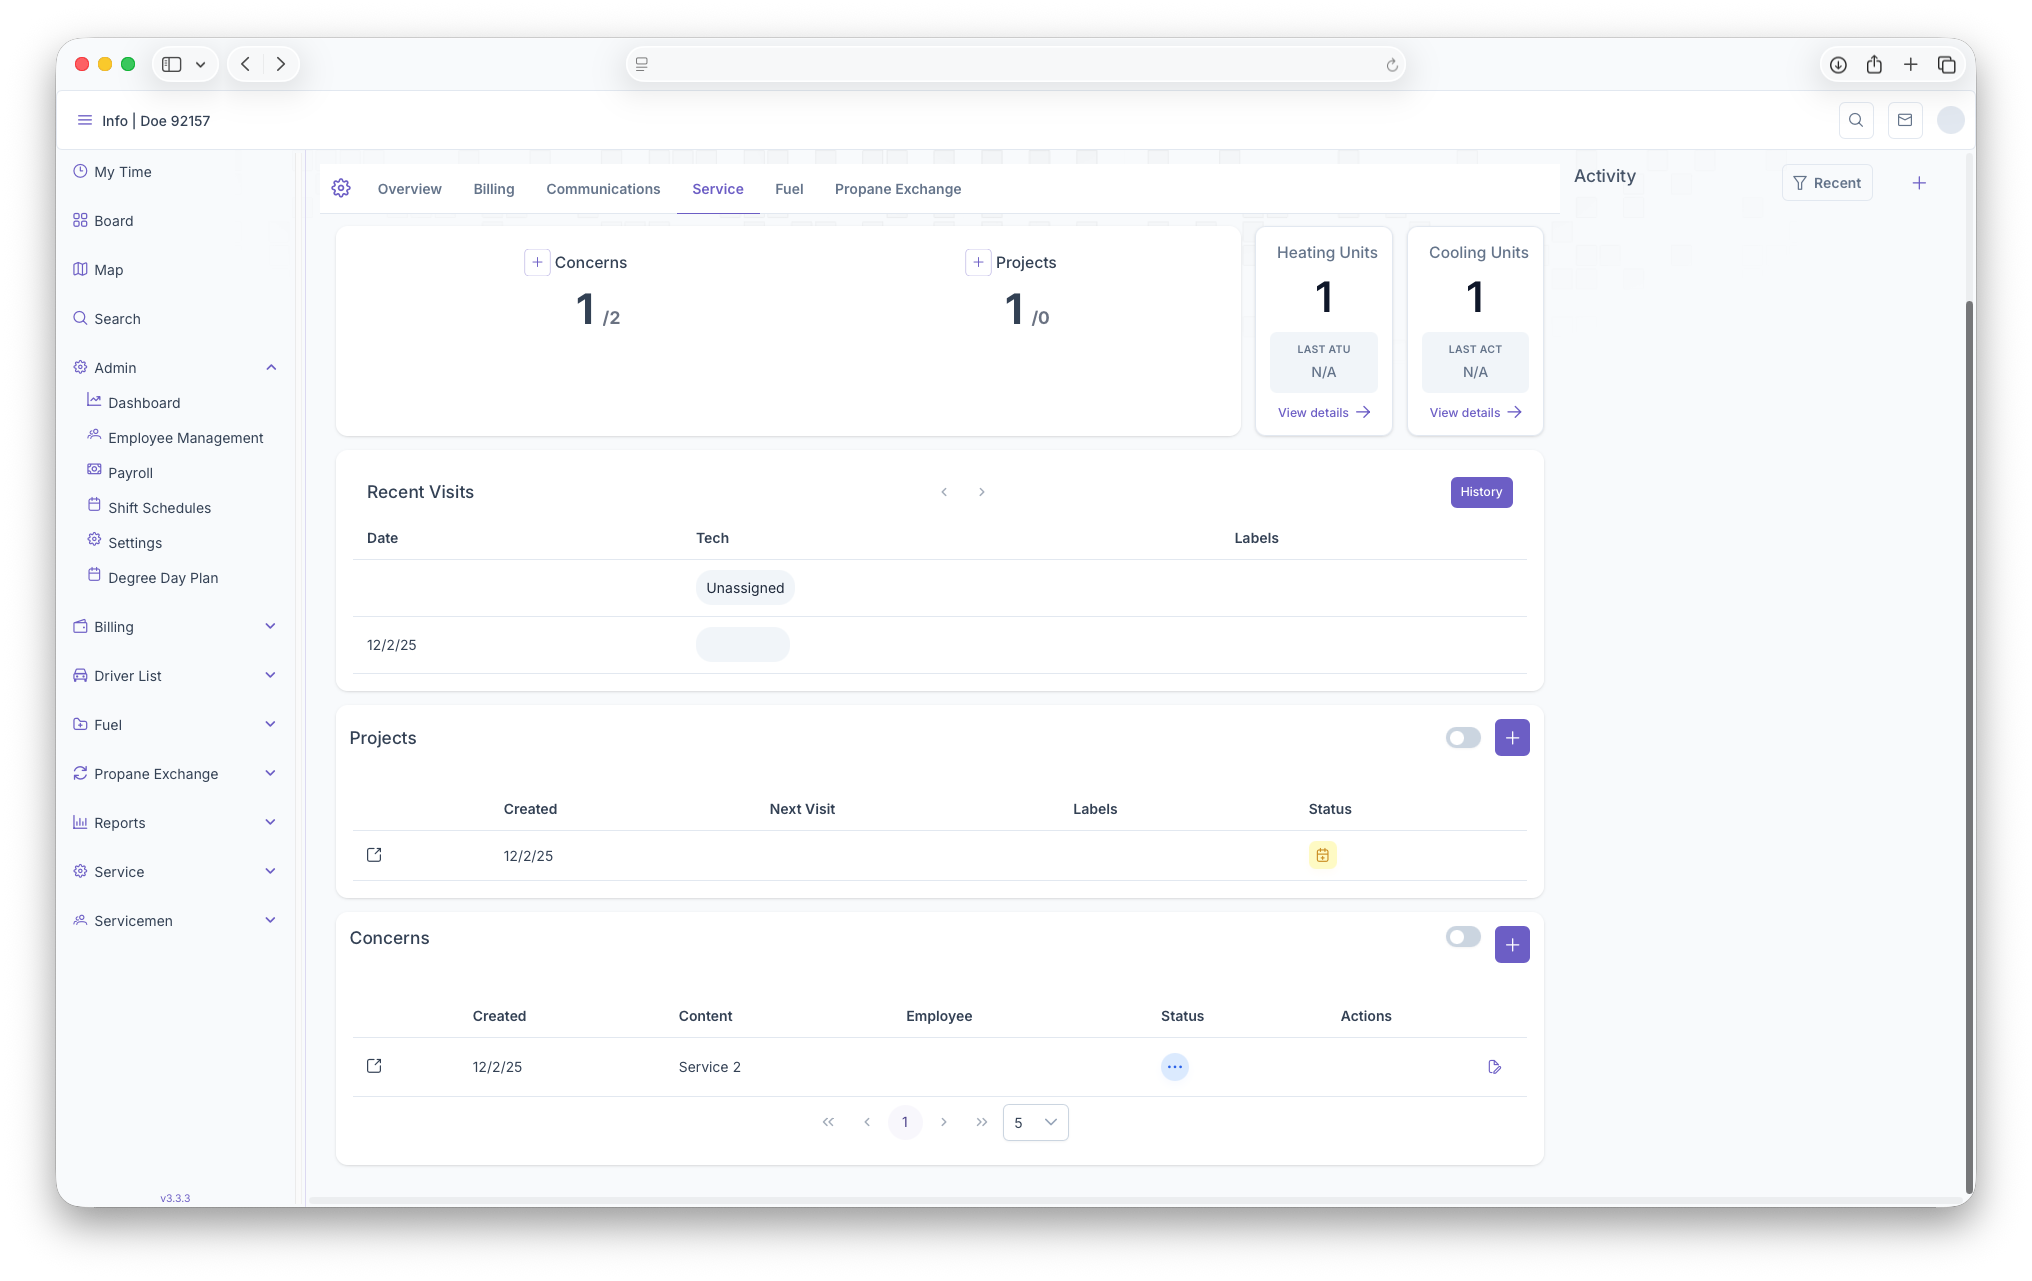
Service
- Concerns/Projects: Able to add any concerns or projects that the customer needs done
- Heating Units/Cooling Units: Shows any Heating or Cooling Units as well as the ability to edit or add more units
- Recent Visits: Provides any recent visits the customer has had
- Projects: Shows all projects that the customer needs to have done. Able to add more projects from here
- Concerns: Shows any concerns the customer has which can then be turned into projects

-
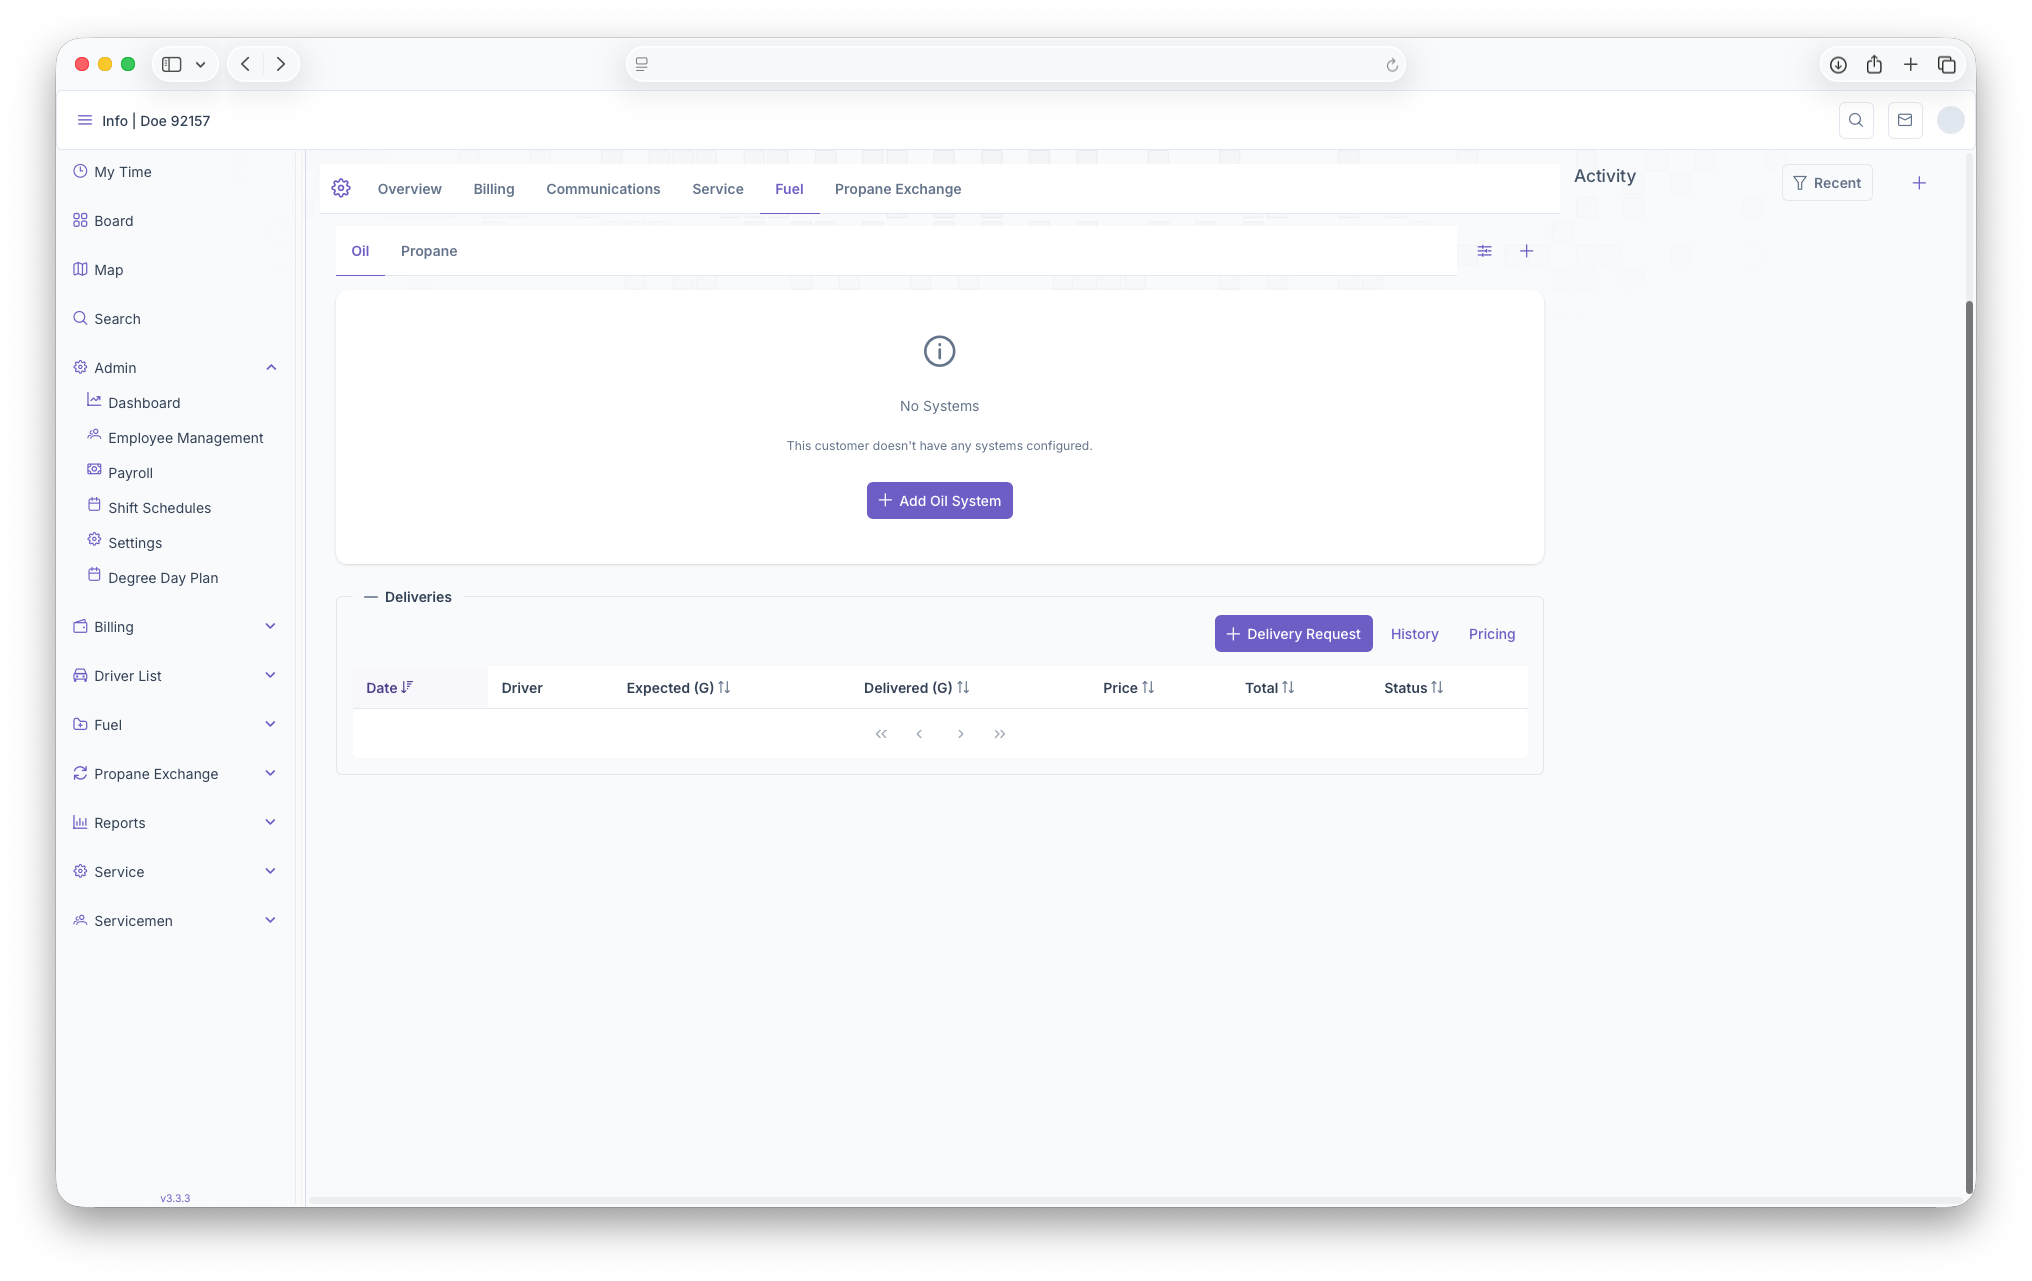
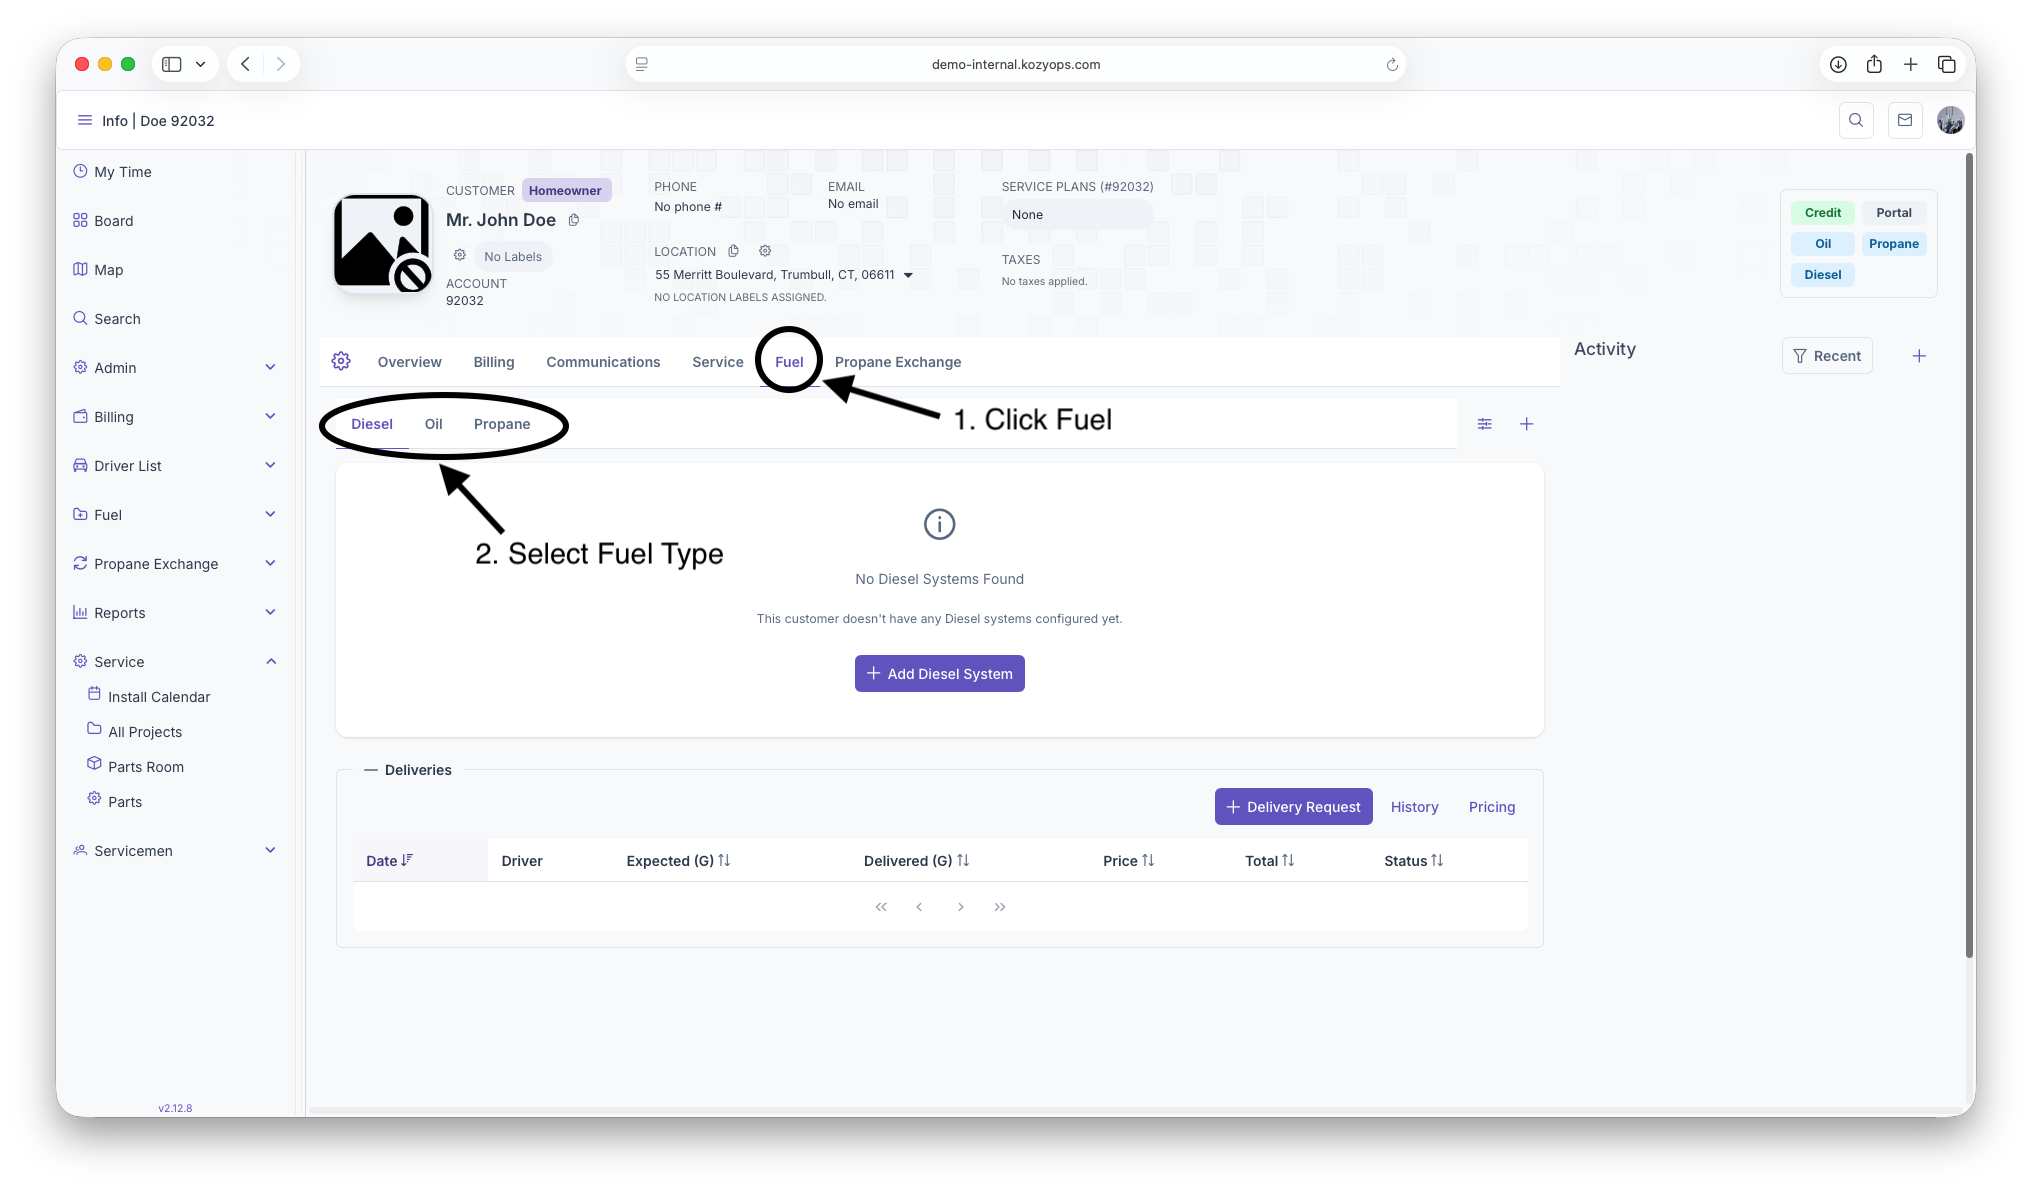
Fuel
- Fuel: Shows all Fuel that associated with the customer and their address
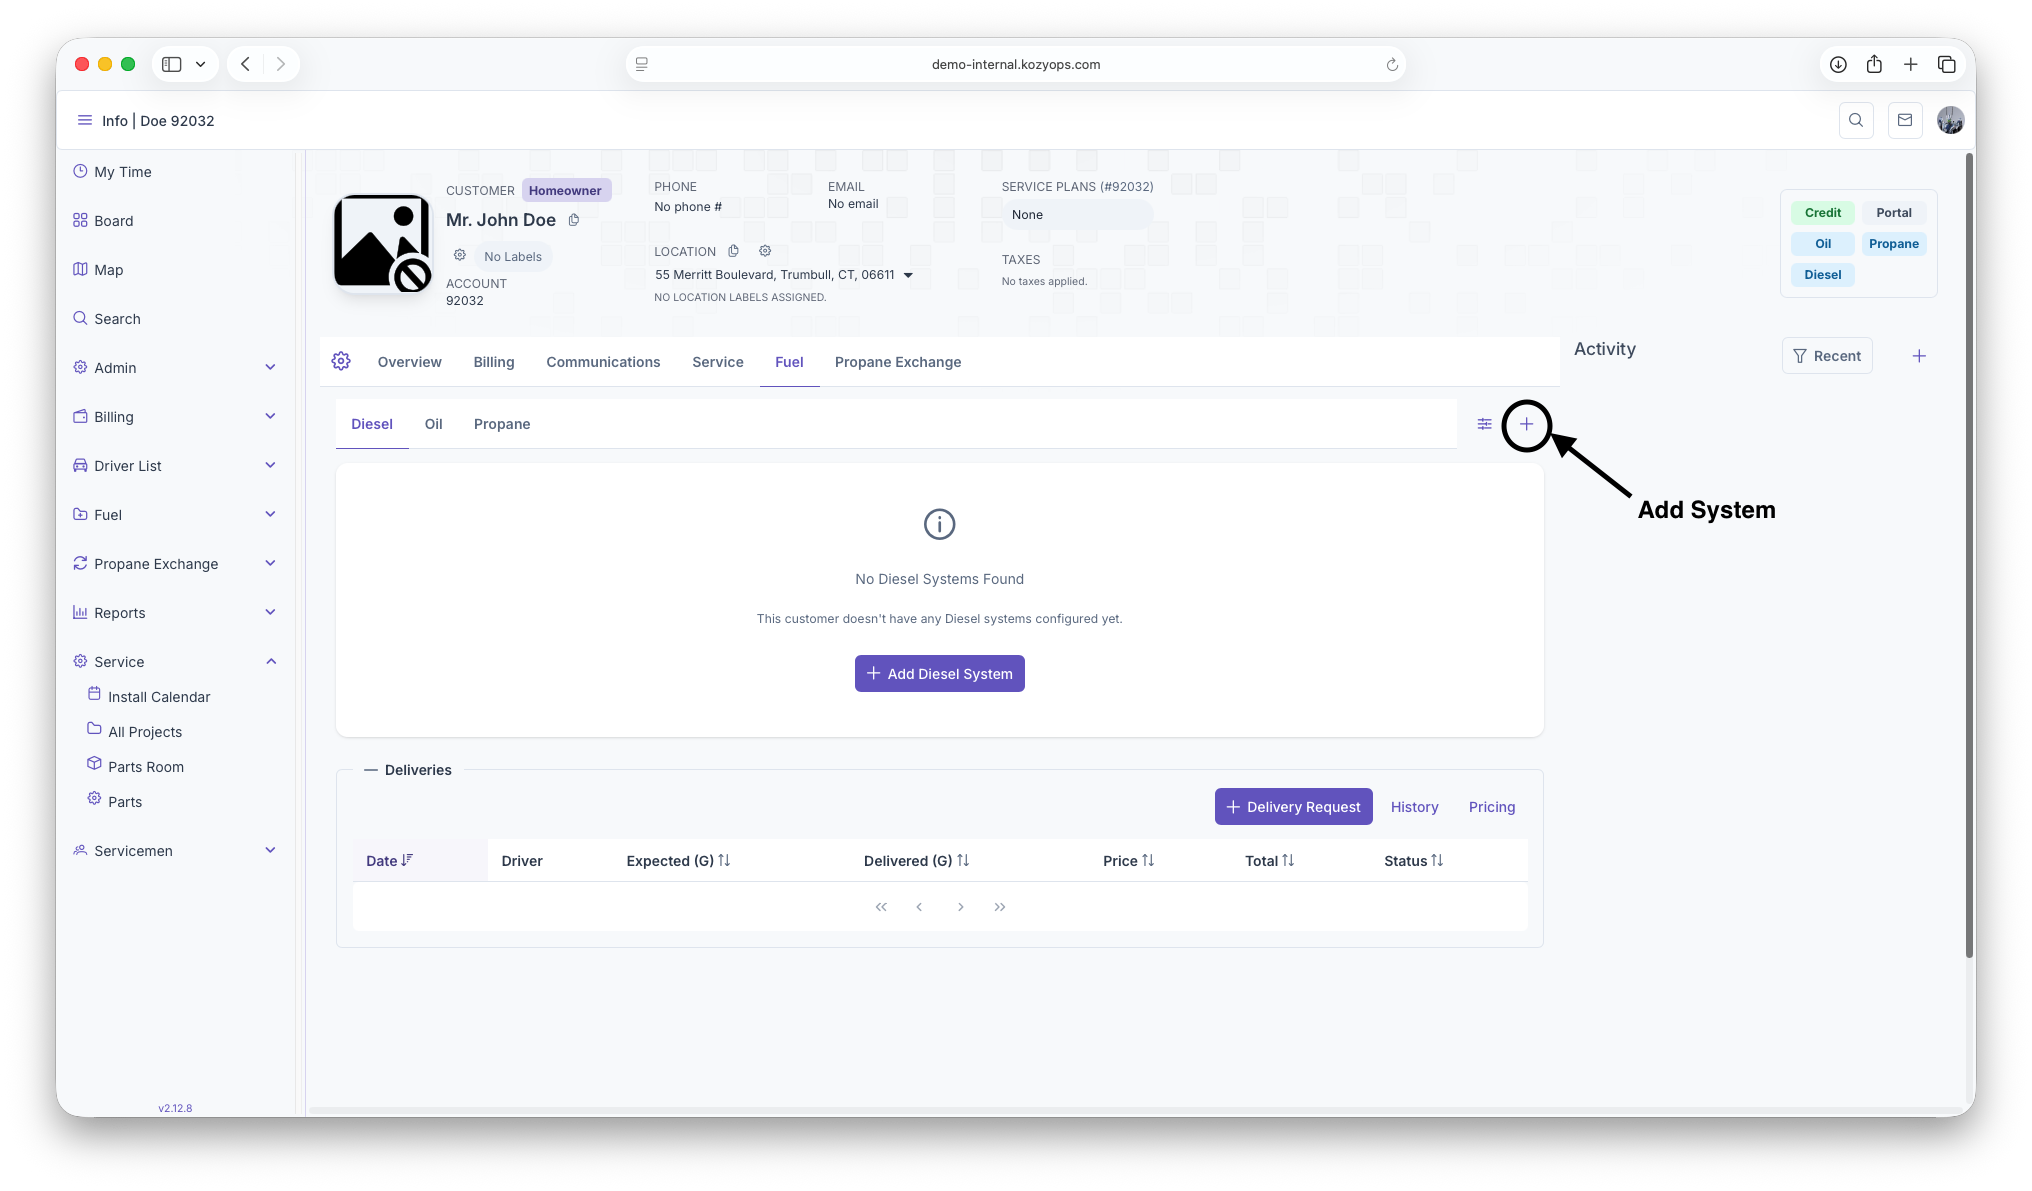
- System: Shows the systems that are being used for the fuel. Able to add or edit Systems here as well
- Equipment: shows the equipment that is tied to the system the customer has. Equipment can also be added or edited from here as well
- Deliveries: Shows all Deliveries that are being made to the customer. Deliveries can also be requested here and History and Pricing can be seen here as well

-
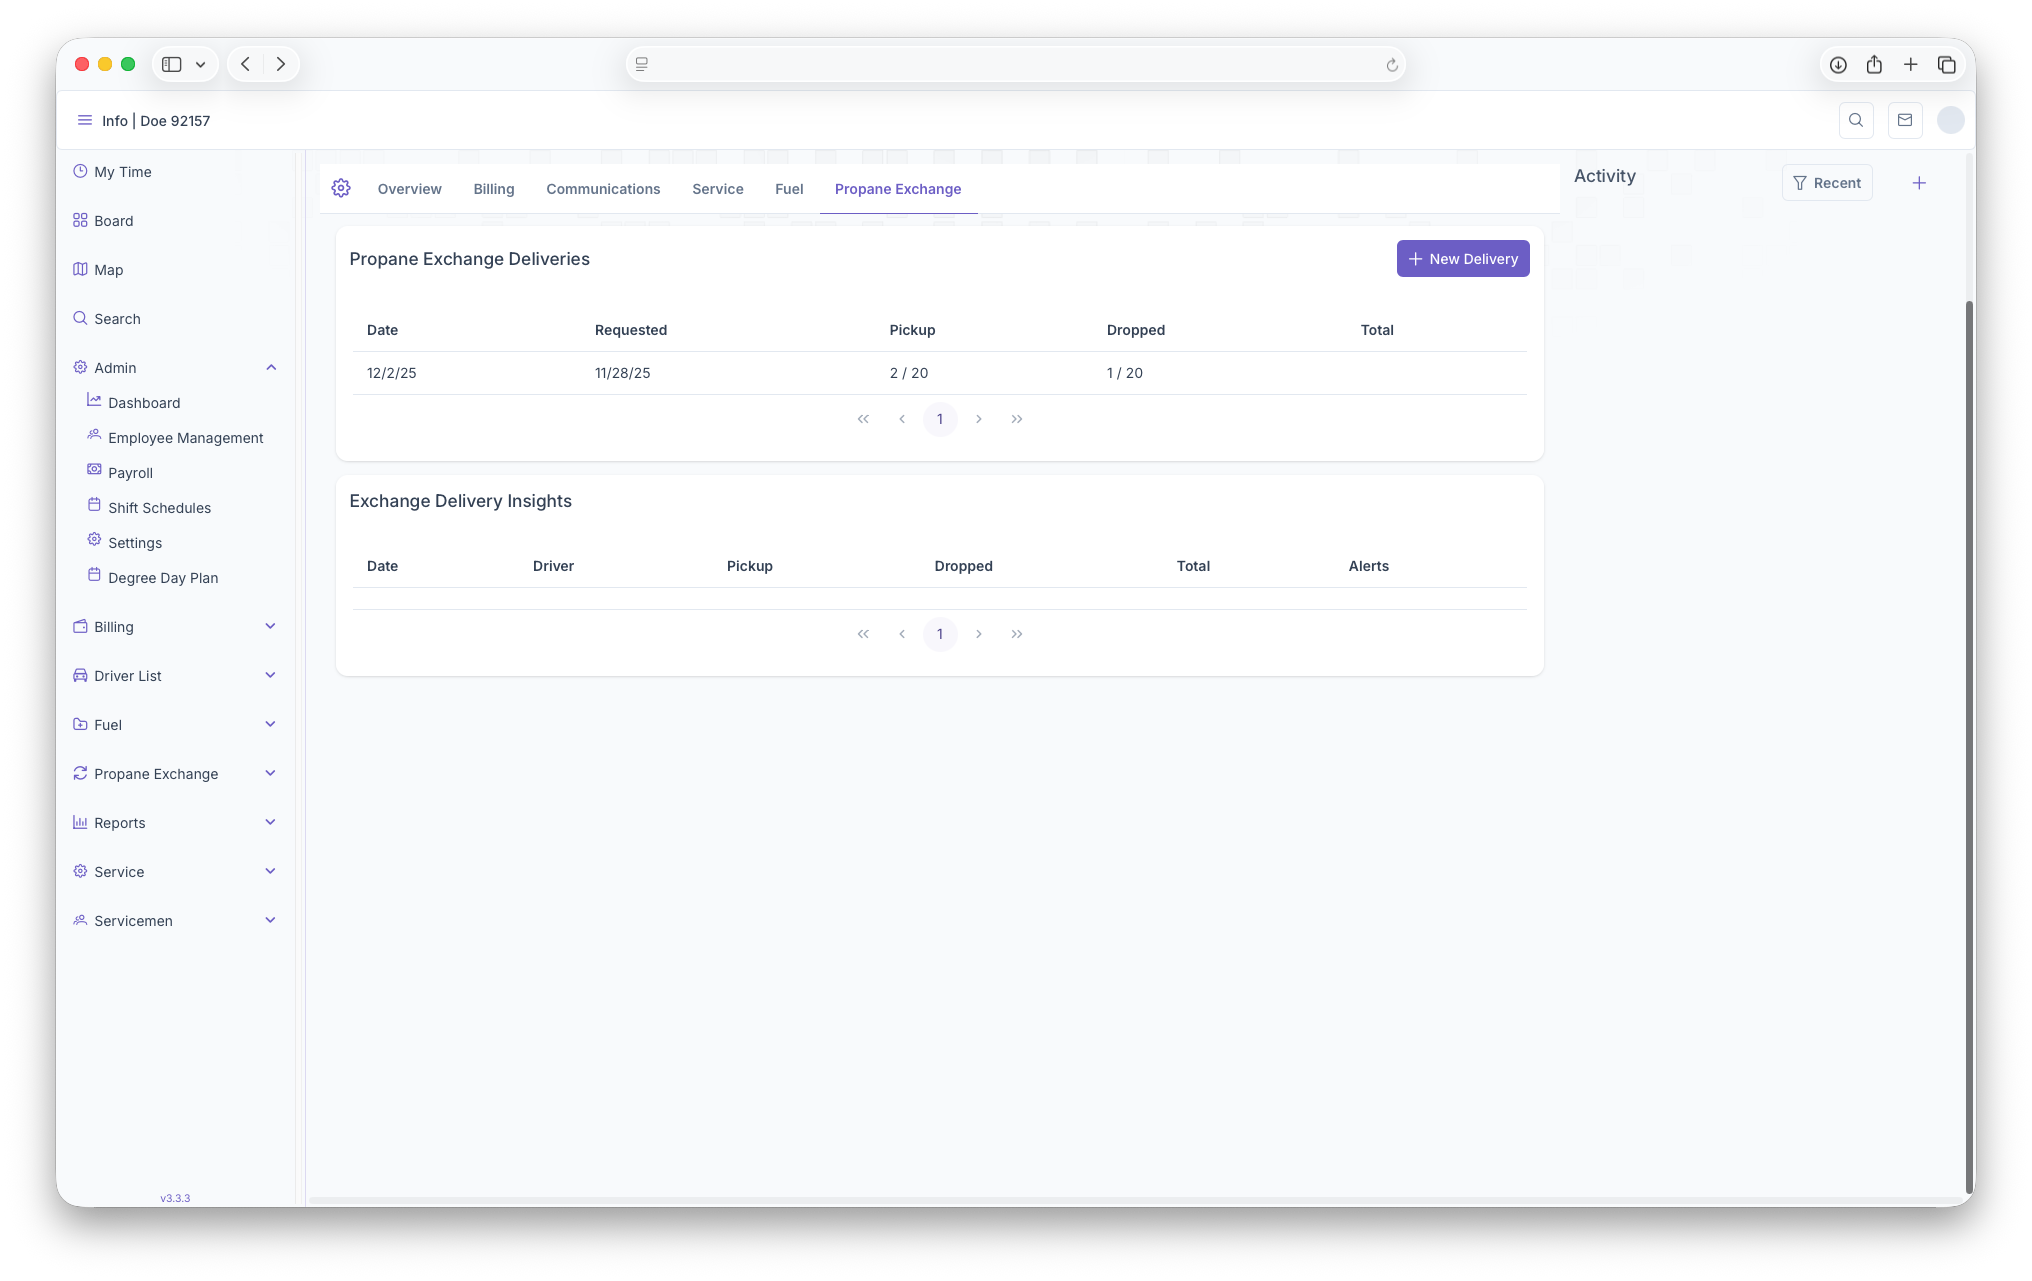
Propane Exchange
- Propane Exchange Deliveries: Shows all scheduled deliveries as well as the ability to add more if neccessary
- Exchange Delivery Insights: Shows a more detailed view of the delivery

This is just a basic overview of the Customer Account page, a much more detailed version can be seen Customer Account
New Customer
Adding a New Customer
This guide walks you through creating a new customer from search to first location setup. It matches the in-app flow used by customer service and onboarding teams. A Customer can also be added through the Onboarding Process as well.
Quick flow
- Start on Search check to see if they have an account. If so, use that Customer account and do not create a new customer.
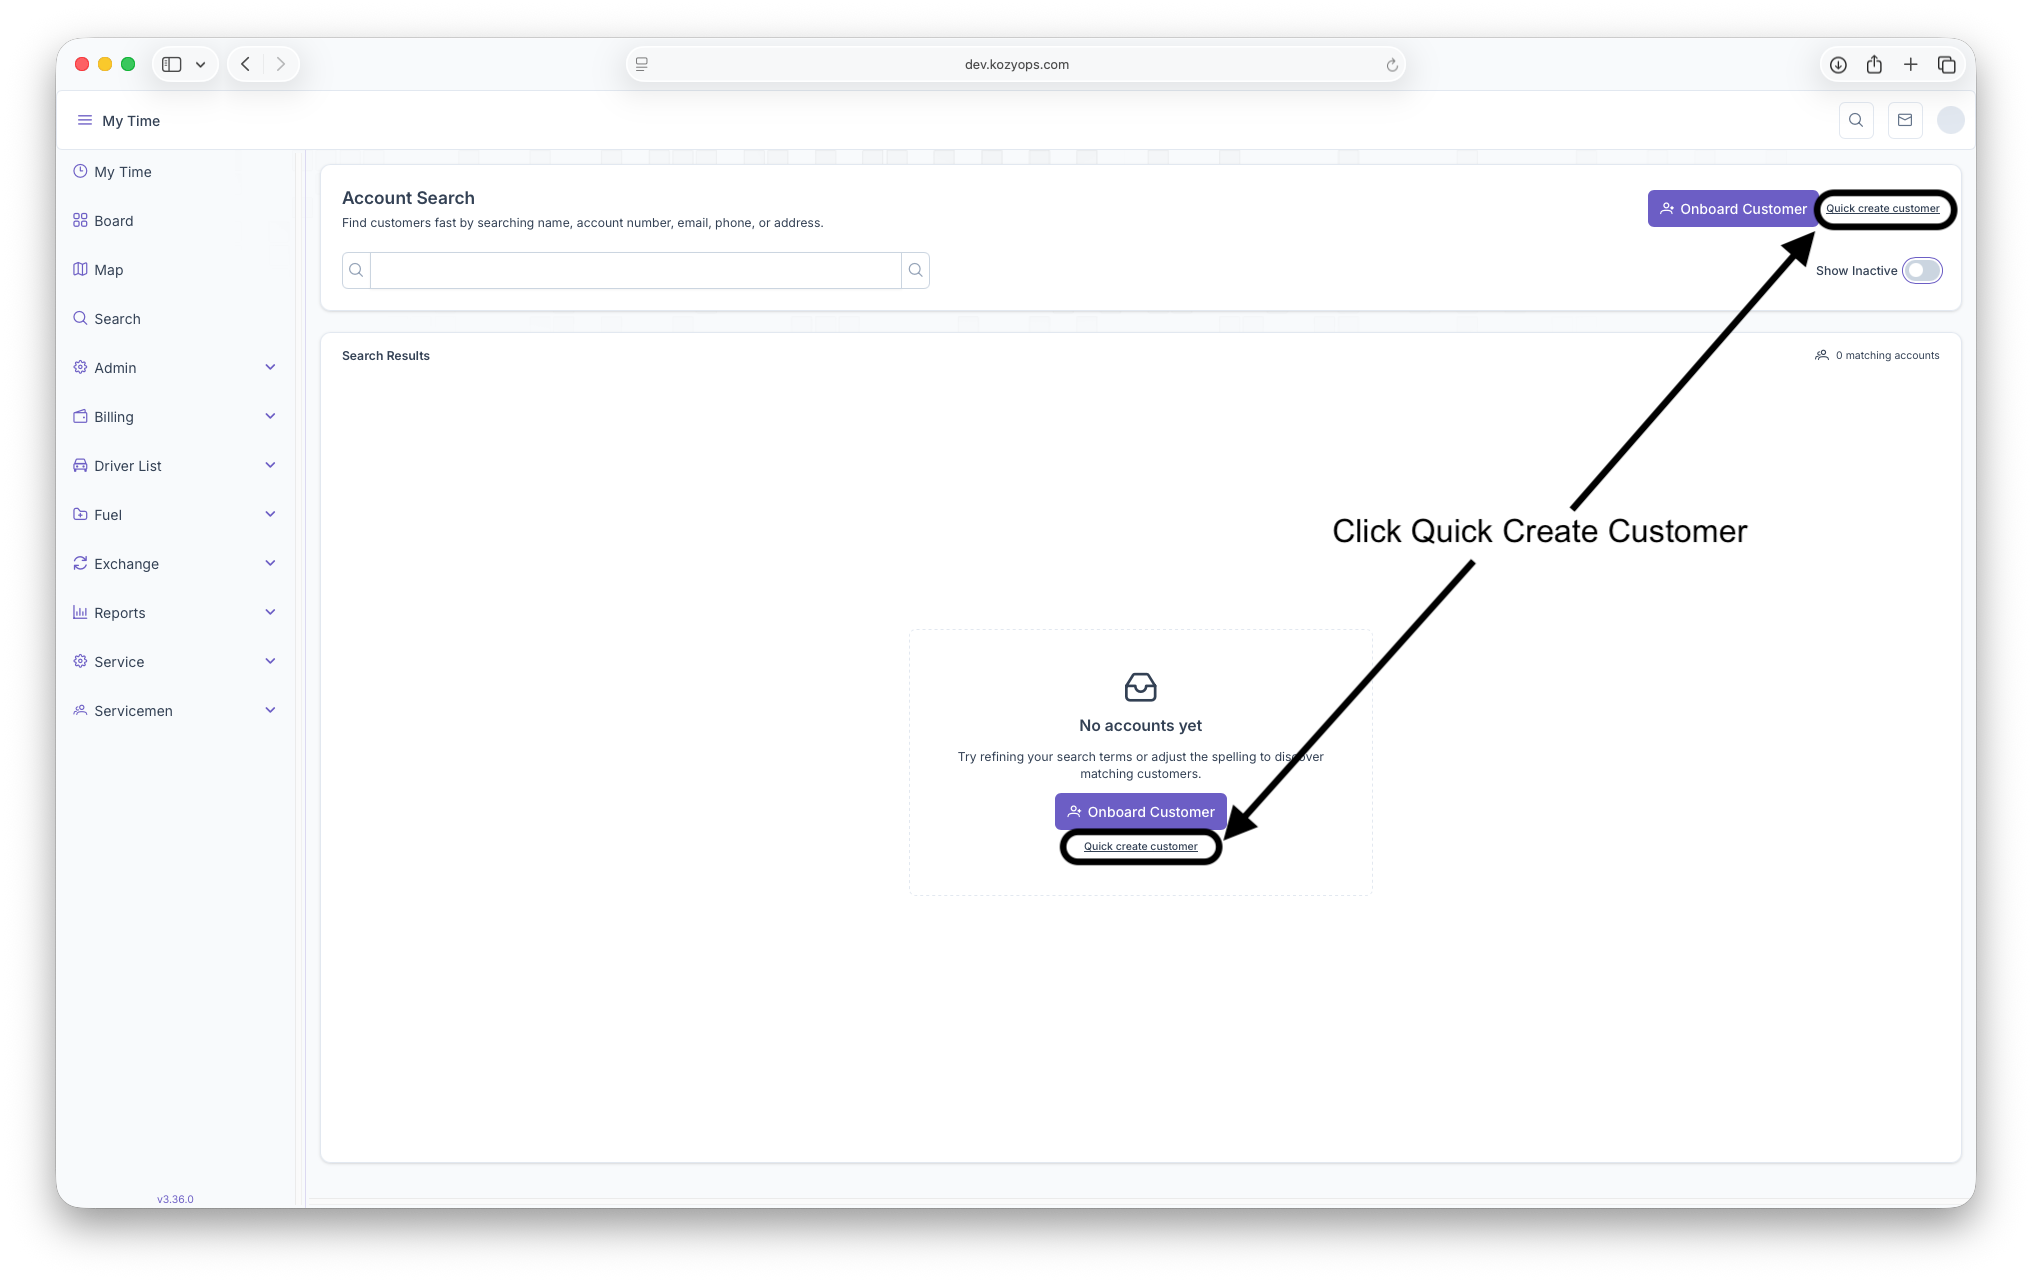
- If they don't exist yet, click Quick Create Customer next to or under the search bar.
- Enter the customer’s details and save.
- You’ll land on the Customer Dashboard.
- In the header, click on locations, then click Add location.
- Follow the Location Management guide to complete the location setup.
Need the detailed location steps? See Location Management (recommended):
- Internal docs: Location Management
- Web docs: https://docs.kozyops.com/books/customers-and-locations/page/location-management
Prerequisites
- You have permission to create customers in the app.
- You know the basic customer details (name, primary contact, phone/email, billing address if available).
Step-by-step
1) Start on Search
- Open the Search page (Account Search).
- Enter the customer name, phone, or email to confirm they don’t already exist.
- If no matching customer is found, proceed to create a new one.

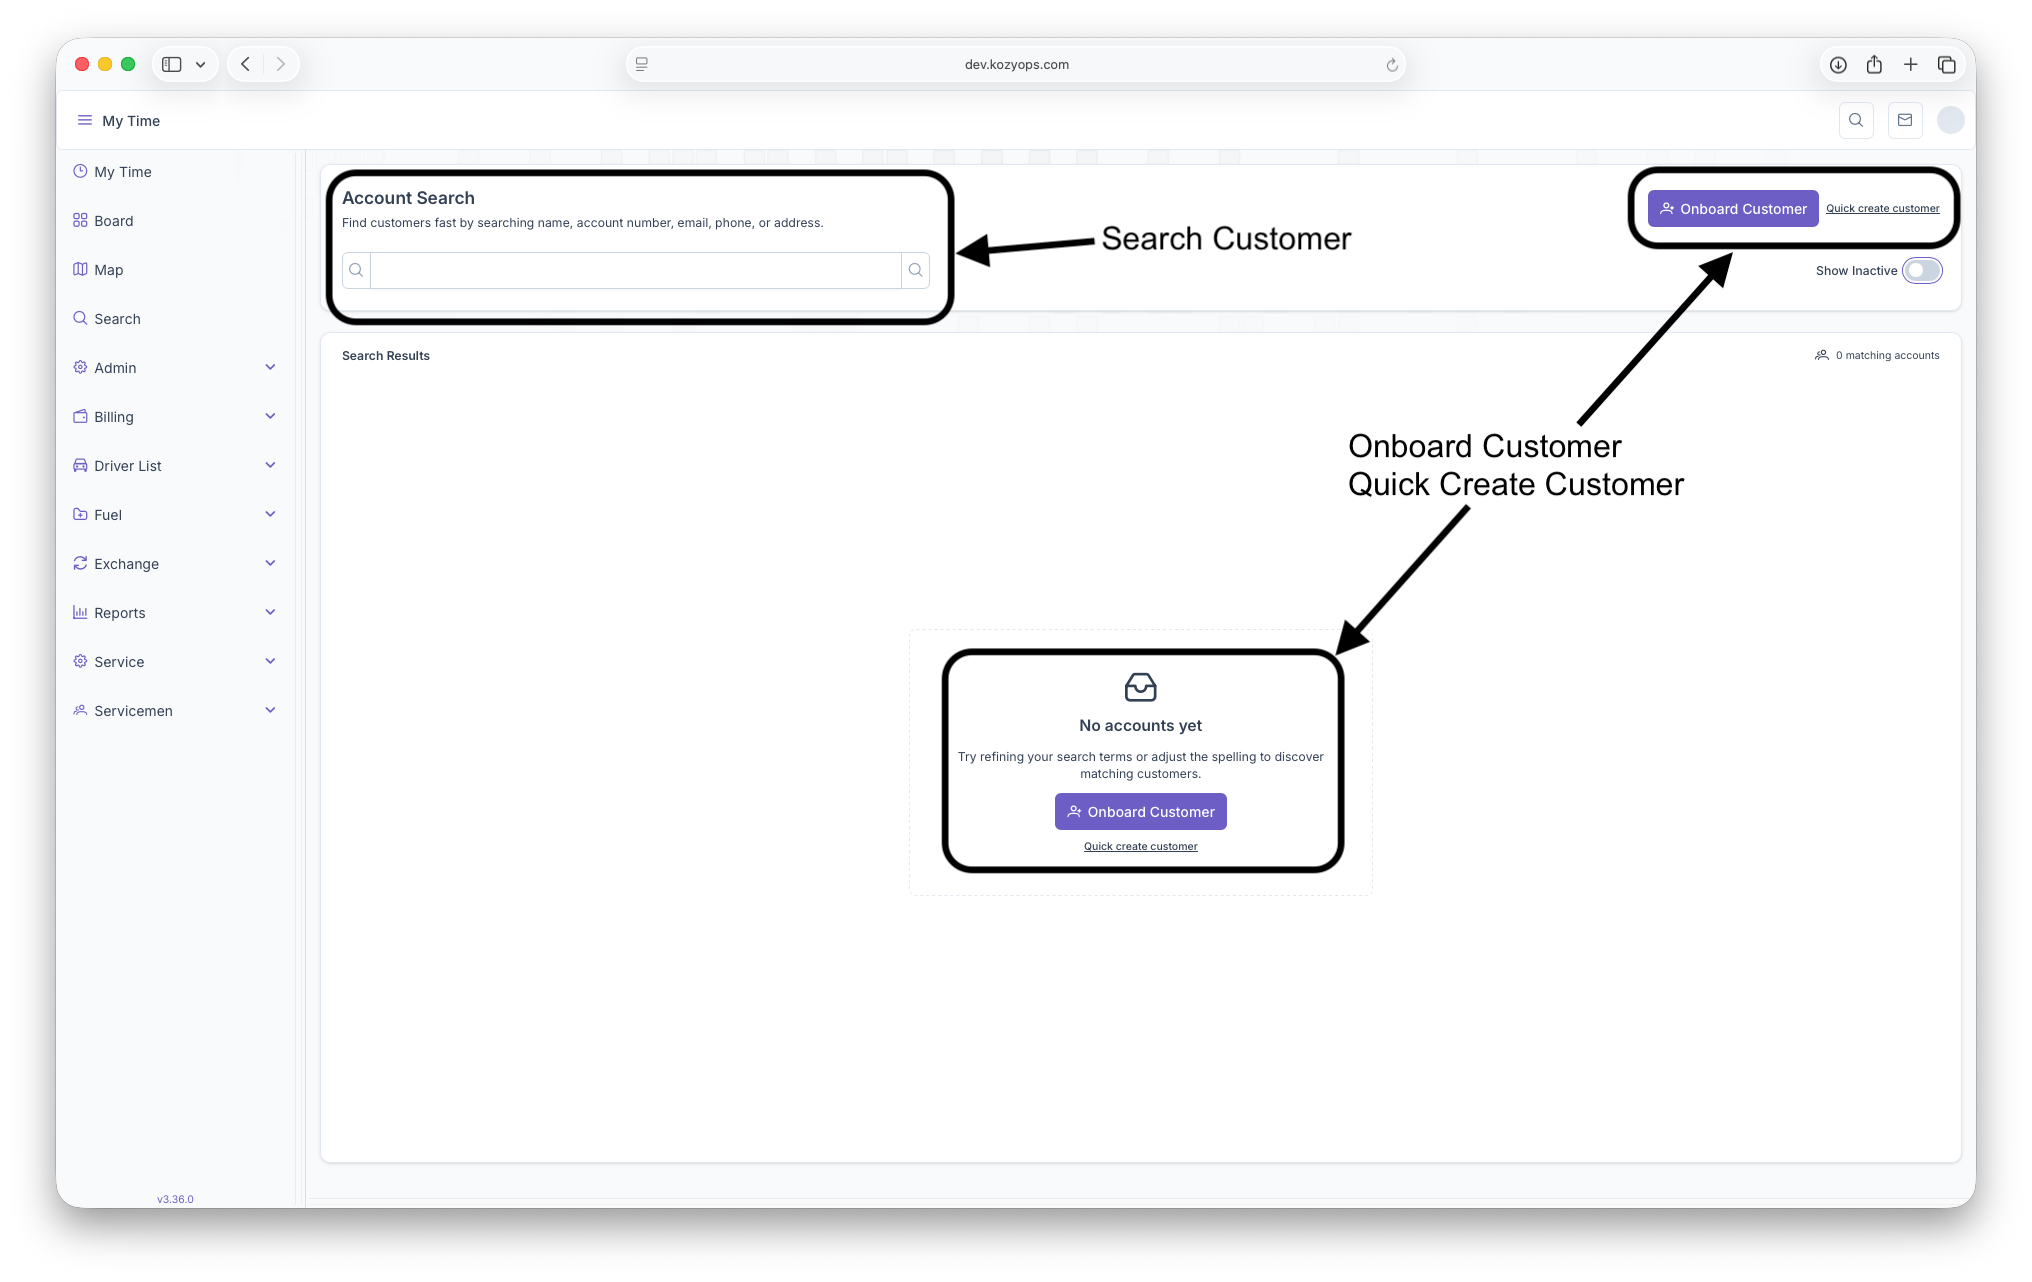
2) Click Quick Create Customer
- Use the Quick Create Customer action from the search results page.
- A Create Customer form will open.
3) Enter customer details
Fill out the form (required fields are marked in the app):
- Basic info: Select the Brand for the Customer
- Primary contact: First/Last name (for residential) or main contact (for commercial)
- Contact methods: Phone and email
- Addresses: Billing address (and mailing if different)
- Preferences - Toggle Customer preferences
Then click Save. If the app flags potential duplicates, review suggestions and confirm creating a new customer only if you’re sure it’s unique.
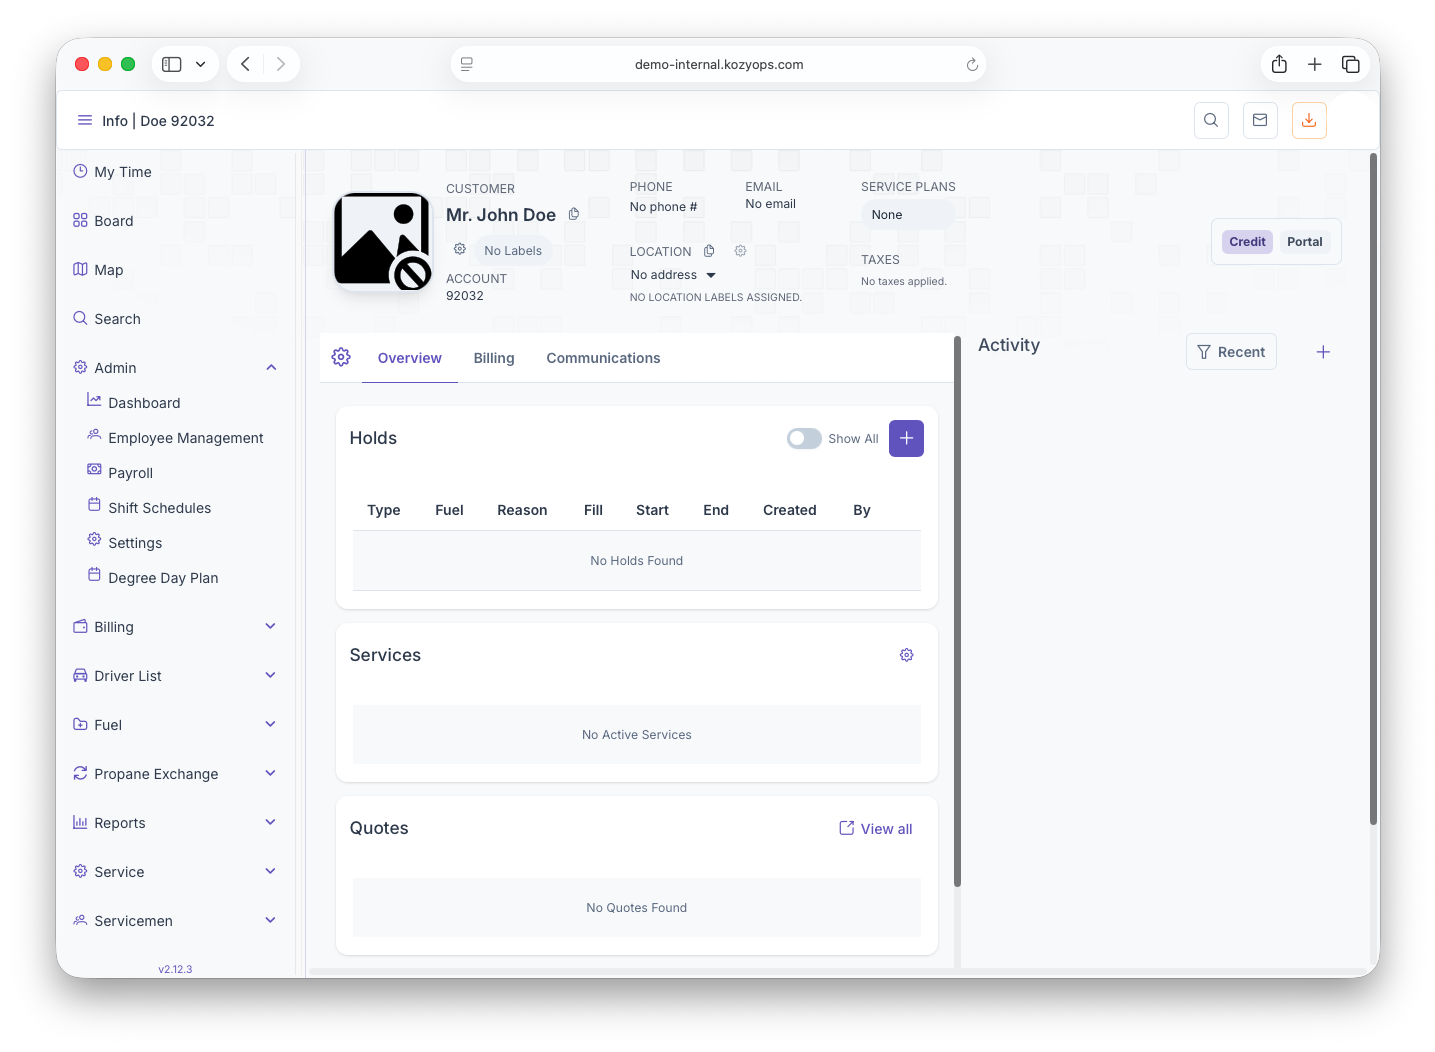
4) Land on the Customer Dashboard
After saving, you’ll be taken directly to the new customer’s dashboard. The customer header will show the current number of locations.
5) Add the first location
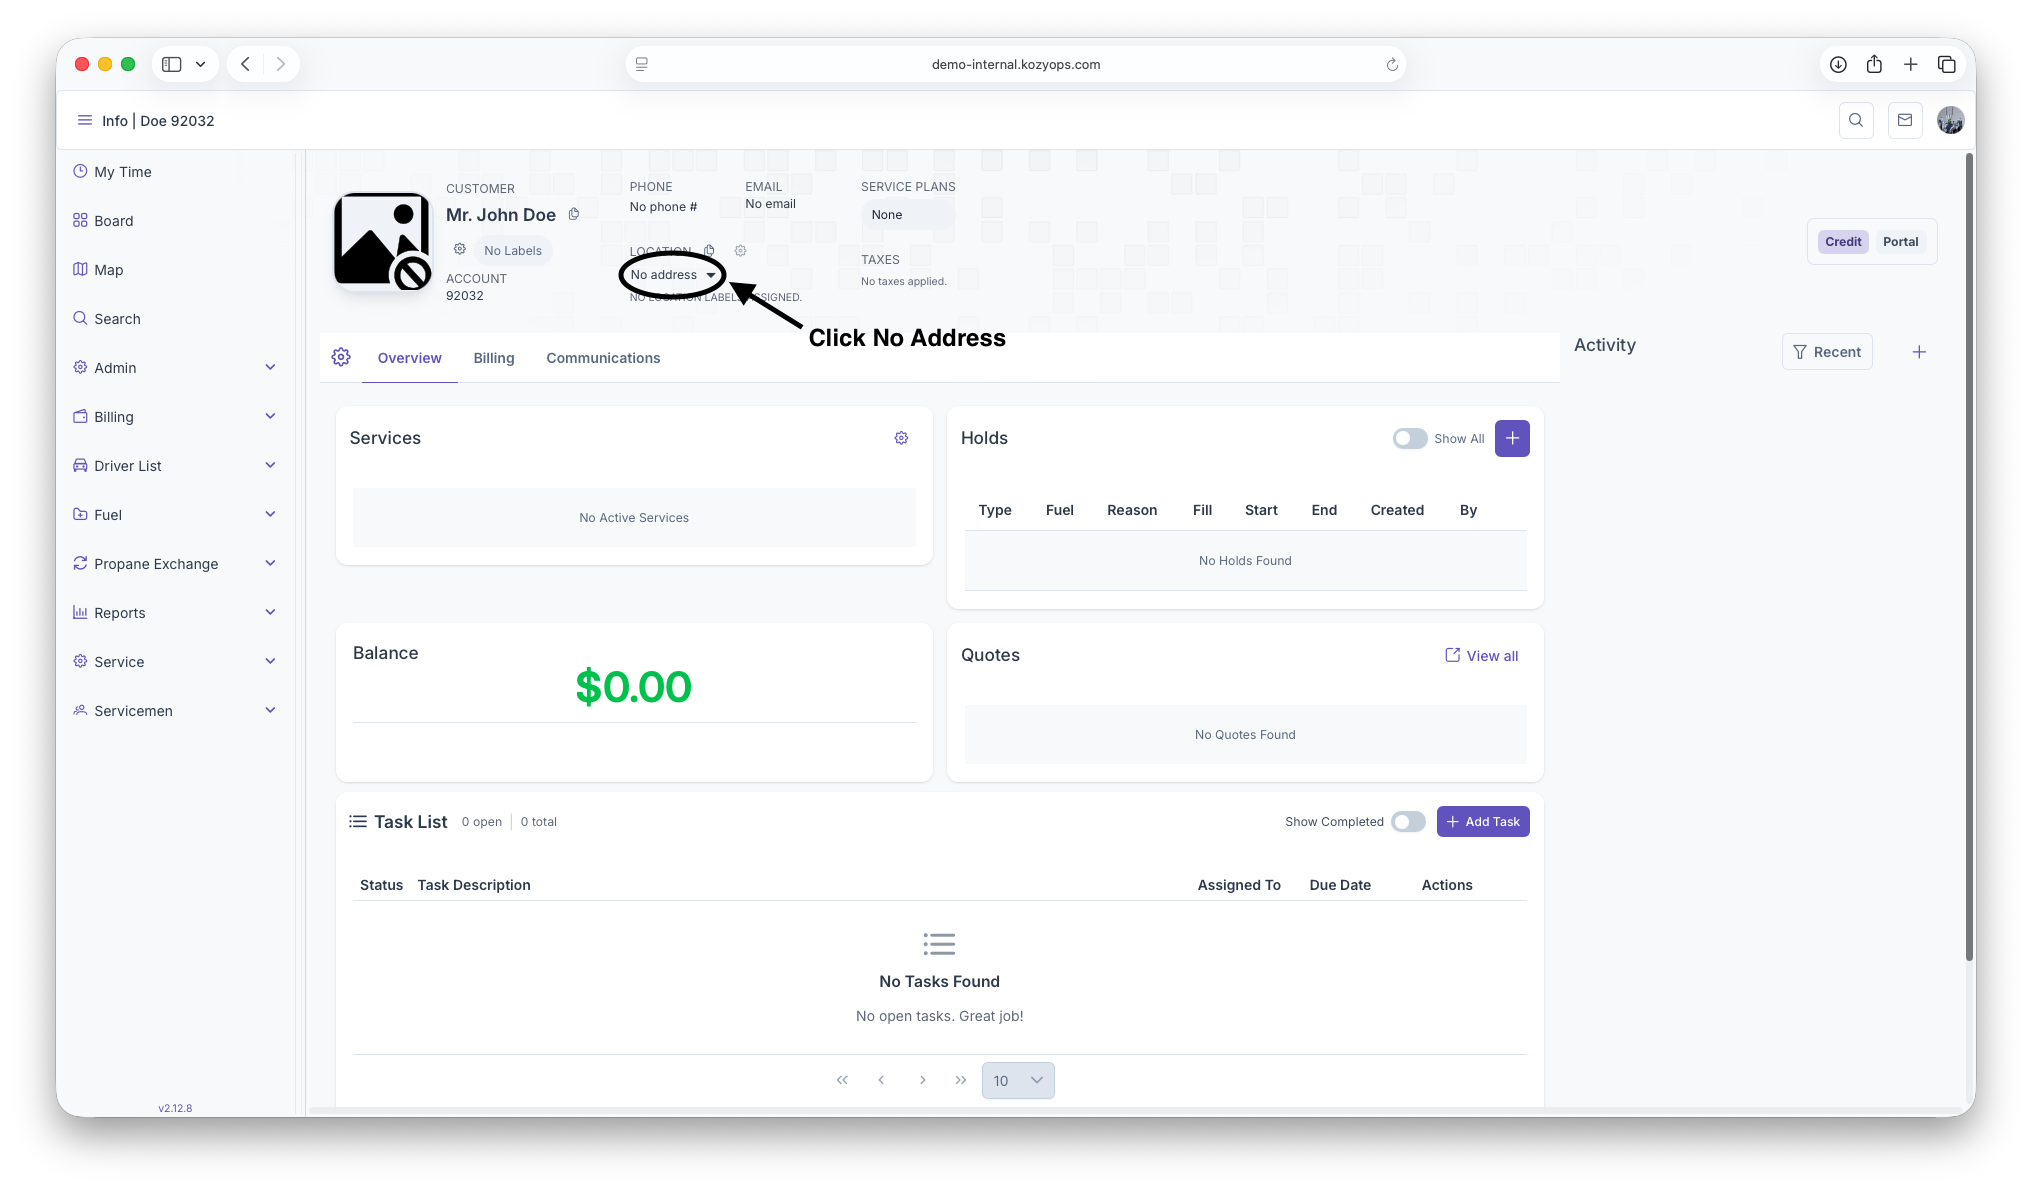
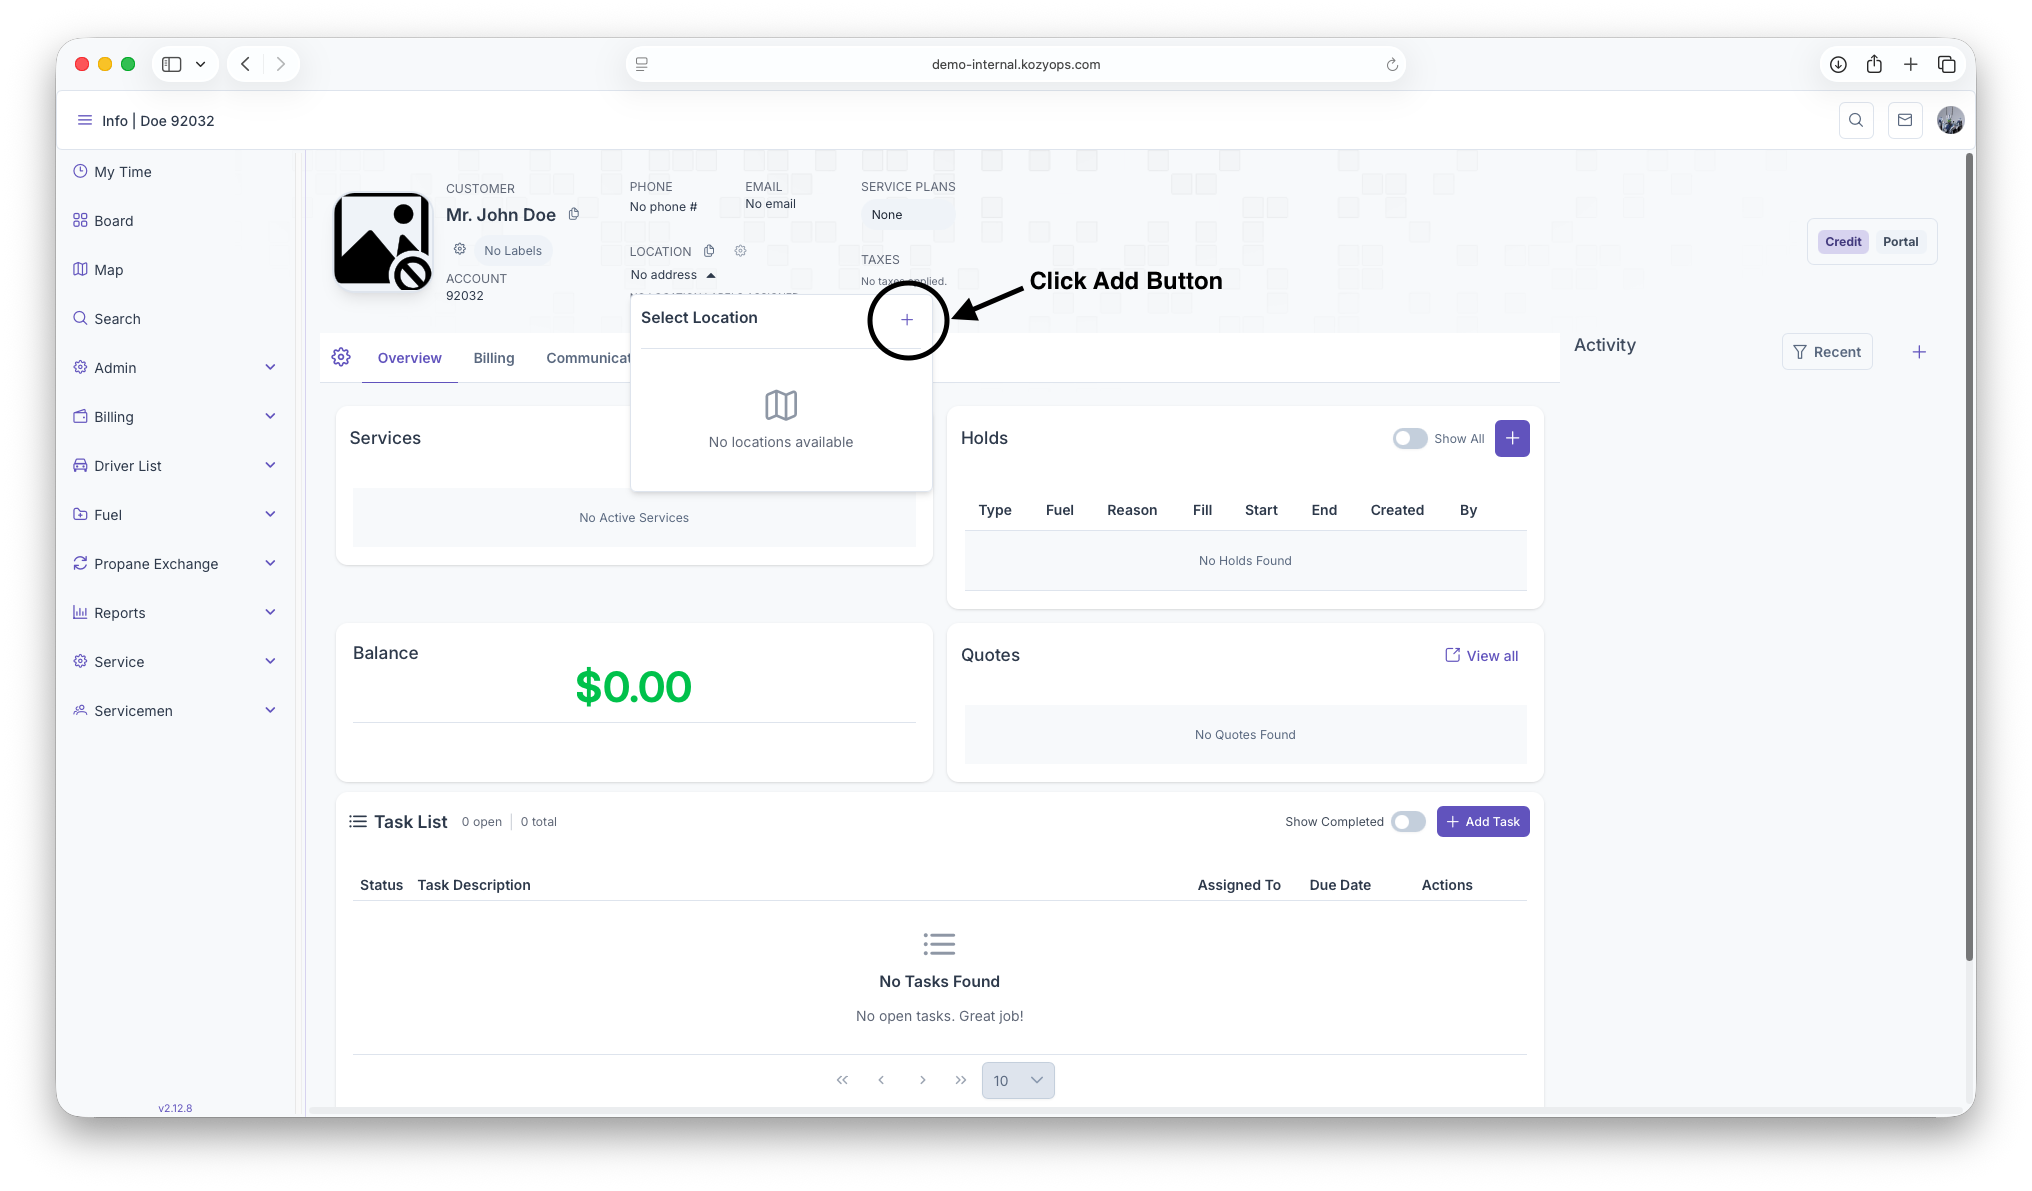
-
In the customer header, click No locations (or the locations count).

-
Click Add location.

-
The Add Location form opens.

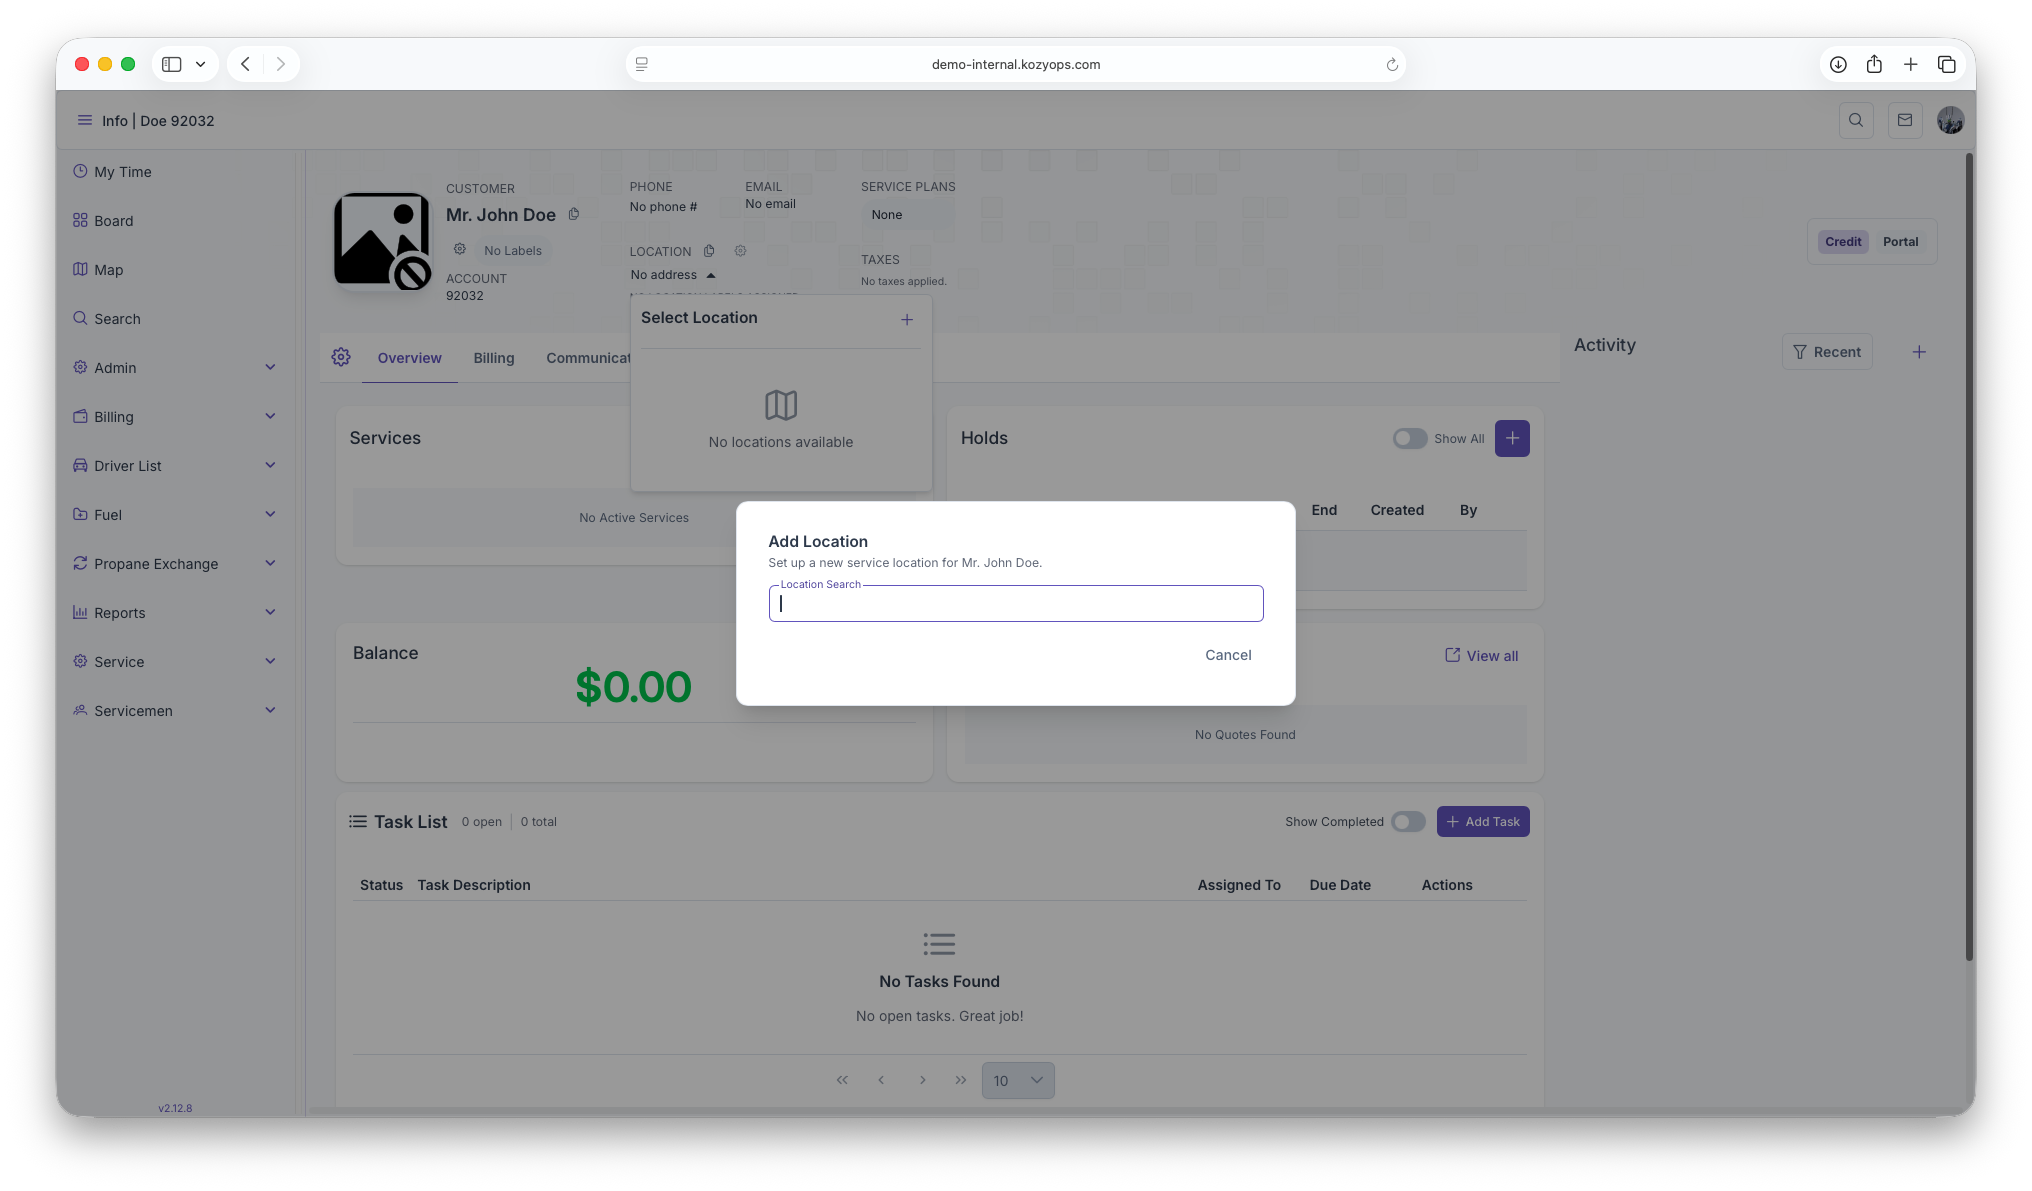
For the full, step-by-step location process (address validation, delivery settings, tanks/equipment, and notes), follow the Location Management guide.
Once the location is saved, it will appear in the customer’s locations list and on the dashboard.
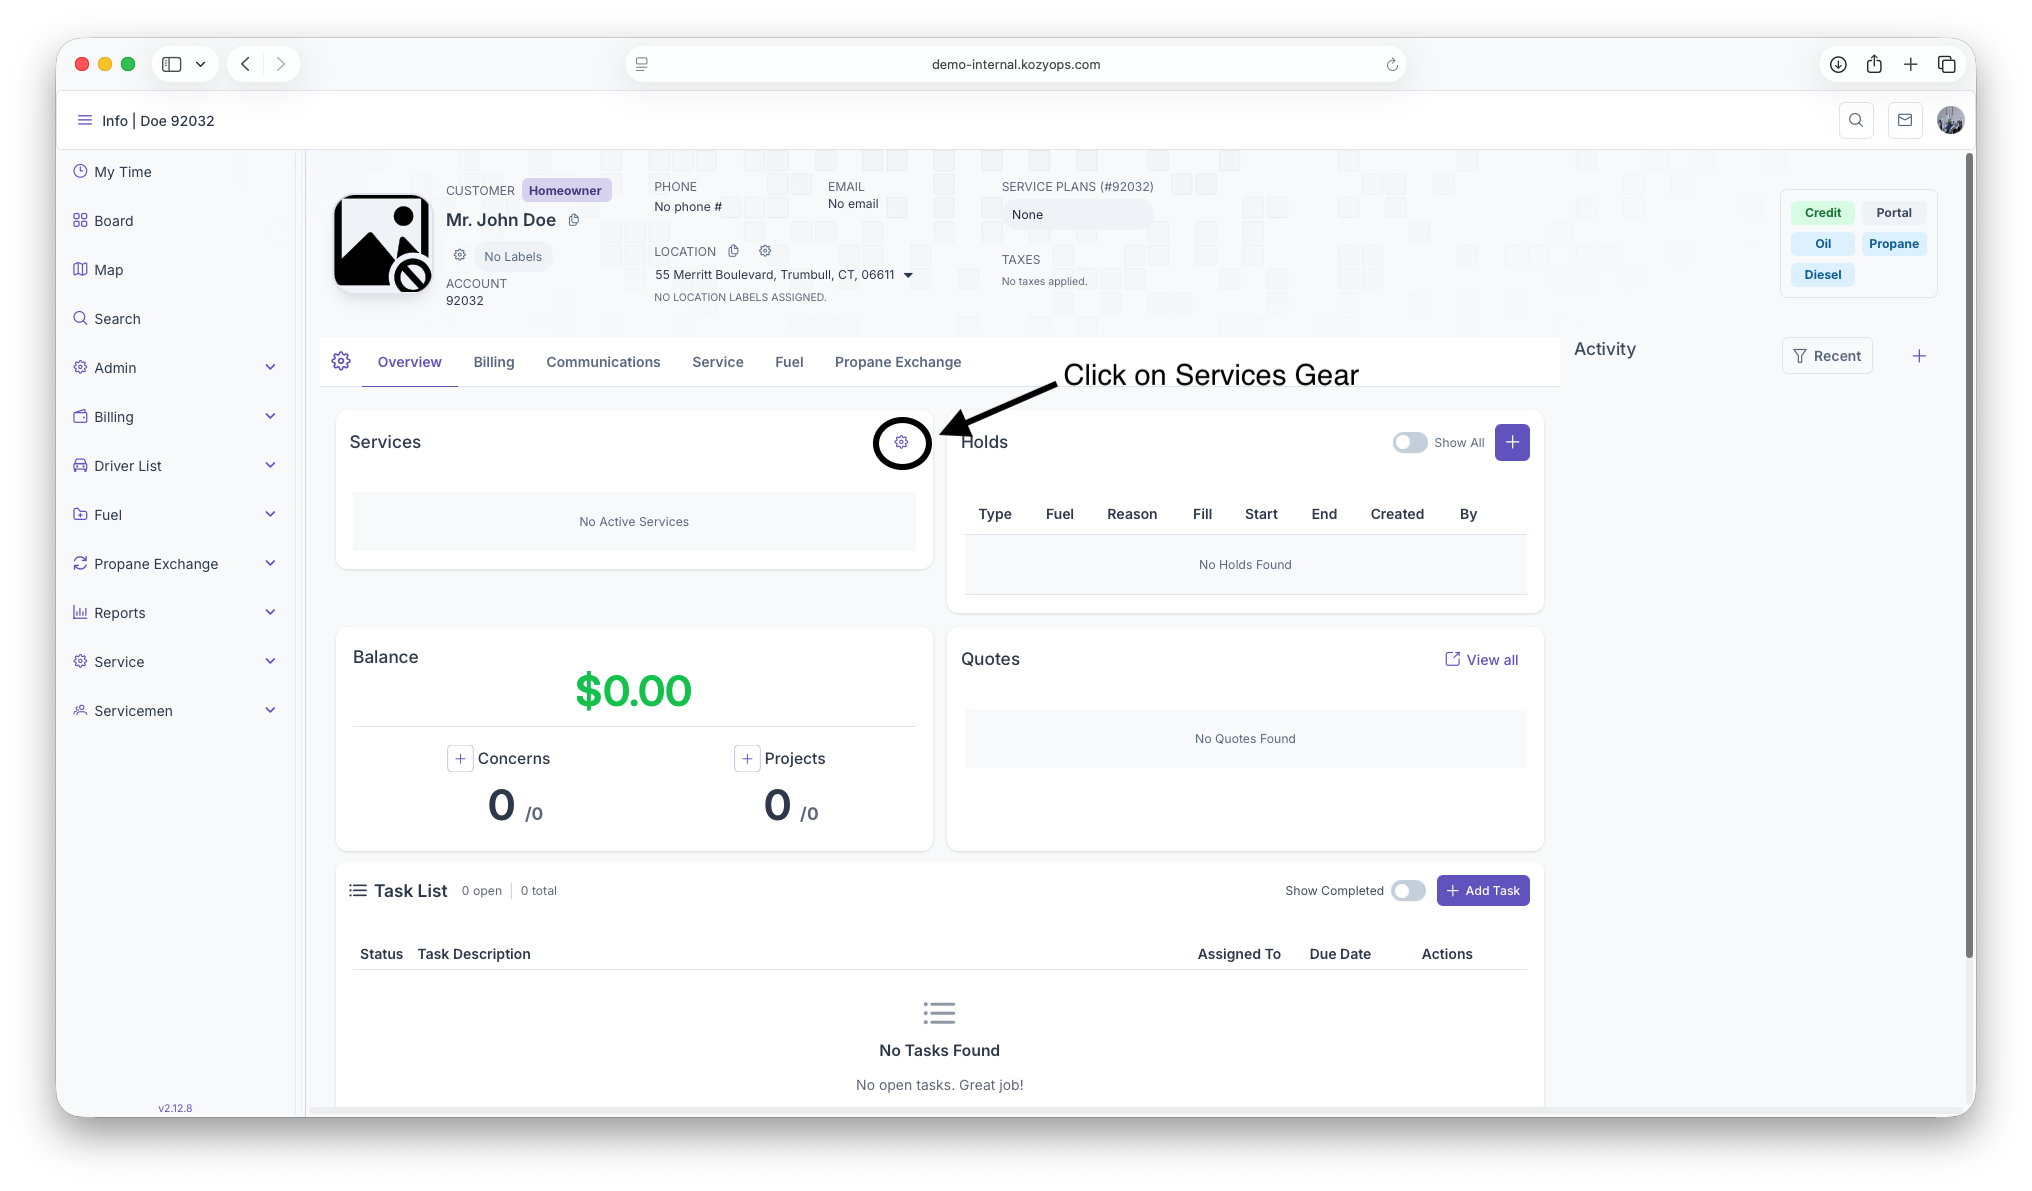
6) Add services for this location
After the customer and location are selected (you should see both in the dashboard header):
-
Open the Customer Dashboard Overview.

-
Click the Services gear icon in the header (or the Services panel action) and choose Add Service.

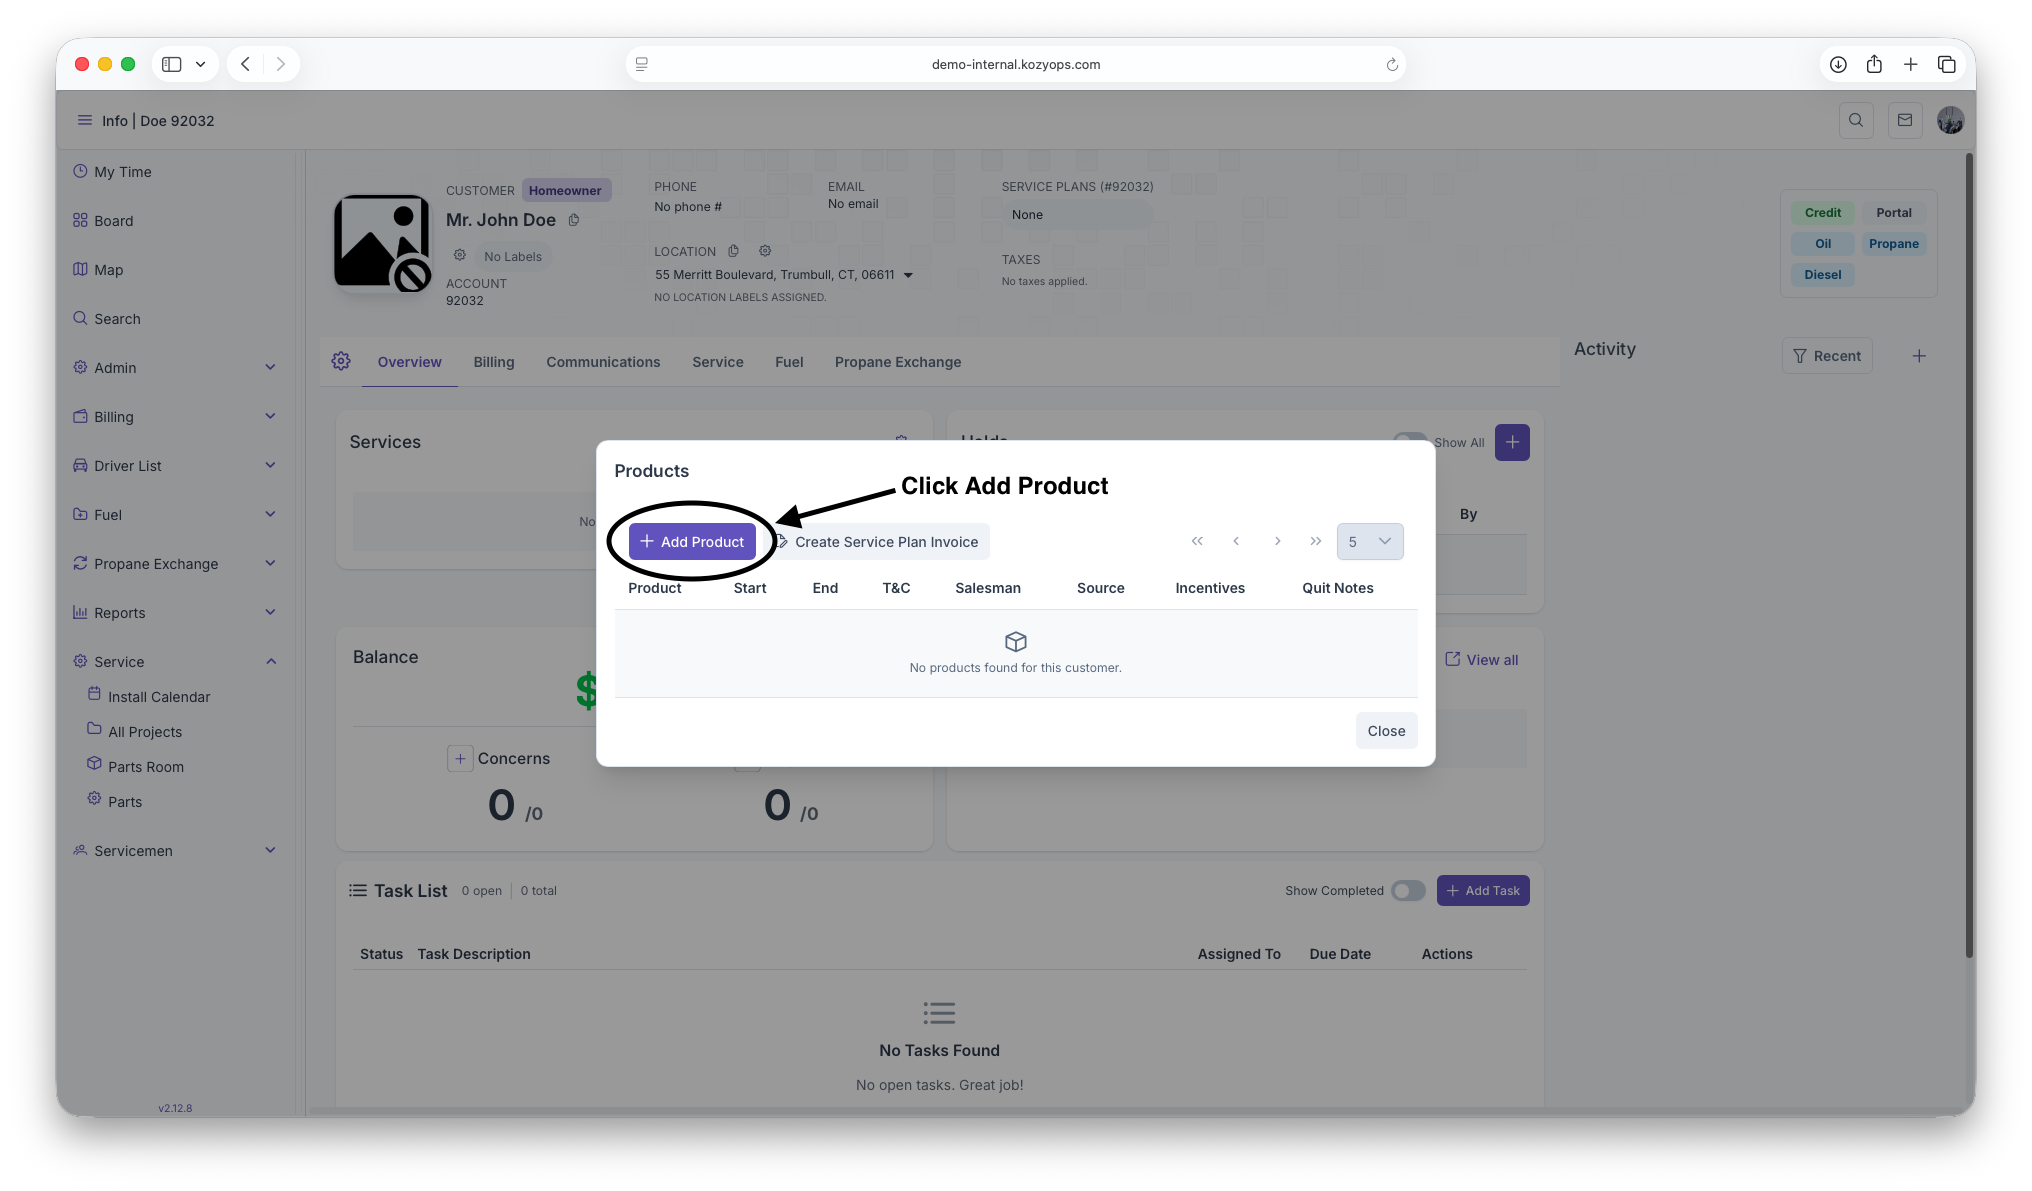
-
Fill out the service details, then Save.


Common fields (exact fields may vary by service type; consult the Add Services guide for specifics):
- Service Type (required): e.g., Oil Delivery, Propane Delivery, Exchange, Maintenance/Service Plan
- Location (required): Auto-selected to the current location; confirm it’s correct
- Delivery Mode (required): Automatic/Keep-Full or Will-Call
- Product/Fuel (required): Select the product to be delivered/serviced
- Primary Tank/System (if applicable): Select the tank or system this service is tied to
- Start Date (required): When the service becomes active
- Status (required): Active, On Hold, or Scheduled
- Pricing/Rate Plan (if applicable): Price tier, contract, or plan
- Minimum Delivery/Threshold (optional): Delivery minimums or triggers
- Schedule/Rules (optional): Degree-day, K-factor, route day, or cadence if used
- Notes (optional): Any special instructions for dispatch or billing
Reference: See the Add Services guide for detailed field explanations and service-type variations.
7) Create systems and equipment (if needed)
If the location’s systems haven’t been set up yet, create them now so services can be associated properly:
-
In the Customer Dashboard, go to the Systems section (or use the Systems action in the header).

-
Click Add System.

-
Enter system details, then Save.


-
After the system is created, add equipment under that system as needed.

Typical system fields:
- System Type (required): Heating, Cooling, Water Heater, Appliance, etc.
- Fuel/Source (required): Oil, Propane, Electric, etc.
- Manufacturer/Model (optional but recommended)
- Serial Number (optional)
- Install/Service Dates (optional)
- Notes (optional)
Typical equipment fields (under a system):
- Equipment Type (required): Tank, Boiler, Furnace, Air Handler, Vaporizer, etc.
- Size/Capacity (if applicable): e.g., tank gallons
- Manufacturer/Model/Serial (optional but recommended)
- Install Date (optional)
- Placement/Location details (optional): indoor/outdoor, access notes
- Monitoring/Telemetry (optional): tank monitor or sensor info
Reference: See the System guides for Creating a New System and Adding Equipment for full details and best practices.
What’s next?
- Create a first delivery or service ticket as needed.
- Add additional locations if the customer has more than one service address.
- Update billing preferences or contacts from the customer dashboard if required.
Onboarding
Onboarding is another process of adding a New customer, but adds all the necessary steps to fully bring in a new customer in an all in one Wizard rather than just quick creating a New Customer. That includes setting the Location, Adding Taxes and Labels, adding Systems and Equipment, Services and Holds, and Adding a Credit card to the account. For more information see the Onboarding guide.
Tips & troubleshooting
- Can’t find Add Customer? Make sure you searched first and that you have create permissions.
- Duplicate warning: If you see a possible duplicate, cross-check contact info and addresses before confirming a new record.
- Required fields: The Save button stays disabled until all required inputs are provided.
- After saving a location, you can return to the dashboard to start work (e.g., orders, service tickets) immediately.
Onboarding
Introduction
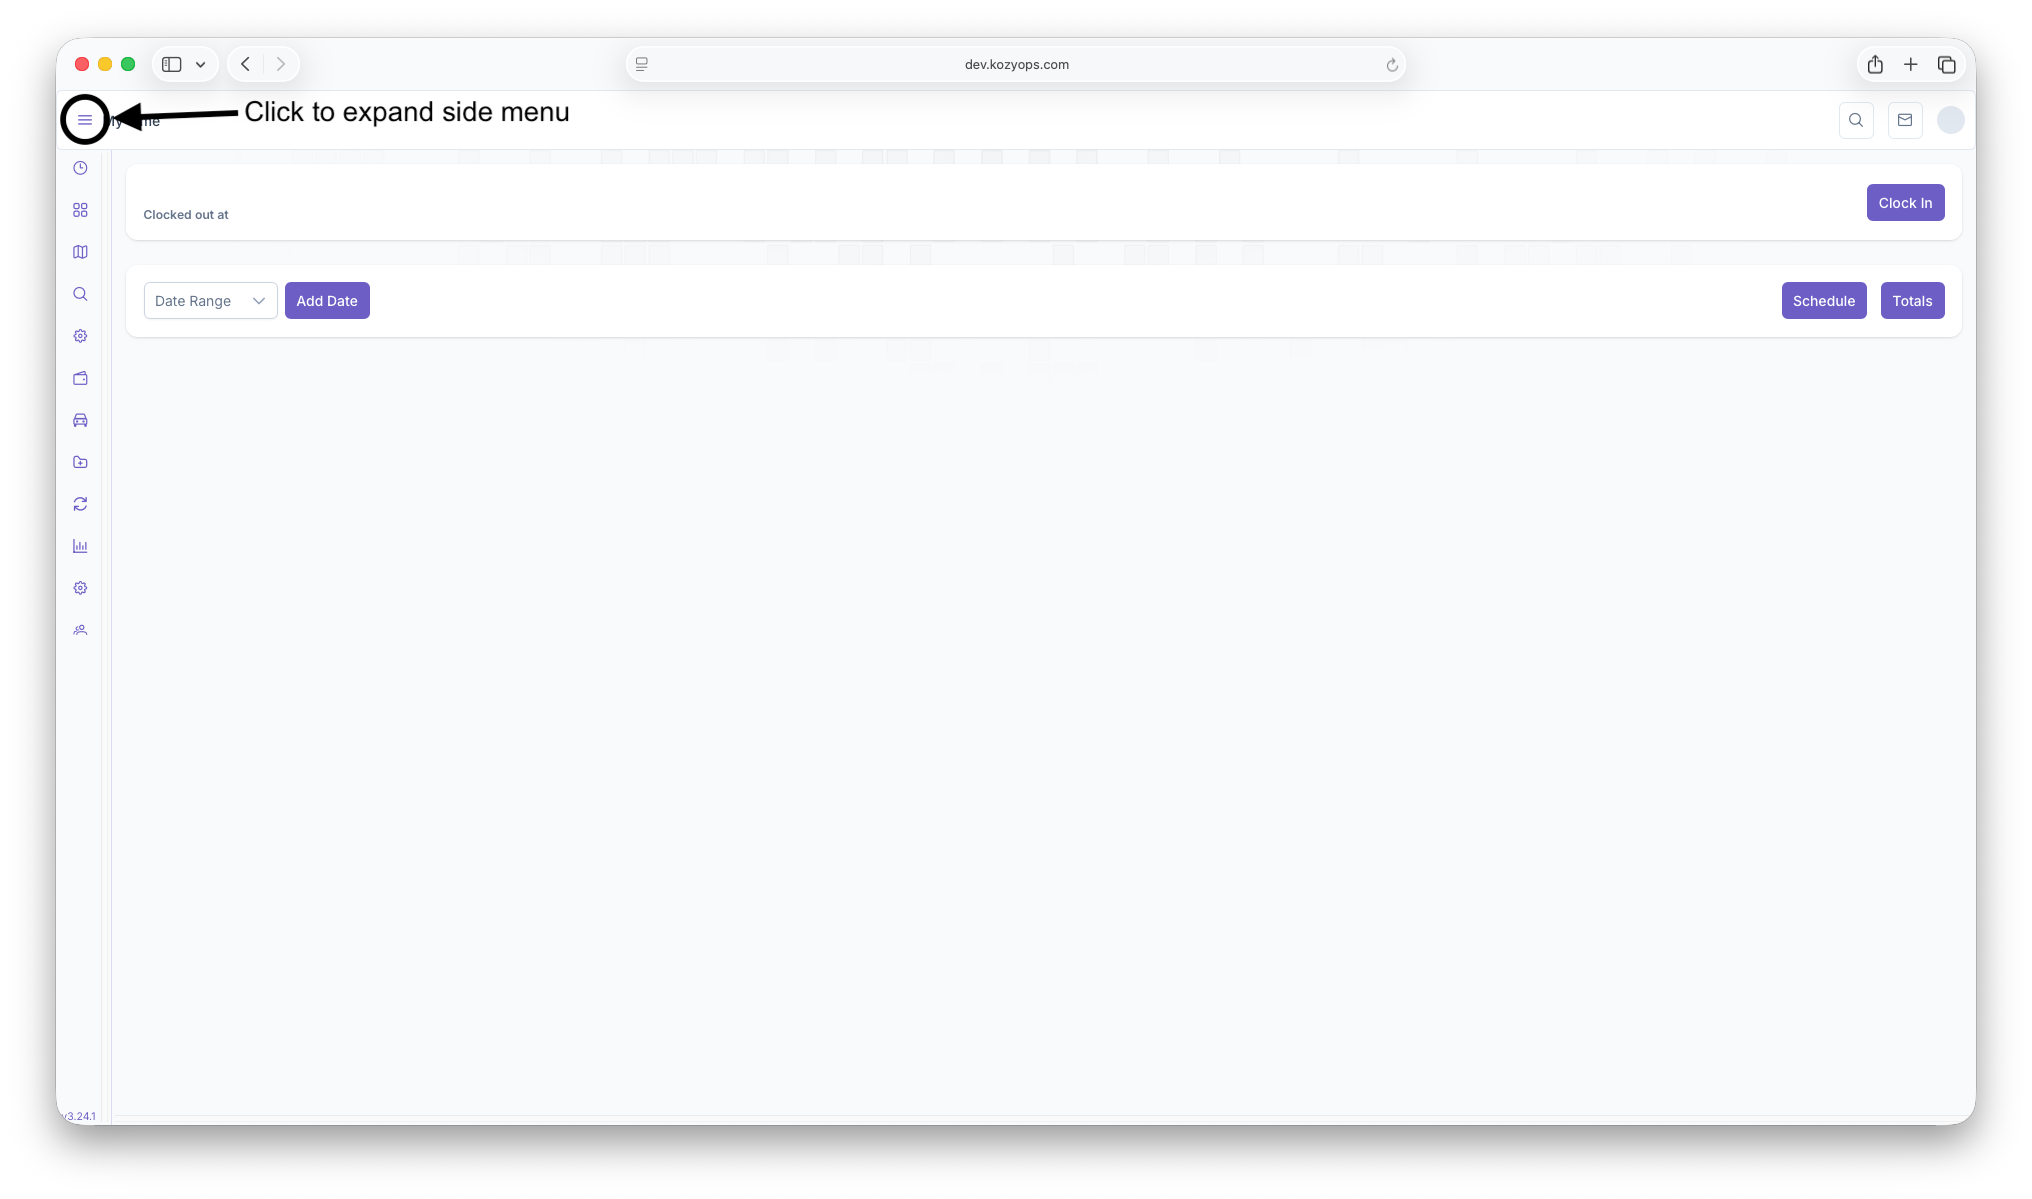
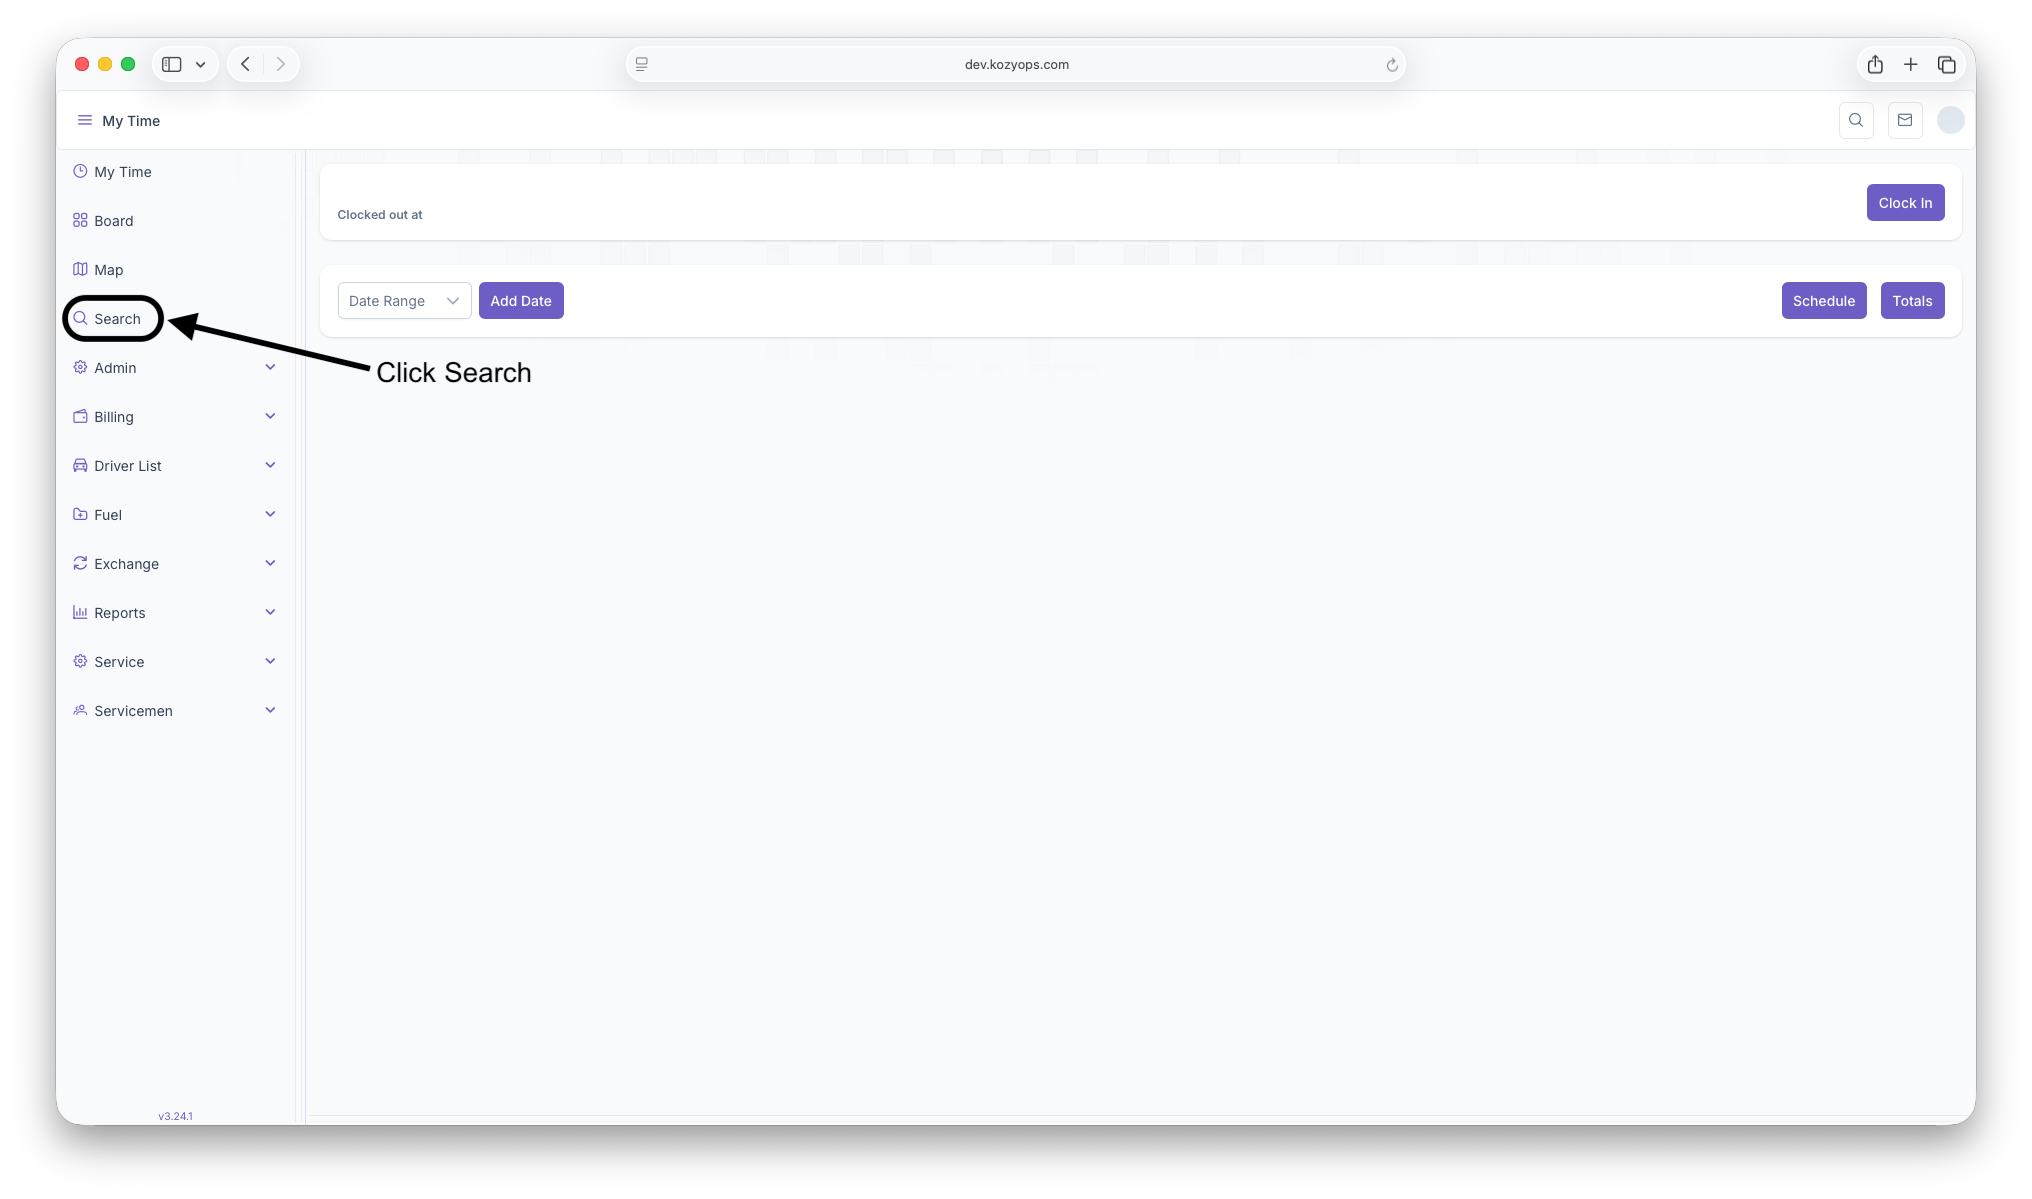
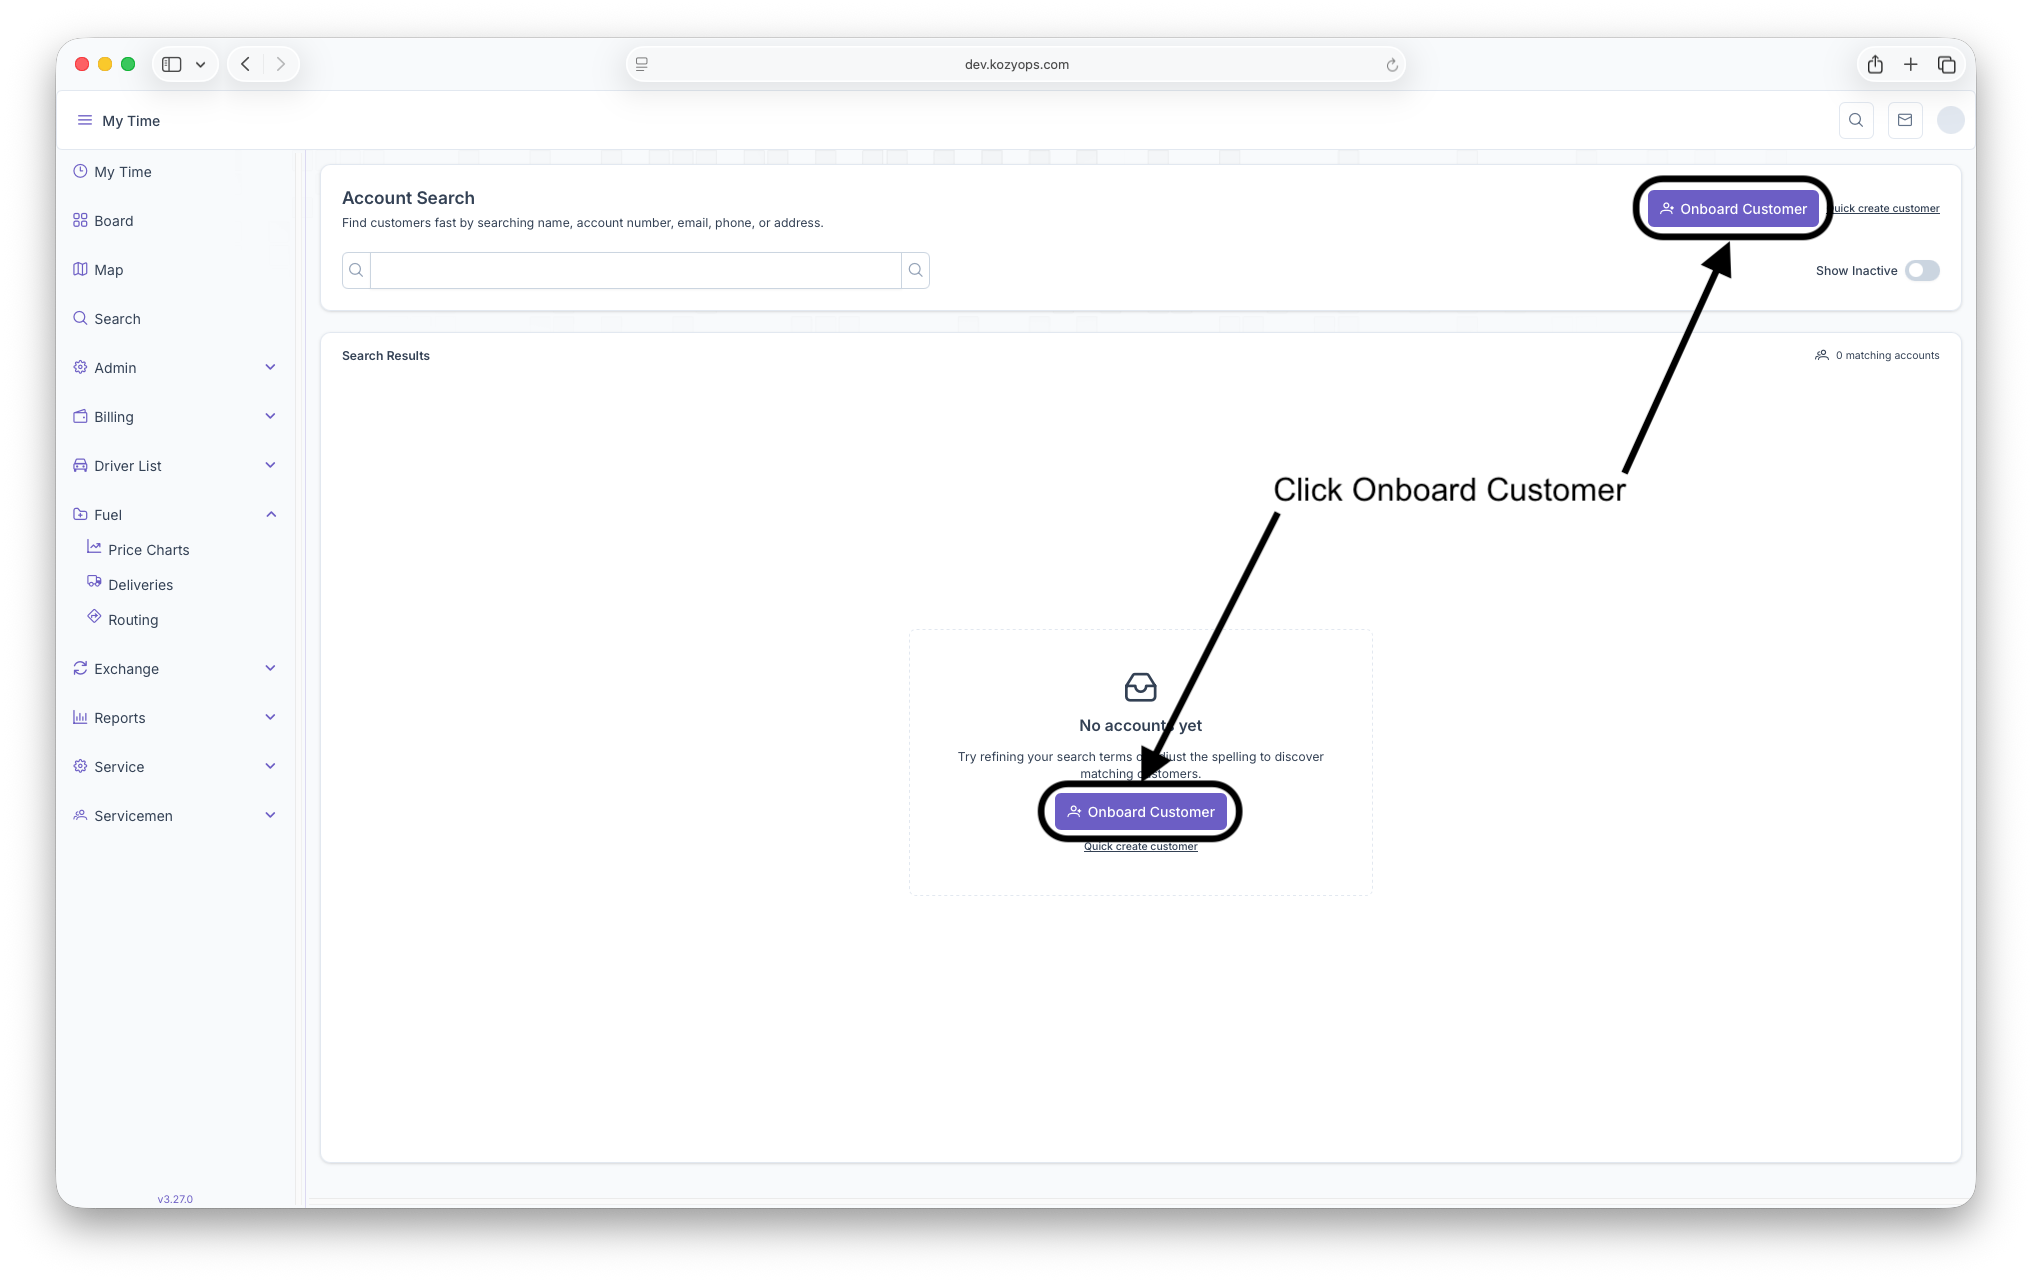
The onboarding process allows for a New Customer to be added to the system, but rather than just creating the customer only, as seen on the Adding a New Customer page, Onboarding allows for the entire process to be done at once to make adding New Customers easier and allow for quicker services to be provided to the New Customer. To reach the Onboarding process, first click on the Search button on the side menu to reach the Account Search page, then click on the Onboard button located in the middle of the page or on the top right corner of the page. Clicking on the three bars on the top left corner of the page will expand the side menu for easier access.
Onboarding
After clicking on the Onboard button, the Customer Onboarding wizard will appear and then the process of onboarding can begin by filling out each page of the wizard. The Wizard initially opens with tabs for Customer, Location, and Credit Cards. After filling out the Customer and Location tabs, the rest of the wizard will open up and Labels & Taxes, Systems and Services will be added as tabs that can be filled out. Filling out each page is optional and only the Customer page is required to create a new account. Doing this will skip the other information for the customer and should only be done as a necessity. If done that way, fully onboarding a customer outside of this wizard can be seen on the Adding a New Customer guide page. The Onboarding process starts with...


Create Customer
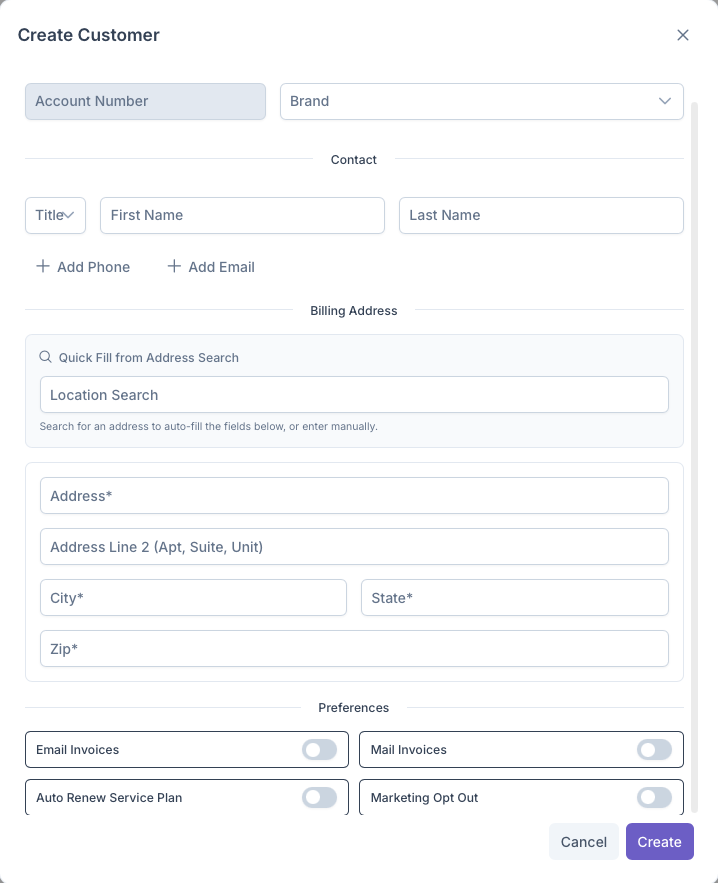
Here is where the customers basic information can be input into the following fields
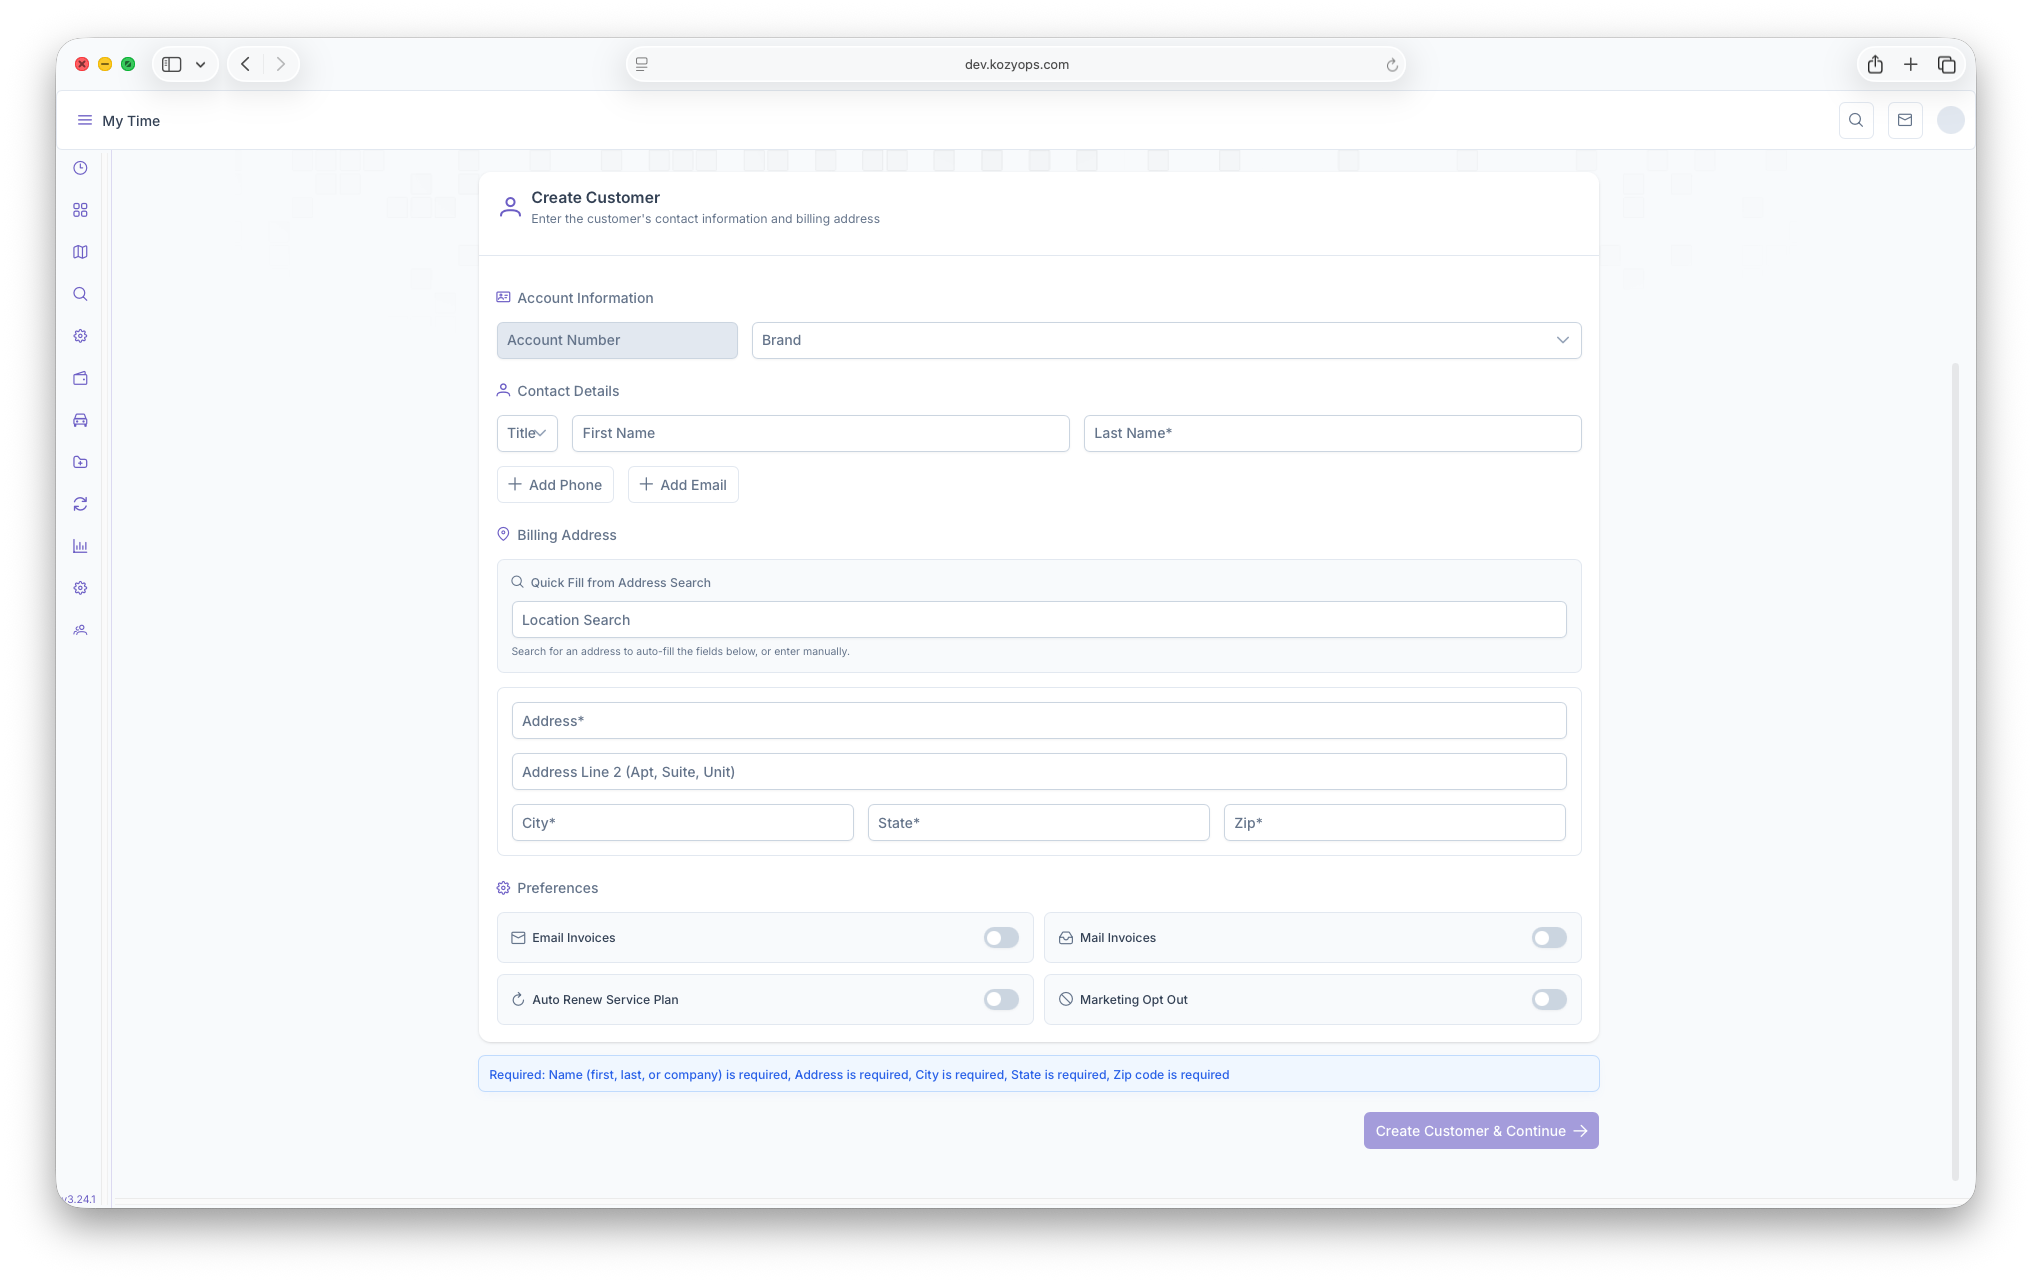
- Account Information
- Account Number - will be automatically generated after the account is created
- Brand - Choosing the brand the customer is going to fall under
- Contact Details
- Title - The title The Customer wants to be referred as
- First Name, Last Name - The Customers Name
- Add Phone, Add Email - The customers phone number and email can be added here
- Billing Address - The Address the Customer is billed to, filling out the Quick Fill From Address Search will fill out the Billing Address information, otherwise the following needs to be filled out
- Address
- Address Line 2 - Optional
- City
- State
- Zip
- Preferences - Preferences for the customer can be toggled here
- Email Invoices - If the customer prefers to have their Invoices emailed to them
- Mail Invoices - If the customer prefers to have their Invoices mailed to them
- Auto Renew Service Plan - If the customer wants their plans to be auto renewed
- Marketing Opt Out - If the customer wants to receive any marketing
After filling out all the information, clicking on Create Customer & Continue will create the customer and the Wizard will continue. The rest of the wizard can be skipped, if necessary, by clicking Skip Location on the next page and then clicking on Complete Onbaording to create the Customers Account. Skipping these steps will require the rest of the customers information to be filled out individually. A guide on how to do the rest of the steps individually can be seen on the Adding a New Customer guide. Otherwise the wizard continues with...
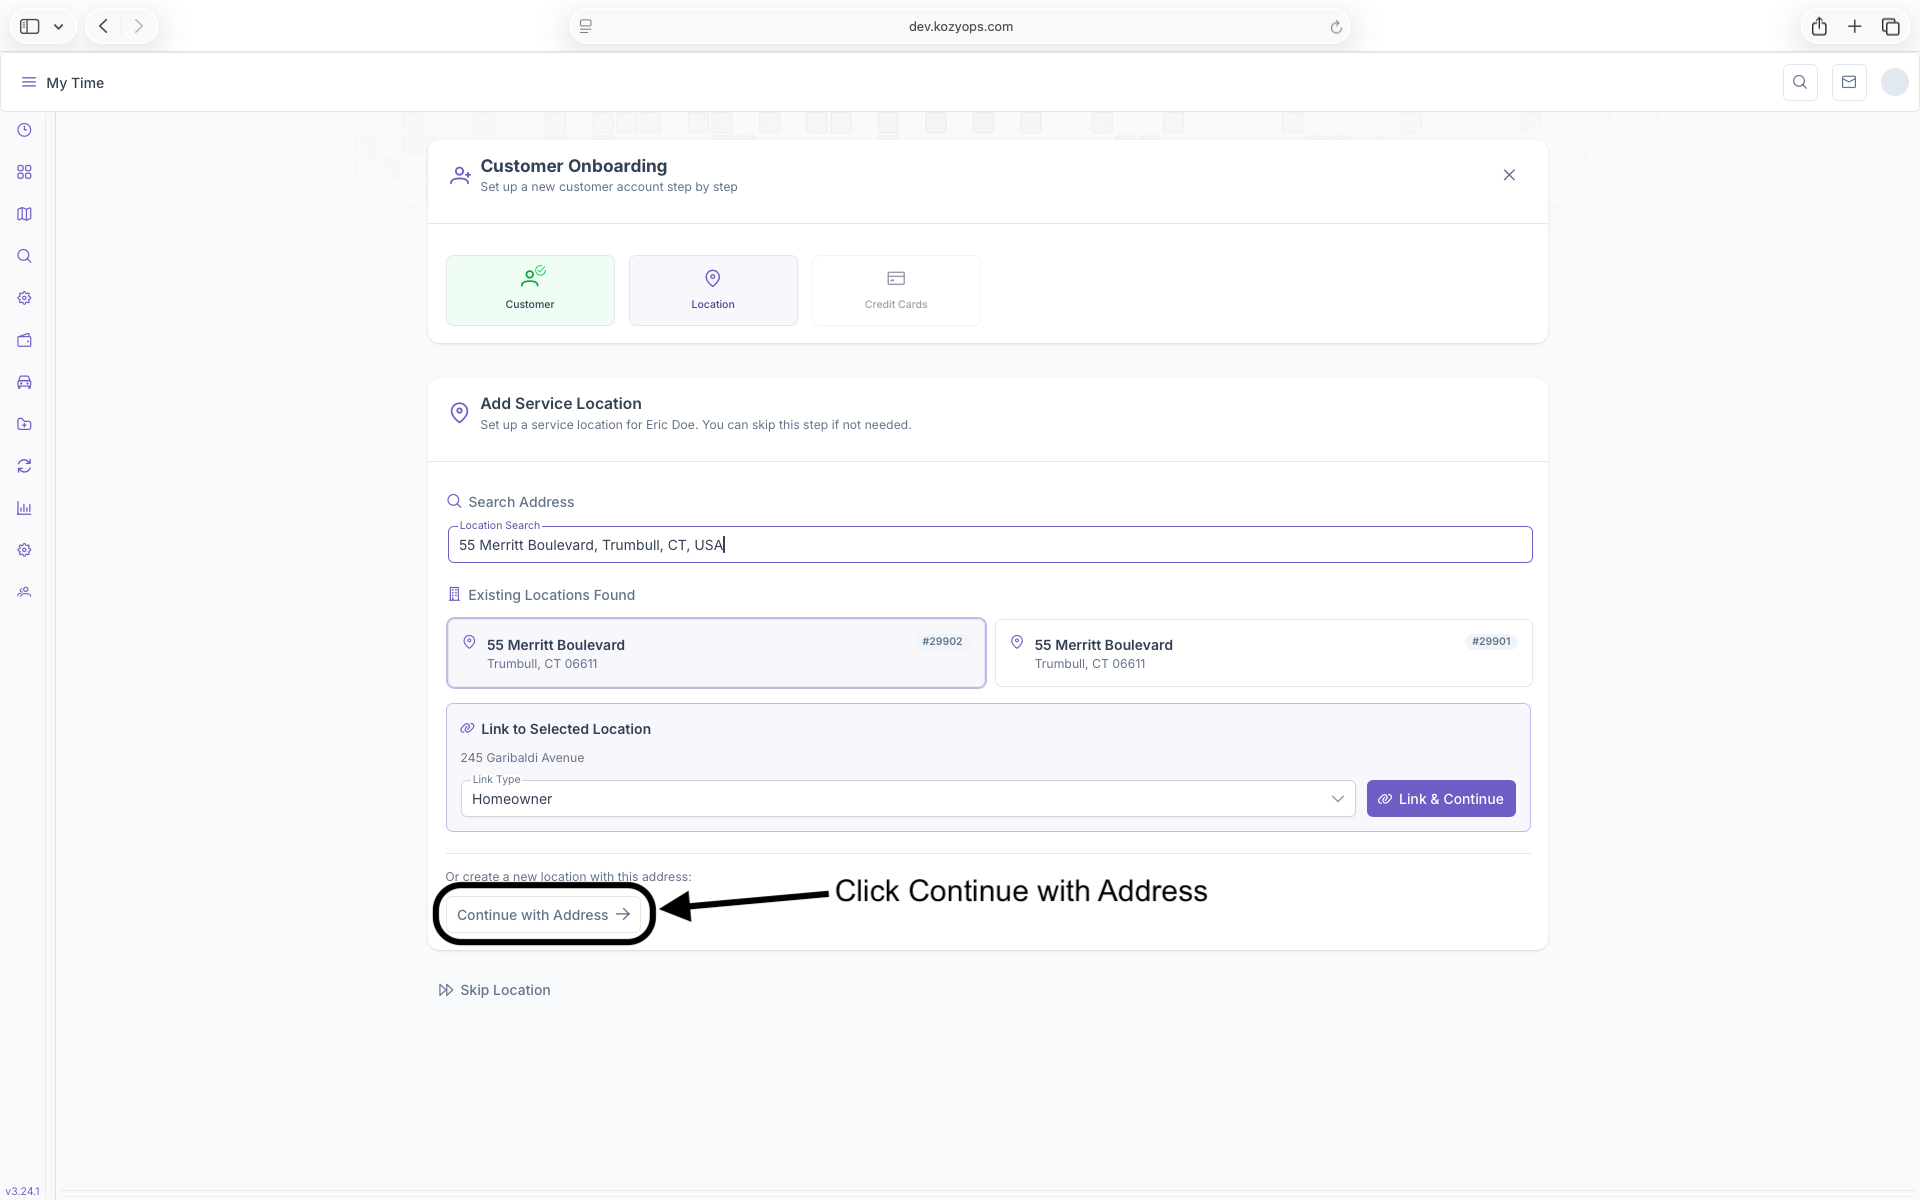
Adding Service Location
Next on the wizard is adding a service location for the customer. In the Search Address box, type in the customers address, if the address already exist in the system, the customer can be linked to the address by selecting an address, then selecting the Link Type (see below for more information) for the customer and then clicking on Link & Continue. This will link the New Customer to an existing location.
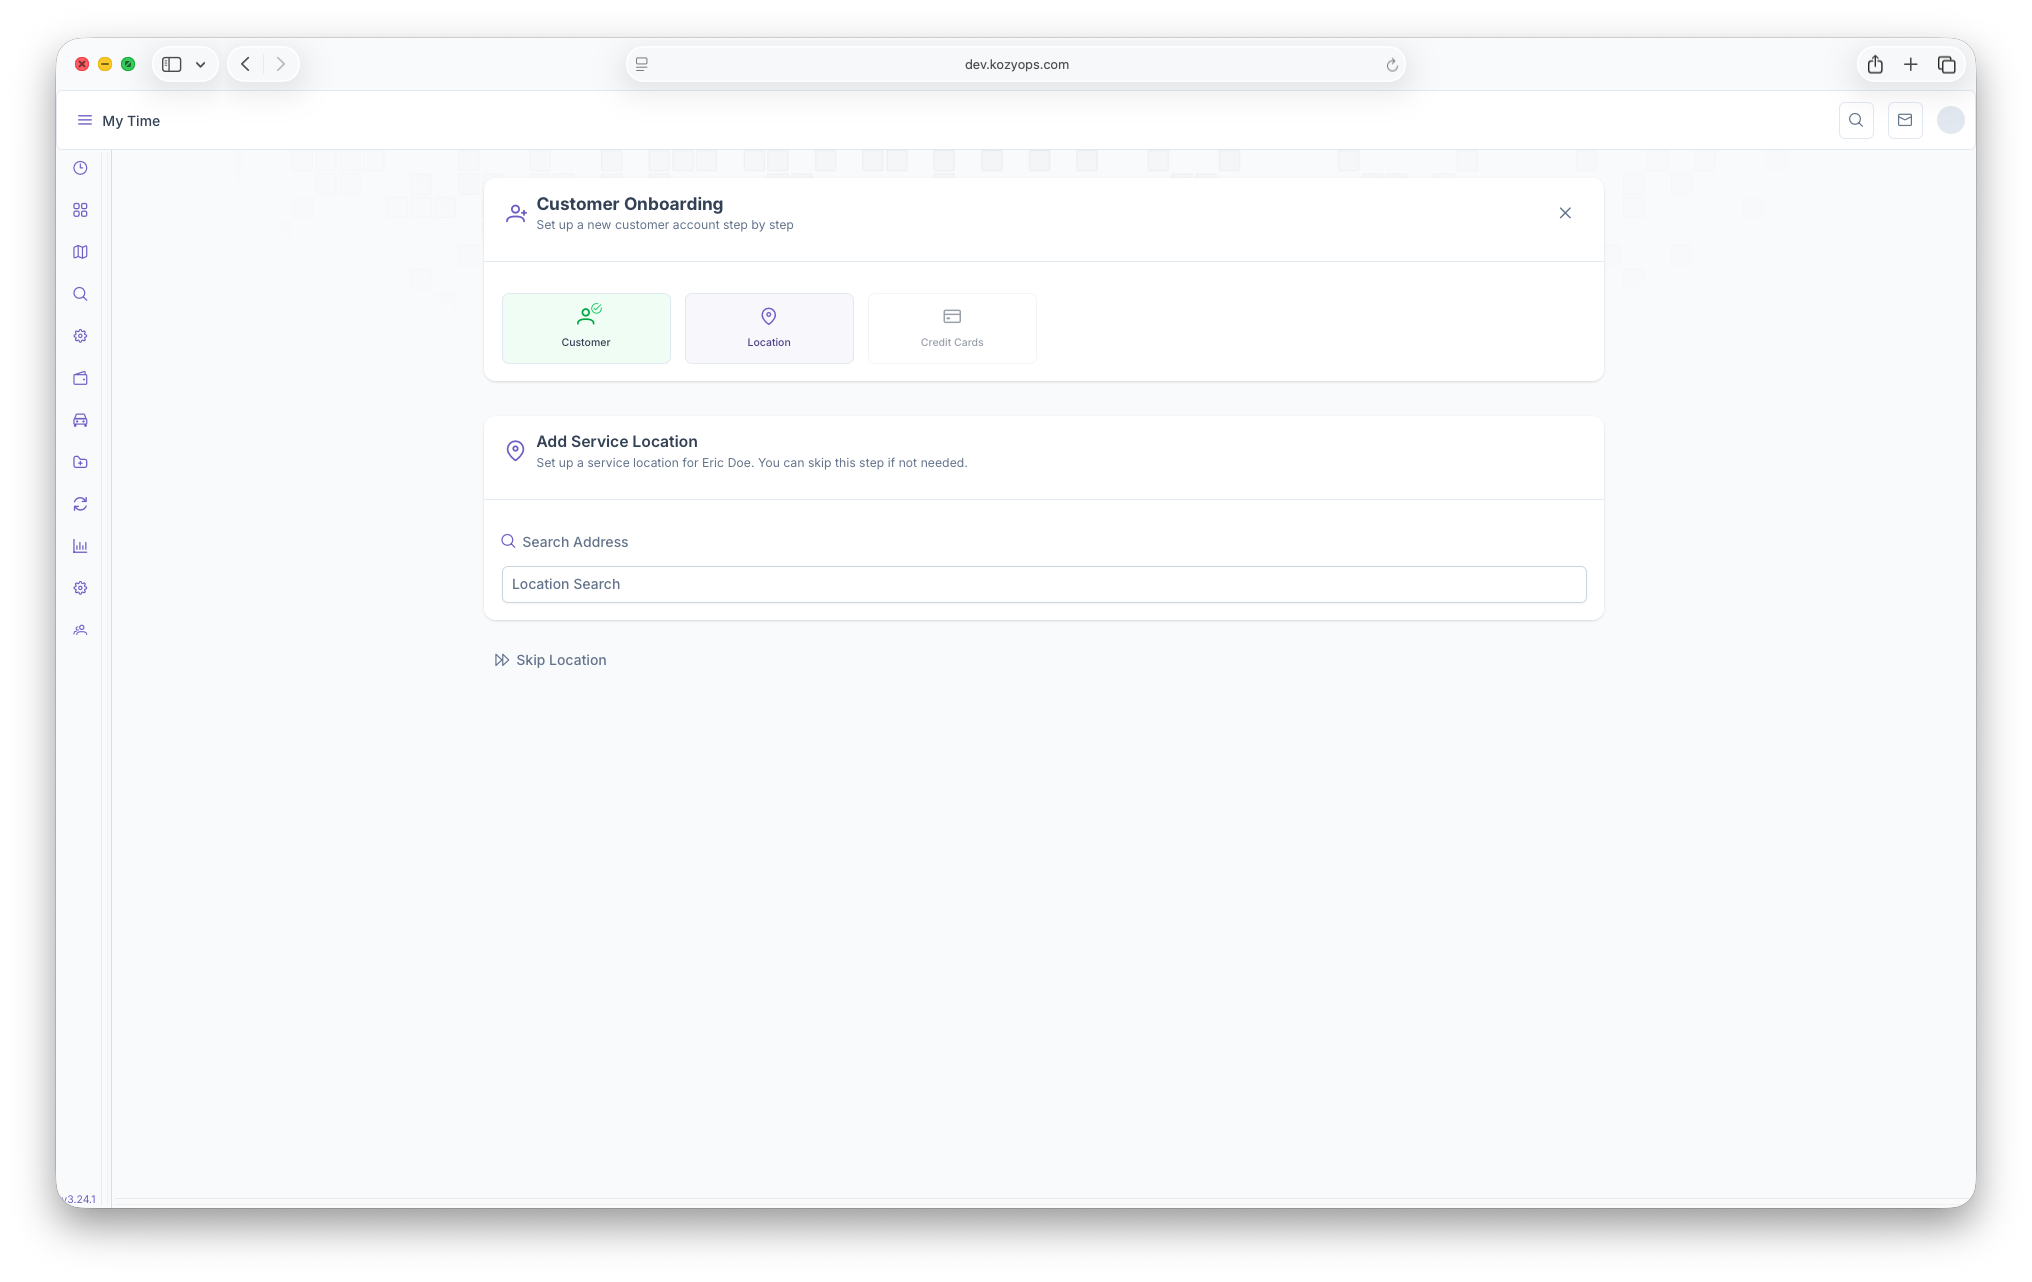

If not, then click on Continue with Address to open Add Service Location page and fill out the following
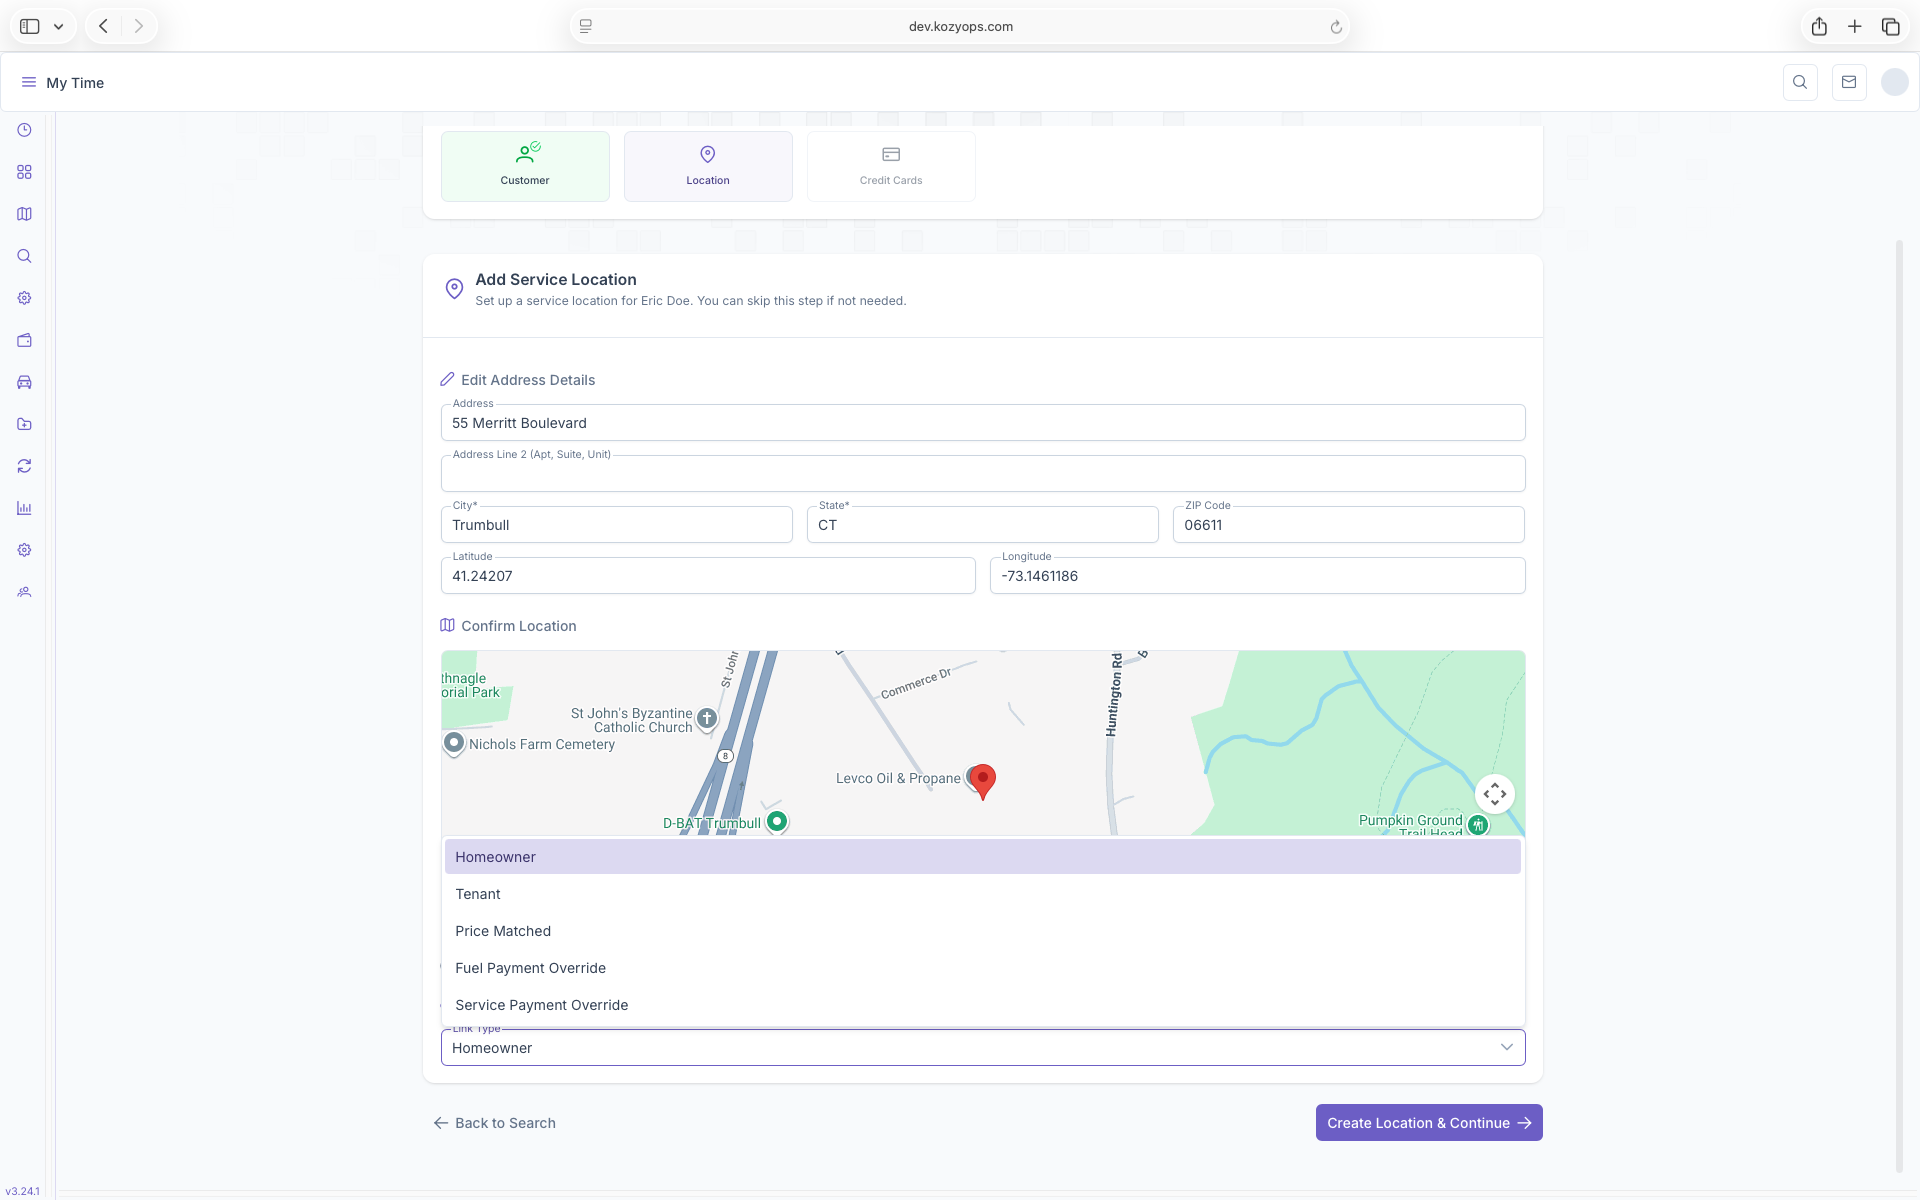
- Edit Address Details
- Address
- Address Line 2
- City
- State
- Zip
- Latitude and Longitude - Can not be edited except for in the Confirm Location map
- Confirm Location
- Map - After the Address is filled out, a location marker will be shown on the map to indicate the address' location and will generate the Latitude and Longitude. The marker can be moved if the location is incorrect on the map
- Link Type - Here the customers link to the location can be added by selecting an option from the dropdown
- Homeowner
- Tenant
- Price Matched
- Fuel Payment Override
- Service Payment Override
A more detailed look at locations can be seen on the Location Management page. After all information is filled out and the map properly displays the customers location, clicking on Create Location & Continue will advance the Wizard to...
Labels, Taxes & Promotions
The next step to onboarding a customer is adding labels, taxes and promotions to their account. Customer and Location labels are used for giving a little more description to both the customer as well as the customers location, Taxes are used for adding taxes to any services provided for the customer, and Promotions are used to give the customer specific discounts or even penalty charges if certain criterias are or arent met. All of these can be added to the customers account here, but must first be created in the settings page under admin in order to be applied. To begin, select an option from each of the following categories, clicking on an item in each of the dropdowns will automatically add it to each category

- Customer Labels - These are used to show a little more detail on the customer themselves such as being a business owner, property manager, etc. More information on how to create a Customer Label can be seen on the Labels page
- Location Labels - These are used to show more detail on the location itself such as being a commercial property, a church, etc. More information on how to create a Customer Label can be seen on the Labels page
- Taxes - These are used to add taxes to a customers account, if applicable, and can be automatically added to any sale that's taxable automatically. More information on creating taxes can be seen on the Taxes page
- Promotions - These are used to add a promotion to a customers account such as a discount for being an auto delivery customer or even a penalty for failing to pay on time. More information on how to create a promotion can be seen on the Promotions page
These items can easily be removed by simply clicking on the X next to each option selected. If a tax is created as default, it will be added automatically to every new customer created and cannot be added here, but will appear after the account has been created. A Tax that isn't set to default can be added here on the other hand. After adding any of the above to the page, clicking on continue will apply all labels, taxes and promotions to the account and the wizard will continue onto...
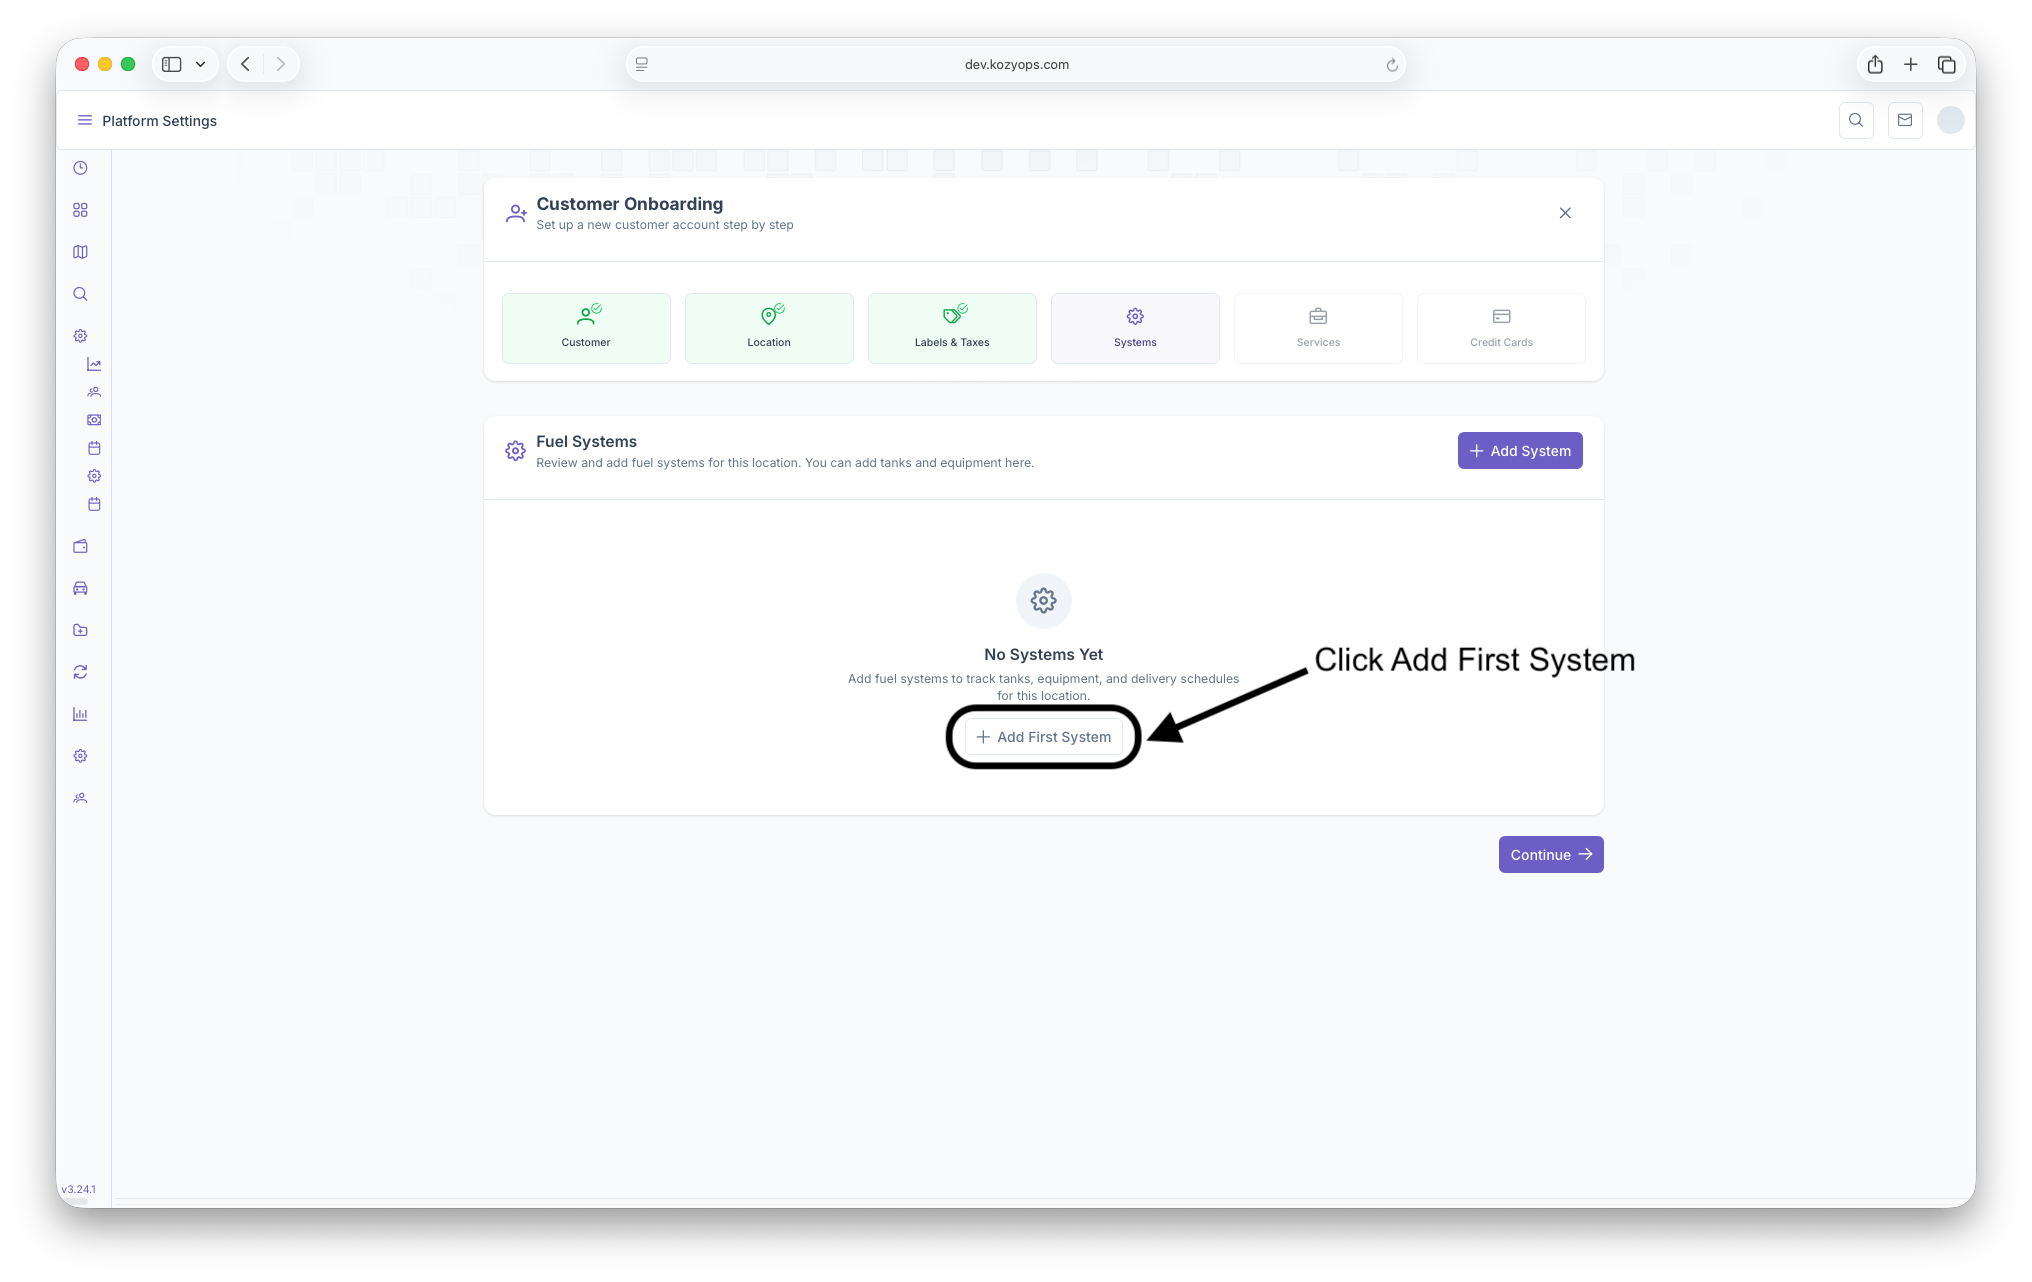
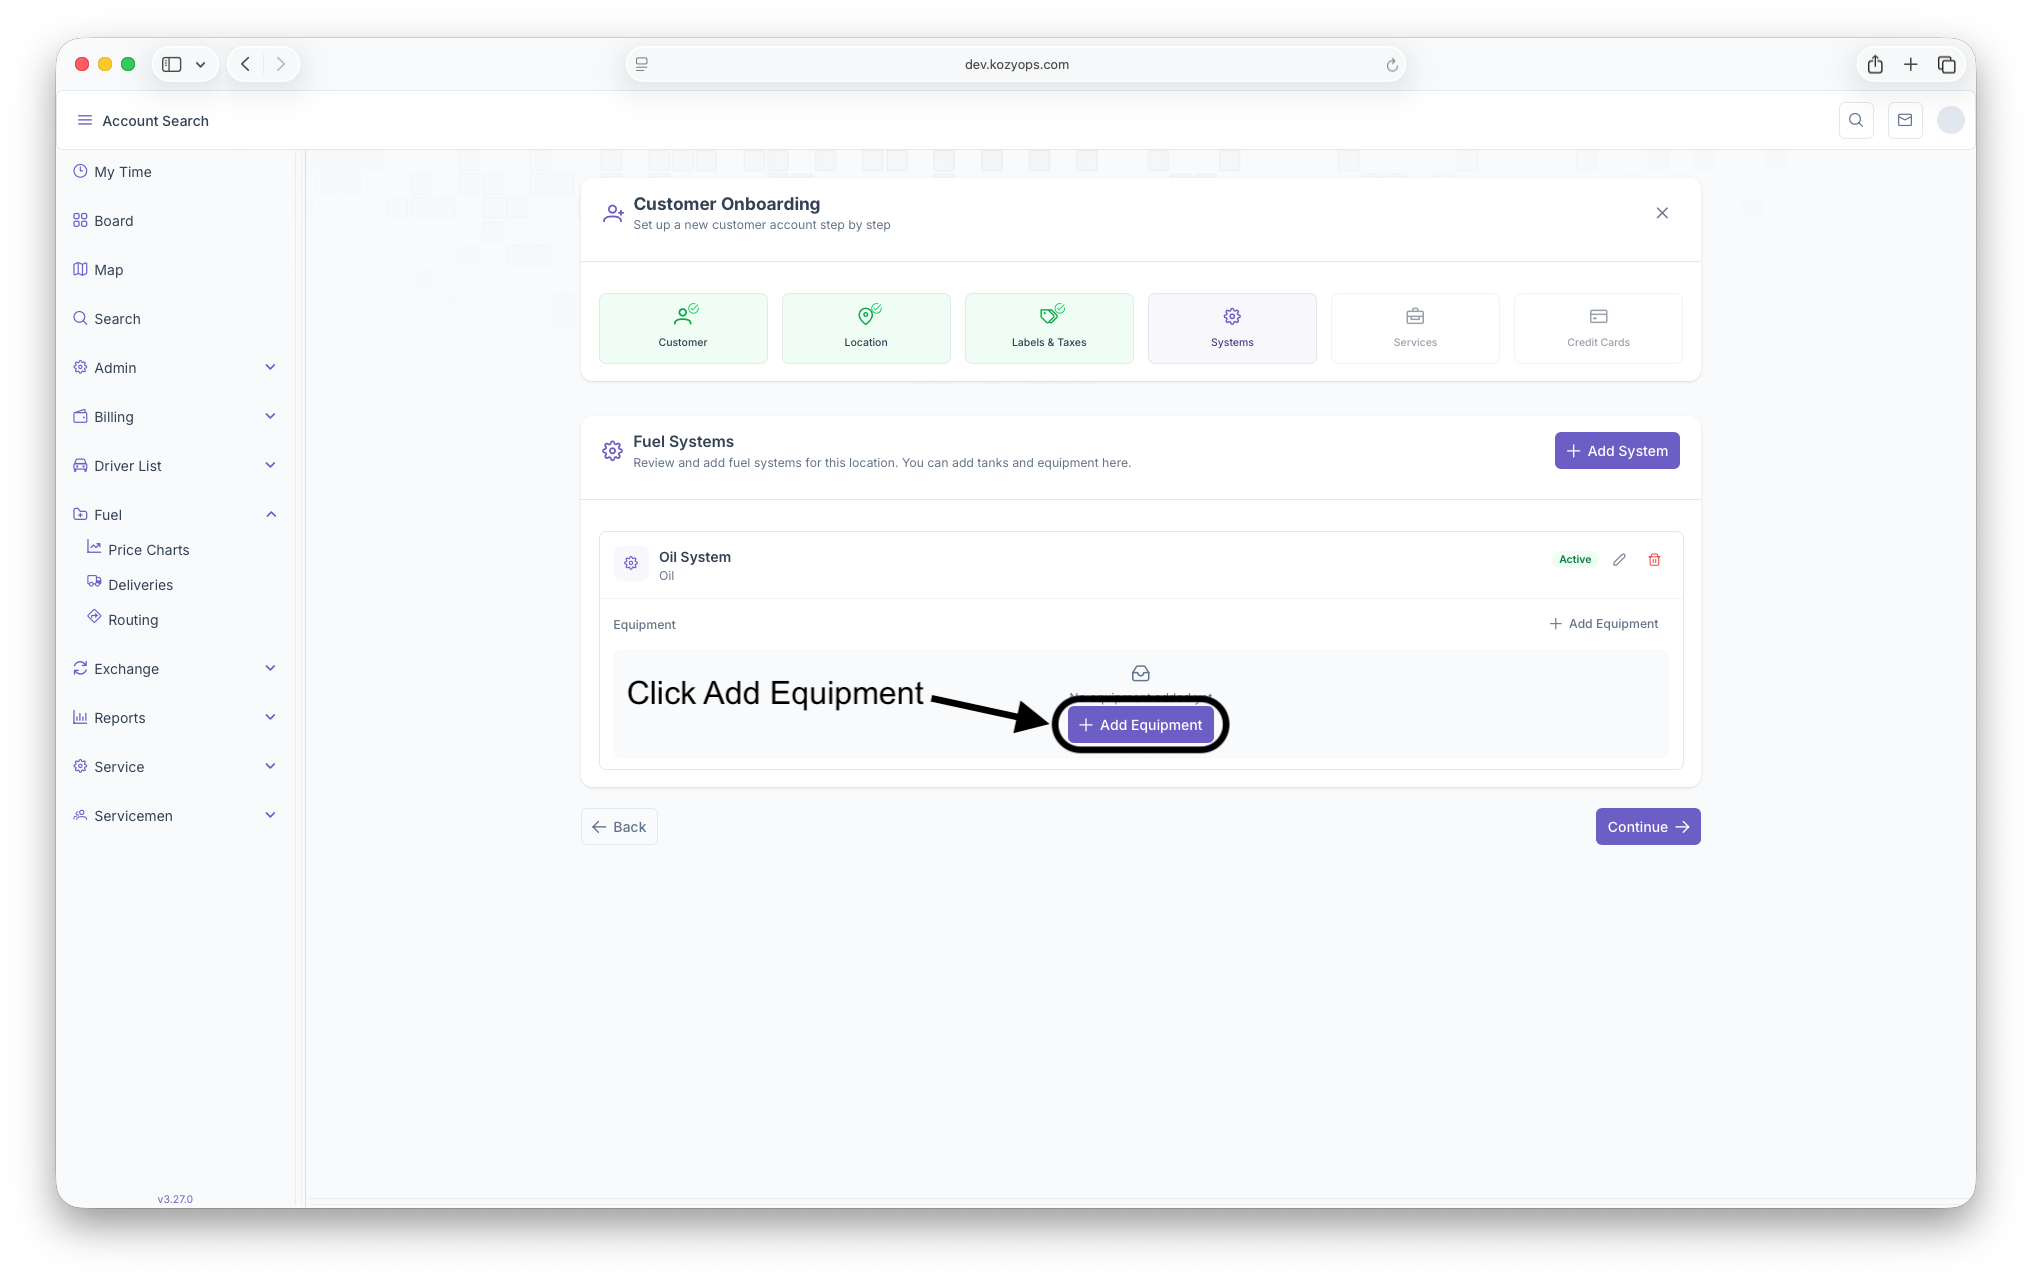
Fuel Systems
The next step in the wizard is to add a system to the customers location. Systems are used to represent multiple euipments linked to the same fill connections, such as multiple tanks used to feed the same home appliance. For more information on Fuel System, see the General guide. To begin adding a system, first click on the Add System button to bring up the add systems popup. Once generated, the follwing fields should be filled out
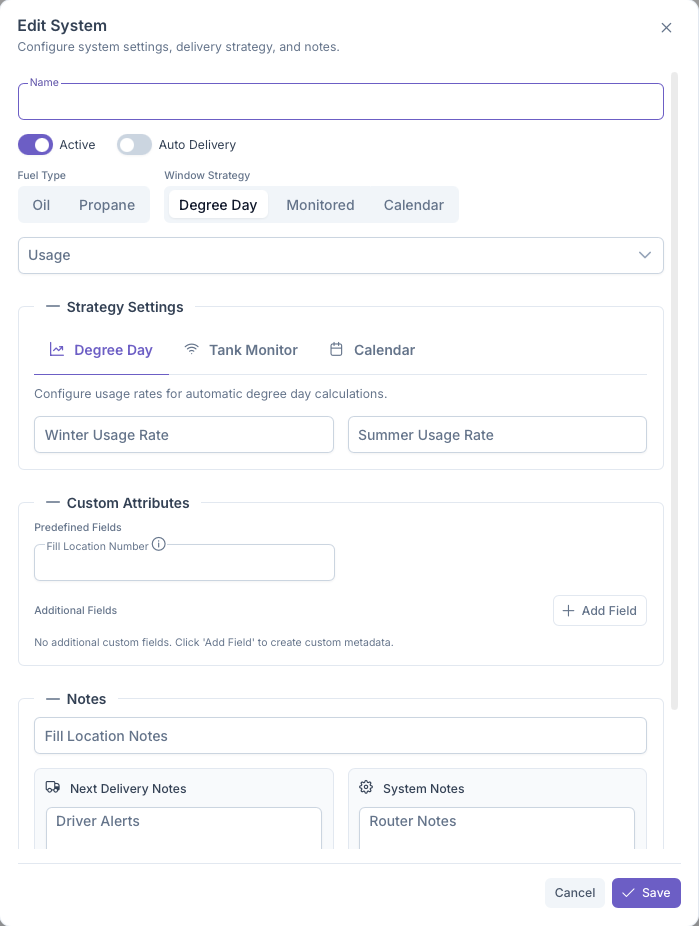
- Name - The name given to the system
- Active - Toggle if the system is active or inactive
- Auto Delivery - Toggle to set as an auto delivery system
- Fuel Type - Select the fuel the system uses
- Window Strategy - Select one or all of the delivery estimations. For more information, see Understanding Window Strategies
- Degree Day - Temperature based use. See Understanding Degree Days for more information
- Monitored - For systems with monitors. See Understanding Fuel Monitoring for more information
- Calendar - For recurring scheduled deliveries. See Understanding Calendar Schedules for more information
- Usage - Select what the fuel is being used for
- Strategy Settings - Fill out the strategies for delivery esitmations
- Degree Day
- Winter Usage Rate - Gallons per Degree Day During Winter Season
- Summer Usage Rate - Gallons per Degree Day During Summer Season
- Tank Monitor
- Monitor Serial Number - Number used to identify Monitor
- Calendar - Start by clicking Add Schedule then filling out the following fields
- Frequency - How many deliveries
- Units - how often a delivery is made per days, weeks, months or years
- Preferred Day of Week - Day the delivery should be made
- Season Start - When the season begins for deliveries
- Seasons Ends - When the season ends for deliveries
- Requested Volume (Gal) - How much is being requested per scheduled delivery
- Activate After Saving - Toggle to activate the Calendar as soon as the system is created. Otherwise The system must be created first, then the Calander strategy can be added after by editing the system in the wizard or in the customers account after the Wizard is complete. For more information on editing a system, see the Editing a System Guide
- Click on Create Schedule to create Calendar Strategy
- Degree Day
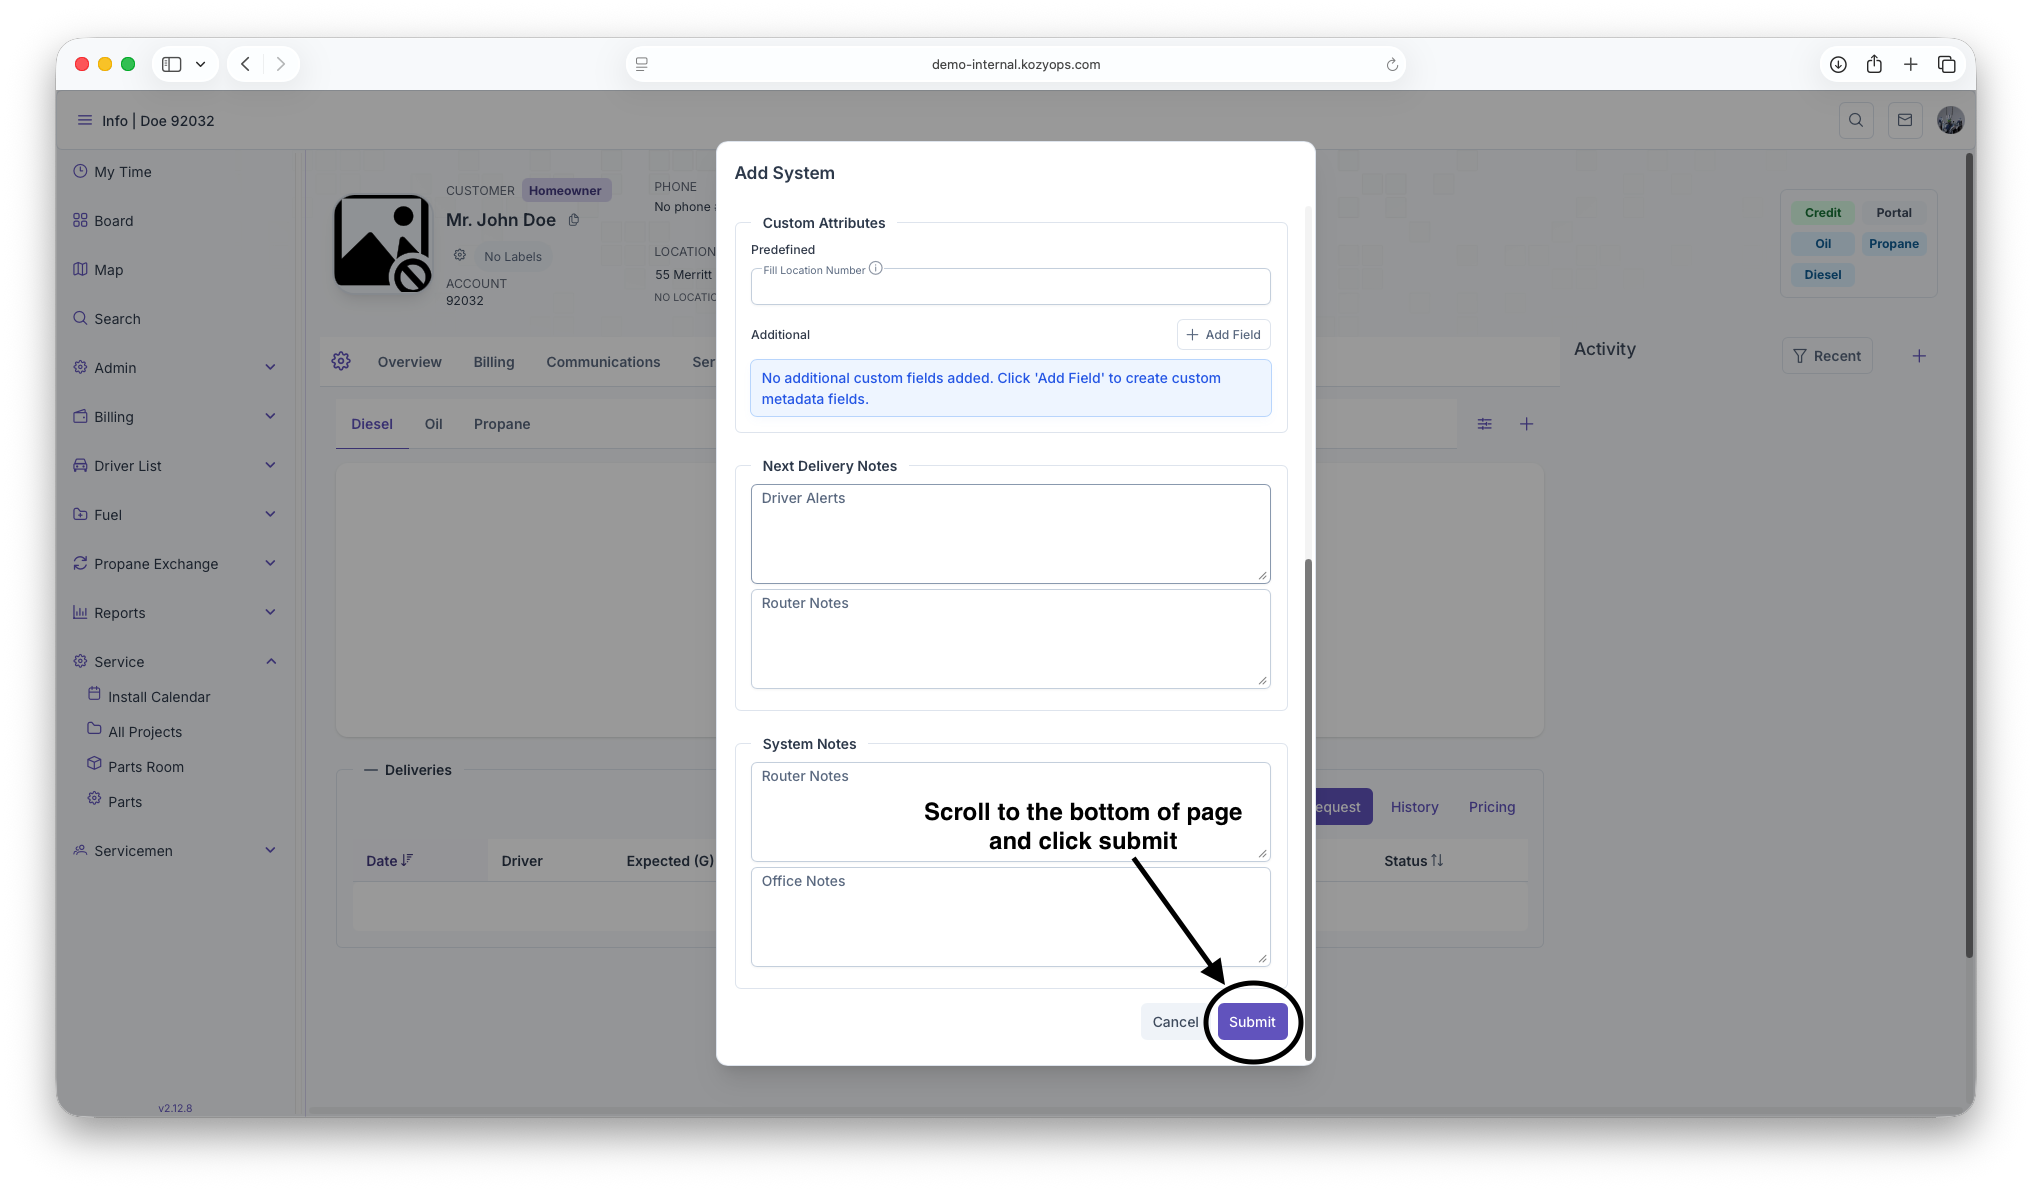
- Custom Attributes - Can add any additional custom information on the equipment if applicable
- Fill Location Number - Fill Number for the Custom Attribute
- Field Name - Name of Custom Attribute being added
- Value - A value if applicable
- Notes -
- Fill Locations Notes - For Delivery Access information
- Next Delivery Notes
- Driver Alerts - Important safety or access notes
- Router Notes - Important notes for routing or dispatching
- System Notes
- Router Notes - Important internal notes for routing or dispatching, not visible by drivers
- Office Notes - Important internal notes only seen by Office Staff
For a more in depth look on Fuel Systems and adding them outside of the Onboarding Process, see The Adding a System Guide. After filling out the above information, clicking on save will save the information and add the system to the onboarding page. Clicking cancel will close out the window and delete all information added to the system. Equipment will need to be added next to complete the system for usage. To add equipment, click on Add Equipment to open the Add Equipment popup and fill out the following fields
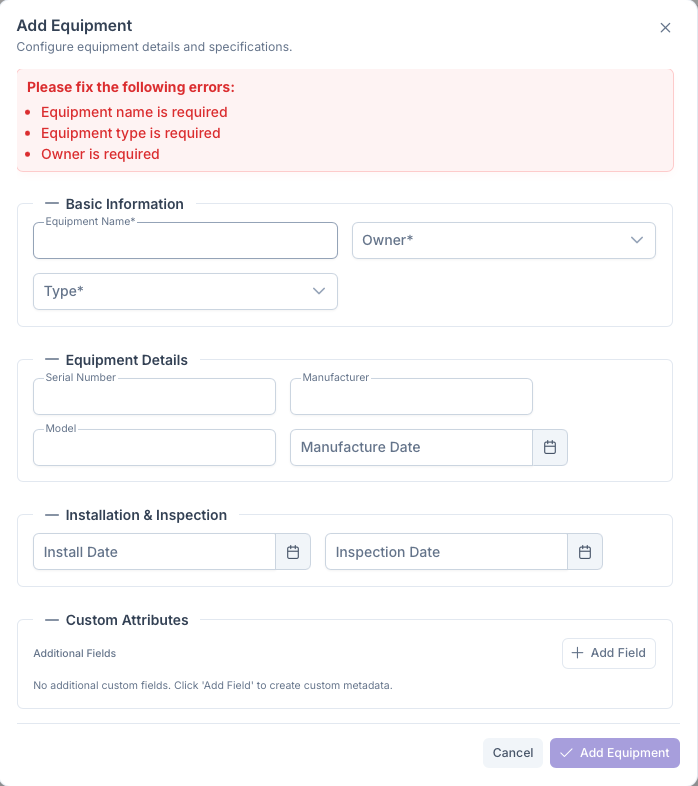
- Basic Information
- Equipment Name - The name of the equipment being added
- Owner - The owner of the equipment
- Type - The type of equipment being created
- Equipment Details
- Serial Number - The unique number assigned to the equipment
- Manufacturer - The name of the equipment manufacturer
- Model - The model number of the equipment
- Manufacture Date - The date the equipment was made
- Installation & Inspection
- Install Date - The date the equipment was installed
- Inspection Date - The date of the equipments last inspection
- Type Information - This will generate based on what the Type of equipment is being used
- Tank
- Size - The size of the tank
- Recommended Capacity - What the recommended capacity is for the tank
- Optimum Delivery - Optimum amount the customer wants delivered
- Regulator
- Expiration Date - The expiration date of the regulator
- Filter, Hot Water Heater, Pool Heater, Other Equipment
- Daily Consumption - How much fuel the system uses per day
- Usage Window Start Day - When the fuel is initially used
- Usage Window End Day - When the fuel is finished being used
- Custom Attributes - Can add any additional custom information on the equipment if applicable
- Field Name - Name of Custom Attribute being added
- Value - A value if applicable
- Tank
For a more a more in depth look on Equipment and adding them outside of the Onboarding process, see the Adding Equipment Guide. While adding equipment isn't necessary for continuing the wizard, a system will not be usable without it and trying to continue will trigger a warning on the page that equipment was not added. Clicking on Go Back will close the warning box and allow for equipment to be added and clicking on Proceed will advance the Wizard without equipment being added.

Multiple Systems and Equipments can be added simply by clicking on Add Systems then clicking on Add Equipment under each system. Once both the Systems and, optionally, Equipments are added, they will appear on the page. They can be deleted by clicking on the trash can button next to the System and equipment. Clicking on Continue will add them to the customers account and advance the Wizard to...
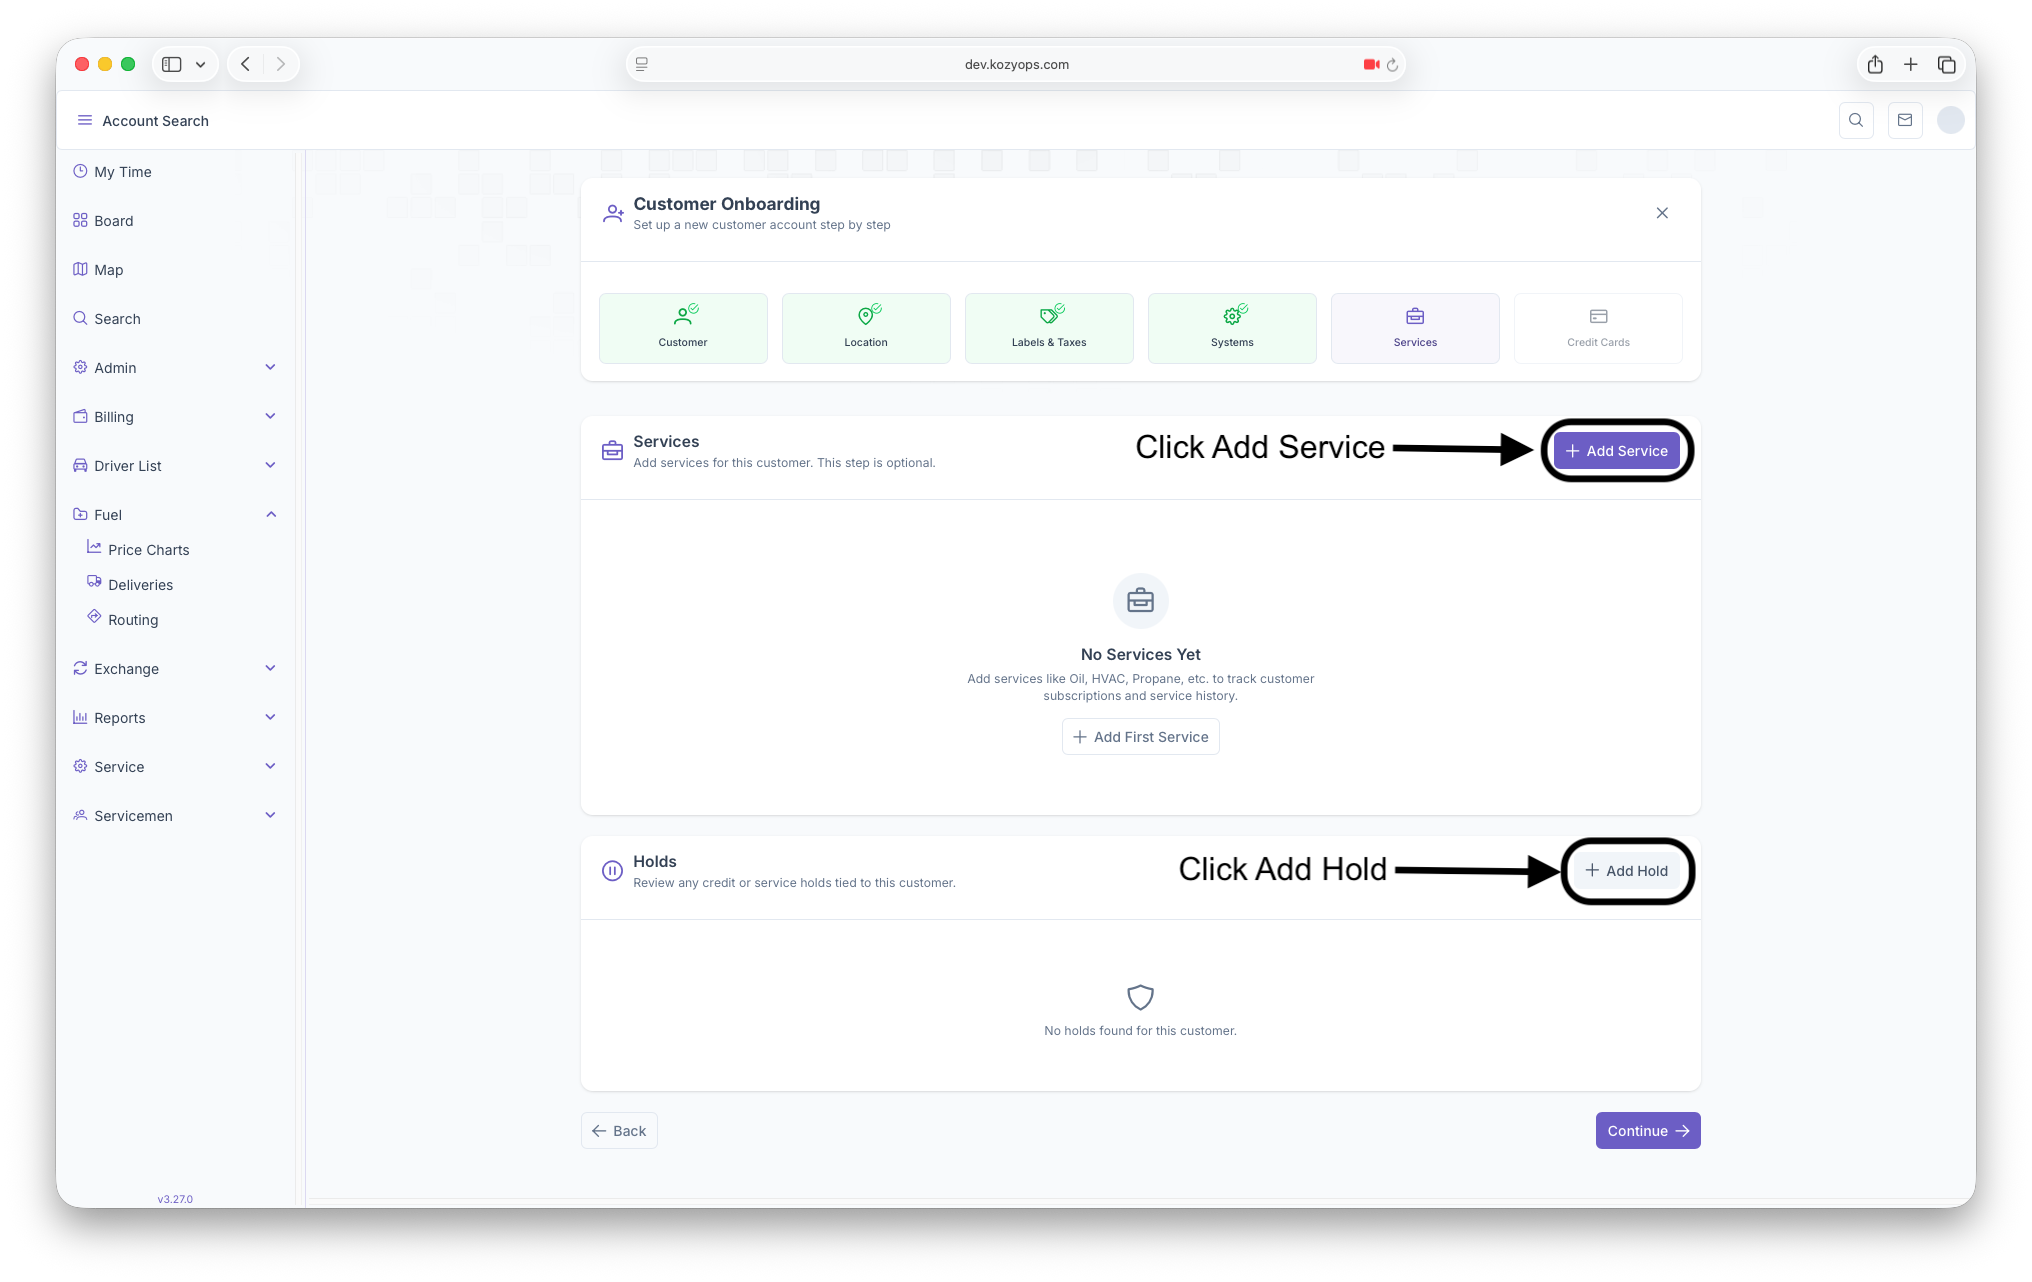
Service
The next step of the Wizard is adding a Service to the customers account. A service is a product or service that's associated with the Customer and Location. In order to add a service, click on the Add Service button to open the Add Service popup and the following fields should be filled out
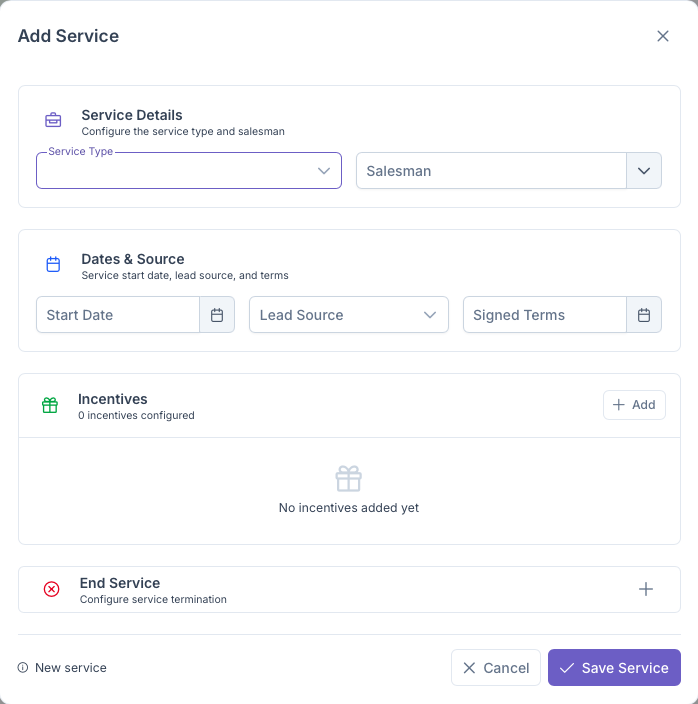
- Service Details
- Service Type - Select the type of service being added to the account
- Salesmen - Select the person who made the sale for the service
- Date & Source
- Start Date - The start date of the service
- Lead Source - Where it came from
- Signed Terms - The date the terms were signed
- Incentives - Incentives can be added by clicking on the Add button. The Add Incentive popup will appear and a description must be added to add an incentive to the Service
- End Service - Clicking on the Plus will begin the process of ending the service and the following fields should be filled out
- Quit Date - The date the service ends
- Quit Reason - The reason the service is ending
- Quit Notes - Any notes about the end of the service
For a more in depth look on Services or adding a service outside of the wizard, see the Adding Services guide. Once finished, clicking on Save Service will add the service to the onboarding page and now a hold can be placed on the account if necessary. In the event that the new customer cannot start paying right away or if fuel cannot be delivered until a certain point, a hold can be placed on the account until any issues are resolved and the new customer is ready to fully get started. To begin the process of creating a Hold, click on the Add Hold button and the Add Hold popup will appear and the type of hold will need to be selected. Depending on the hold selected, a different popup will appear and the following will need to be filled out
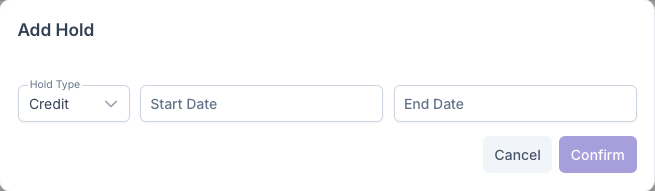
- Credit Hold
- Hold Type - Credit Hold
- Start Date - The date the hold will be placed onto the account
- End Date - The date the hold will end on the account
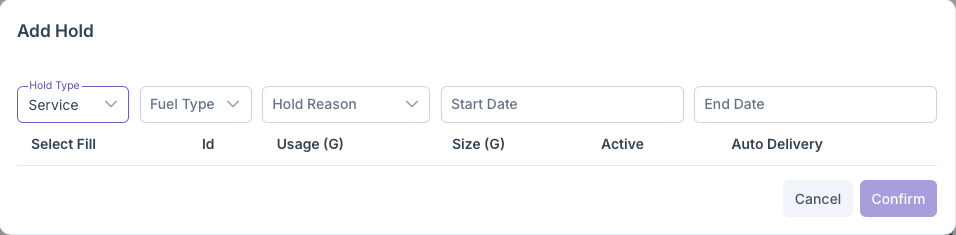
- Service Hold
- Hold Type - Service Hold
- Fuel Type - The type of fuel used being put on hold
- Hold Reason - Why the hold is being put on hold
- Start Date - When the hold is going in to effect
- End Date - When the hold is ending on the account, if applicable
After selecting the fuel type, a table will show with any systems created on the previous section of the Onboarding process and will show the following
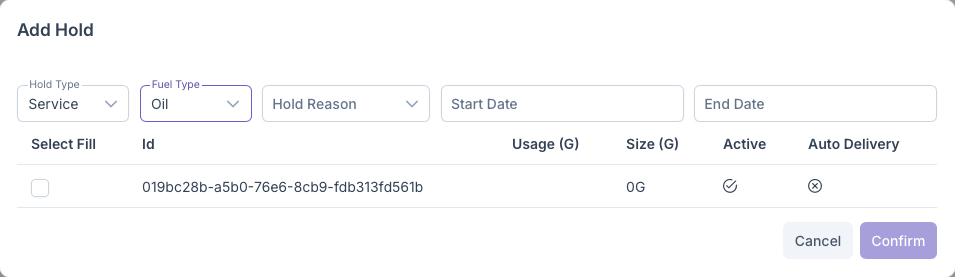
- Select Fill - This is where the system going on hold will be selected
- ID - The ID assigned to the system created
- Usage - How much the system uses, if applicable
- Size - The size of the equipement that belongs to the system
- Active - If the system is active or Inactive
- Auto Delivery - If the system is set up for auto delivery
For a more in depth look on holds, see the Holds guide. After filling out all information, clicking confirm will add the hold to the onboarding page. If needed, more Services and Holds can be added simply by clicking on Add Service and/or Add Hold. Clicking on continue will add the services and holds to the customers account and the Wizard will continue on to the last step...
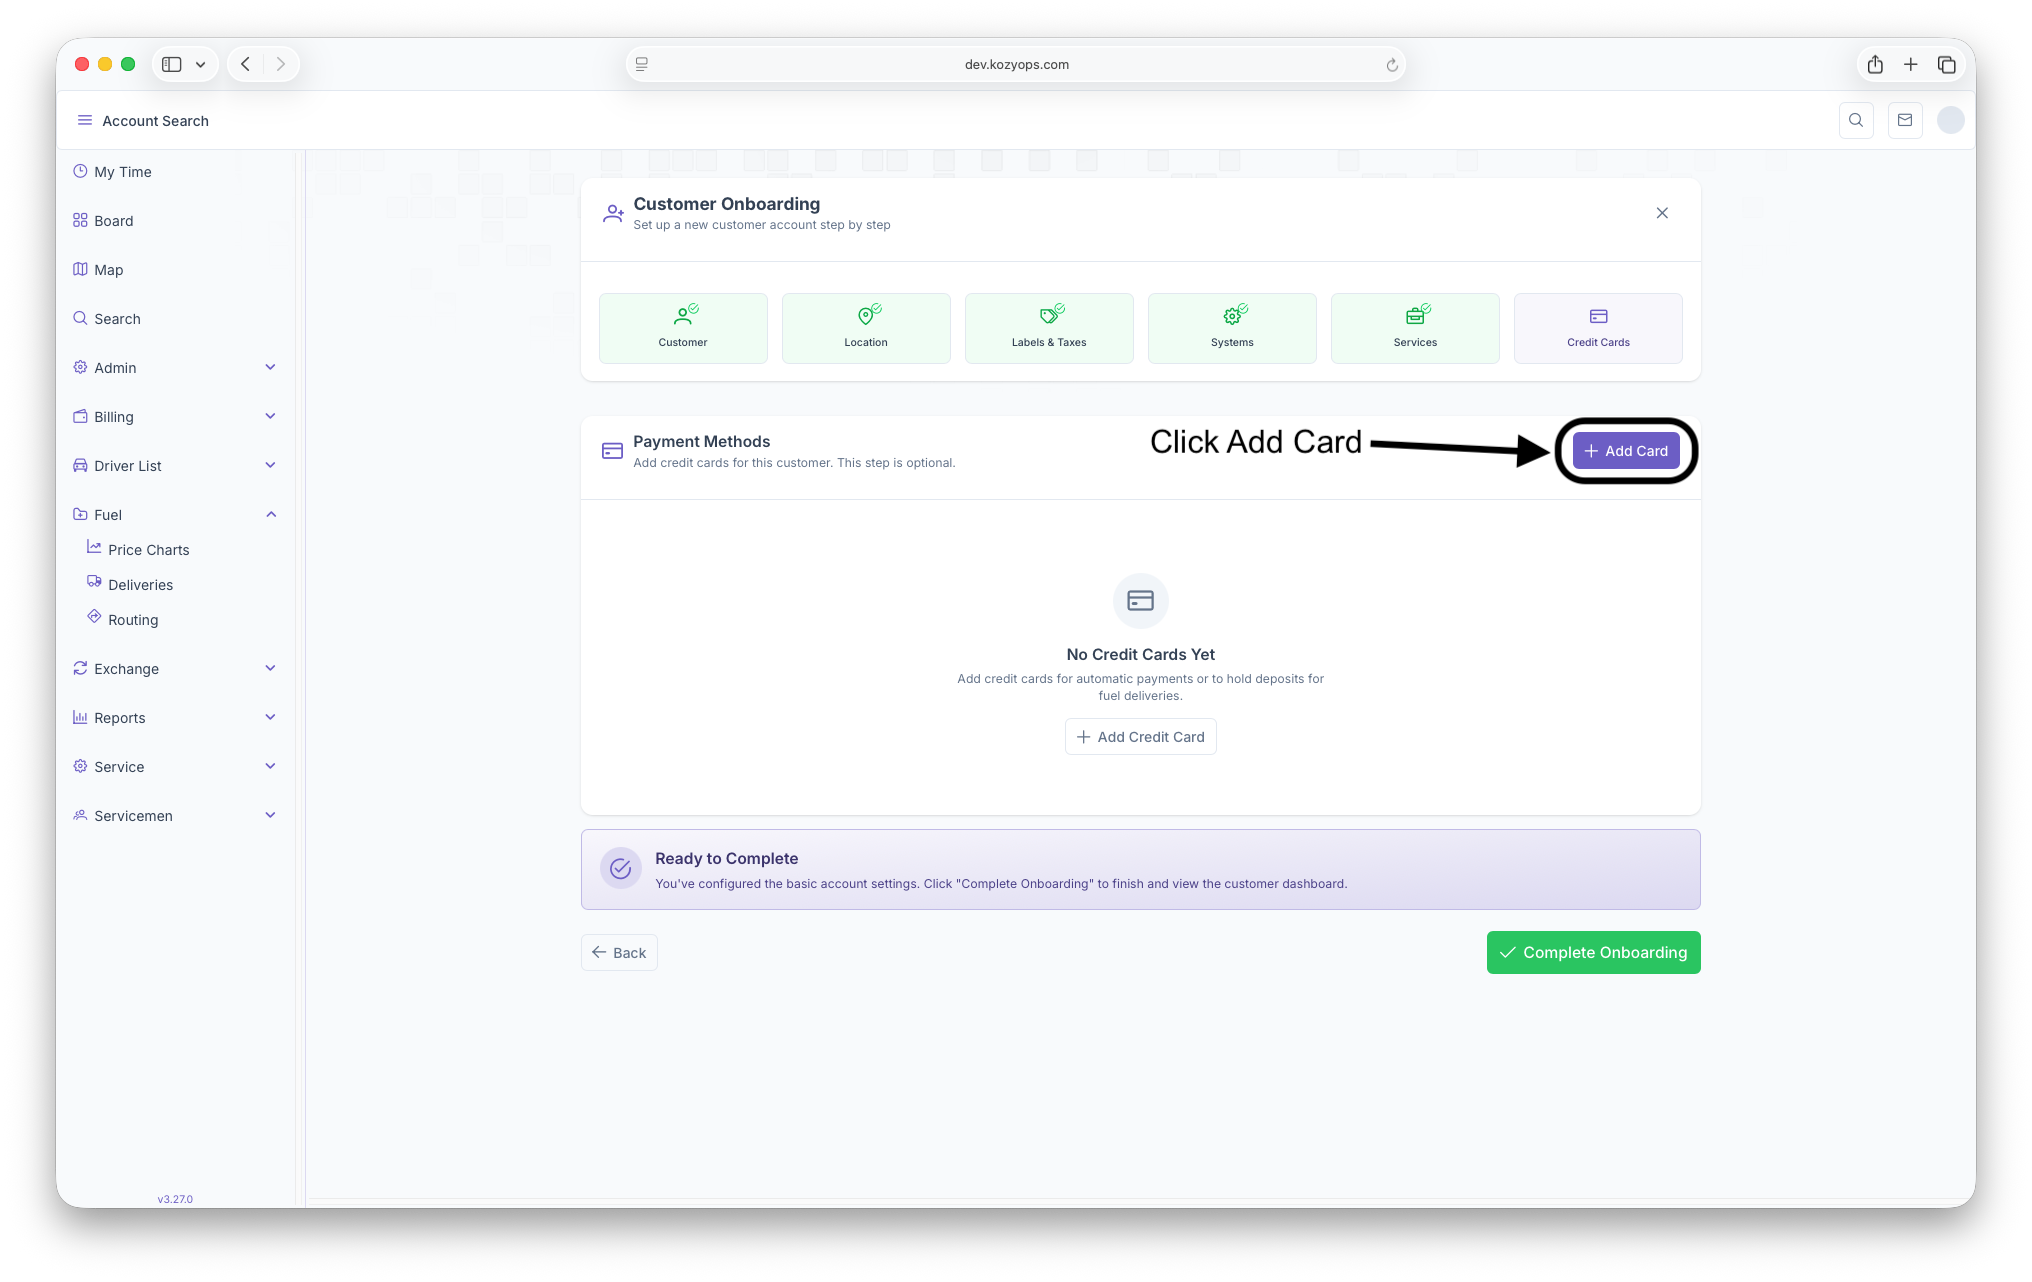
Credit Cards
The final step in onboarding a customer is to add a credit card to the Customers Account if applicable. Clicking on the Add Card button will begin the process of adding a card and the Add Credit Card popup will appear with the following fields to be filled out
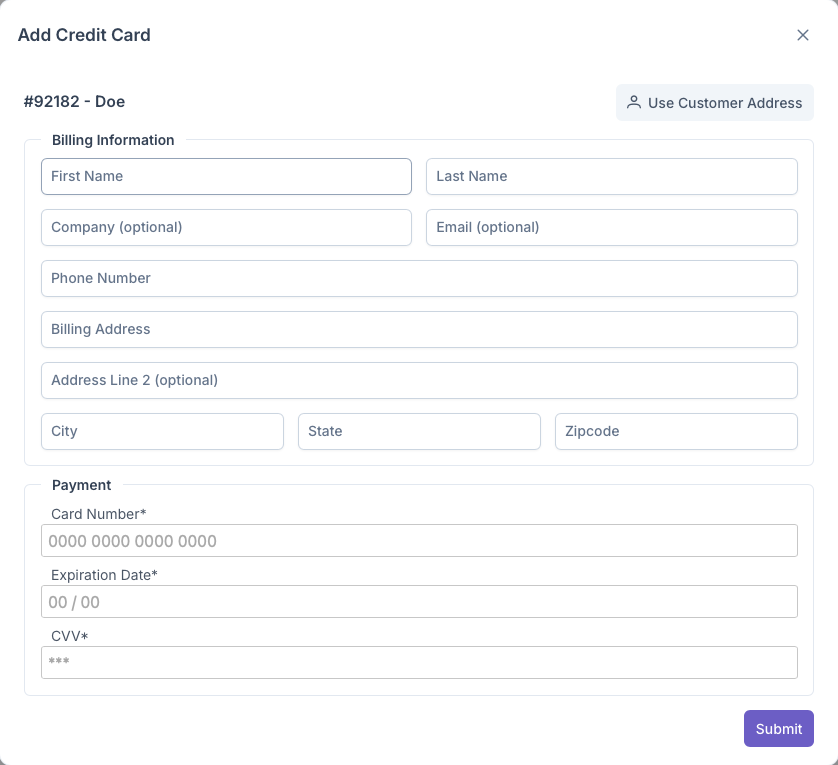
- Billing information - If the customers address is the same as the billing information, clicking on Use Customer Address will automatically apply the same information to the billing information. If The customers address is not the same as the billing address, then the following should be filled out
- First Name, Last Name - Customers Name
- Company - The Customers business name (Optional)
- Email - The Customers Email (Optional)
- Phone Number - The Customers phone number
- Billing Address - The address associated with the card
- Address Line 2 - For more address information if applicable
- City - Billing City
- State - Billing State
- Zipcode - Billing Zipcode
- Payment
- Card Number
- Expiration Date
- CVV
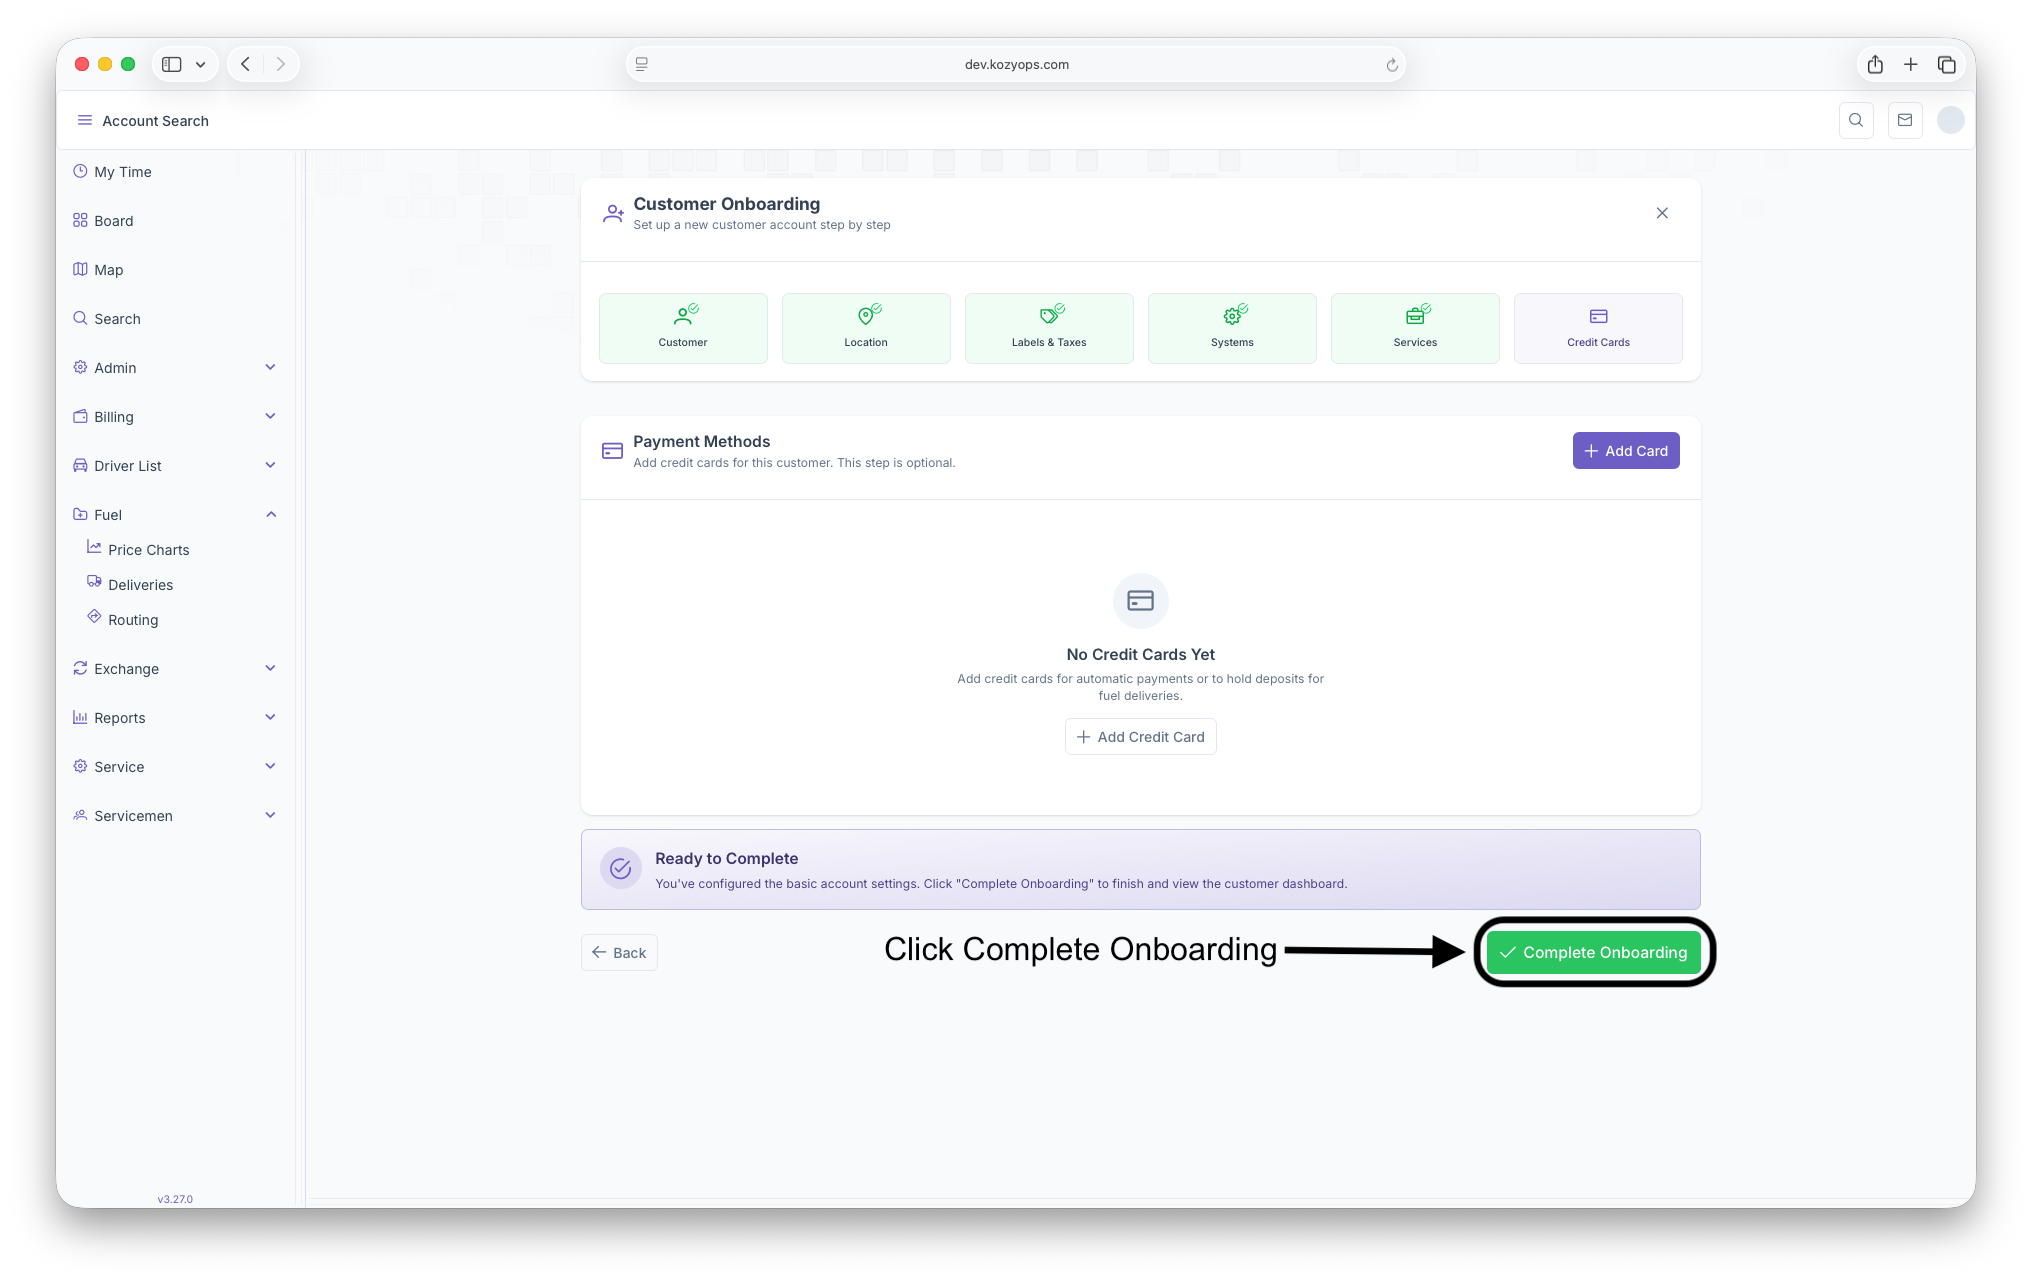
More information on Credit Cards or adding cards outside of the onboarding process can be seen on the Autopay/Adding Credit Cards guide. After all the information is filled out and the system accepts the card, it will be added to the onboarding page and ready to be added to the account. Clicking on any of the category tabs on the top of the page allows access to those steps for review if necessary. Clicking on Complete Onboarding will add the card to the customers account and the onboarding process will be complete. With that the customers account will be set up and ready for routing and for deliveries and services to be provided as well
Editing
Edits on the wizard can be done by clicking on the tab that needs to be edited. Editing is limited to the Labels and Taxes, Systems and Credit cards tabs. Customer, Location and Service cannot be edited until after the wizard is complete and the Customer is onboarded. Edits outside the wizard are possible and can be done by going into each individual category. For editing any of the information above, see the following
- Customer - Customer Account
- Location - Location Management
- Labels and Taxes - Customer Account, Manage Location Settings
- Systems - Adding a System Guide, Editing a System Guide, Adding Equipment Guide
- Services - Adding Services, Holds
- Credit Cards - Autopay/Adding Credit Cards