Billing
Bank Deposits and Receipts
Bank Deposits
The Bank Deposits page can be used to manage and track all payment deposits. To reach the Bank Deposits page, on the side menu, click on Billing then click on Bank Deposits. Clicking on the three side bars on the top left corner of the page allows the side bar to be expanded for easier access. The page can be filtered by date ranges and will then show the following
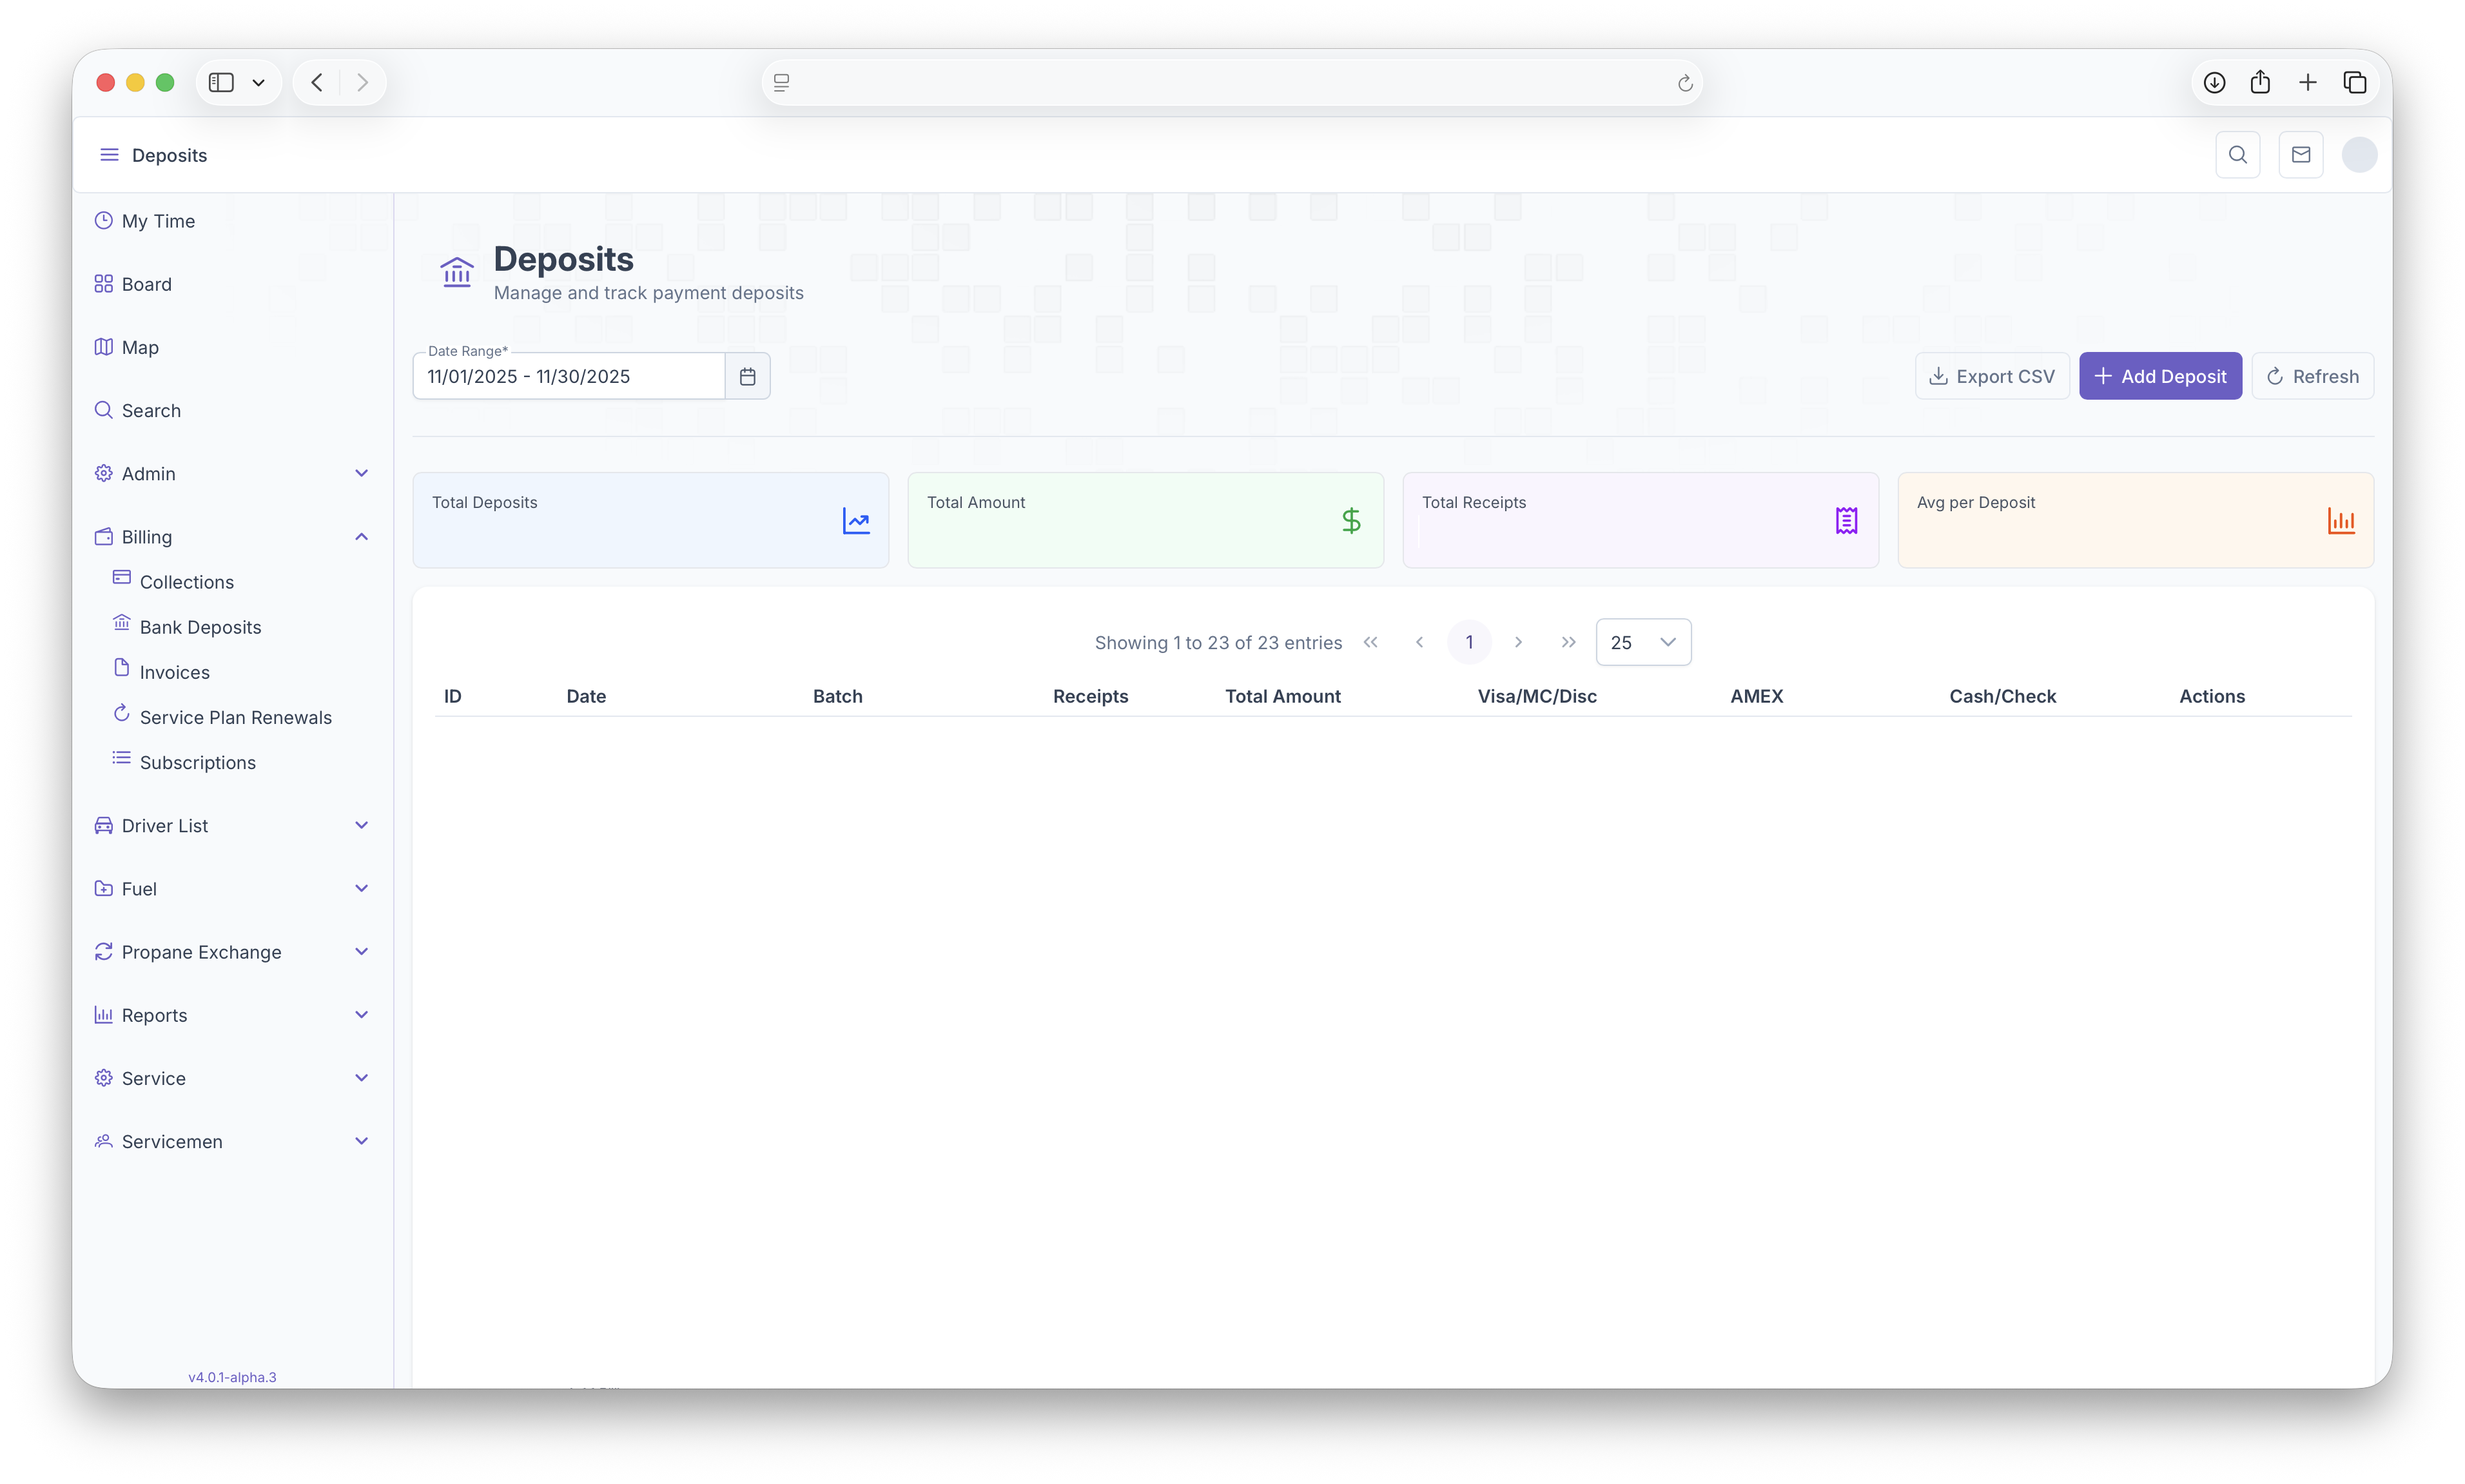
- Total Deposits - Shows the total deposits made within the selected date range
- Total Amount - Total Amount deposited within the selected date range
- Total Receipts - Total number of receipts
- Average Per Deposits - The average amount for each deposit
Following that a table will be generated with each deposit as a line item with the following columns
- Deposit ID - The ID assigned to each deposit
- Date - The date the deposit was created
- Batch - The Batch number of the deposit
- Number of Receipts - How many receipts are in the deposit
- Total Amount - The Total amount that was deposited
- Visa/MC/Disc - How much was deposited through these cards
- AMEX - How much was deposited through Amex
- Check/Cash - How much was deposited through cash or check
- Actions - Actions that can be taken on each deposit, view the details of the deposit or open the deposit on a new tab
A deposit can be opened by clicking on one of the actions or by simply clicking on a deposit line to show a more in depth look at each receipt. See below for more information on receipts. The Deposits page can also be exported for easier printing or sharing by clicking on the Export CSV button found on the top right corner of the page. Clicking on Add Deposits will add a deposit for the current day. Only one deposit can be created for a day and receipts can only be added on the day the deposit was created. Clicking on refresh will refresh the page as receipts are added throught the day
Receipts
After clicking on the deposit or selecting an action on the deposit, all receipts for that deposit will then appear. The top of the page displays the following
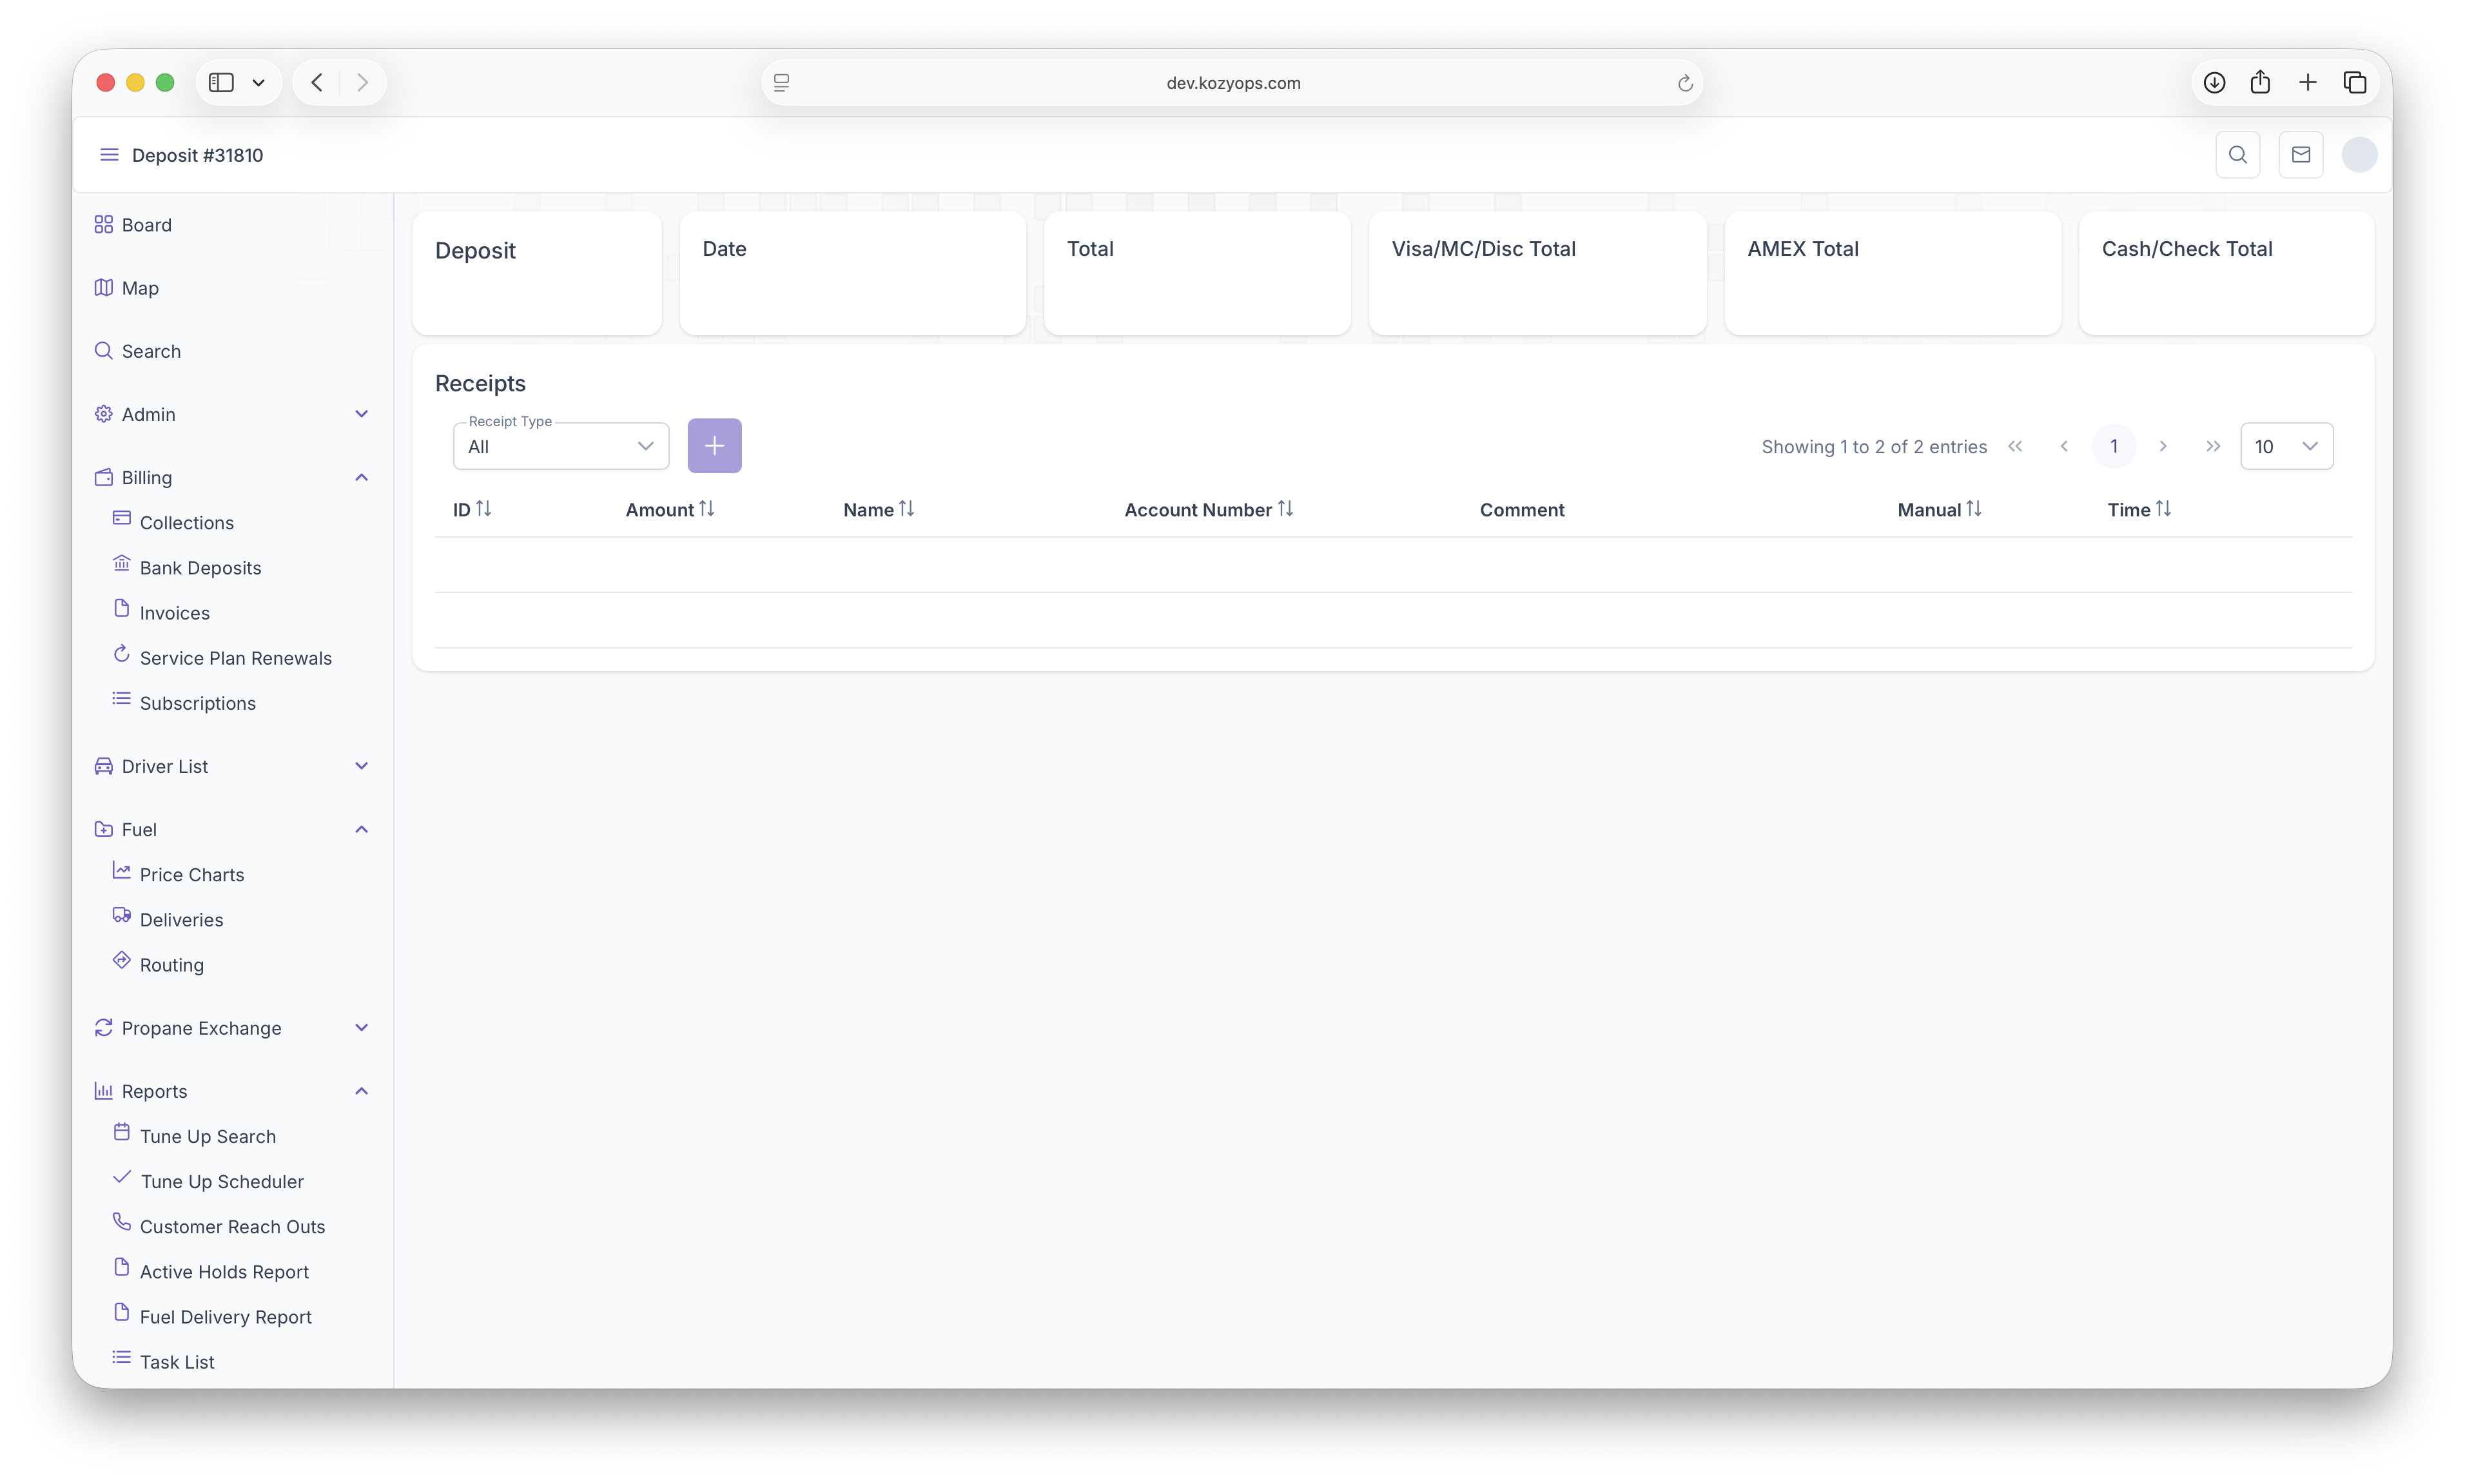
- Deposit ID - The ID assigned to the deposit
- The Date - The date the deposit was created
- Total - The total amount of the deposit
- Visa/MC/Disc - The total amount paid through these cards
- AMEX - Total amount paid by AMEX
- Cash/Check - Total amount paid by cash or check
The page can then be filtered by selecting a Receipt Type. Filters include All Receipts, Visa/MC/Disc, AMEX, Cash/Card or All Manual. The page will then generate a table with each receipt as a line item and with the following columns
- Receipt ID - ID Assigned to each receipt0
- the Amount - The amount that was paid by the customer
- Customer Name - Name of the customer
- Account Number - The Customers account number
- Comments - Any comments made on the receipt
- Manual - If the payment was manually input
- Time - When the receipt was created
Adding Receipts
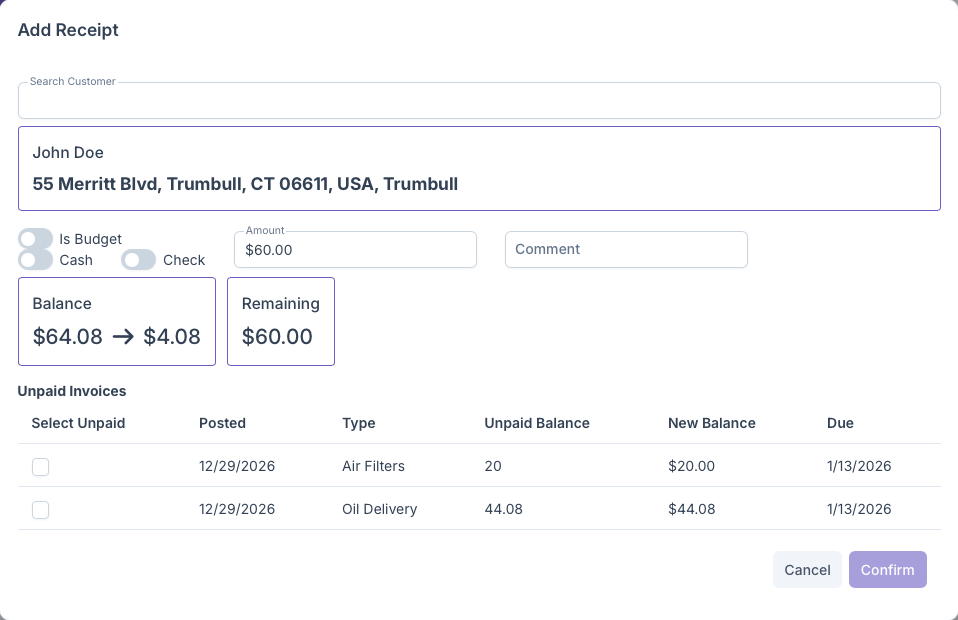
Receipts can be added to the deposit by clicking on the Add button next to the date filter. Clicking on the add button will bring up the custmer search for whom the receipt is being added for.
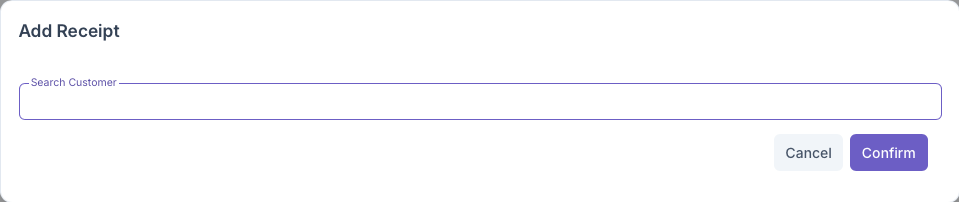
A customer can be searched by name, account number or even address. After filling out the field, the customer will appear below the search line
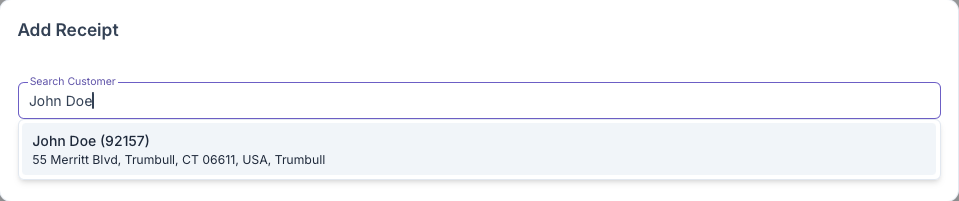
Once the customer appears, clicking on the customer will generate the full Add Receipts popup and shows the following
-
Search Customer - Gives the ability to change customers by search
-
Customer - Shows the customers name and address
-
Toggle - Gives the option to toggle if a customer Is Budget and if they are paying by cash or check
-
Amount - Add the amount the customer is paying
-
Comment - Add comments regarding the payment being made
-
Balance - Shows the Total Balance due and how much is still owed if not paid in full
-
Remaing - Shows the amount that's being allocated to each invoice being paid
-
Unpaid Invoices - Shows a table with each unpaid invoice as a line item with the following columns
- Select Unpaid - Select which invoices are paid with the allocated amount
- Posted - The date the invoice was posted
- Type - Shows the type of service the invoice was for
- Unpaid Balance - Shows how much is still owed on the invoice
- New Balance - Shows the balance and updates as payments are allocated
- Due - When the payment is due
Once all fields are filled out and payments are allocated, clicking on confirm will add the receipt to the Deposit. Clicking on cancel will close the window and any information added will be deleted.
Invoices
Introduction
The invoice page can be used to see all invoices for customers as well as specific totals based on pre set filters. To see the Invoices, on the side menu, click on Billing then click on Invoices. Clicking on the three bars on the top left corner of the page also expands the side menu to show more detail for easier access.
Invoices
After a delivery or service has been completed, an invoice will be generated and appear on this list for review before being posted. Having an invoice post will charge the customer for the service performed and will either be charged automatically after being posted if the customer has auto pay set up, or they will have to be manually charged on the collections portion of billing. Invoice should be thoroughly reviewed as once posted, it cannot be altered from both a technical and legal perspective. Once on the page, Invoices can be filtered by the following Date Range, Payment Type, Bill Type, Status and Brand. Once filters have been selected, the page will display Filtered totals which includes
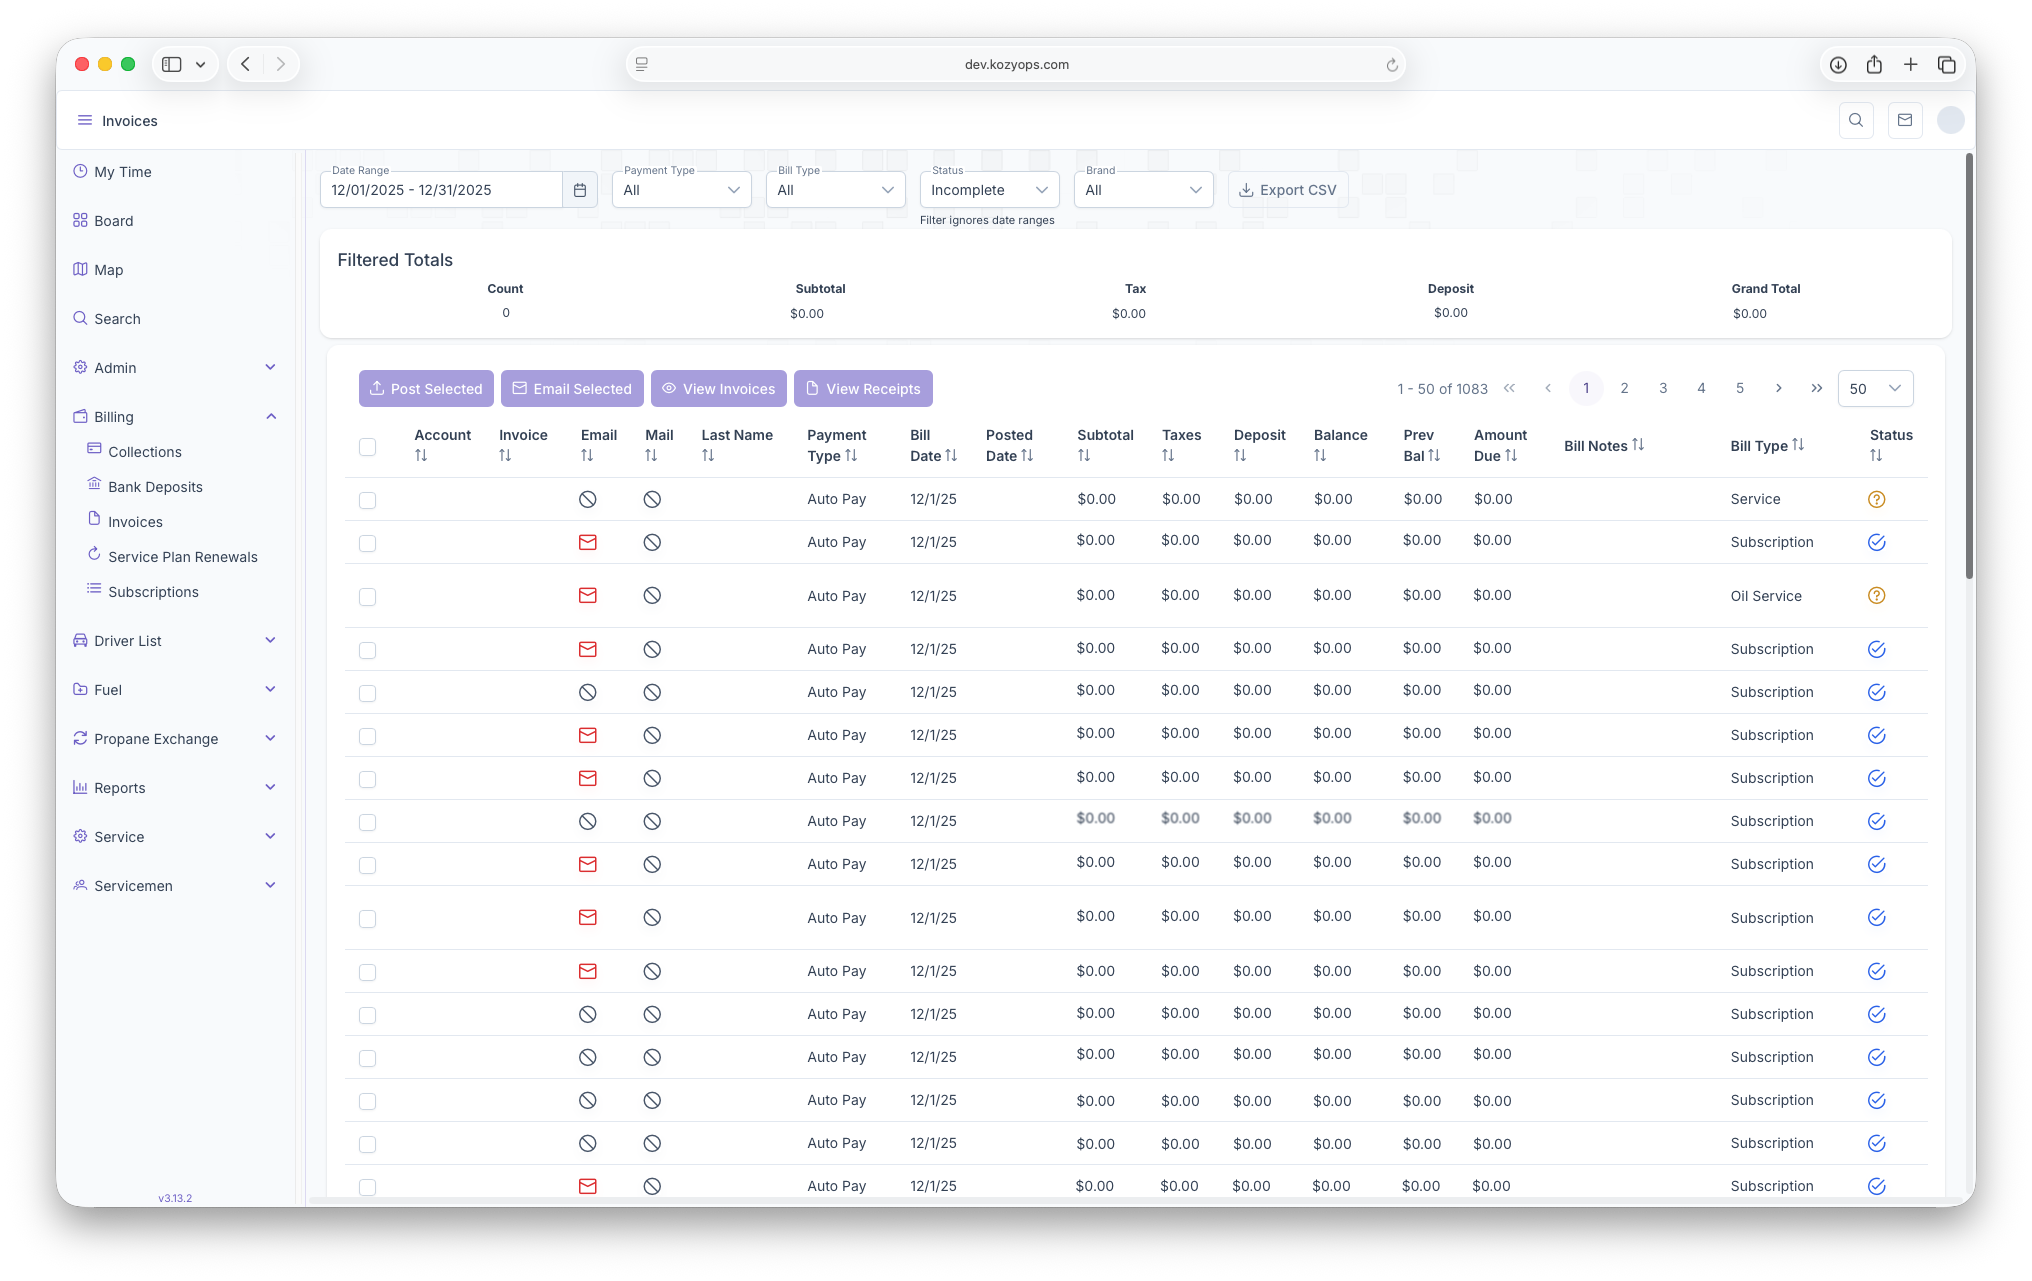
- Count - Number of Invoices
- Subtotal - Total Amount for the invoice
- Tax - Taxes on sales
- Deposits - How much was deposited
- Grand Total - Combined total amount due
The report is then generated as a table with each invoice as a line item with the following columns
- Account Number - Displays the customers account number
- Invoice Number - Displays the Invoice Number
- Email - Shows if invoice needs to be emailed or optional
- Mail - Shows if invoice needs to be mailed or optional
- Last Name - Customers last name
- Payment Type - Shows how the payment was made
- Bill Date - Date of the bill
- Posted Date - Shows the date the invoice was posted
- Subtotal - Shows the total amount of the invoice
- Taxes - Shows the taxes of the invoice
- Deposit - Shows a deposit if the customer made one
- Balance - Shows the current balance of the customer
- Previous Balance - Shows what the previous balance of the customer was
- Ammount Due - Shows the total Amount due including past balances
- Bill Notes - Notes on the bill
- Bill Types - What type of service the invoice is for
- Status - Status of the invoice, whether checked or not
The report can also be exported to document format for easier printing and sharing by clicking on the Export CSV button on the top of the page next to the adjustable filters. Selecting an invoice will now allow for the following actions to be taken
- Post selected - Allows for the invoice to be posted and for the customer to be charged
- Email Selected - Allows for the invoice to be emailed out to the customer
- View Invoice - Allows for the invoice to be exported for easier sharing and printing
- View Receipt - Allows for the receipt of the invoice to be exported out for easier sharing or printing
Note that multiple invoice can be selected at once or all at once, this makes it easier for posting all invoices rather than having to do them one at a time. MAKE SURE ALL invoices are reviewed before posting, as once an invoice is posted, it cannot be undone
Service Plan Renewal
Subscriptions
Collections
Introduction
The Collections page is where posted invoices appear and are ready to be charged if a customer has a credit card on their account but do not have autopay set up. To reach the invoice page, click on the Billing dropdown then click on Collections. Clicking on the 3 lines on the top left of the page will expand the side menu for easier access.
Collections
The collections page is where customers who have credit cards on file can be charged after an invoice has been posted. If a customer has autopay set up, then the customers account will be charged automatically after the invoice has been posted. If a customer does not have a card on file, then the customer needs to be charged on the Bank Deposits page. For more information see the Bank Deposits and Receipts guide for charging an account with no card on file. When arriving on collections, the page will first display the following information
- Reminders Completed - Shows the total number of collections that have been completed
- Reminders Due - Shows the total number of collections that are due
- Reminders Upcoming - Shows collections who's due dates are approaching
- Unpaid - Shows the total amount that's owed and needs to be collected
The page can then be filtered by the type of invoice that was generated if looking for a specific invoice to charge. After selecting a filter, the page will then display as a table with all invoices being line items and with the following columns
- Account - Shows the Customer's Account Number, clicking here will bring up the customers account page
- Name - The name of the account holder
- Address - The account holders Address
- Due - The due date of the invoice
- Type - The type of invoice/service
- Amount - The amount due for that invoice
- Last Update - The last time the invoice was updated
- Credit Hold - Shows if the customer has a credit hold on their account
- Actions - Clicking on Charge will charge the customers card on file for the amount due
Clicking on each column header will sort the table by the selected header and display accordingly. A more in depth look at each individuals collection invoice can be seen on the Recent Transactions page on the customers account if an invoice needs to be seen at a closer level for more information