Fuel Systems
General
This directory contains comprehensive guides for managing customer systems, equipment, and delivery window strategies (delivery estimation methods).
Core System Management
Adding Equipment
Learn how to add tanks, boilers, furnaces, and other equipment to a system. Includes detailed instructions for multi-tank configurations.
Key topics:
- Equipment types (tanks, boilers, furnaces, appliances)
- Multi-tank/manifolded tank setup
- Capacity and monitoring configuration
- Linking equipment to systems
Editing a System
Modify existing systems safely with guidance on which changes are safe vs. those requiring caution.
Key topics:
- Safe edits (name, notes, metadata)
- Cautious changes (window strategy, fuel type, status)
- Reassigning equipment between systems
- Deactivating vs. deleting systems
Delivery Window Strategies (Estimation Methods)
Window Strategies
Choose and configure the delivery estimation method for each system. Window strategies determine how the system calculates when deliveries are needed.
Key topics:
- Degree Day, Monitored, and Calendar strategies
- Selecting the right strategy for each customer type
- Configuring strategies in the system dialog
- Auto Delivery toggle behavior
Degree Day System
Temperature-based consumption estimation using heating degree days and usage rates.
Key topics:
- Winter and summer usage rates
- Visual degree day windows
- Target DD and forced delivery
- Reset DD and Reset Window actions
Monitoring
Real-time tank level tracking using IoT monitoring devices identified by serial numbers.
Key topics:
- Monitor serial numbers and barcodes
- Real-time level readings
- Validation requirements for monitored systems
Calendar Scheduling
Time-based recurring delivery schedules with seasonal controls and frequency settings.
Key topics:
- Frequency and units (days, weeks, months, years)
- Preferred day of week
- Seasonal start/end dates
- Active/inactive schedule management
- One active schedule limit
Getting Started
-
Create a system: Start with the Add System Guide
- Choose system name and fuel type
- Select a window strategy (Degree Day, Monitored, or Calendar)
- Configure strategy-specific settings
- Enable Auto Delivery toggle if needed
-
Add equipment: Follow Adding Equipment to add tanks and appliances
-
Configure delivery: Your window strategy determines how deliveries are triggered:
- Degree Day for temperature-based estimation
- Monitoring for IoT device-driven deliveries
- Calendar for recurring time-based schedules
Quick Reference
System Concepts
- System: A group of equipment that all share the same fill connection
- Equipment: Physical components (tanks, boilers, furnaces, etc.)
- Multi-tank: Multiple tanks manifolded to a single fill (add to same equipment)
- Fill Group: Equipment in a system all connect to the same delivery fill point
- Window Strategy: The delivery estimation method (Degree Day, Monitored, or Calendar)
- Auto Delivery: Toggle that enables/disables automatic delivery request generation
Window Strategy Comparison
| Strategy | Configured In | Triggers On | Requires |
|---|---|---|---|
| Degree Day | Degree Day tab | Temperature data + usage rates | Winter/summer rates, window boundaries |
| Monitored | Tank Monitor tab | Tank level readings | Monitor serial number |
| Calendar | Calendar tab | Time intervals + rules | Active schedule with frequency/dates |
Configuration Locations
All window strategy settings are configured in the Add/Edit System dialog:
- Basic settings: System name, Active toggle, Auto Delivery toggle, Fuel selector, Window Strategy selector
- Degree Day tab: Usage rates, window start/target/end, Reset actions
- Tank Monitor tab: Serial number, barcode
- Calendar tab: Schedule frequency, units, day of week, seasonal dates, volume
Common Workflow
Related Documentation
- Creating a New Customer — Full onboarding flow
- Location Management — Managing service locations
- Add Services — Services can be applied to locations or systems
- Add System — Creating and configuring new systems
Adding a System Guide
A system represents a group of equipment that all share the same fill connection (the same delivery fill). For example, multiple manifolded tanks feeding the same appliance belong to one system. This guide shows how to create a system and configure its delivery window strategy.
Important: You can attach multiple physical tanks to the same equipment entry when they are manifolded to a single fill. This keeps projections and routing accurate for the shared capacity.
Prerequisites
- Customer and Location exist.
- You are on the Customer Dashboard with the Location selected in the header.
Create a system
-
Open the Customer Dashboard for the selected Customer and Location.

-
Go to Systems in the overview (or use the Systems action in the header).


-
Click Add System.

-
The Add System dialog opens with multiple configuration sections.


-
Complete the basic settings and select a window strategy.
-
Configure the strategy-specific settings in the appropriate tab.
-
Click Submit to save.


Basic system settings
Required fields
- System Name: A clear label (e.g., "Main Oil System" or "Shop Propane")
- Fuel: Propane, Oil, etc. (select button group)
- Window Strategy: Choose Degree Day, Monitored, or Calendar (select button group)
Toggles
- Active: Enable to activate the system immediately (default: on)
- Auto Delivery: Enable automatic delivery scheduling based on the selected window strategy
Optional fields
- Usage: Multi-select dropdown for usage types (heating, appliance, etc.)
Window strategy selection
Choose the delivery estimation method that best fits this system:
-
Degree Day: For temperature-based consumption estimation (best for heating oil)
-
Monitored: For systems with tank monitors providing real-time levels
-
Calendar: For recurring time-based delivery schedules


The selected strategy determines which configuration tab you'll use next.
See: Window Strategies Guide for detailed comparison and recommendations.
Strategy-specific configuration
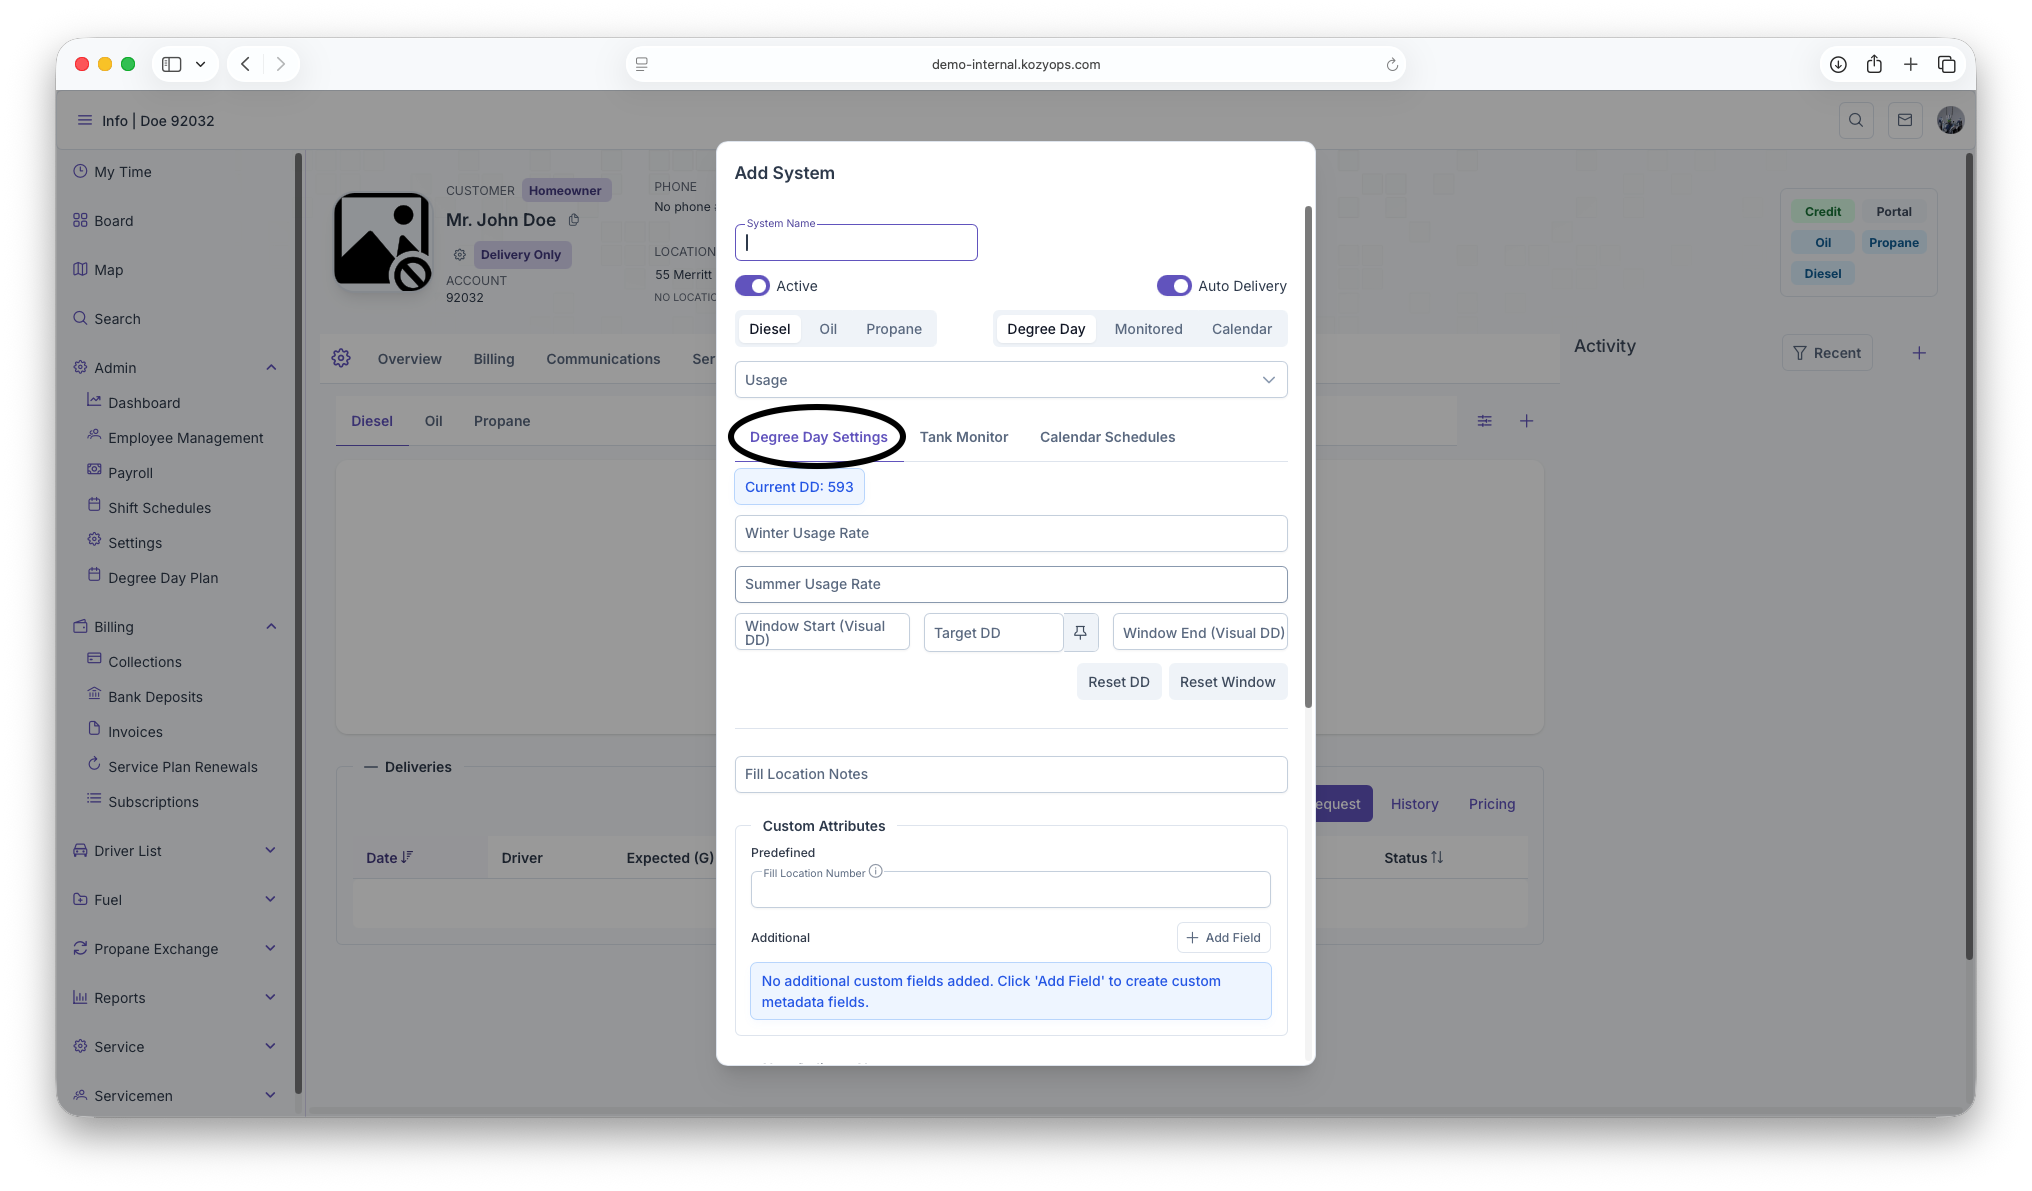
Degree Day configuration

If you selected "Degree Day" as your window strategy:
Usage rates:
- Winter Usage Rate: Gallons per degree day during winter season (supports up to 4 decimal places)
- Summer Usage Rate: Gallons per degree day during summer season (supports up to 4 decimal places)
Delivery windows:
- Window Start (Visual DD): Lower boundary value for when deliveries can begin
- Target DD: The degree day value that triggers a delivery
- Window End (Visual DD): Upper boundary value for delivery window
Actions available:
- Force Degree Day button (thumbtack icon): Manually override and force the current target
- Reset DD and Reset Window buttons (only available after system is saved and has delivery history)
Monitored configuration
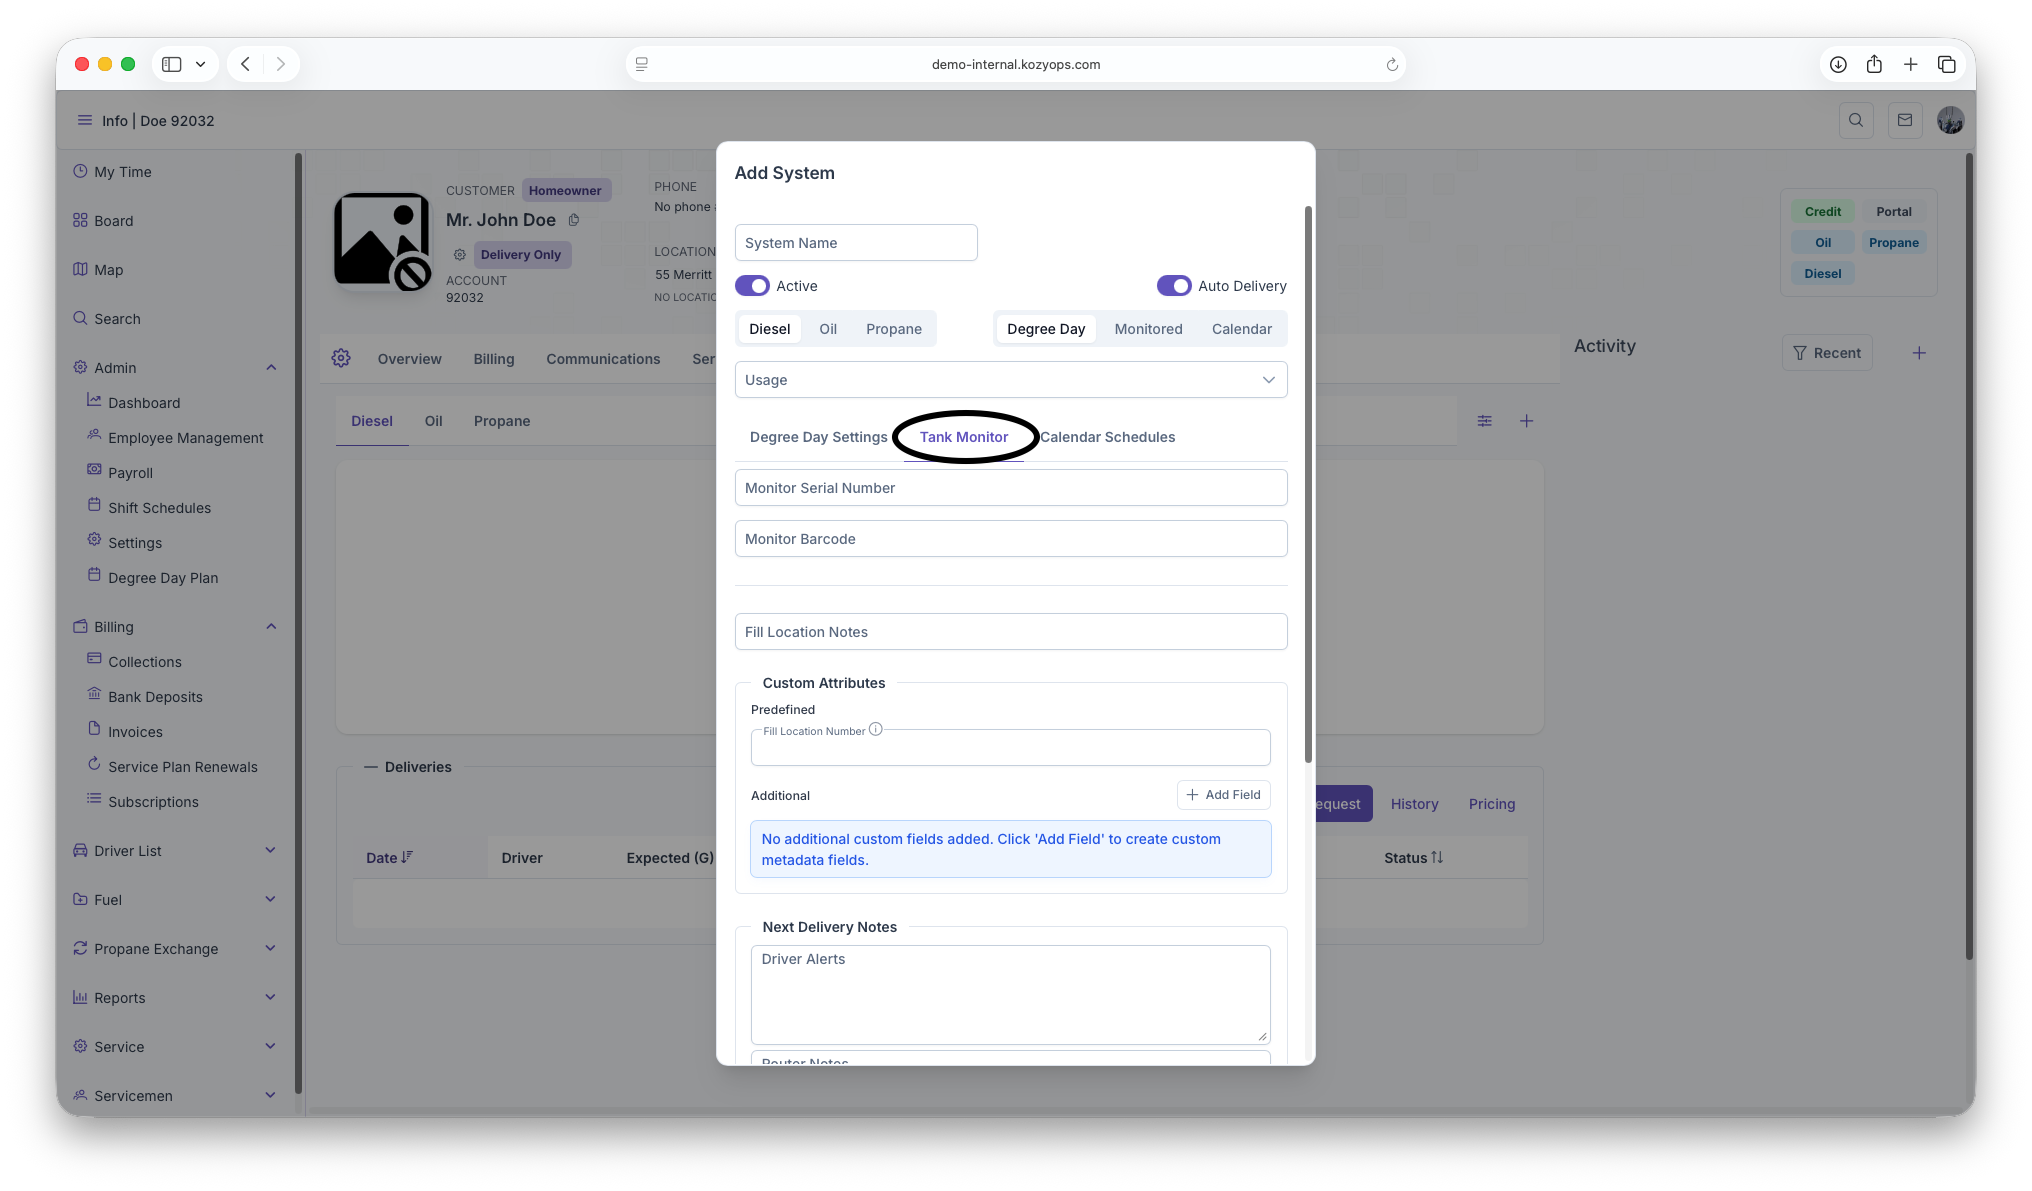
If you selected "Monitored" as your window strategy:
Required:
- Monitor Serial Number: The unique identifier for the tank monitoring device
Optional:
- Monitor Barcode: Additional identifier for the monitor
Note: The submit button will be disabled until you provide a monitor serial number for monitored systems.
Calendar configuration
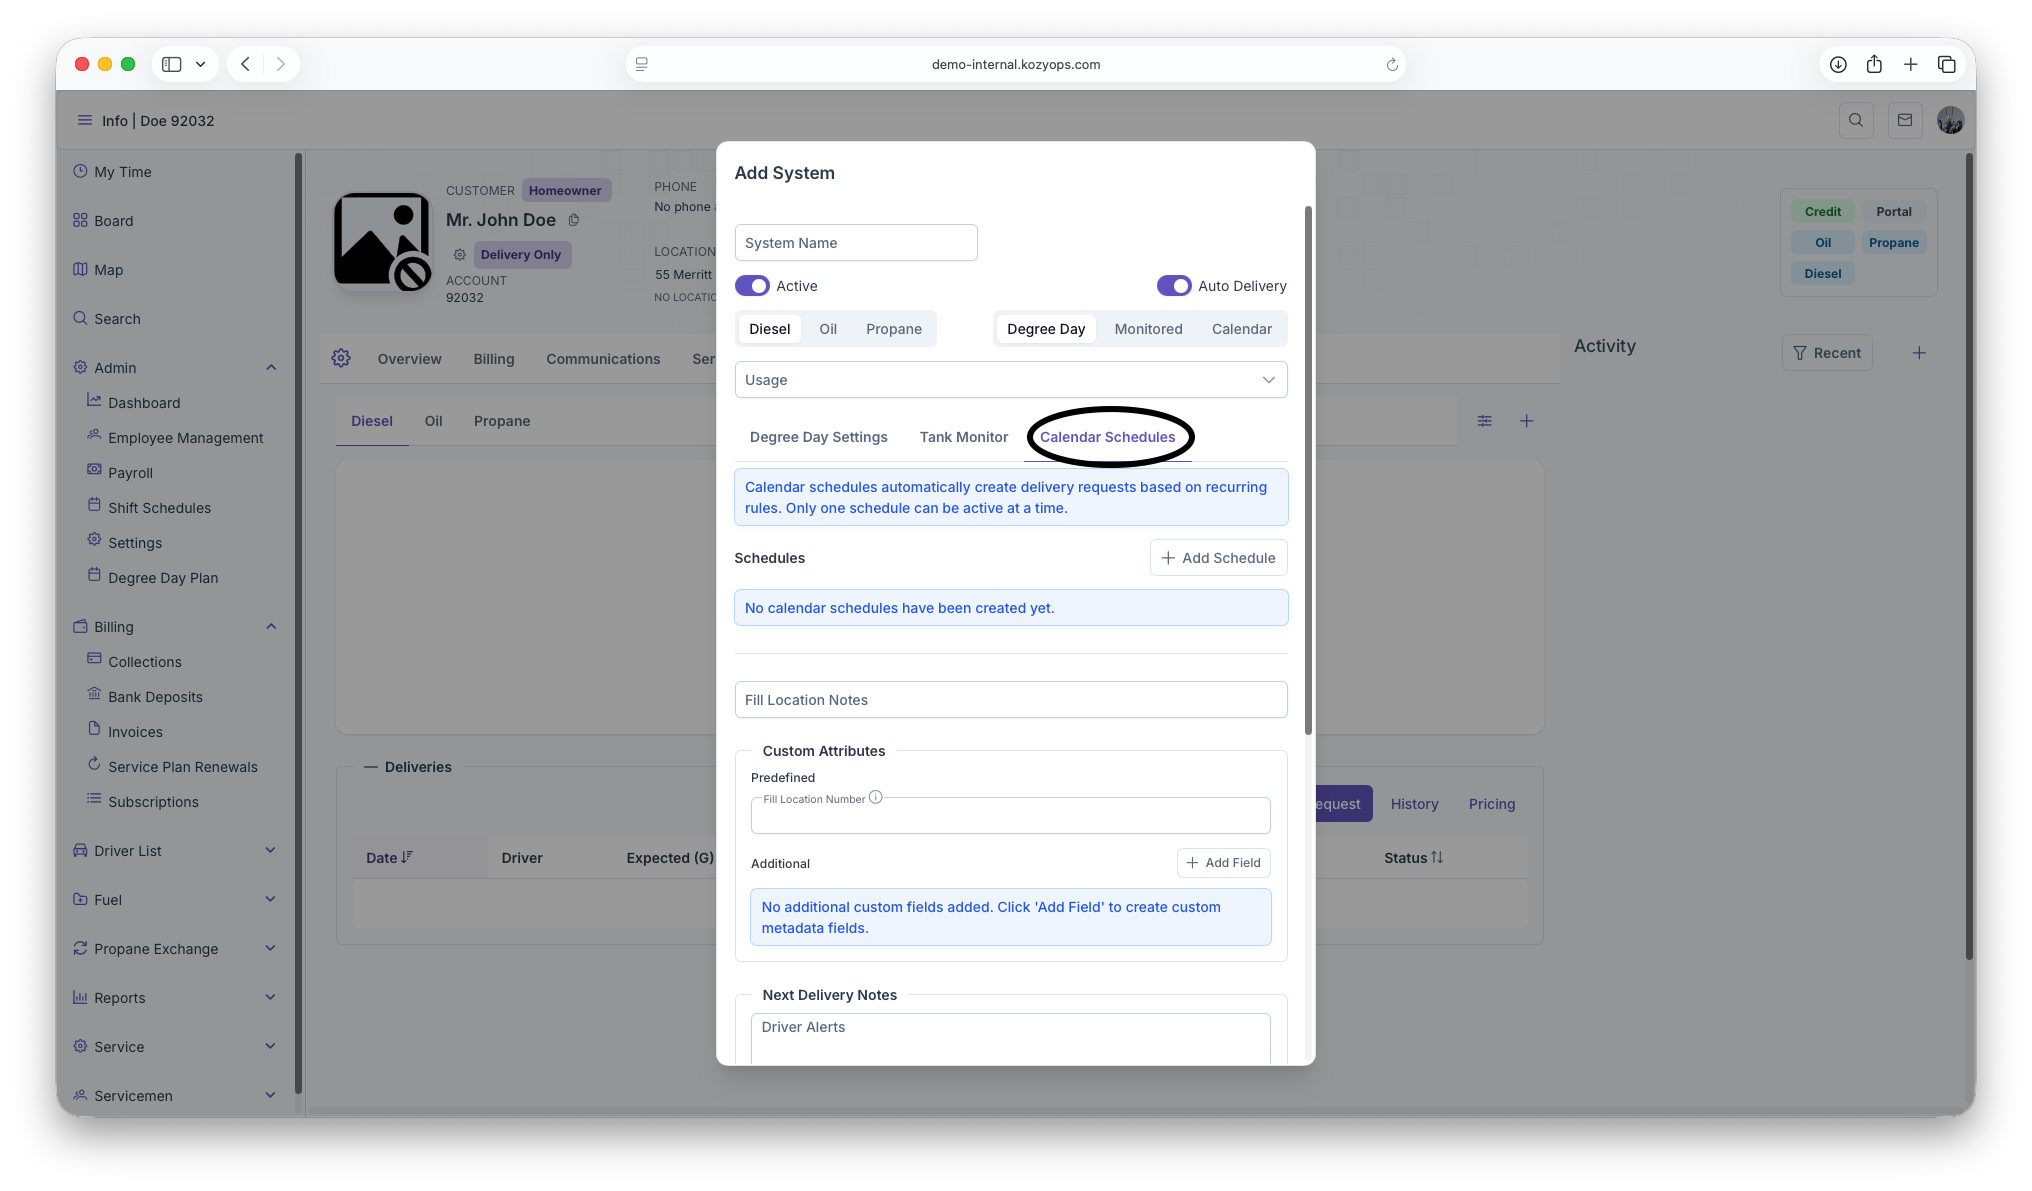
If you selected "Calendar" as your window strategy:
For new systems, calendar schedules must be configured after the system is saved. You'll see a warning message: "Save the system before managing calendar schedules."
After saving, you can create calendar schedules with:
- Frequency and units (days, weeks, months, years)
- Preferred day of week
- Seasonal start/end dates
- Requested delivery volume
- Active/inactive status
Only one calendar schedule can be active at a time.
See: Calendar Scheduling Guide for detailed schedule management.
Understanding systems and fills
A system is a logical grouping of equipment that all connect to the same fill point:
- If you have 2 manifolded tanks feeding one boiler, that's one system with multiple tanks attached to the same equipment.
- If you have separate heating and water heater systems at the same location, each with their own fill, those are two separate systems.
This grouping ensures accurate capacity tracking, delivery projections, and routing.
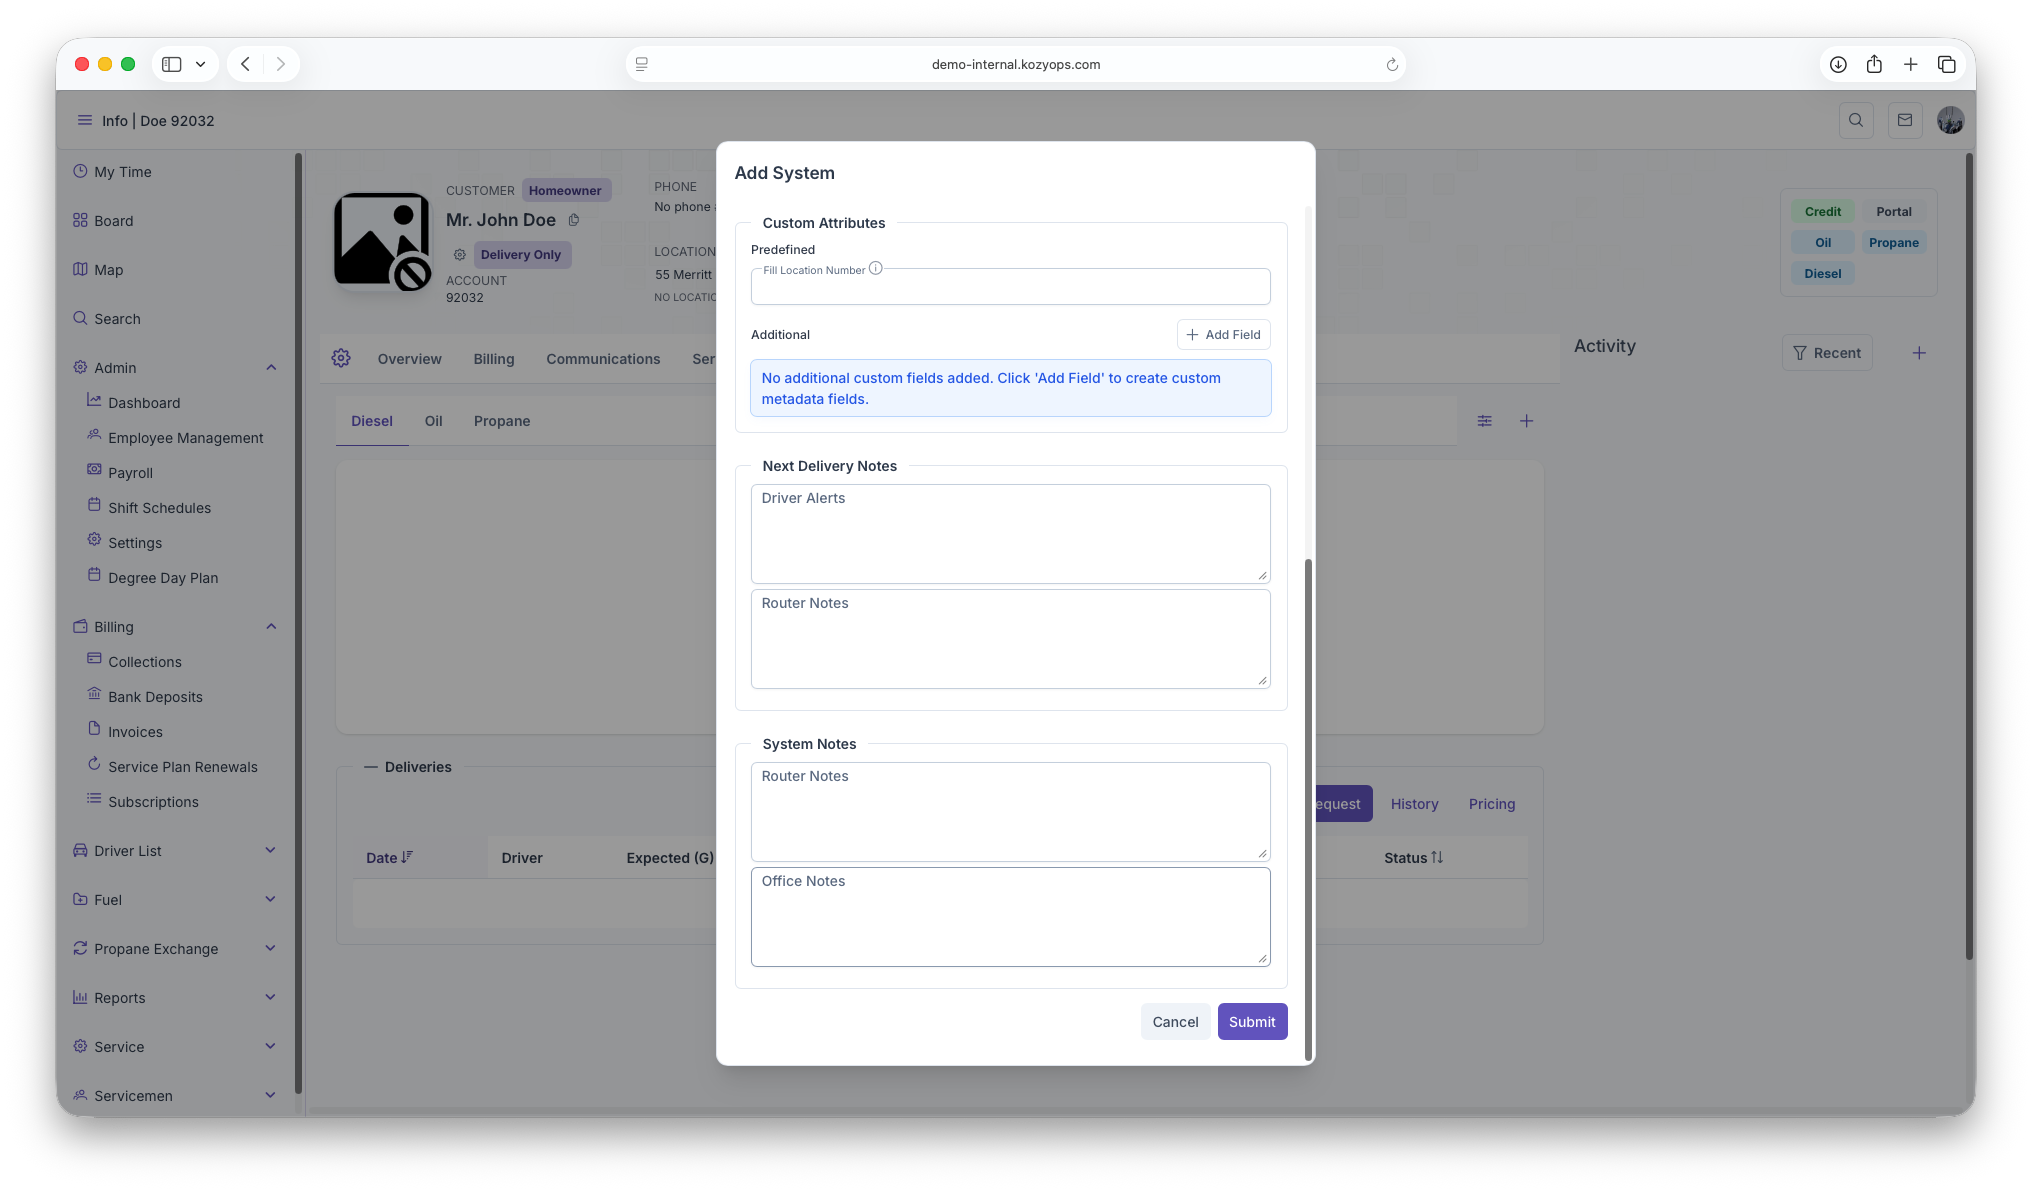
Additional system fields

Fill Location Notes

- Text field for delivery access instructions (gate codes, driveway location, etc.)
Custom Attributes

Predefined fields:
- System-type-specific custom fields loaded from the API
- Each shows with label, optional description tooltip
Additional custom fields:
- Click "Add Field" to create custom key-value metadata pairs
- Enter field name and value
- Remove with trash icon
Next Delivery Notes
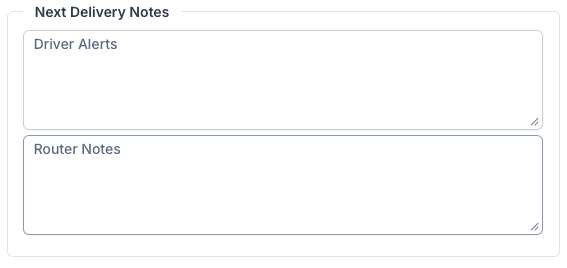
Driver Alerts:
- Important safety or access information for delivery drivers
- Displayed prominently during delivery
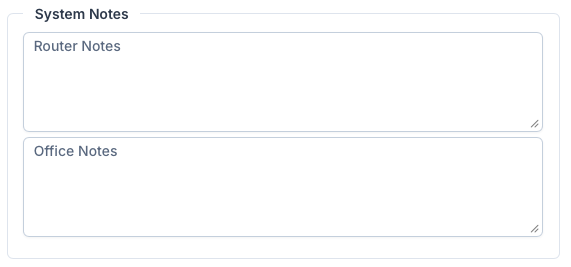
Router Notes:
- Instructions for routing and dispatching
- Helps with route planning and optimization
Office Notes

- Internal notes visible only to office staff
- General system information not needed by drivers
Next: Add equipment
After saving the system, add equipment under the system (tanks, boilers, furnaces, vaporizers, regulators, etc.).
For manifolded tanks feeding the same appliance/fill, attach multiple tanks to the same equipment set to represent one shared capacity.
See: Adding Equipment
Editing later
You can rename the system, adjust window strategy, or deactivate it. Be careful changing fill associations or window strategies after deliveries exist, as it can impact projections.
See: Editing a System
Related guides
- Window Strategies — Choosing and configuring the right delivery estimation method
- Add Services — Services are linked to locations or systems
- Location Management — Managing service locations
- Creating a New Customer — Full onboarding flow
Editing a System Guide
This guide explains how to edit an existing system using the Edit System dialog and what each field and setting controls.
Prerequisites
- The system exists and you have permission to modify it.
- You are on the Customer Dashboard with the Location selected.
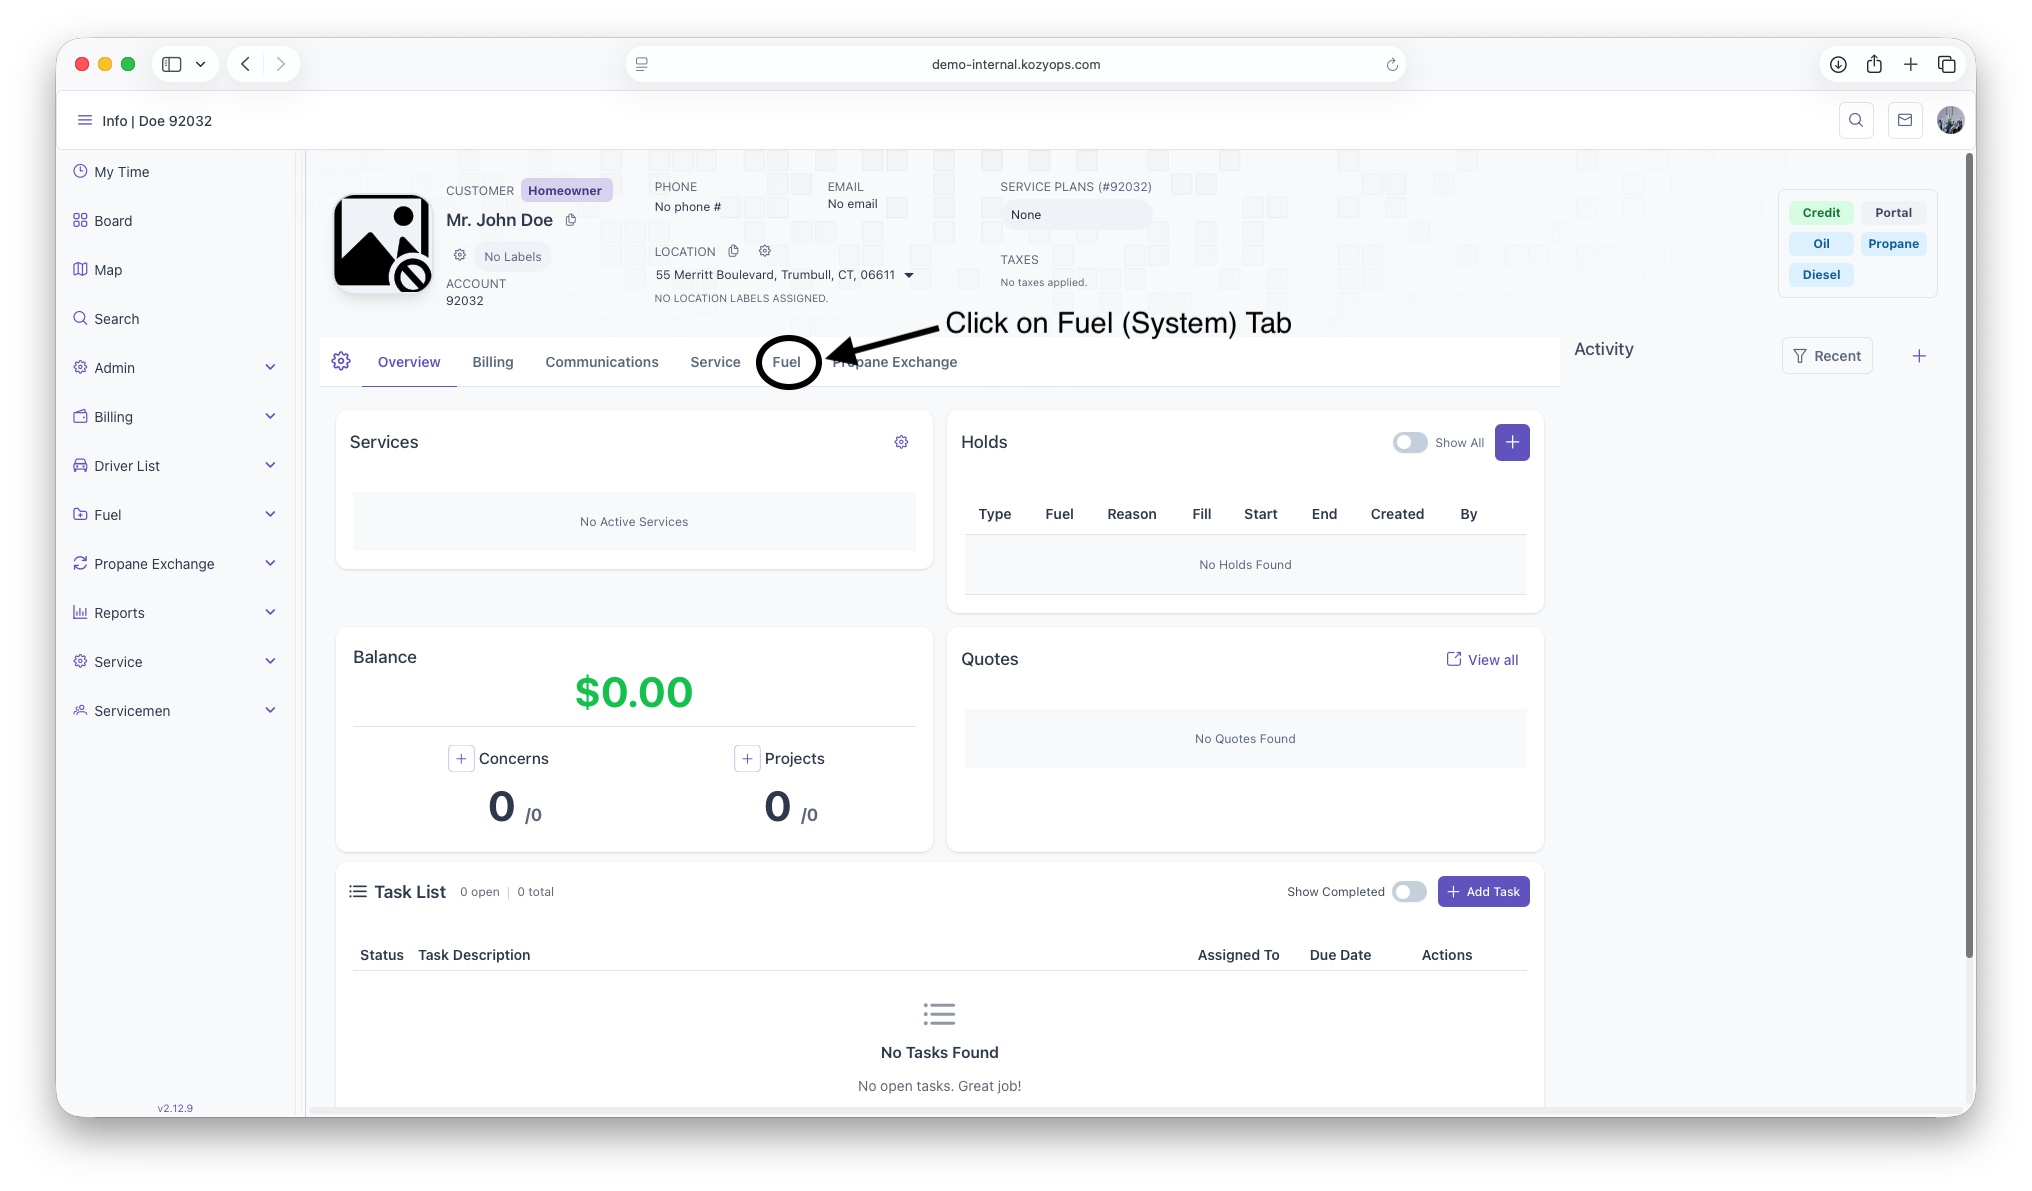
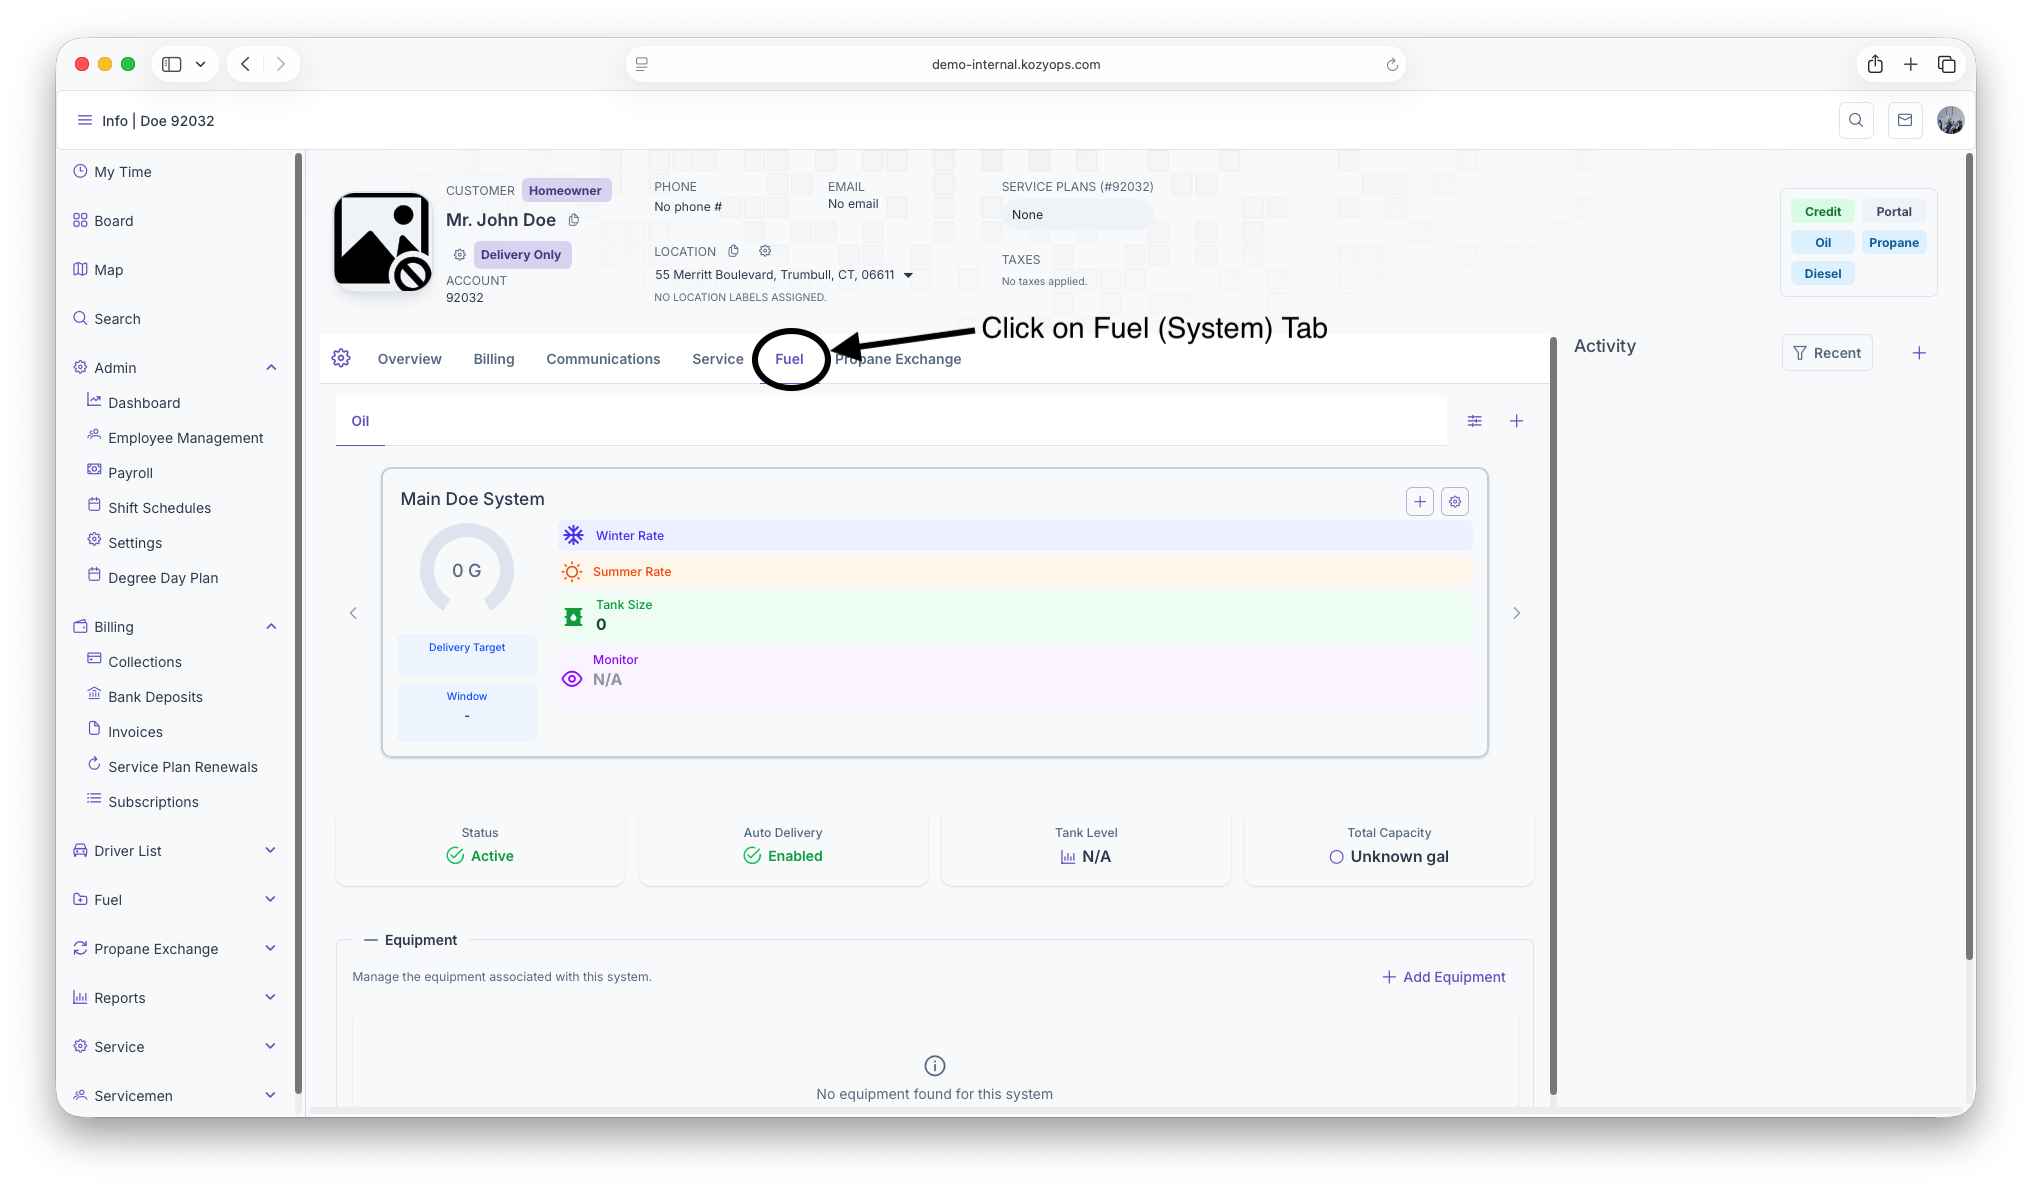
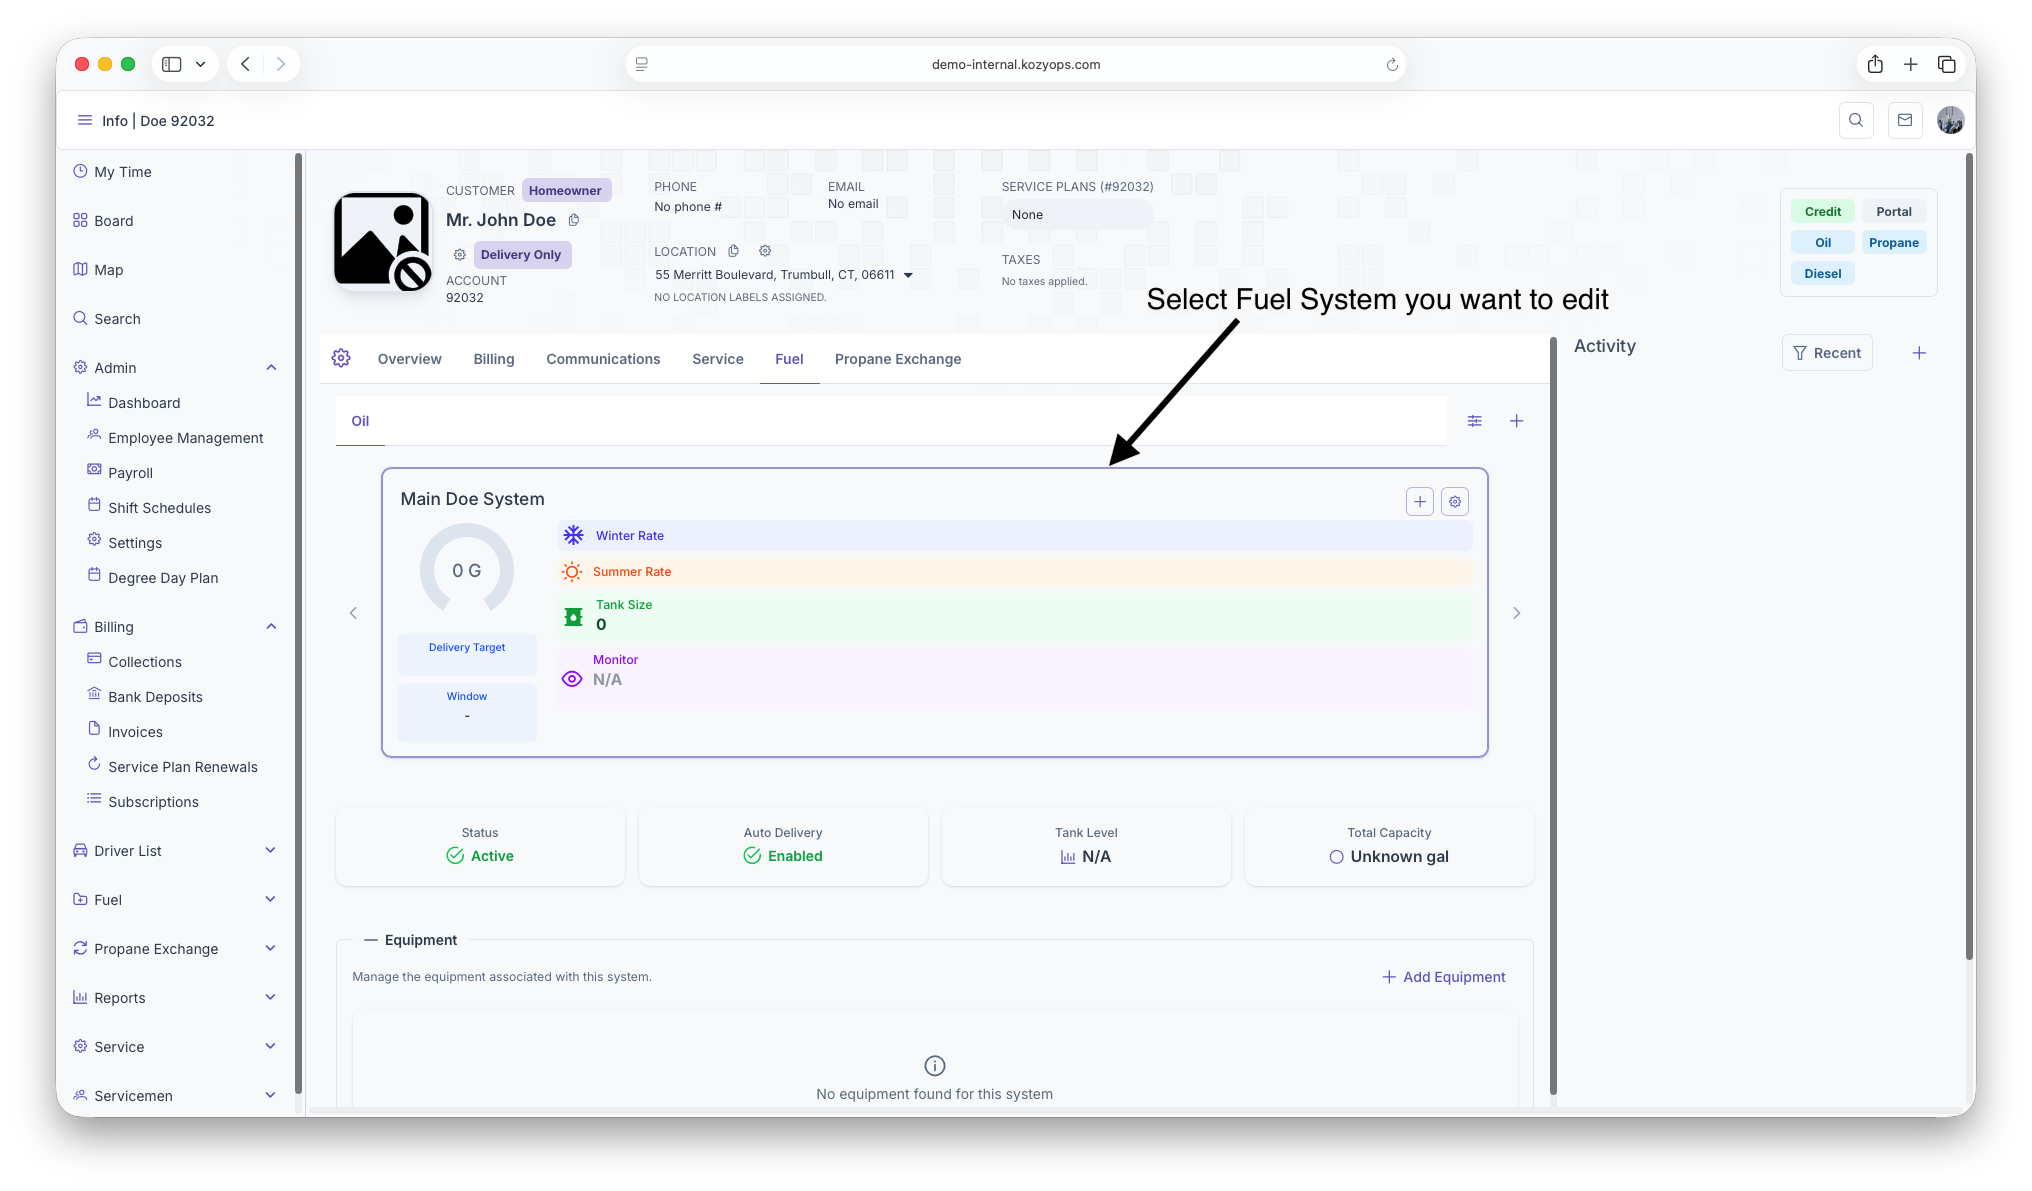
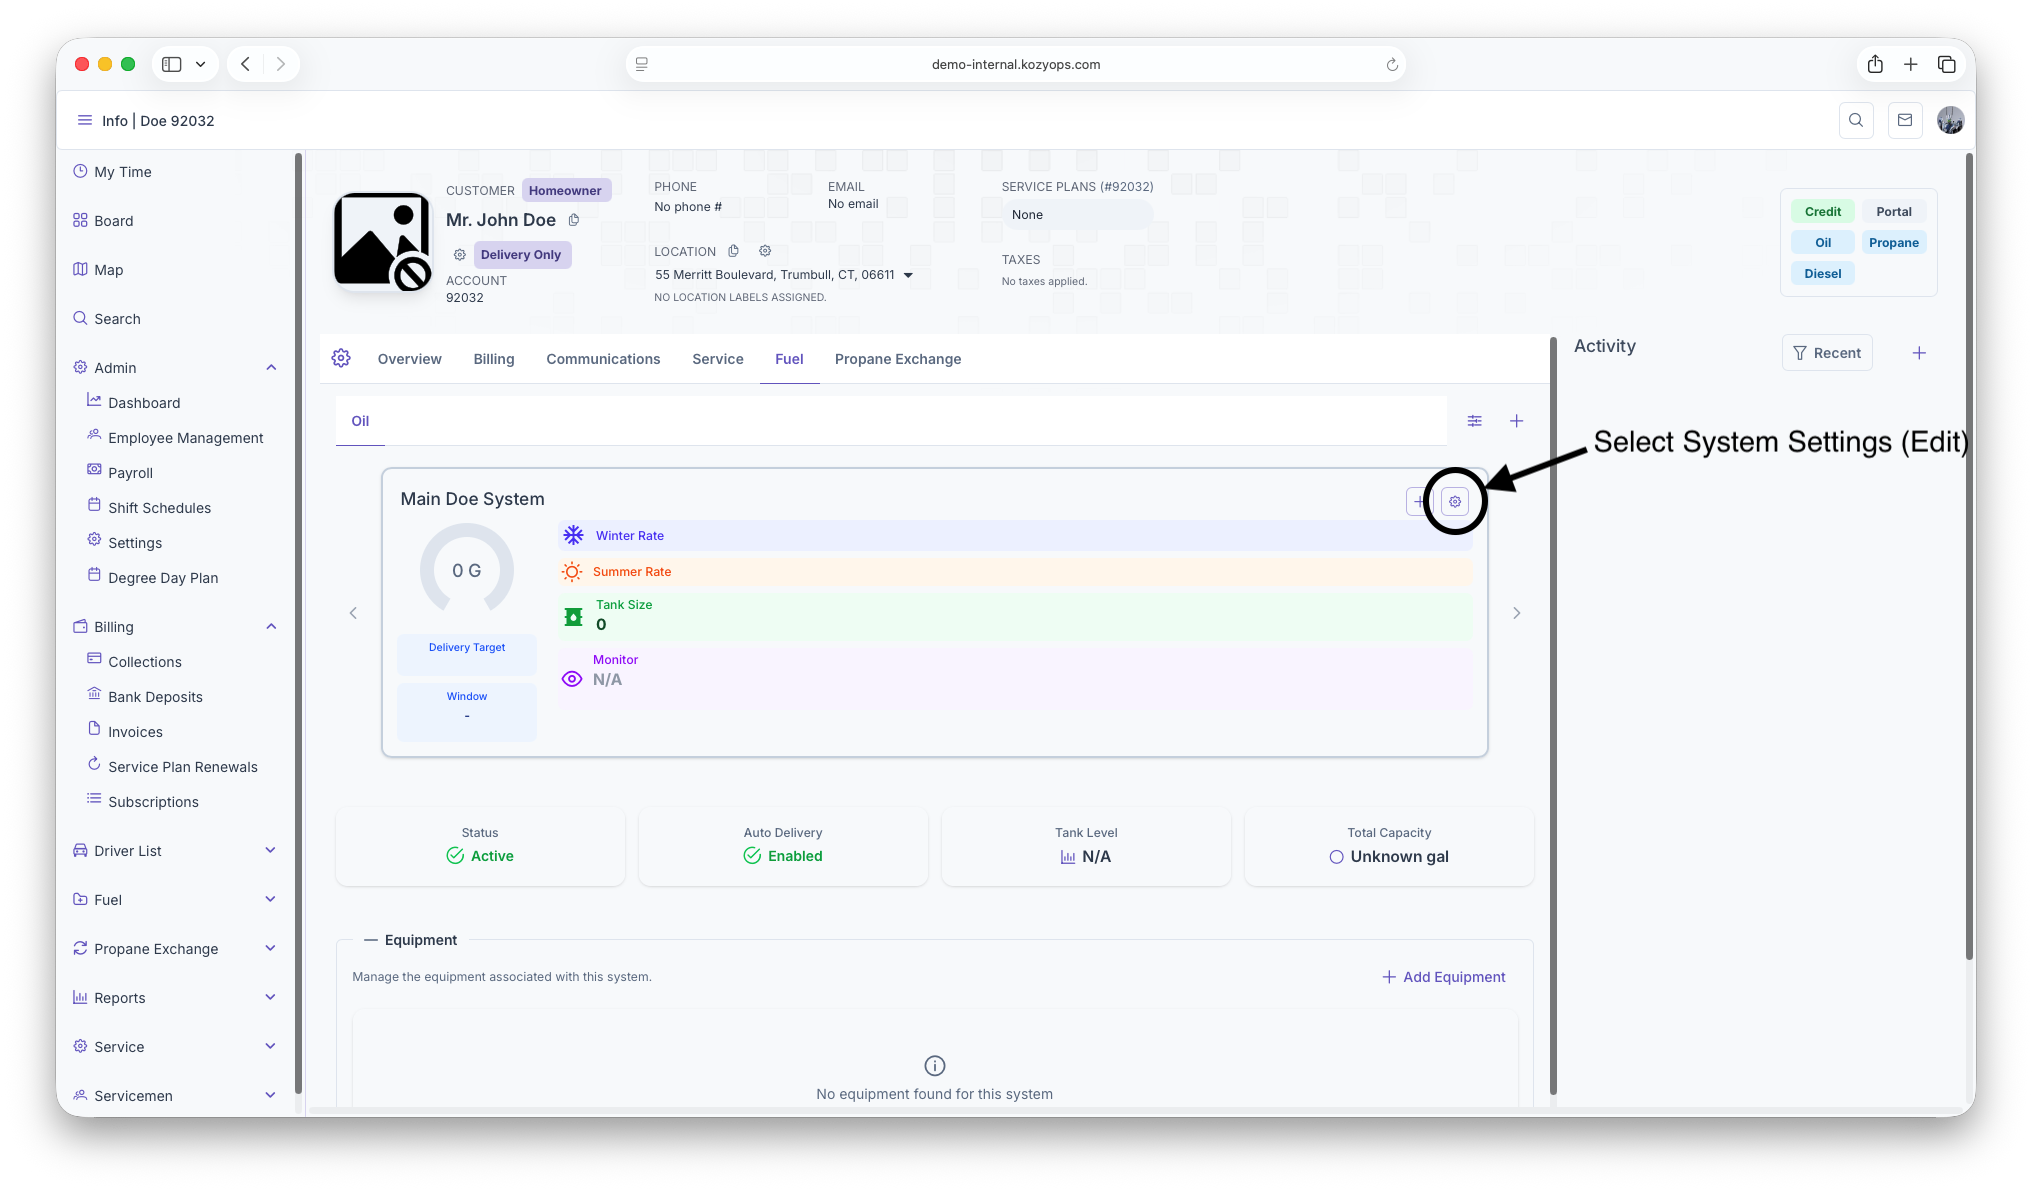
Edit a system
-
Navigate to Systems from the Customer Dashboard.

-
Find the system you want to edit.

-
Click Edit on the system.

-
The Edit System dialog opens with all current settings.

-
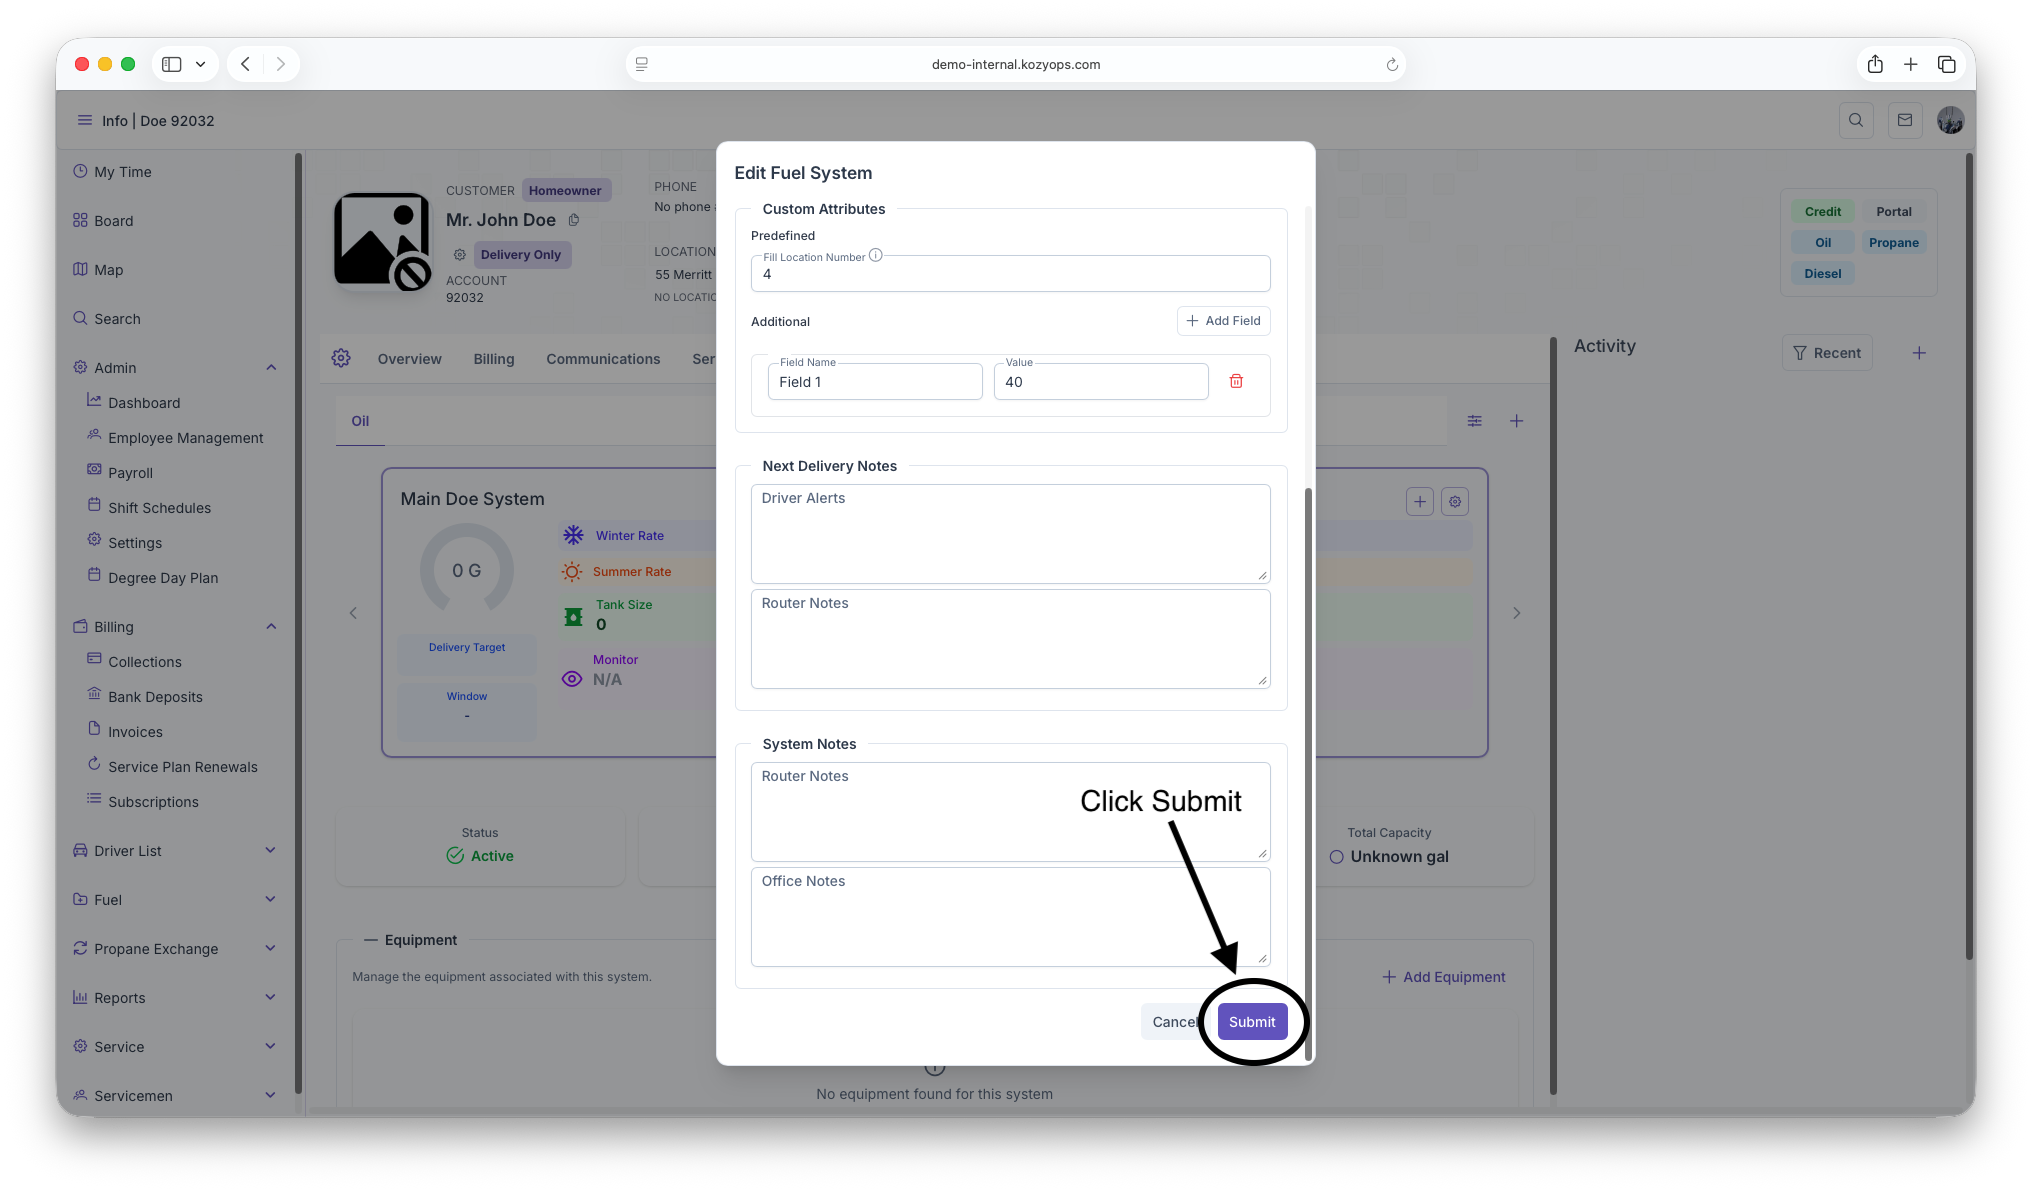
Make your changes and click Submit.

What you can edit
The Edit System dialog has the same structure as Add System, with all fields editable:
Basic system settings
System Name
- Text field for the system identifier
- Safe to change at any time for clarity
Active toggle
- Enable to keep the system active
- Disable to deactivate the system (stops delivery generation)
Auto Delivery toggle
- Enable to allow automatic delivery request generation based on window strategy
- Disable for manual/will-call only (system still tracks data but doesn't auto-generate requests)
Fuel selector (Propane, Oil, etc.)
- Caution: Only change if the physical system has been converted
- Changing fuel type may affect linked services and pricing
Window Strategy selector (Degree Day, Monitored, Calendar)
- Changes which tab's settings are used for delivery estimation
- Safe to switch, but verify the new strategy is properly configured
- See: Window Strategies
Usage multi-select
- Add or remove usage types (heating, appliance, etc.)
- Safe to change at any time
Window strategy tabs
After selecting a window strategy, configure its settings in the appropriate tab:
Degree Day Settings tab

Usage Rates:
- Winter Usage Rate: Gallons per degree day (0-4 decimal places)
- Summer Usage Rate: Gallons per degree day (0-4 decimal places)
- Safe to adjust based on consumption history
Window boundaries:
- Window Start (Visual DD): Lower boundary
- Target DD: Trigger point for delivery
- Window End (Visual DD): Upper boundary
- Force Degree Day (thumbtack icon): Manually override the current target
- Reset DD: Resets degree day accumulation (only available for existing systems with delivery history)
- Reset Window: Resets window boundaries (only available for existing systems)
Info displays:
- Current DD, Last Delivery date, Visual DD, Actual DD values
- Warning messages if target DD change is pending or window is forced
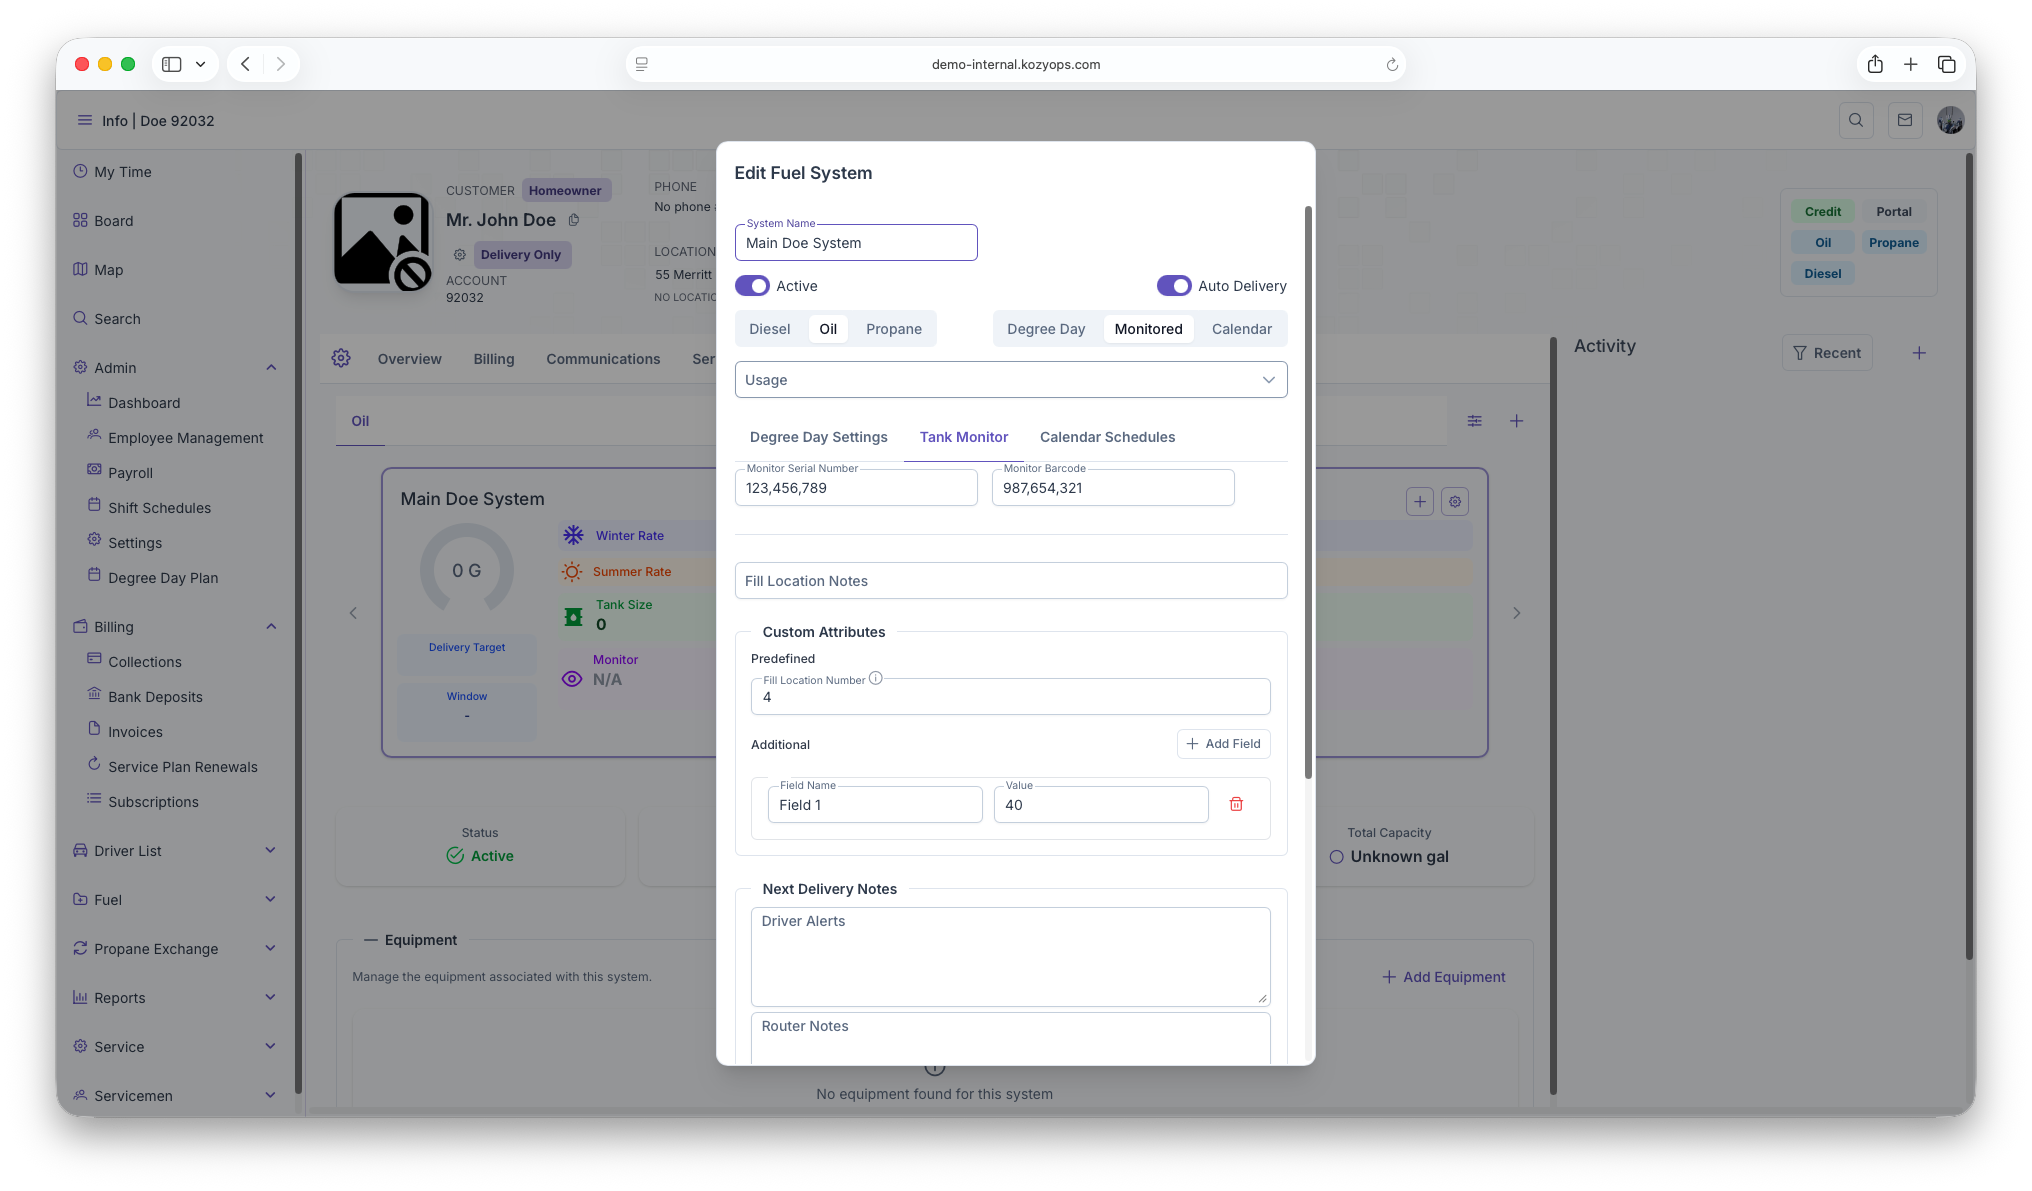
Tank Monitor tab

Monitor Serial Number
- Required if Window Strategy is set to Monitored
- Enter the device's serial identifier
- Submit button is disabled until provided for monitored systems
Monitor Barcode
- Optional additional identifier
Calendar Schedules tab

Manage recurring delivery schedules:
- Add Schedule, Edit, Set Active, Deactivate, Delete
- Only available for existing systems (must save first for new systems)
- See: Calendar Scheduling
Additional editable fields
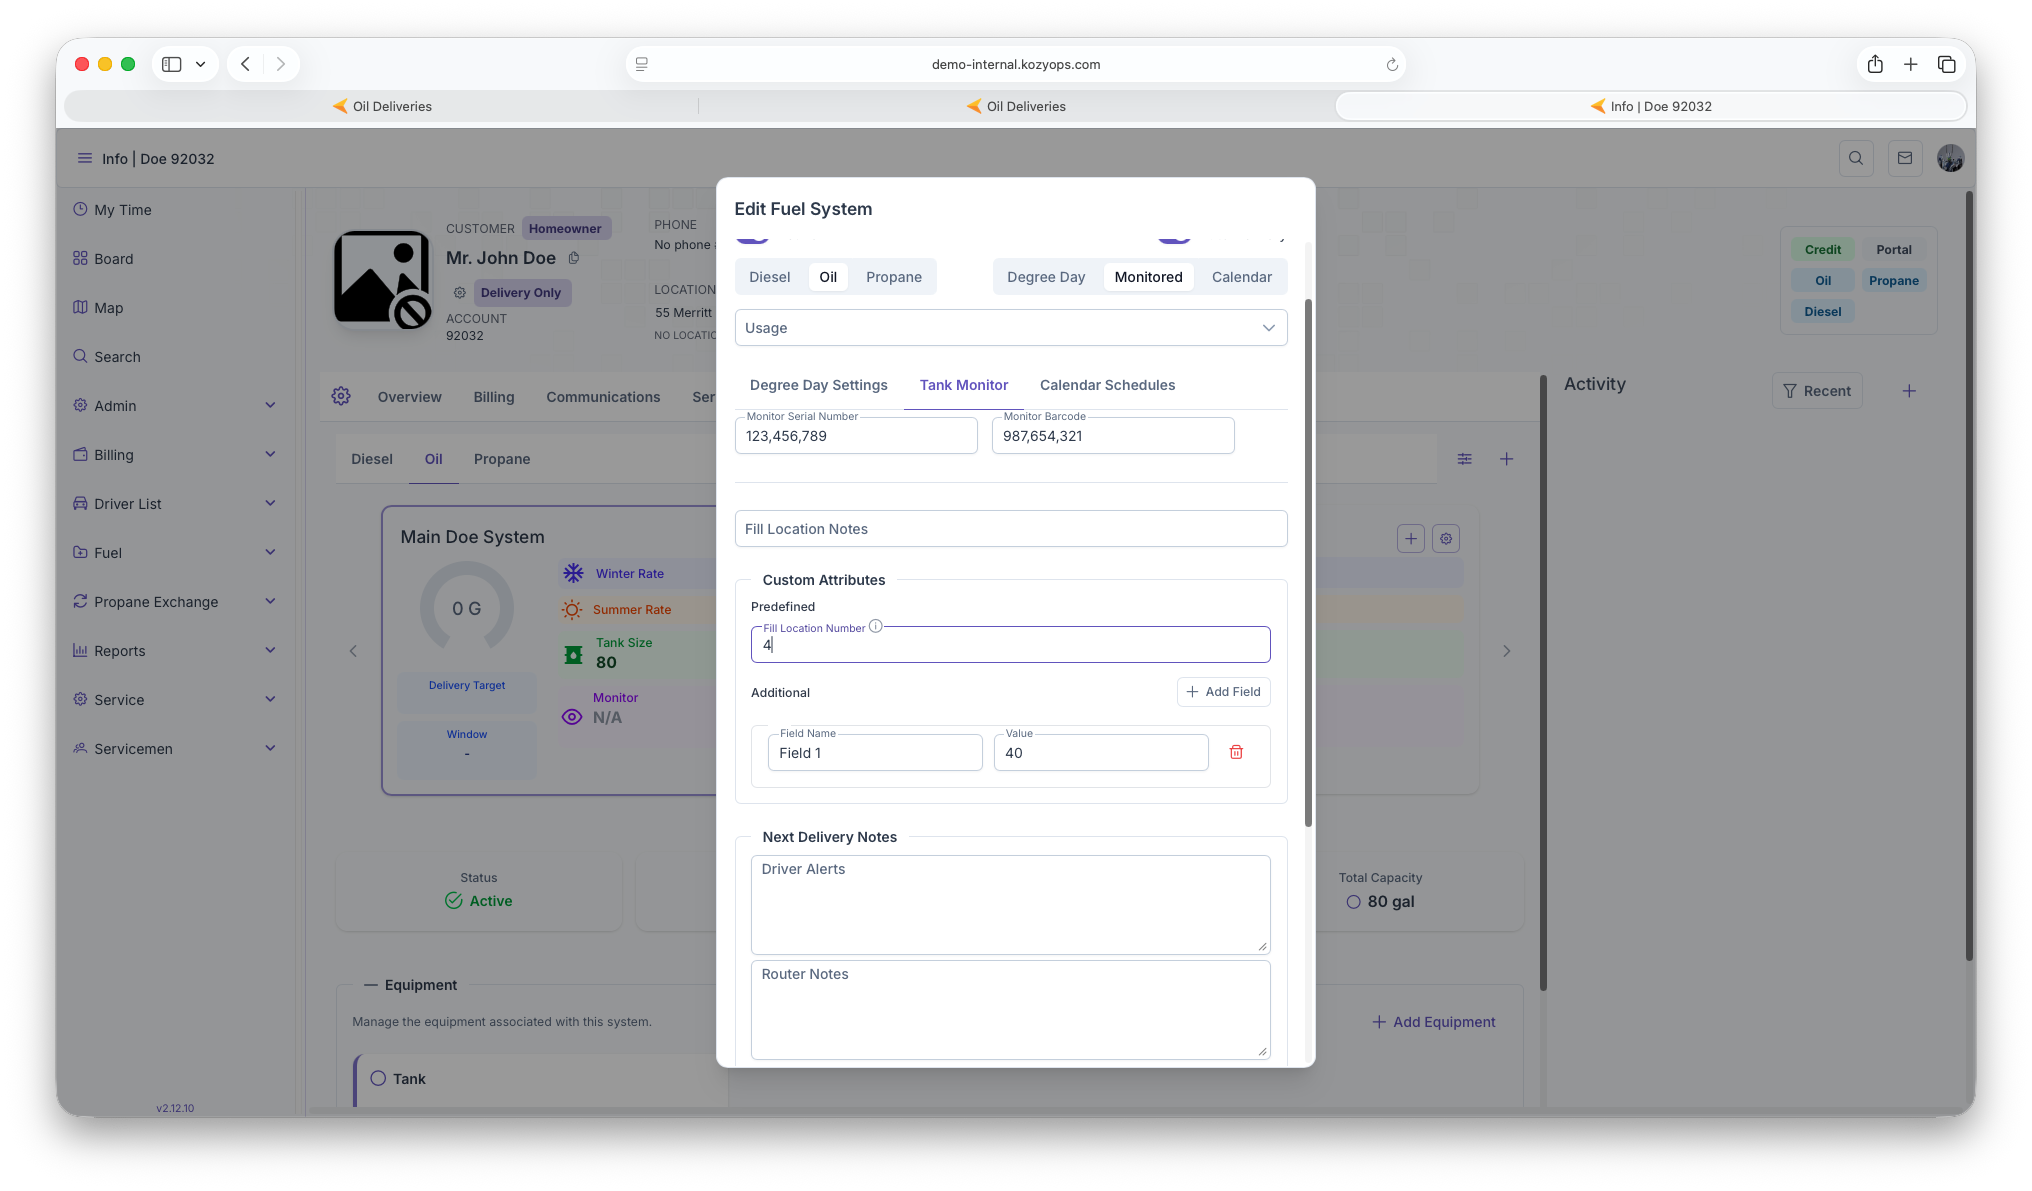
Fill Location Notes

- Text field for delivery access instructions
- Examples: gate codes, driveway location, fill pipe location
- Safe to update at any time
Custom Attributes
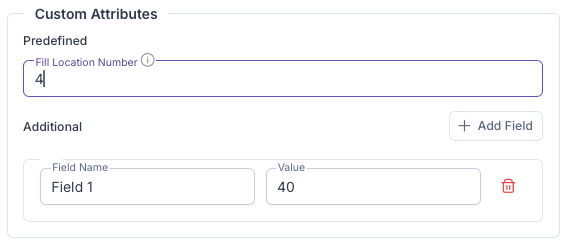
Predefined fields:
- System-type-specific fields loaded from API
- Each has a label and optional description tooltip
- Safe to fill out or update
Additional custom fields:
- Click "Add Field" to create key-value metadata
- Remove with trash icon
- Safe to add, edit, or remove
Next Delivery Notes

Driver Alerts:
- Important information for delivery drivers
- Displayed prominently during delivery
- Examples: safety warnings, access restrictions, special instructions
Router Notes:
- Instructions for routing and dispatch
- Examples: delivery window preferences, route-specific notes
Office Notes
- Internal notes visible only to office staff
- General system information not needed by drivers
- Safe to update at any time
Safe edits (no delivery impact)
These changes can be made freely without affecting active deliveries:
- System Name: Rename for clarity
- Usage types: Add or remove usage categories
- Fill Location Notes: Update access instructions
- Custom Attributes: Add, edit, or remove metadata
- Driver/Router/Office Notes: Update any notes
- Degree Day usage rates: Adjust based on historical data
- Calendar schedules: Add, edit, activate, or deactivate schedules
Changes requiring caution
Deactivating the system (Active toggle off)
Impact:
- System stops tracking and generating deliveries
- Existing delivery requests may be canceled
- Equipment and monitors remain linked but inactive
When to use:
- Customer temporarily discontinues service
- System is being replaced or upgraded
- Account is on hold
Best practice: Verify no pending deliveries exist before deactivating
Disabling Auto Delivery toggle
Impact:
- System continues tracking data but stops generating automatic delivery requests
- Switches to manual/will-call mode
- Monitor/degree day data still calculated for reference
When to use:
- Customer switches to will-call
- Temporary pause in automatic deliveries
- Testing or troubleshooting
Changing Window Strategy
Impact:
- Changes which calculation method triggers deliveries
- Previous strategy data is preserved but not used
- New strategy must be fully configured
Example: Switching from Degree Day to Monitored
- Enter Monitor Serial Number
- Verify monitor is transmitting
- Old degree day settings remain but aren't used
Best practice: Configure the new strategy completely before switching
Changing Fuel type
Impact:
- May cause mismatches with equipment fuel types
- Affects pricing and product calculations
- Historical delivery data remains but context may be confusing
When to use: Only if the physical system has been converted (e.g., oil to propane)
Best practice:
- Update equipment fuel types to match
- Notify dispatch and billing teams
- Document the conversion date in notes
Forcing Degree Day or Resetting Windows
Impact:
- Overrides automatic calculations
- Can cause deliveries to trigger earlier or later than projected
- Resets may clear accumulated history
When to use:
- Manual delivery override needed
- Projections are significantly off
- After major system changes or repairs
Best practice: Document the reason in notes
Equipment management
Equipment is not edited directly in the system dialog. To manage equipment:
- View equipment list in the system details
- Click Edit on the specific equipment
- Use the Equipment dialog to modify
- See: Adding Equipment
Note: You cannot change which system equipment belongs to from this dialog. Edit the equipment itself to reassign it.
What you cannot edit
- System creation date: Historical timestamp, read-only
- Last delivery information: Calculated from delivery history
- Current degree day value: Real-time data from weather service
- Monitor readings: Real-time data from monitoring device
- Equipment list: Managed separately via equipment dialogs
Validation and errors
The dialog validates entries before allowing submission:
Common validation errors:
- Monitor serial number required when Window Strategy = Monitored
- Window strategy must be selected
- Fuel type must be selected
- Numeric fields must be valid numbers
Validation errors appear at the top or inline with red styling. The Submit button is disabled until all errors are resolved.
After saving changes
When you click Submit:
- Changes are saved immediately
- Dialog closes and returns to the system list
- System selector and displays update with new values
- Delivery projections recalculate based on new settings
Note: Changes to window strategy or usage rates may cause immediate recalculation of delivery windows and target dates.
Deactivating vs. deleting a system
Deactivate (Active toggle off):
- Preserves all historical data
- Can be reactivated later
- Recommended for systems temporarily out of service or that have been replaced.
Delete (via delete action):
- Permanently removes the system
- Deletes linked equipment
- Cannot be undone
- Only use if system was created in error
Best practice: Always deactivate rather than delete to maintain data integrity and history.
Related guides
- Add System — Creating new systems
- Window Strategies — Understanding and configuring window strategies
- Degree Day System — Degree day settings and calculations
- Monitoring — Tank monitor configuration
- Calendar Scheduling — Managing calendar schedules
- Adding Equipment — Managing equipment within systems
- Add Services — Products and service plans
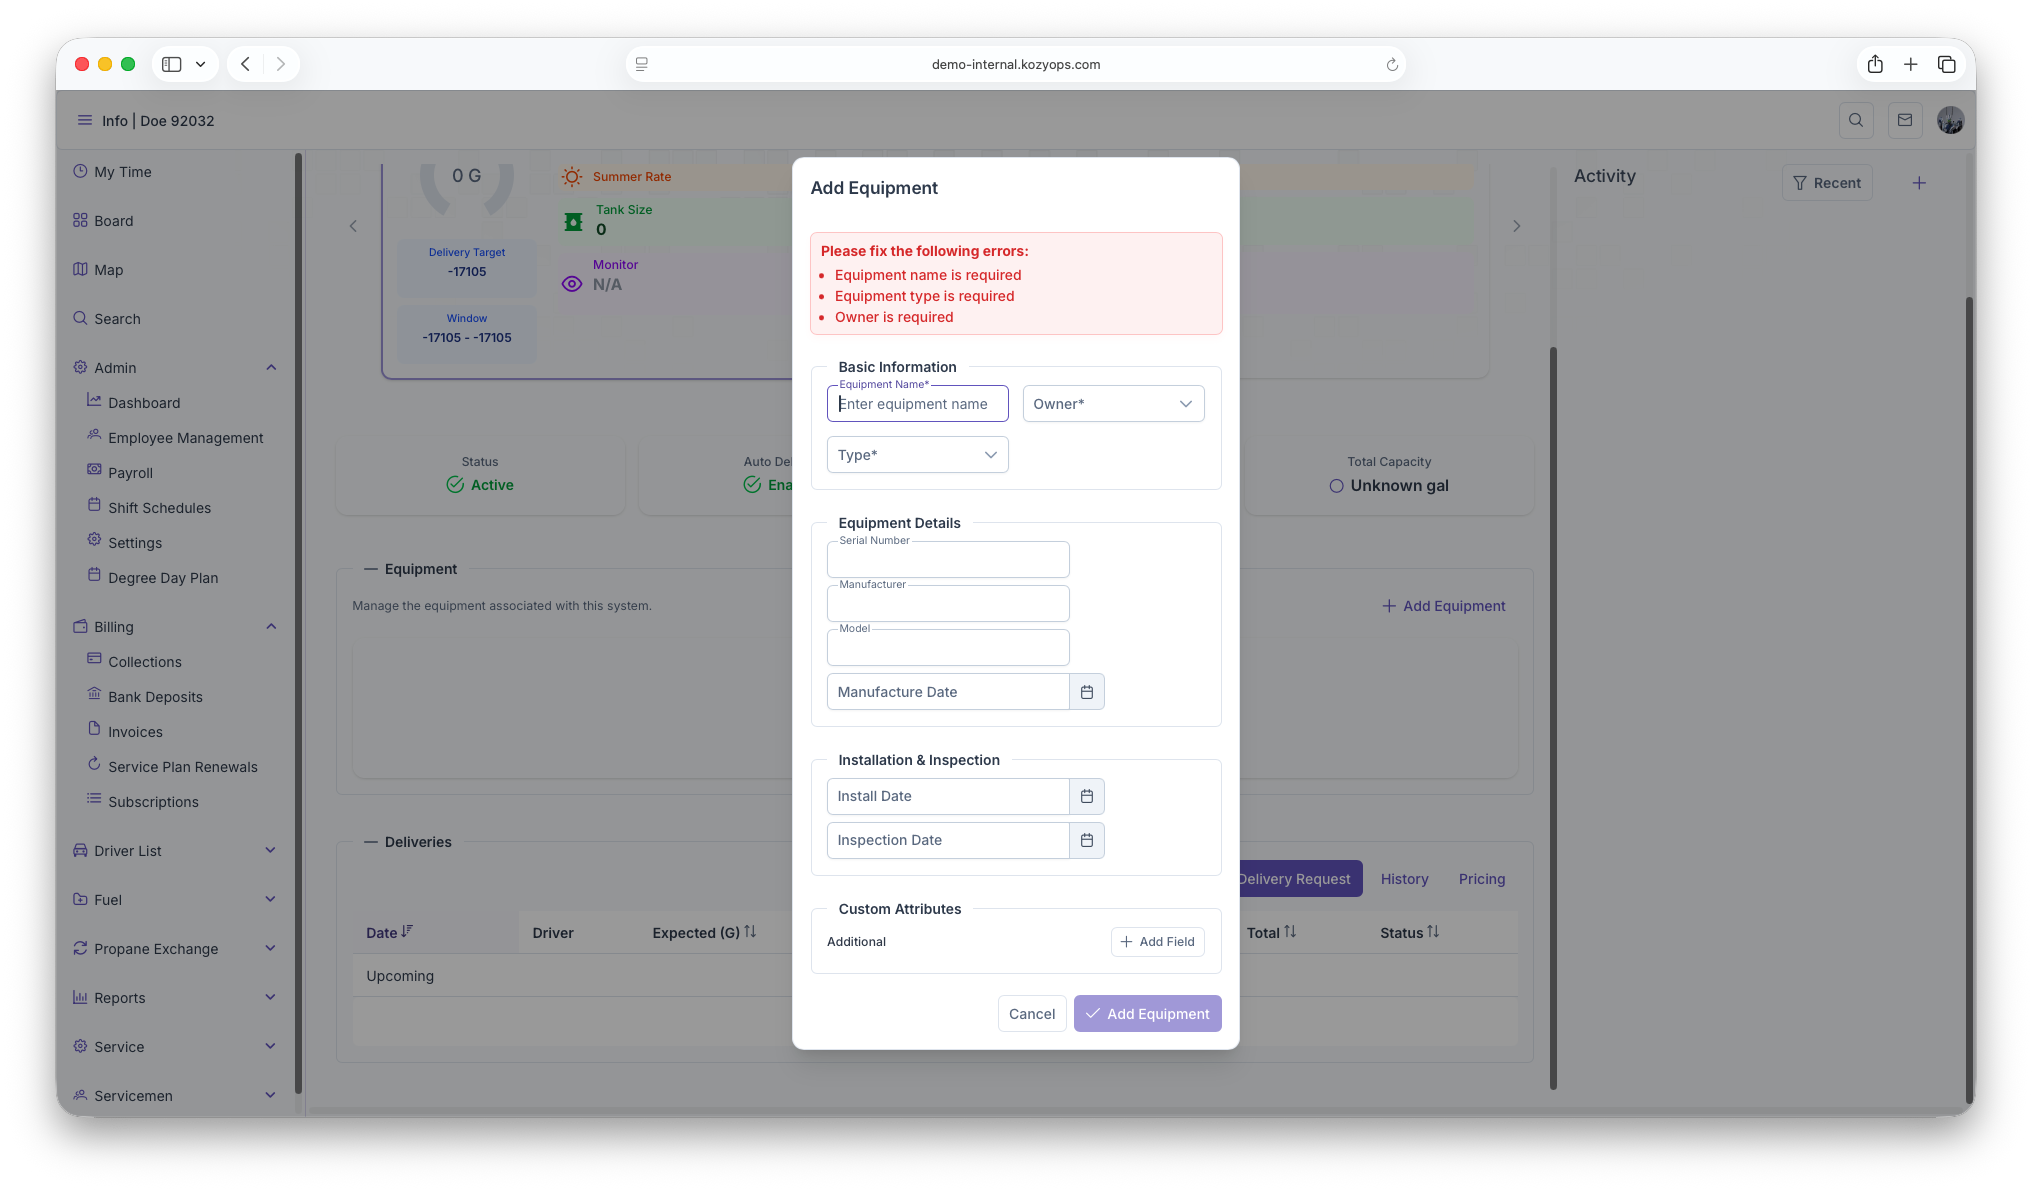
Adding Equipment Guide
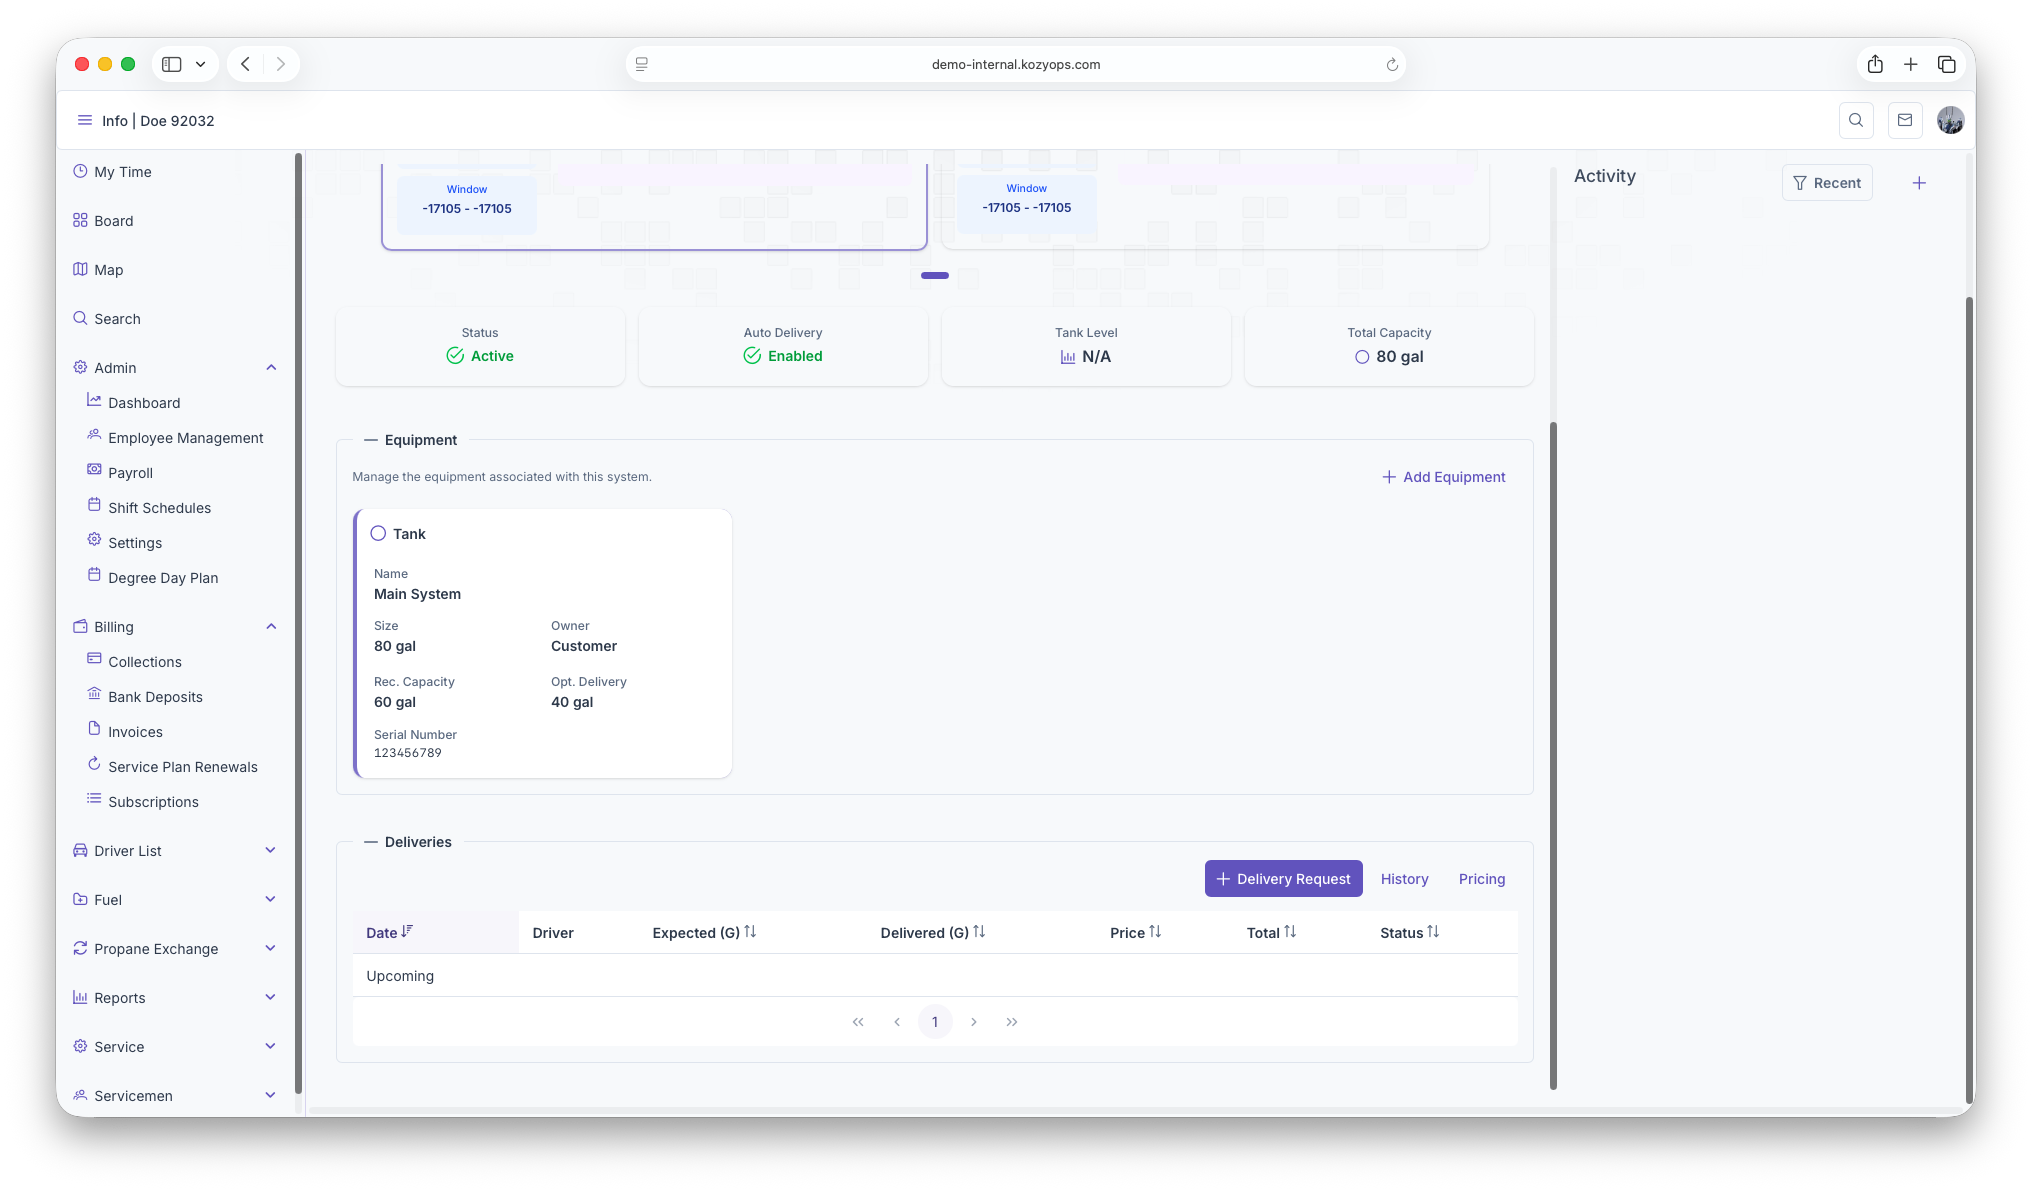
This guide explains how to add equipment to a system using the Add/Edit Equipment dialog. Equipment represents physical components like tanks, regulators, filters, and other equipment.
Key concept: You can add multiple tanks to a system when they share the same fill connection. Each piece of equipment is tracked separately within the system.
Prerequisites
- A system must exist for the location. See Add System if you need to create one first.
- You are on the Customer Dashboard with the correct Location selected.
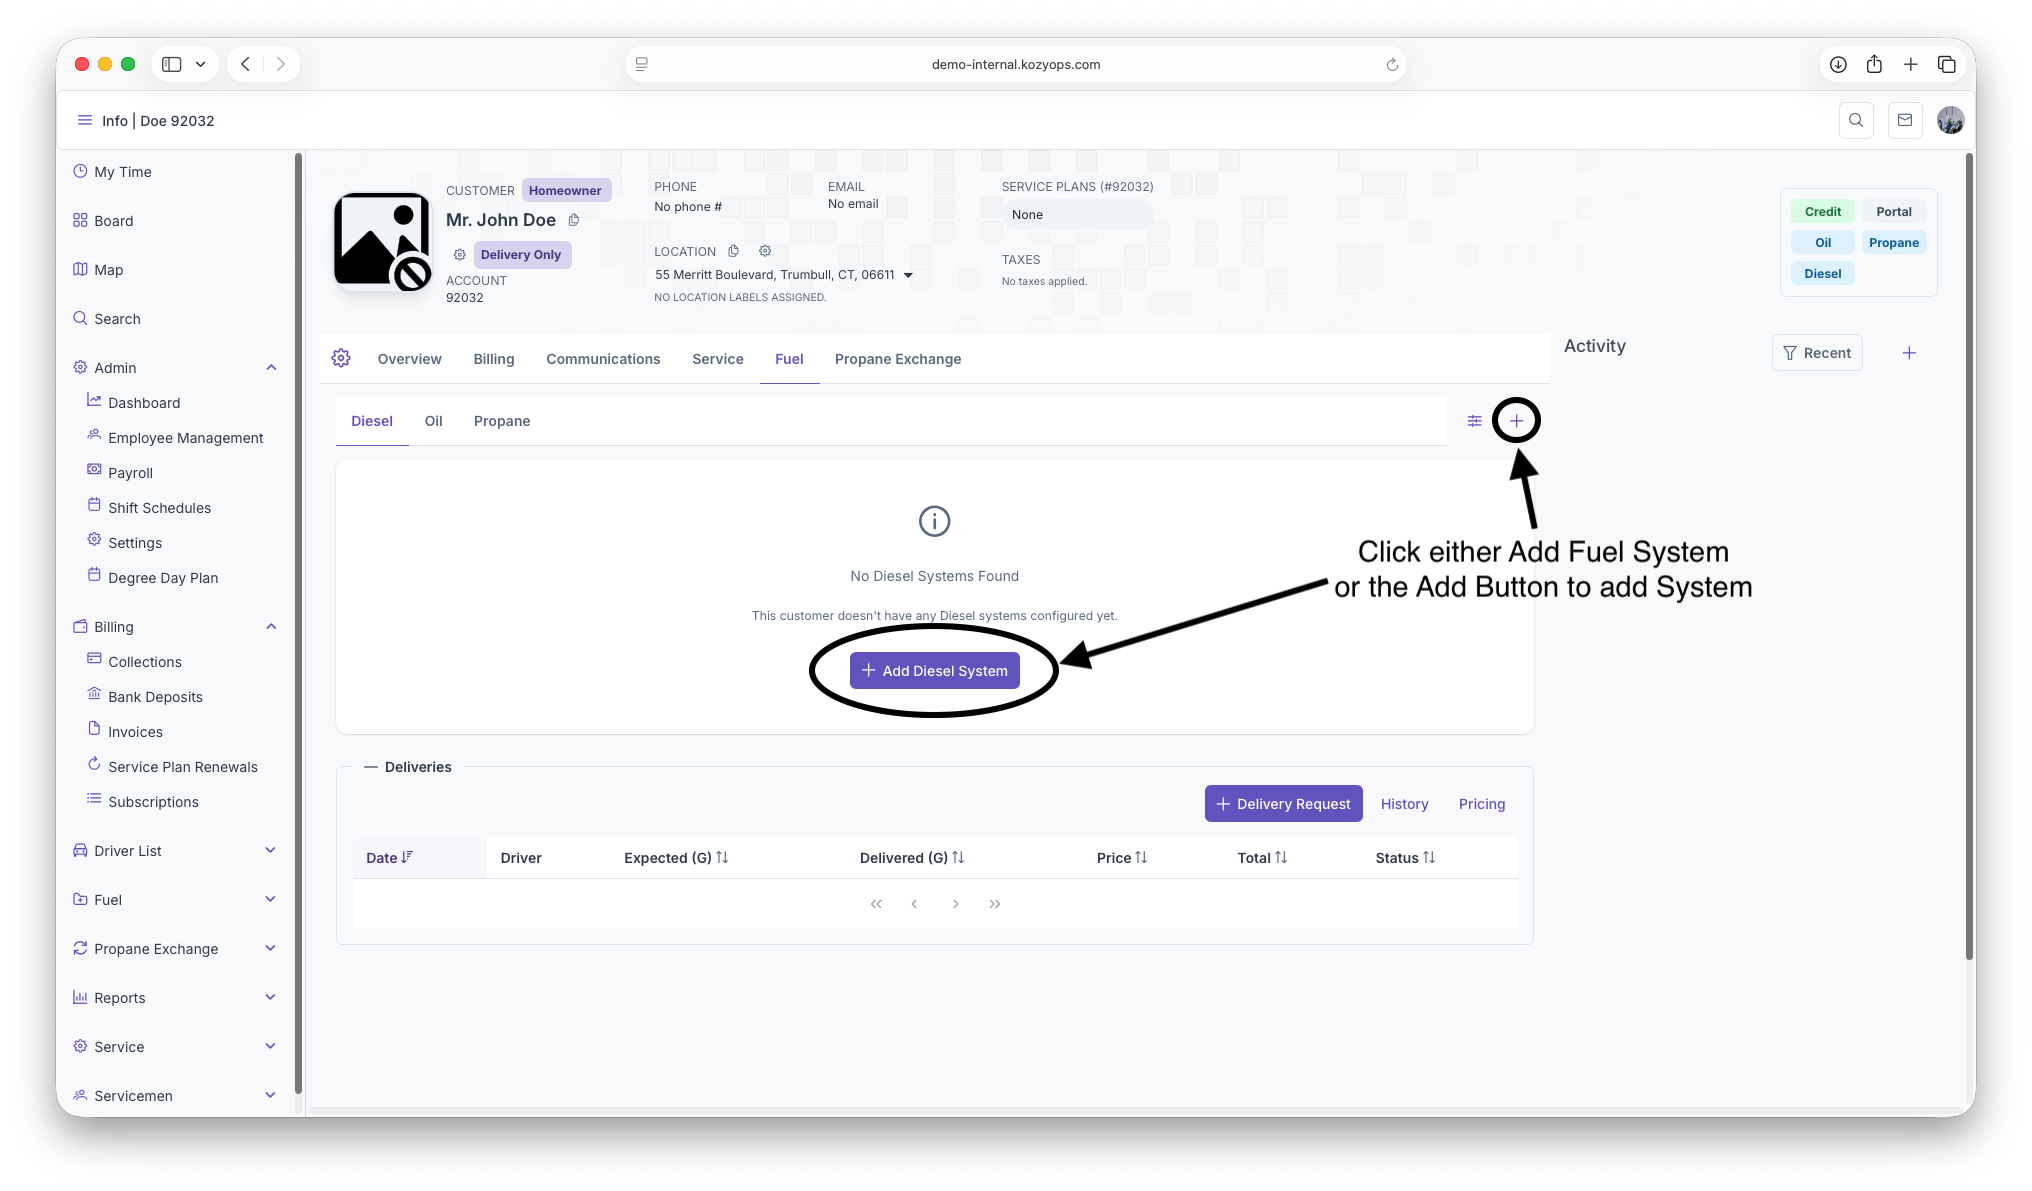
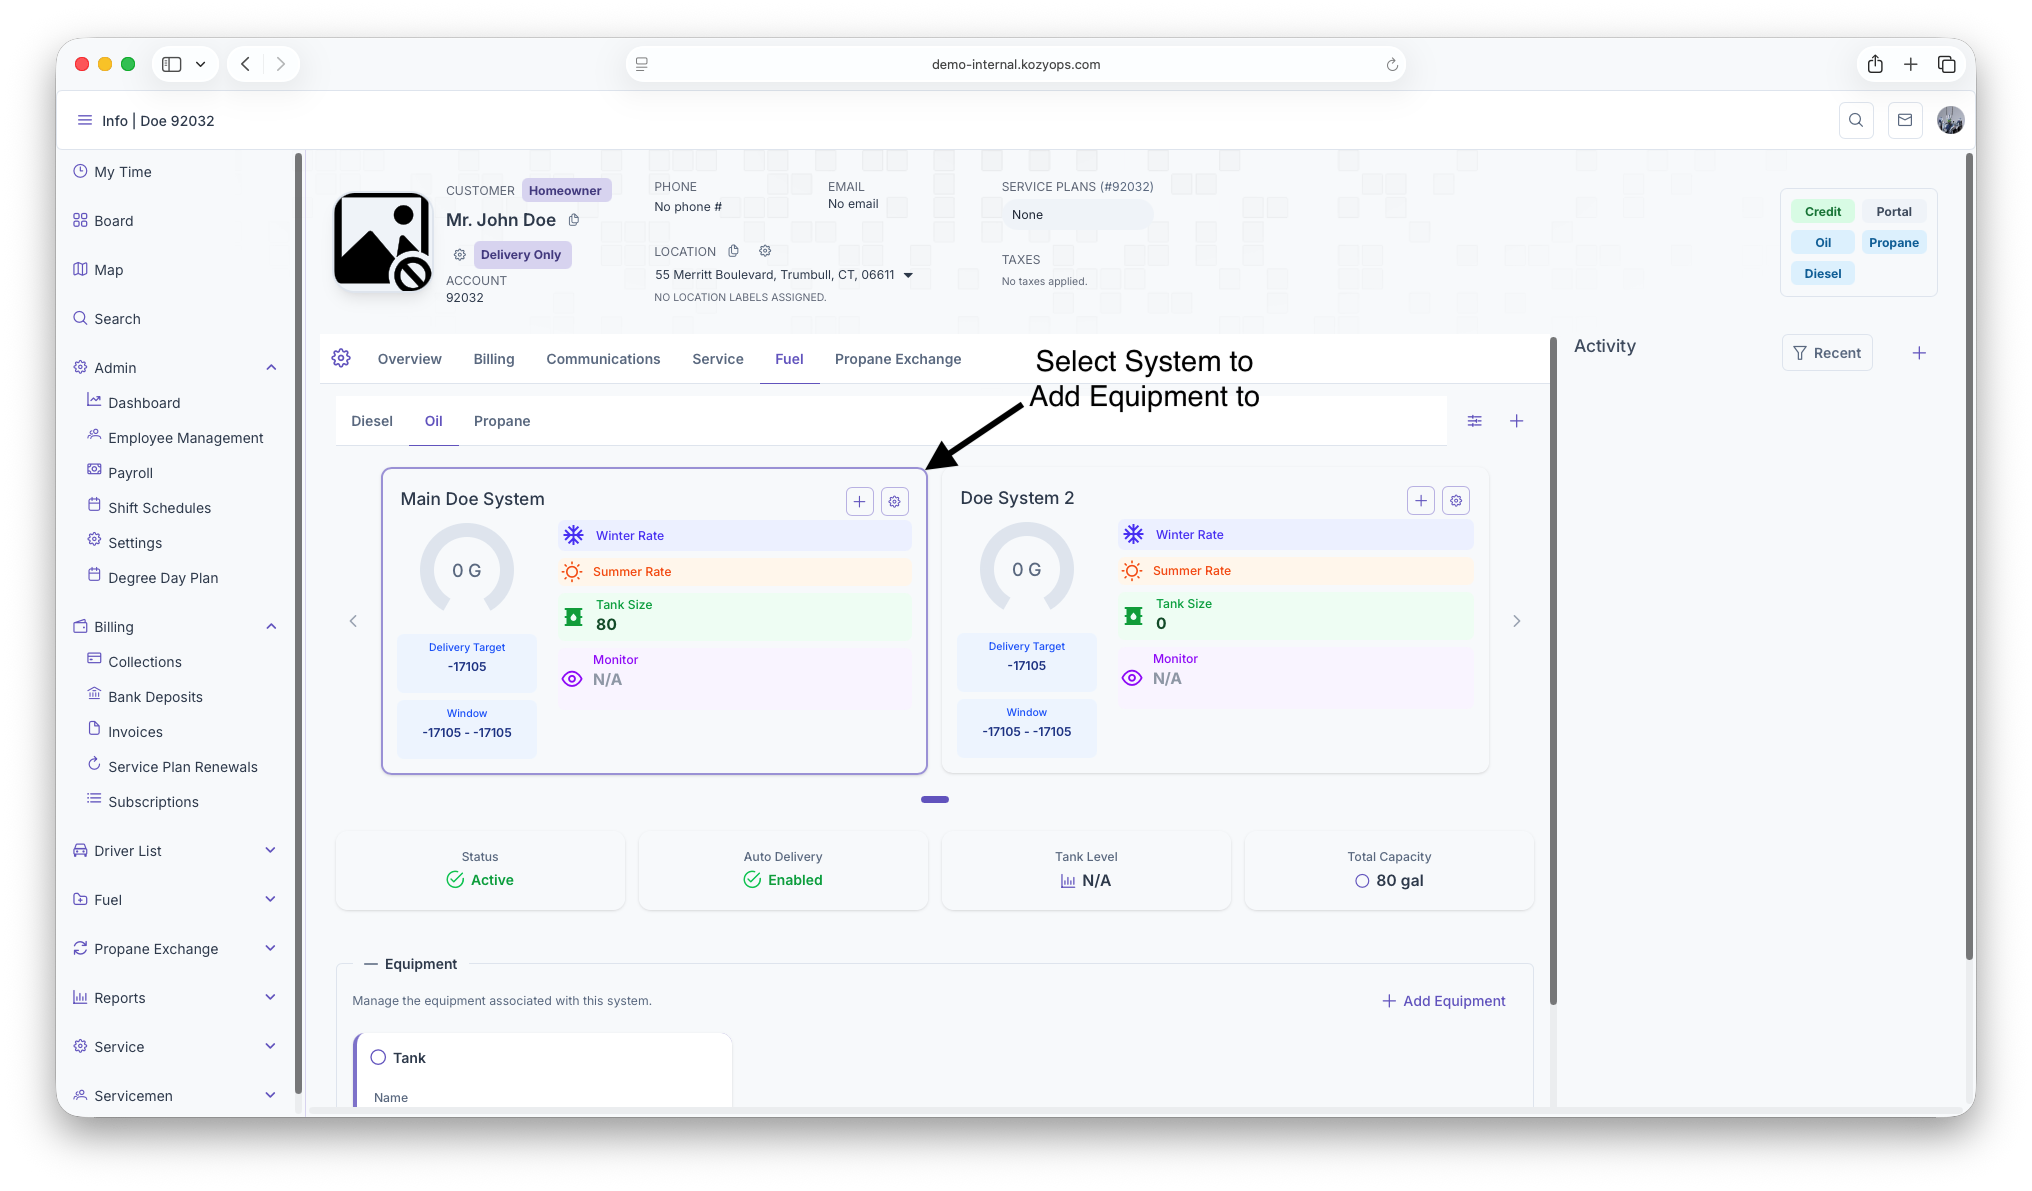
Add equipment to a system
-
Navigate to the Systems section from the Customer Dashboard.

-
Select the system you want to add equipment to.

-
Click Add Tank or Add Equipment.

-
The Add Equipment dialog opens with multiple sections.

-
Fill out the required fields and click Add Equipment or Update Equipment.


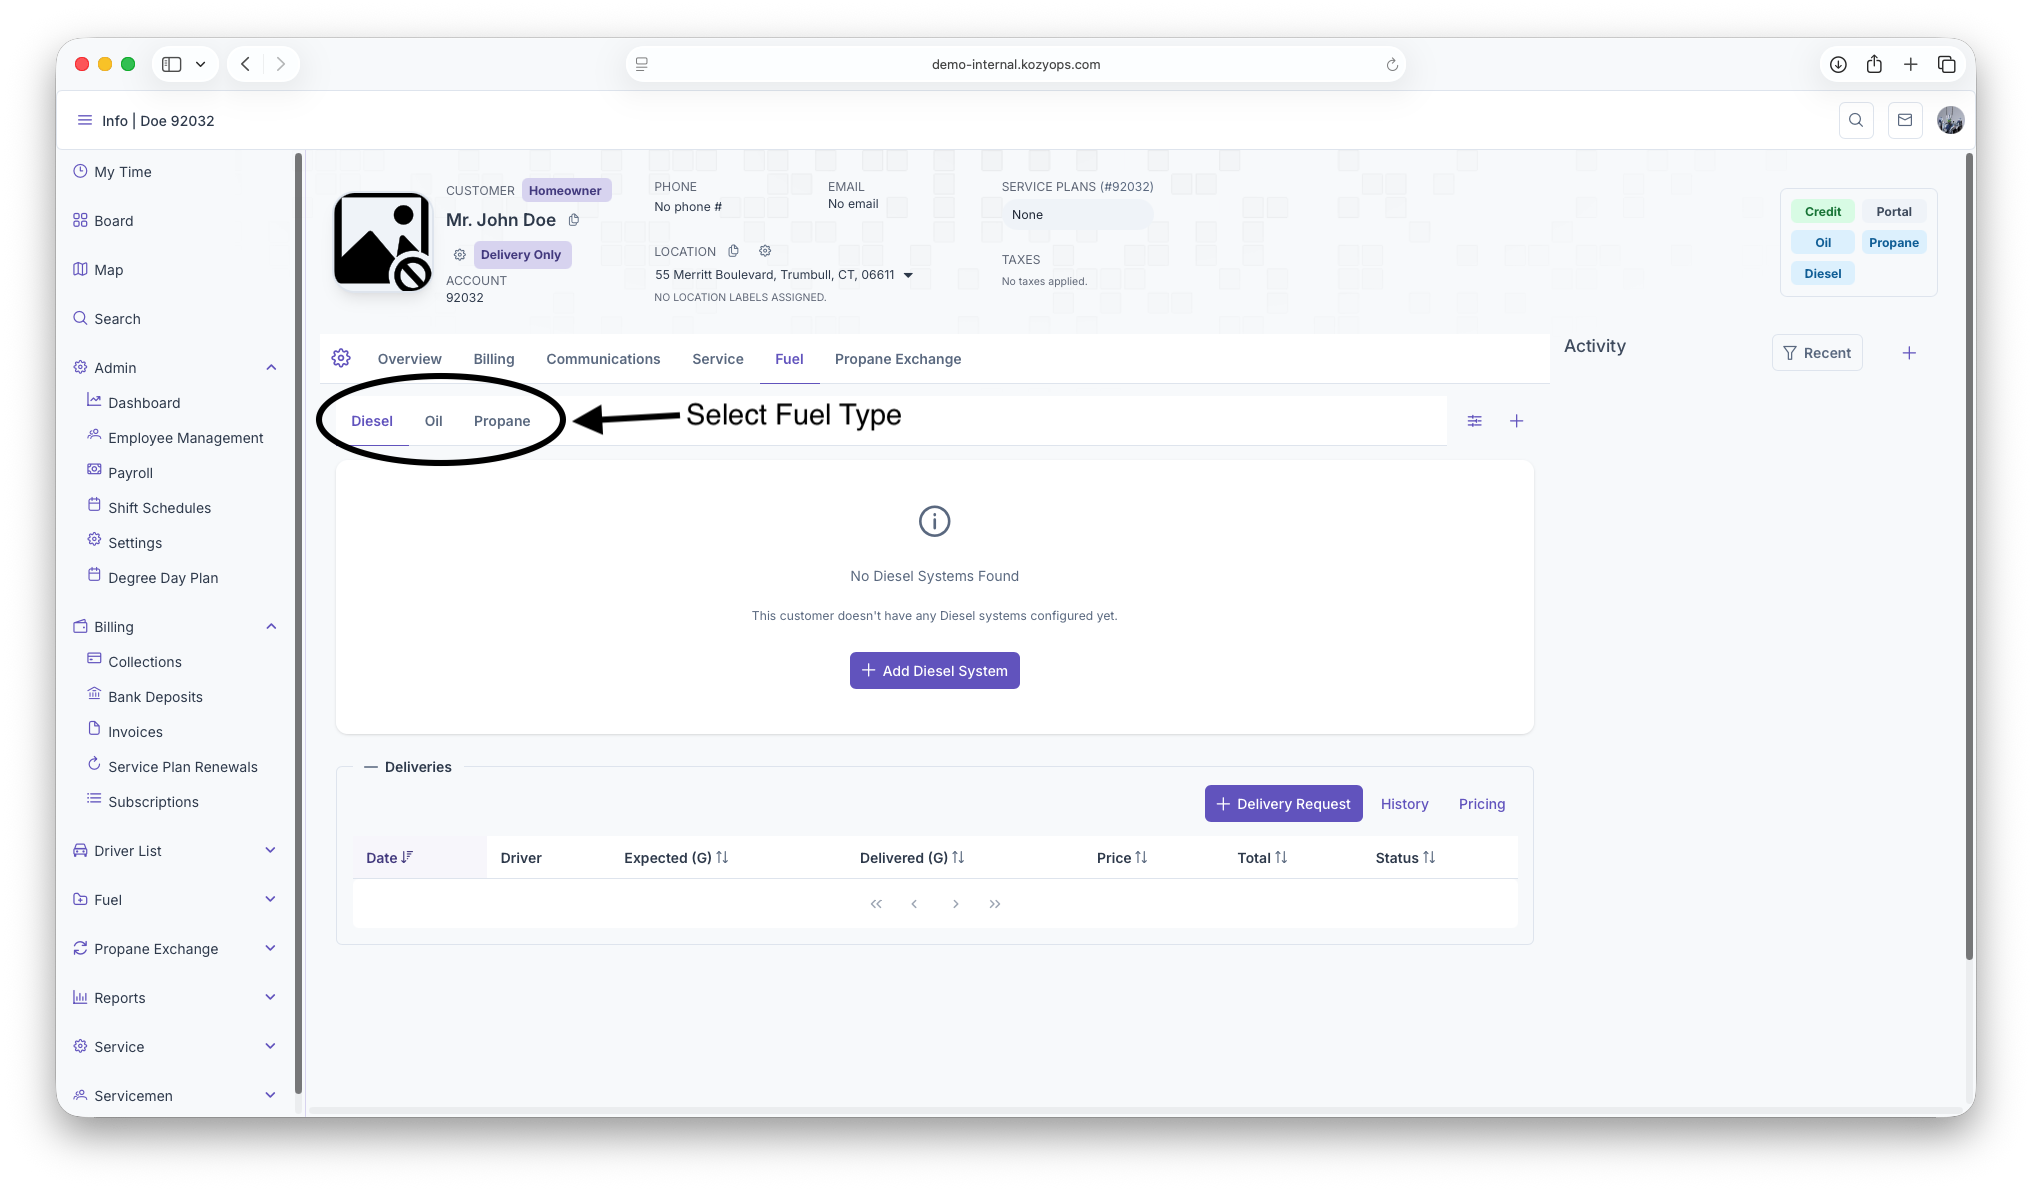
Equipment types
The dialog supports these equipment types:
- Tank: Storage tanks for fuel (propane, oil)
- Regulator: Pressure regulation equipment (requires expiration date)
- Filter: Filtration equipment
- Other Equipment: Custom equipment types
Basic Information section
Required fields
- Equipment Name: Clear identifier for the equipment
- Owner: Select "Customer" or "Internal"
- Type: Tank, Regulator, Filter, or Other Equipment
All three fields are required to proceed.
Equipment Details section
Serial Number
- Required if Owner is "Internal"
- Optional for customer-owned equipment
- Used for warranty and service tracking
Optional fields
- Manufacturer: Equipment manufacturer name
- Model: Model number or designation
- Manufacture Date: When the equipment was manufactured (date picker with Luxon support)
Installation & Inspection section
Both fields are optional:
- Install Date: When the equipment was installed or replaced
- Inspection Date: Most recent inspection date
Use date pickers to select dates.
Regulator Information (regulators only)
If you selected Type = Regulator, an additional section appears:
Required field
- Expiration Date: When the regulator expires and needs replacement (required for regulators)
This field uses a date picker and is mandatory for regulator equipment.
Tank Information (tanks only)
If you selected Type = Tank, an additional section appears with three required fields:
Required fields (all with gallon suffix)
-
Size (Gallons): Total tank size capacity
- Supports up to 3 decimal places
- Minimum value: 1 gallon
-
Recommended Capacity: The recommended fill capacity (typically 80-90% of total size)
- Supports up to 3 decimal places
- Minimum value: 1 gallon
- Used for delivery calculations
-
Optimum Delivery: The optimal delivery amount for this tank
- Supports up to 3 decimal places
- Minimum value: 1 gallon
- Used for routing and delivery planning
Example for a 275-gallon tank:
- Size: 275 gallons
- Recommended Capacity: 247 gallons (90% of 275)
- Optimum Delivery: 200 gallons
Multiple tanks on one system
When you have multiple tanks sharing the same fill connection:
- Add each tank as separate equipment to the same system
- Enter accurate Size, Recommended Capacity, and Optimum Delivery for each tank
- The system automatically aggregates capacity across all tanks for delivery calculations
Example setup:
- System: "Main Propane System"
- Tank 1: 500 gallons (450 recommended, 400 optimum)
- Tank 2: 500 gallons (450 recommended, 400 optimum)
- Total system capacity: 1000 gallons (900 recommended)
This approach allows accurate tracking of individual tanks while calculating deliveries for the combined system.
Custom Attributes section
Always visible at the bottom of the dialog:
Predefined custom fields
- Loaded from the API based on equipment type
- Each field shows with a label and optional description tooltip
- Enter values as needed for your tracking requirements
Additional custom fields
- Click Add Field to create custom key-value metadata
- Enter Field Name and Value
- Remove fields with the trash icon button
- Useful for tracking location-specific or custom attributes
Validation and submission
The dialog validates your entries:
- Validation errors appear at the top in a red message box
- Common errors:
- Missing required fields (Name, Owner, Type)
- Serial number required for Internal-owned equipment
- Expiration date required for regulators
- Tank size, recommended capacity, and optimum delivery required for tanks
- Values must be > 0 for numeric fields
The Add Equipment or Update Equipment button is disabled until all validation passes.
Dialog actions
- Cancel: Close the dialog without saving changes
- Add Equipment (for new): Save the new equipment to the system
- Update Equipment (for existing): Save changes to existing equipment
After saving, the equipment appears in the system's equipment list and can be used for delivery projections, monitoring, and service tracking.
Editing or removing equipment
- To edit: Click the equipment row or Edit button, make changes, and click Update Equipment
- To remove: Use the delete/remove action (typically with confirmation)
- Be cautious if the equipment is linked to active monitors or services
Related guides
- Add System — Create the parent system first
- Editing a System — Modify system details
- Monitoring — Link tank monitors to equipment
- Window Strategies — Configure delivery estimation using equipment data
- Add Services — Products and service plans for the customer
Delivery Strategies
Understanding Window Strategies
Window strategies determine how deliveries are estimated and scheduled by selecting the calculation method used for each system. The window strategy is configured in the system edit dialog and determines which approach is used to trigger deliveries.
What are window strategies?
A window strategy defines the method used to calculate when a delivery is needed:
- Degree Day: Temperature-based consumption estimation using heating degree days
- Monitored: Real-time tank level readings from IoT monitoring devices
- Calendar: Time-based recurring delivery schedules based on intervals
The window strategy determines which calculation approach takes priority for triggering deliveries for all equipment within that system.
Window strategy types
Degree Day Window
Uses outdoor temperature data to estimate fuel consumption and predict when refills are needed based on accumulated heating degree days.
Best for:
- Heating oil customers
- Predictable seasonal consumption patterns
- Locations without tank monitors
How it works:
- Accumulates heating degree days since last delivery
- Applies usage rates (winter/summer) to estimate gallons consumed
- Triggers delivery when estimated remaining fuel drops below threshold
- Uses visual degree day windows to determine delivery timing
See: Understanding Degree Days
Monitored Window
Uses real-time tank level data from IoT monitoring devices to trigger deliveries based on actual fuel levels.
Best for:
- Customers with installed tank monitors
- Critical accounts requiring precise tracking
- Unpredictable consumption patterns
How it works:
- Reads current tank level from monitor device via serial number
- Triggers delivery when level drops below configured threshold
- Provides ground truth vs. estimated consumption
See: Understanding Fuel Monitoring
Calendar Window
Uses recurring time-based schedules to plan deliveries at regular intervals regardless of consumption.
Best for:
- Commercial accounts with predictable usage
- Will-call customers preferring set schedules
- Service contracts with fixed delivery frequencies
How it works:
- Schedules deliveries at configured intervals (days, weeks, months, years)
- Triggers on specific calendar dates or days of the week
- Can have seasonal start/end dates
- Only one schedule can be active at a time
See: Understanding Calendar Schedules
Configuring window strategies
Window strategies are configured when adding or editing a system through the Add/Edit System dialog.
Basic system settings
At the top of the dialog:
- System Name: Text field for the system identifier
- Active toggle: Enable/disable the entire system
- Auto Delivery toggle: Enable automatic delivery scheduling based on the selected window strategy
- Fuel selector: Choose between Propane, Oil, etc.
- Window Strategy selector: Choose Degree Day, Monitored, or Calendar
- Usage multi-select: Select applicable usage types
Strategy-specific configuration tabs
Degree Day Settings Tab
Configuration fields:
- Winter Usage Rate: Gallons per degree day during winter (up to 4 decimal places)
- Summer Usage Rate: Gallons per degree day during summer (up to 4 decimal places)
- Window Start (Visual DD): Lower boundary of the delivery window
- Target DD: Target degree day for delivery trigger
- Window End (Visual DD): Upper boundary of the delivery window
- Force Degree Day (thumbtack icon): Manually forces the current degree day target
- Reset DD: Resets the degree day accumulation
- Reset Window: Resets the delivery window boundaries
Tank Monitor Tab
Configuration fields:
- Monitor Serial Number: Required field for the tank monitor identifier such as OTOData's DeviceId.
- Monitor Barcode: Optional field
Validation:
Calendar Schedules Tab
Schedule configuration:
- Frequency: Numeric value (minimum 1)
- Units: Days, Weeks, Months, Years
- Preferred Day of Week: Monday-Sunday or "Any day"
- Season Starts/Ends: Date pickers
- Requested Volume (gal): Delivery amount
- Active toggle: Activate/deactivate schedule
Schedule actions:
- Set Active: Activates schedule (deactivates others)
- Deactivate: Pauses schedule
- Edit: Modify schedule
- Delete: Remove schedule
Auto Delivery toggle
Controls whether the system should appear on the routing map & automatically generates delivery requests for calendar scheduling:
- Enabled: System actively triggers deliveries based on strategy
- Disabled: System tracks data but doesn't create automatic requests
Related guides
Understanding Calendar Schedules
Calendar scheduling allows you to set up automatic delivery requests for your customers based on recurring patterns. When you post an invoice for a fuel delivery, the system automatically creates the next delivery request based on the schedule you've configured.
Key Features
Flexible Recurring Patterns
You can schedule deliveries to repeat at any interval you need:
- Every X Days - For example, every 30 days or every 45 days
- Every X Weeks - For example, every week or every 2 weeks
- Every X Months - For example, monthly or every 3 months
- Every X Years - For annual deliveries
Specific Day of the Week
If your customers prefer deliveries on certain days, you can set schedules to occur on:
- Monday through Sunday (or any specific day)
- Leave blank if the day of the week doesn't matter
When you set a day of the week, the system will automatically schedule the delivery on the next occurrence of that day after the interval passes.
Example: If you schedule "every 2 weeks on Friday," the system will always create delivery requests for Fridays, even if the exact 2-week interval would land on a different day.
Seasonal Schedules
Many customers have different needs throughout the year. Calendar scheduling supports seasonal patterns:
- Summer Schedule - Active only during warm months (e.g., May 1 - October 31)
- Winter Schedule - Active only during cold months (e.g., November 1 - March 31)
- Year-Round - Active all 12 months
The system uses the month and day from your start and end dates, ignoring the year. This means your seasonal schedules automatically repeat every year without needing to update them.
Example: Set a schedule active from November 1 to March 31, and it will automatically activate every winter, year after year.
Pre-Set Delivery Volume
You can specify how many gallons or liters should be requested for each scheduled delivery. This helps your drivers know approximately how much fuel to bring.
How It Works
Setting Up a Schedule
For each fuel system (tank), you can create one or more calendar schedules with:
- Frequency - How often deliveries should occur (number and unit)
- Day of Week (Optional) - Which day deliveries should happen
- Start Date (Optional) - What month/day the schedule becomes active
- End Date (Optional) - What month/day the schedule becomes inactive
- Delivery Volume (Optional) - How many gallons/liters to request
Automatic Delivery Request Creation
When you post an invoice for a delivery:
- The system checks if there's an active calendar schedule for that fuel system
- It verifies the delivery date falls within the schedule's active period
- It calculates when the next delivery should occur
- It automatically creates a delivery request for that future date
The new delivery request includes:
- The calculated delivery date
- The requested volume (if specified in the schedule)
- A note explaining it was created by the calendar schedule
Managing Active Schedules
You can have multiple schedules for the same system, but only one will create a delivery request per invoice posting. Schedules can be:
- Active - Currently in use and creating delivery requests
- Inactive - Disabled and not creating delivery requests
To stop a schedule from creating delivery requests, mark it as inactive rather than deleting it. This preserves the configuration if you need to reactivate it later.
Common Use Cases
Example 1: Summer Propane Fill-Ups
Scenario: A customer wants propane deliveries every 60 days during the summer months only.
Configuration:
- Frequency: 60 days
- Day of Week: (none)
- Active: May 1 - October 31
- Volume: 100 gallons
Result: Every time you post an invoice between May and October, the system creates the next delivery request 60 days out. No deliveries are scheduled during winter months.
Example 2: Weekly Friday Deliveries
Scenario: A commercial customer receives heating oil every week on Fridays.
Configuration:
- Frequency: 1 week
- Day of Week: Friday
- Active: Year-round
- Volume: 150 gallons
Result: After each delivery, the system automatically schedules the next delivery for the following Friday.
Example 3: Monthly Winter Fuel Oil
Scenario: A residential customer needs heating oil monthly during winter only.
Configuration:
- Frequency: 1 month
- Day of Week: (none)
- Active: November 1 - March 31
- Volume: 200 gallons
Result: Monthly deliveries are scheduled from November through March each year. The schedule automatically reactivates each winter.
Example 4: Bi-Weekly Tuesday Deliveries (Winter Only)
Scenario: A customer wants deliveries every 2 weeks on Tuesdays, but only during the heating season.
Configuration:
- Frequency: 2 weeks
- Day of Week: Tuesday
- Active: October 1 - April 30
- Volume: 175 gallons
Result: Deliveries are scheduled every other Tuesday during the specified months, automatically resuming each heating season.
Tips for Success
Setting Seasonal Boundaries
- Use month and day only - the year is automatically ignored
- For winter schedules that cross year boundaries (e.g., Nov-Mar), make sure the start month comes after the end month
- Leave both blank if you want year-round scheduling
Choosing Day of Week
- Use this when customers have specific preferences or when route optimization matters
- Leave blank for maximum flexibility in scheduling
- Remember: Monday = 1, Sunday = 7
Delivery Volume Estimates
- Set realistic volumes based on the customer's usage patterns
- This helps drivers prepare the right amount of fuel
- You can always adjust the actual delivery amount when fulfilling the request
Multiple Schedules
- You can create different schedules for different seasons
- Make sure to set appropriate start/end dates so they don't overlap
- Only one schedule will trigger per invoice posting, so avoid conflicting active schedules
Troubleshooting
No Delivery Request Created
If a delivery request isn't automatically created after posting an invoice:
- Check that the schedule is active (not marked inactive)
- Verify the delivery date falls within the schedule's active date range
- Ensure the fuel system has the calendar schedule properly configured
- Contact your system administrator if the issue persists
Wrong Delivery Date
If the calculated delivery date seems incorrect:
- Double-check the frequency and frequency units (days vs. weeks vs. months)
- If using day of week, verify the correct day is selected (1-7)
- Review the seasonal start/end dates to ensure they're set as intended
Seasonal Schedule Not Activating
For schedules that should work across the year boundary (Nov-Mar):
- Make sure the start date's month number is greater than the end date's month number
- Example: November (month 11) to March (month 3) is correct
- The system automatically handles the year transition
Getting Started
To begin using calendar scheduling:
Calendar scheduling saves time by eliminating manual delivery request creation and ensures consistent service for your customers. Set it up once and let the system handle the rest!
Understanding Degree Days
The degree day system predicts heating fuel consumption based on outdoor temperature. It's commonly used for automatic oil delivery scheduling to estimate when a customer will need a refill.
What is a degree day?
A degree day measures heating demand:
- Heating Degree Day (HDD): Measures how cold it is relative to a base temperature (usually 65°F)
- Calculation: For each day, HDD = max(0, Base Temp - Average Outdoor Temp)
- Accumulation: Sum HDDs over time to estimate fuel consumption
Example:
- Base temperature: 65°F
- Average outdoor temperature: 40°F
- HDD for that day: 65 - 40 = 25 HDD
If it takes 5 HDD to burn 1 gallon of oil (K-factor = 5), then after 100 accumulated HDD, the customer has used approximately 20 gallons.
Key formulas
Daily heating degree days
$$ HDD_{day} = \max(0, T_{base} - T_{avg}) $$
Where:
- $T_{base}$ = Base temperature (typically 65°F)
- $T_{avg}$ = Average outdoor temperature for the day
Accumulated degree days
$$ HDD_{accumulated} = \sum_{i=1}^{n} HDD_i $$
Sum all daily HDDs since the last delivery.
K-factor (consumption rate)
The K-factor represents the relationship between degree days and gallons consumed:
$$ K = \frac{HDD}{gallons} $$
Example: If a customer used 200 gallons over 1000 HDD, then:
$$ K = \frac{1000}{200} = 5.0 $$
So it takes 5 HDD to consume 1 gallon.
Estimating gallons used
$$ gallons_{used} = \frac{HDD_{accumulated}}{K} $$
Remaining fuel estimate
$$ remaining = capacity - gallons_{used} $$
Where capacity is the effective tank capacity (total capacity minus a reserve buffer).
Triggering a delivery
Dispatch a delivery when:
$$ remaining \leq reserve_{threshold} $$
Typically, reserve threshold is 25-30% of capacity to avoid run-outs.
Configuration steps
1. Set base temperature
- Standard: 65°F for most residential heating
- Adjustments: Some buildings may use 60°F or 68°F based on insulation, thermostat settings, or climate
- Configuration: Set at the service or system level
2. Determine K-factor
Initial K-factor (before delivery history):
- Use industry defaults: 4.0–6.0 for typical homes
- Adjust based on building type:
- Well-insulated modern homes: 6.0–8.0 (higher K = less consumption per HDD)
- Older, poorly insulated: 3.0–4.5
- Commercial buildings: Varies widely; consult historical data or energy audit
Computed K-factor (after deliveries):
- After 2-3 deliveries, compute K-factor from actual consumption:
- Gallons delivered = amount filled
- HDD accumulated = sum of degree days between deliveries
- $K = \frac{HDD}{gallons}$
- Update the service's K-factor with the computed value for better accuracy
3. Initialize the system
On the first delivery (or when setting up):
- Last delivery date: Date of most recent fill
- Last delivery amount: Gallons delivered
- Starting tank level: Estimated gallons remaining before the delivery (if known)
The system will start accumulating degree days from the last delivery date.
4. Set minimum days between deliveries
Prevent too-frequent deliveries by setting a minimum interval (e.g., 14 or 21 days). Even if degree day projections suggest a delivery is needed, the system will wait until the minimum interval passes.
5. Set trigger thresholds
Define when to dispatch:
- Reserve threshold: Gallons or percentage remaining (e.g., 25% or 75 gallons for a 275-gallon tank)
- Lookahead days: Optional; trigger delivery if projection shows run-out within X days
Example scenario
- Customer: Residential, 275-gallon oil tank
- Base temp: 65°F
- K-factor: 5.0 (initial estimate)
- Last delivery: January 1, filled 200 gallons
- Effective capacity: 250 gallons (reserve 25 gallons)
- Reserve threshold: 75 gallons
Degree day accumulation (simplified):
-
Jan 1–15: 300 HDD
-
Estimated gallons used: 300 / 5 = 60 gallons
-
Remaining: 250 - 60 = 190 gallons (above threshold, no delivery yet)
-
Jan 16–31: Another 300 HDD (total 600 HDD)
-
Estimated gallons used: 600 / 5 = 120 gallons
-
Remaining: 250 - 120 = 130 gallons (still above 75-gallon threshold)
-
Feb 1–15: Another 300 HDD (total 900 HDD)
-
Estimated gallons used: 900 / 5 = 180 gallons
-
Remaining: 250 - 180 = 70 gallons (below 75-gallon threshold)
-
Trigger delivery
Degree day data sources
- National Weather Service (NWS): Historical and forecast degree days
- NOAA: Free weather data APIs
- Third-party services: Commercial degree day providers with regional accuracy
- Internal tracking: Some systems calculate degree days from local weather station data
Your system may automatically pull degree day data but at any time you can update or modify it.
Improving accuracy
We Recompute K-factor regularly
- After each delivery, our system automatically recalculates K-factor and uses rolling averages of the last 3-5 deliveries to smooth out anomalies (e.g., vacations, extreme weather).
Adjust for customer behavior
- Vacation adjustments: If a customer is away, consumption drops; this should be noted within the customer account or routing notes to avoid under-delivery
- Building changes: New insulation, windows, or equipment can alter K-factor significantly
Combine with monitors
- If a tank monitor is installed, use both degree day projections and real-time level data
- Degree day provides a forecast; monitor provides ground truth
- If monitor reading diverges from degree day estimate, adjust K-factor or investigate consumption anomalies
See: Monitoring Guide
Troubleshooting common issues
Projections are too conservative (deliveries too frequent)
- Cause: K-factor is too low (overestimating consumption)
- Fix: Increase K-factor based on actual delivery history
Projections are too aggressive (customer runs out)
- Cause: K-factor is too high (underestimating consumption)
- Fix: Decrease K-factor; consider lowering reserve threshold
Degree days don't match consumption
- Cause: Weather data source is not local enough, or customer behavior changed
- Fix: Use more localized weather data by changing the weather location within the admin settings.
Sudden change in usage
- Cause: Equipment failure, thermostat adjustment, occupancy change, or building modification
- Fix: Investigate and adjust K-factor or note the anomaly; monitor closely
Related guides
- Window Strategies — Add time-of-day constraints to degree day deliveries
- Calendar Scheduling — Combine recurring schedules with degree day
- Monitoring — Use monitors to validate degree day estimates
- Add Services — Apply degree day strategy to services
- Adding Equipment — Track tank capacity for accurate projections
Understanding Fuel Monitoring
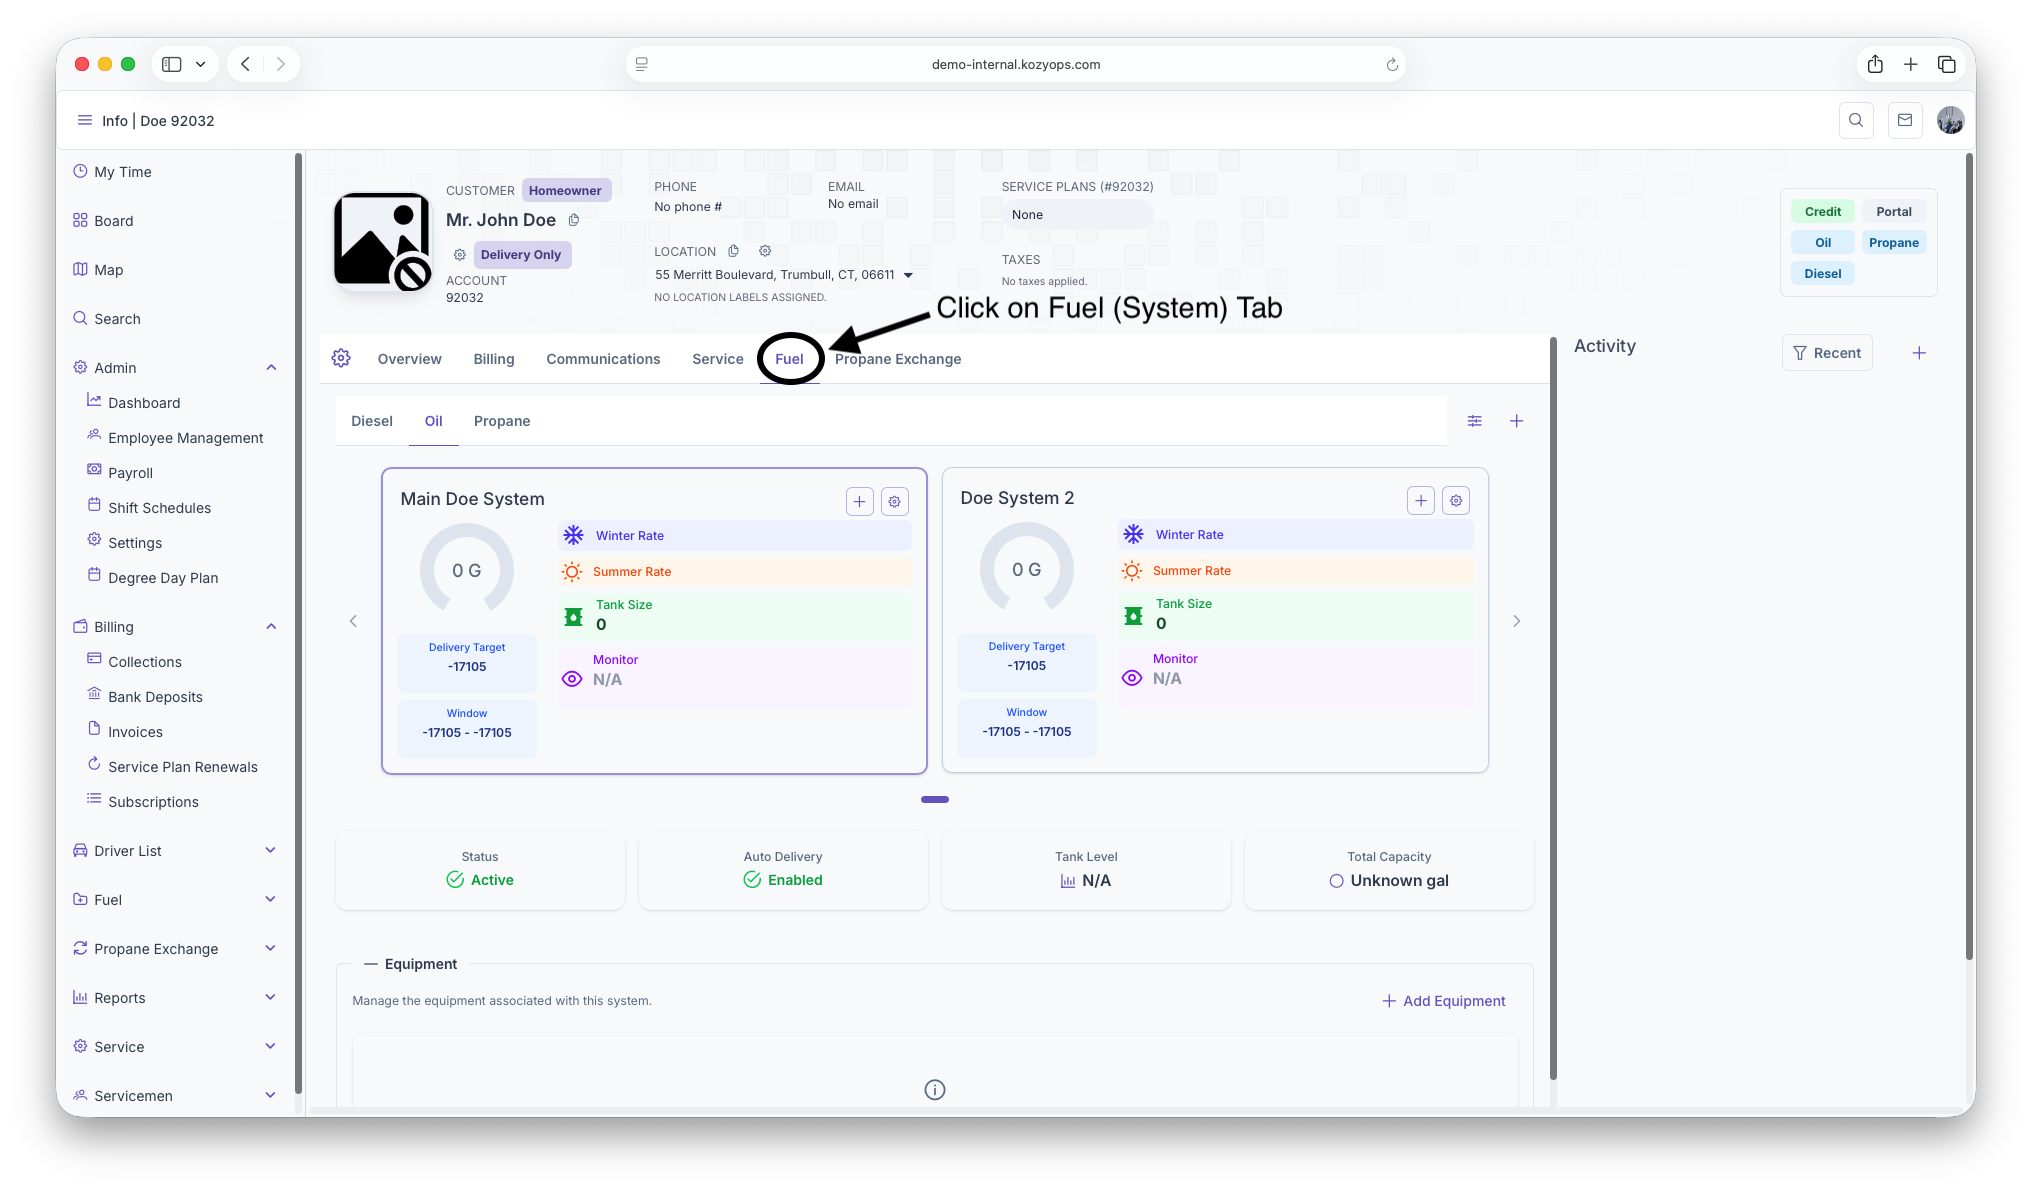
Tank monitoring systems use IoT devices to track fuel levels in real time. This guide explains how to link monitors to equipment, view monitor data in the app (Systems carousel), and use monitor data for delivery scheduling.
What is tank monitoring?
Tank monitoring devices:
- Measure fuel level in the tank (percentage, gallons, or both)
- Transmit data wirelessly to the cloud (cellular, WiFi, or LoRa)
- Alert when levels drop below thresholds or when the device goes offline
- Integrate with delivery scheduling to trigger automatic refills
Where to see monitor info in the app
You can quickly see monitor information from the customer dashboard:
Systems carousel
- Go to the Customer Dashboard for a location
- In the Systems section, use the horizontal carousel to browse systems
- Select a system to view its details at-a-glance
When a system is linked to a tank monitor, the selector shows:
- Tank Level (%): Current level from the monitor (visual gauge/knob)
- Estimated Gallons Remaining: Calculated from the current level and recommended capacity
- Target/Window Dates: Projected delivery window or target date
- For a monitored system, dates are still shown; the level drives urgency
- For non-monitored systems, dates are converted from degree days
Tip: You can toggle the date/time display per system to reveal window start/end and target dates.
How the selector computes gallons remaining
The system selector calculates gallons remaining using the best available data:
-
If a monitor reading is available
- Uses the monitor's current level (e.g., 0.42 for 42%)
- Multiplies by the system's recommended delivery capacity
- Formula:
gallons = monitorLevel * recommendedCapacity
-
If no monitor reading is available (fallback)
- Estimates consumption using degree days since the last full delivery
- Applies seasonal usage rates (winter/summer) across the heating year
- Subtracts estimated consumption from recommended capacity to estimate remaining gallons
This mirrors the in-app logic: monitor values take precedence; otherwise, the degree-day model provides a reasonable estimate.
Linking a monitor to a tank
The monitor is now linked and data will flow into the system and the Systems carousel.
Using monitor data for scheduling
To have the system automatically trigger deliveries based on monitor readings:
- Edit the system (Add/Edit System dialog)
- Set Window Strategy to Monitored
- Enter the Monitor Serial Number (required)
- Enable the Auto Delivery toggle
- Deliveries are triggered when the level drops below configured thresholds (per your operations policy)
- If the monitor goes offline, the system can fall back to degree day estimates (see Window Strategies)
See: Window Strategies
Combining monitors with other strategies
Monitoring works best alongside other estimation methods:
Monitored (primary) + Degree Day (fallback)
- Primary: Tank monitor provides ground-truth level
- Fallback: If monitor goes offline/stale, switch to degree day estimates
- Benefit: Reliable automation with a safe backup
Calendar + Monitor (validation)
- Primary: Recurring calendar schedule
- Validation: Skip a scheduled delivery if the monitor shows the tank is still sufficiently full
- Benefit: Avoids unnecessary trips and overfilling
For configuring priorities, see: Window Strategies
Monitor data fields
Real-time readings
- Current Level (%): Percentage of tank capacity (drives the gauge and gallon estimates)
- Current Level (gallons): Calculated gallons based on capacity
- Last Reading Timestamp: When the last data transmission occurred
- Signal Strength: Cellular or WiFi signal quality
- Battery Level: Monitor battery status (for battery-powered units)
Historical data
- Reading History: Chart or log of level over time
- Consumption Trend: Rate of fuel usage derived from readings
- Anomalies: Sudden drops (delivery) or unusual patterns (leaks, sensor issues)
Offline behavior and stale readings
Monitors can go offline due to signal loss, power failure, or damage. Configure fallback behavior:
Stale reading grace period
- Grace period: Allow readings to be X hours old before marking as stale (e.g., 48 hours)
- Alert: Notify dispatch or service tech if the monitor hasn't reported within the grace period
- Fallback strategy:
- Switch to degree day projections (if configured)
- Switch to manual calendar scheduling
- Flag customer for manual review
Status indicators (implementation-dependent)
- Red/Offline: No reading in grace period; investigate
- Yellow/Stale: Reading is aging; monitor closely
- Green/Active: Recent reading within normal bounds
Calibration and accuracy
Initial calibration
When installing a monitor:
- Fill the tank to a known level (e.g., 100% after delivery)
- Calibrate the monitor to read that level accurately
- Verify readings against gauge or stick measurements for a few weeks
Ongoing calibration
- Every so often after a delivery, compare:
- Gallons delivered (from ticket)
- Pre-delivery monitor reading
- Post-delivery monitor reading
This can be done with the rate checking feature on the fuel deliveries page Fuel Deliveries
- If discrepancies > 5%, recalibrate or investigate:
- Tank shape irregularities
- Sensor placement
- Fuel expansion/contraction with temperature
Common accuracy issues
- Fuel temperature: Cold fuel contracts, warm fuel expands; some monitors compensate, others don't
- Tank tilt: Uneven ground can skew float gauge readings
- Sediment buildup: Bottom of tank may have sludge reducing effective capacity
- Sensor drift: Over time, sensors may need recalibration
Troubleshooting from the Systems carousel
- No percent shown: Ensure the system is set to the Monitored strategy and a serial number is saved
- Gallons remaining seems off: Verify the tank's recommended capacity on the equipment record
- Dates look odd: If not monitored, dates are computed from degree days; check winter/summer usage rates
- Cannot see schedules: Calendar schedules are managed in the system dialog; save the system first
Related guides
- Adding Equipment — Set up tank equipment to link monitors
- Degree Day System — Used as fallback and for estimation without monitors
- Window Strategies — Configure Monitored primary and fallbacks
- Calendar Scheduling — Use with monitor validation to skip unnecessary deliveries
- Add Services — Apply strategies via system configuration
Creating a Calendar Schedule
Calendar Scheduling Guide
Calendar scheduling creates time-based recurring delivery requests based on configured rules. This guide explains how to set up, manage, and use calendar schedules within the system dialog.
What is calendar scheduling?
Calendar scheduling automatically generates delivery requests based on:
- Recurring frequency: How often deliveries occur (days, weeks, months, years)
- Preferred day of week: Optional constraint (Monday–Sunday or any day)
- Seasonal dates: Start and end dates for seasonal schedules
- Requested volume: Specific gallon amount per delivery (optional)
- Active status: Only one schedule can be active at a time
Calendar schedules are configured in the Calendar Schedules tab of the Add/Edit System dialog.
When to use calendar scheduling
Use calendar scheduling for:
- Commercial accounts with predictable usage patterns
- Regular delivery schedules (e.g., every 2 weeks, monthly)
- Seasonal deliveries (e.g., heating season only: October–April)
- Fixed-volume deliveries (e.g., always deliver 200 gallons)
- Customers preferring consistent schedules over automatic keep-full
Accessing calendar schedules
Calendar schedules are managed in the System dialog:
Important: For new systems, you must save the system first before you can add calendar schedules. You'll see a warning: "Save the system before managing calendar schedules."
Creating a calendar schedule
Step 1: Click "Add Schedule"
After saving the system, click the Add Schedule button to open the schedule form.
Step 2: Configure frequency
The form has three frequency fields in the first row:
Frequency (number)
- Numeric value (minimum 1, step 1)
- Example: 2 for "every 2 [units]"
Units (dropdown)
- Days
- Weeks
- Months
- Years
Preferred Day of Week (dropdown, optional)
- Monday through Sunday
- Or leave blank/clear for "Any day"
- Placeholder shows "Any day" when not selected
Example combinations:
- Frequency: 2, Units: Weeks, Day: Tuesday = "Every 2 weeks on Tuesday"
- Frequency: 1, Units: Months, Day: (Any) = "Every month on any day"
- Frequency: 14, Units: Days, Day: (Any) = "Every 14 days"
Step 3: Set seasonal dates (optional)
Season Starts and Season Ends
- Date pickers with icon and button bar
- Both are optional
- Use to limit schedule to specific time periods (e.g., heating season)
- Leave blank for year-round schedules
Example:
- Season Starts: October 1
- Season Ends: April 30
- Schedule only generates deliveries during this window
Step 4: Set delivery volume (optional)
Requested Volume (gal)
- Numeric field (minimum 0)
- Specify gallons to request per delivery
- Leave at 0 or blank for automatic calculation
Step 5: Set active status
Active toggle
- For new schedules: Label shows "Activate after saving"
- For existing schedules: Label shows "Active"
- Toggle on to make this schedule the active one
- Important: Only one schedule can be active at a time; activating a new schedule deactivates others
Step 6: Save the schedule
Click Create Schedule (or Update Schedule if editing).
The schedule will appear in the list below with:
- Frequency description (e.g., "Every 2 weeks")
- Active/Inactive badge (green for active, gray for inactive)
- Season, day of week, and requested volume details
Managing existing schedules
Each schedule in the list displays:
Header:
- Frequency: Human-readable format (e.g., "Every 2 weeks", "Every month")
- Status badge: Active (green) or Inactive (gray)
Details:
- Season: Date range or "No seasonal restrictions"
- Day of week: Specific day or "Any day"
- Requested volume: "XXX gal" or "Not specified"
-
Set Active (green checkmark icon)
- Makes this schedule the active one
- Automatically deactivates other schedules
- Disabled if already active or if another action is in flight
-
Deactivate (pause icon, outlined)
- Pauses the schedule without deleting it
- Disabled if already inactive or if another action is in flight
-
Edit (pencil icon)
- Opens the schedule in edit mode
- Same form as creating, with existing values populated
- Click "Update Schedule" to save changes
-
Delete (trash icon, text style, danger color)
- Removes the schedule permanently
- Typically shows a confirmation dialog
Schedule states and rules
Only one active schedule
The system enforces that only one calendar schedule can be active at a time per system:
- Setting a schedule to Active automatically deactivates all others
- You can have multiple inactive schedules saved for future use or seasonal switching
Inactive schedules
Inactive schedules:
- Are saved but do not generate delivery requests
- Can be activated later
- Useful for seasonal switching (e.g., winter schedule vs. summer schedule)
Loading and error states
- Loading: Shows spinner with "Loading schedules…" message
- No schedules: Shows info message "No calendar schedules have been created yet."
- Error: Shows error message with details if schedules fail to load
Example configurations
Example 1: Biweekly residential delivery
Configuration:
- Frequency: 2
- Units: Weeks
- Preferred Day: Tuesday
- Season Starts: (blank)
- Season Ends: (blank)
- Requested Volume: 200
- Active: Yes
Result: Delivers 200 gallons every 2 weeks on Tuesday, year-round
Example 2: Monthly commercial fill
Configuration:
- Frequency: 1
- Units: Months
- Preferred Day: (Any day)
- Season Starts: (blank)
- Season Ends: (blank)
- Requested Volume: 0 (automatic)
- Active: Yes
Result: Monthly delivery on any day with automatic volume calculation
Example 3: Seasonal heating oil
Configuration:
- Frequency: 3
- Units: Weeks
- Preferred Day: (Any day)
- Season Starts: October 1
- Season Ends: April 30
- Requested Volume: 0
- Active: Yes
Result: Delivery every 3 weeks during heating season only (Oct 1 – Apr 30)
Editing a schedule
- Click Edit on the schedule you want to modify
- The schedule form appears with current values populated
- Make your changes
- Click Update Schedule to save
- The schedule list updates with the new configuration
You can change any field: frequency, units, day of week, seasonal dates, volume, or active status.
Switching between schedules
To switch from one schedule to another (e.g., winter to summer):
- Create both schedules with appropriate settings
- Set one as Active (this becomes the current schedule)
- When the season changes, click Set Active on the other schedule
- The system automatically deactivates the previous schedule and activates the new one
Example:
- Winter schedule: Every 2 weeks, Oct 1 – Apr 30, Active
- Summer schedule: Every 6 weeks, May 1 – Sep 30, Inactive
- In May, click Set Active on the summer schedule
Deleting a schedule
Click Delete on a schedule to remove it permanently. This action typically requires confirmation and cannot be undone.
Caution: Deleting an active schedule stops automatic delivery generation. Ensure you have another schedule activated or switch the system to a different window strategy.
Calendar schedules and window strategies
Calendar scheduling is selected as a Window Strategy at the system level:
- In the system dialog, set Window Strategy to Calendar
- Enable Auto Delivery toggle if you want automatic delivery request generation
- Configure your calendar schedule(s) in the Calendar Schedules tab
With Auto Delivery enabled and an active calendar schedule, the system will automatically generate delivery requests based on the configured frequency and rules.
See: Window Strategies
Combining calendar with other data
Calendar + Monitor validation
If the system also has a tank monitor:
- The calendar schedule generates requests on schedule
- Monitor data can be used to validate or skip deliveries if the tank is still sufficiently full
- This prevents unnecessary deliveries while maintaining a predictable schedule
Calendar + Degree Day cross-check
If degree day settings are also configured:
- Calendar provides the schedule cadence
- Degree day projections can validate whether the delivery is needed
- Helps refine the calendar frequency over time
Troubleshooting
Cannot add schedules
Issue: "Save the system before managing calendar schedules" warning appears Solution: Click Submit on the system dialog to save the system first, then edit it again to add schedules
Schedule not generating deliveries
Issue: Schedule is created but deliveries aren't happening Check:
- Is the schedule set to Active? (green badge)
- Is Auto Delivery toggle enabled on the system?
- Is the current date within the seasonal date range (if specified)?
- Is Window Strategy set to Calendar?
Wrong delivery frequency
Issue: Deliveries happening too often or too infrequently Solution: Edit the schedule and adjust Frequency/Units to match desired cadence
All schedules become inactive
Issue: Activating a schedule deactivates all others Expected behavior: This is by design. Only one schedule can be active at a time.
Related guides
- Window Strategies — Select Calendar as window strategy and enable Auto Delivery
- Add System — Create the system before adding calendar schedules
- Monitoring — Use monitor validation with calendar schedules
- Degree Day System — Cross-check calendar with degree day projections