Fuel
- General
- Adding a System Guide
- Editing a System Guide
- Adding Equipment Guide
- Deliveries
- Delivery History
- Pricing
General
This directory contains comprehensive guides for managing customer systems, equipment, and delivery window strategies (delivery estimation methods).
Core System Management
Adding Equipment
Learn how to add tanks, boilers, furnaces, and other equipment to a system. Includes detailed instructions for multi-tank configurations.
Key topics:
- Equipment types (tanks, boilers, furnaces, appliances)
- Multi-tank/manifolded tank setup
- Capacity and monitoring configuration
- Linking equipment to systems
Editing a System
Modify existing systems safely with guidance on which changes are safe vs. those requiring caution.
Key topics:
- Safe edits (name, notes, metadata)
- Cautious changes (window strategy, fuel type, status)
- Reassigning equipment between systems
- Deactivating vs. deleting systems
Delivery Window Strategies (Estimation Methods)
Window Strategies
Choose and configure the delivery estimation method for each system. Window strategies determine how the system calculates when deliveries are needed.
Key topics:
- Degree Day, Monitored, and Calendar strategies
- Selecting the right strategy for each customer type
- Configuring strategies in the system dialog
- Auto Delivery toggle behavior
Degree Day System
Temperature-based consumption estimation using heating degree days and usage rates.
Key topics:
- Winter and summer usage rates
- Visual degree day windows
- Target DD and forced delivery
- Reset DD and Reset Window actions
Monitoring
Real-time tank level tracking using IoT monitoring devices identified by serial numbers.
Key topics:
- Monitor serial numbers and barcodes
- Real-time level readings
- Validation requirements for monitored systems
Calendar Scheduling
Time-based recurring delivery schedules with seasonal controls and frequency settings.
Key topics:
- Frequency and units (days, weeks, months, years)
- Preferred day of week
- Seasonal start/end dates
- Active/inactive schedule management
- One active schedule limit
Getting Started
-
Create a system: Start with the Add System Guide
- Choose system name and fuel type
- Select a window strategy (Degree Day, Monitored, or Calendar)
- Configure strategy-specific settings
- Enable Auto Delivery toggle if needed
-
Add equipment: Follow Adding Equipment to add tanks and appliances
-
Configure delivery: Your window strategy determines how deliveries are triggered:
- Degree Day for temperature-based estimation
- Monitoring for IoT device-driven deliveries
- Calendar for recurring time-based schedules
Quick Reference
System Concepts
- System: A group of equipment that all share the same fill connection
- Equipment: Physical components (tanks, boilers, furnaces, etc.)
- Multi-tank: Multiple tanks manifolded to a single fill (add to same equipment)
- Fill Group: Equipment in a system all connect to the same delivery fill point
- Window Strategy: The delivery estimation method (Degree Day, Monitored, or Calendar)
- Auto Delivery: Toggle that enables/disables automatic delivery request generation
Window Strategy Comparison
| Strategy | Configured In | Triggers On | Requires |
|---|---|---|---|
| Degree Day | Degree Day tab | Temperature data + usage rates | Winter/summer rates, window boundaries |
| Monitored | Tank Monitor tab | Tank level readings | Monitor serial number |
| Calendar | Calendar tab | Time intervals + rules | Active schedule with frequency/dates |
Configuration Locations
All window strategy settings are configured in the Add/Edit System dialog:
- Basic settings: System name, Active toggle, Auto Delivery toggle, Fuel selector, Window Strategy selector
- Degree Day tab: Usage rates, window start/target/end, Reset actions
- Tank Monitor tab: Serial number, barcode
- Calendar tab: Schedule frequency, units, day of week, seasonal dates, volume
Common Workflow
Related Documentation
- Creating a New Customer — Full onboarding flow
- Location Management — Managing service locations
- Add Services — Services can be applied to locations or systems
- Add System — Creating and configuring new systems
Adding a System Guide
A system represents a group of equipment that all share the same fill connection (the same delivery fill). For example, multiple manifolded tanks feeding the same appliance belong to one system. This guide shows how to create a system and configure its delivery window strategy.
Important: You can attach multiple physical tanks to the same equipment entry when they are manifolded to a single fill. This keeps projections and routing accurate for the shared capacity.
Prerequisites
- Customer and Location exist.
- You are on the Customer Dashboard with the Location selected in the header.
Create a system
-
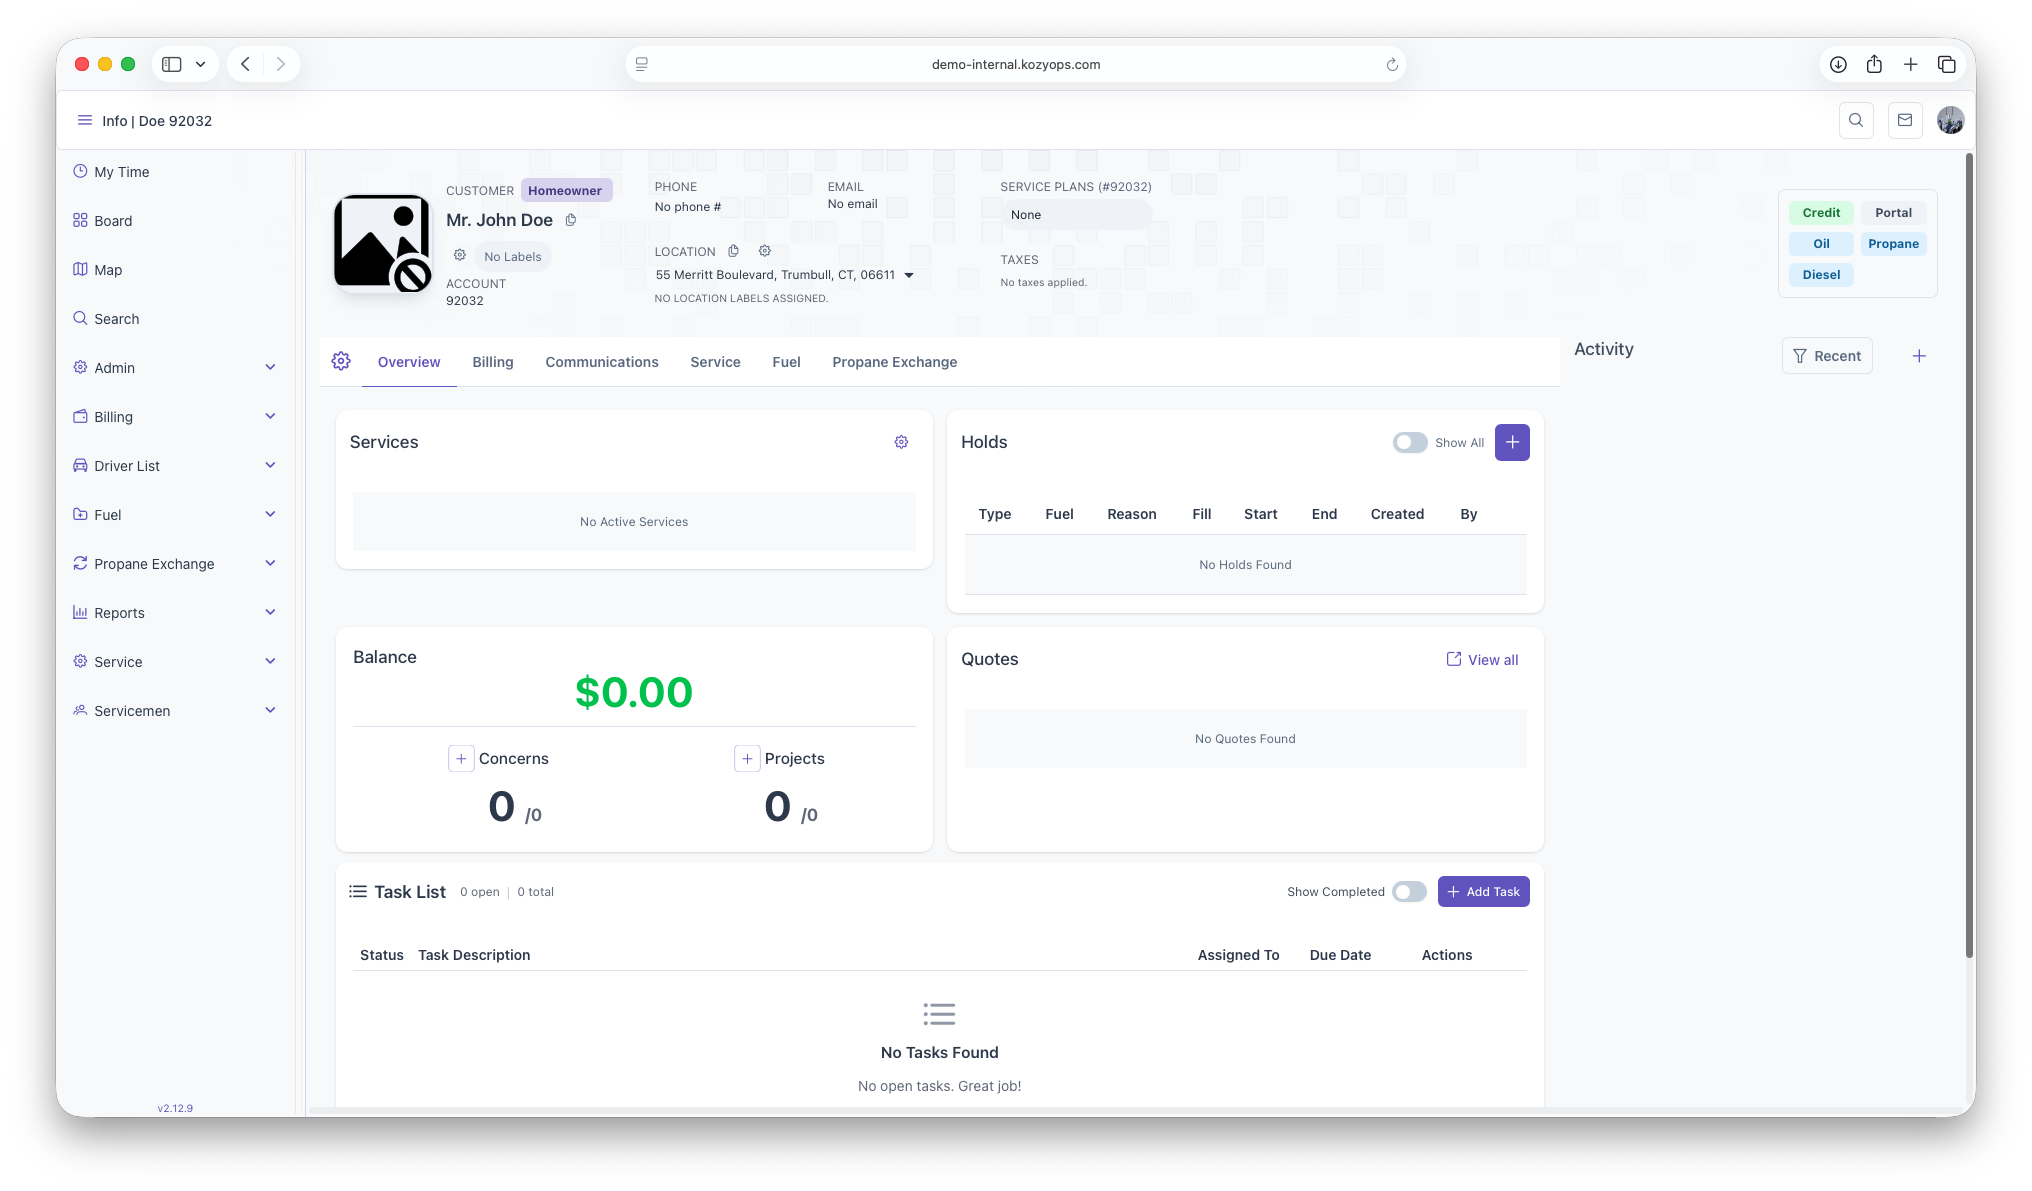
Open the Customer Dashboard for the selected Customer and Location.

-
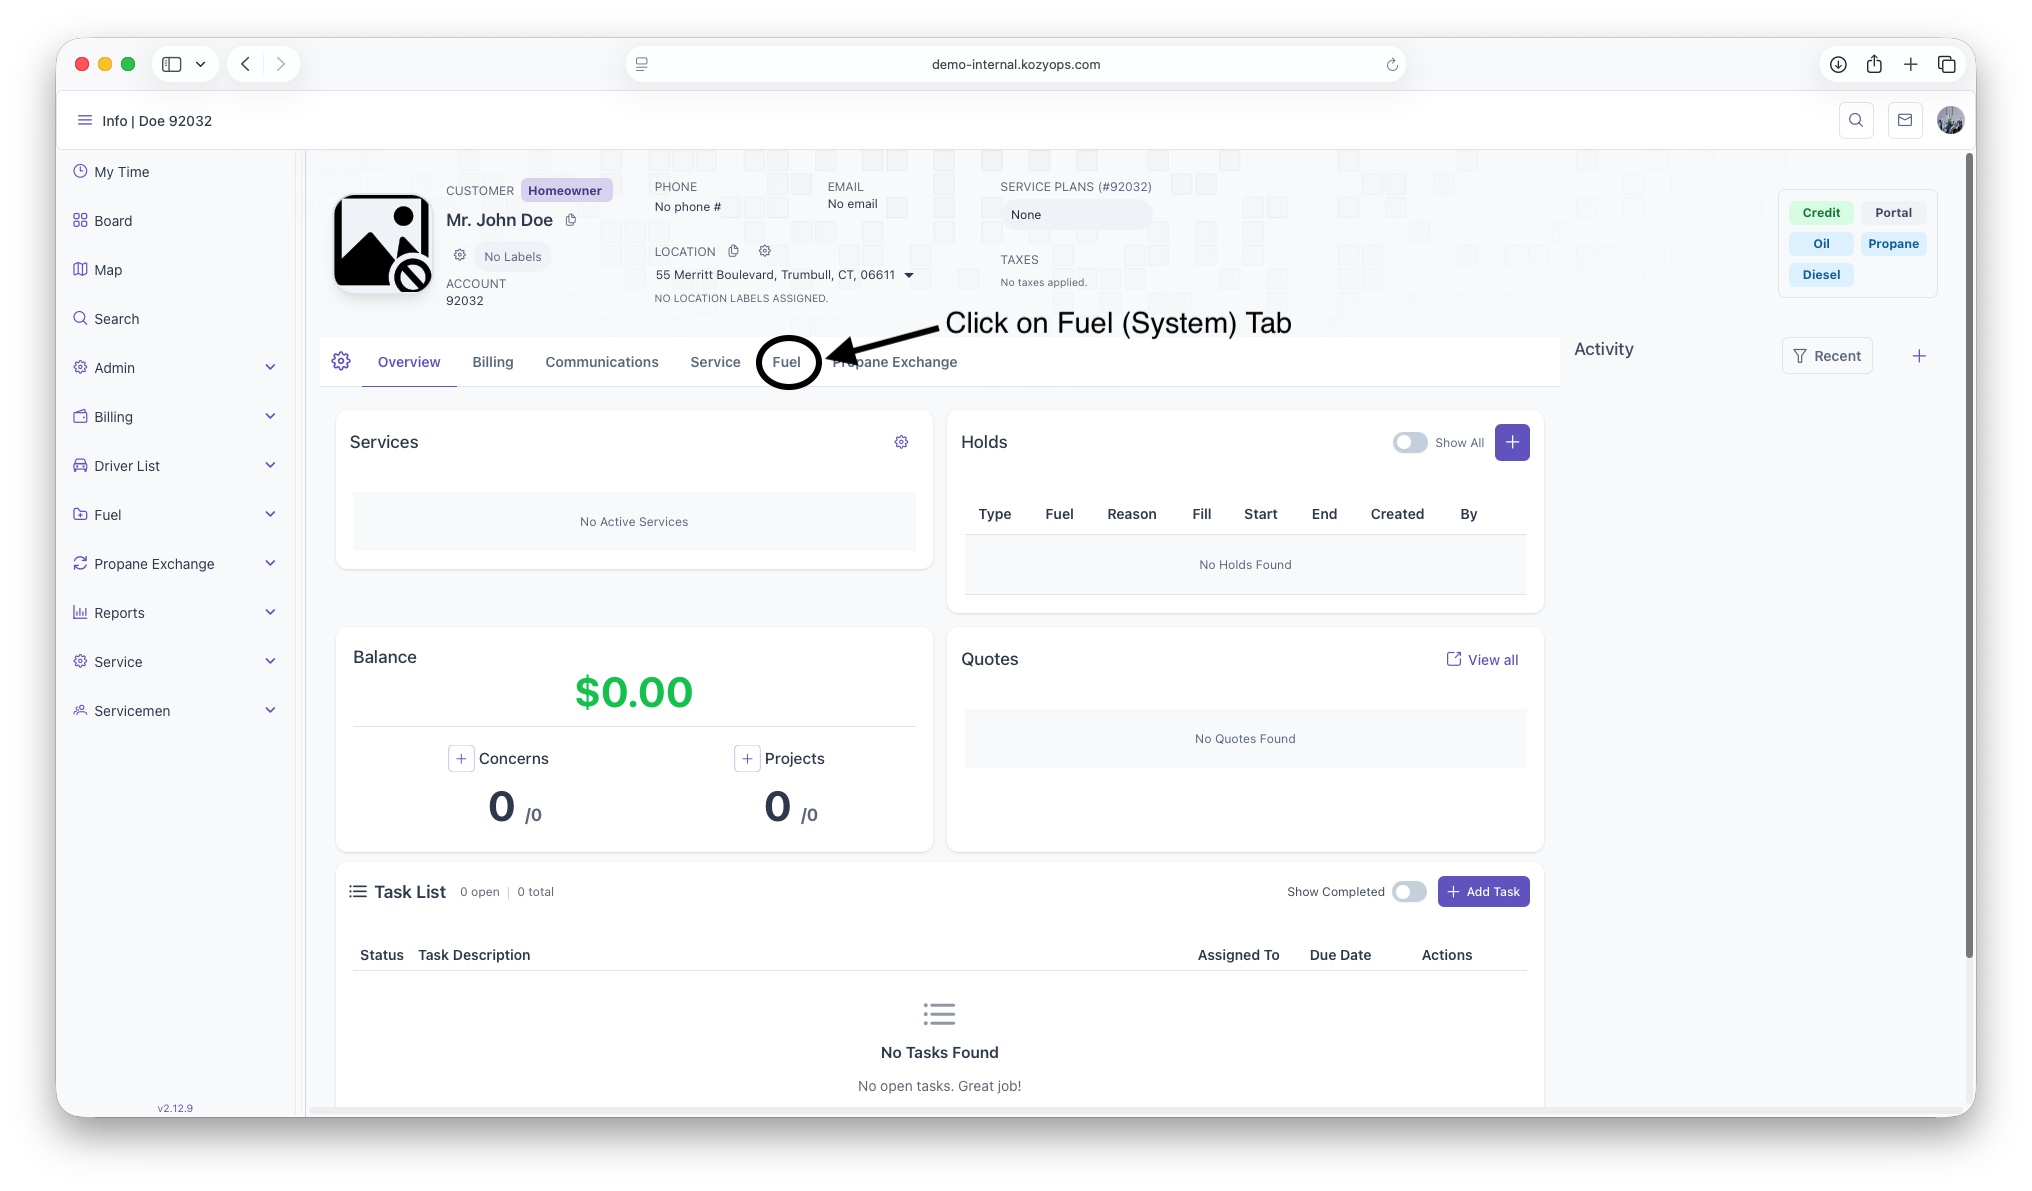
Go to Systems in the overview (or use the Systems action in the header).


-
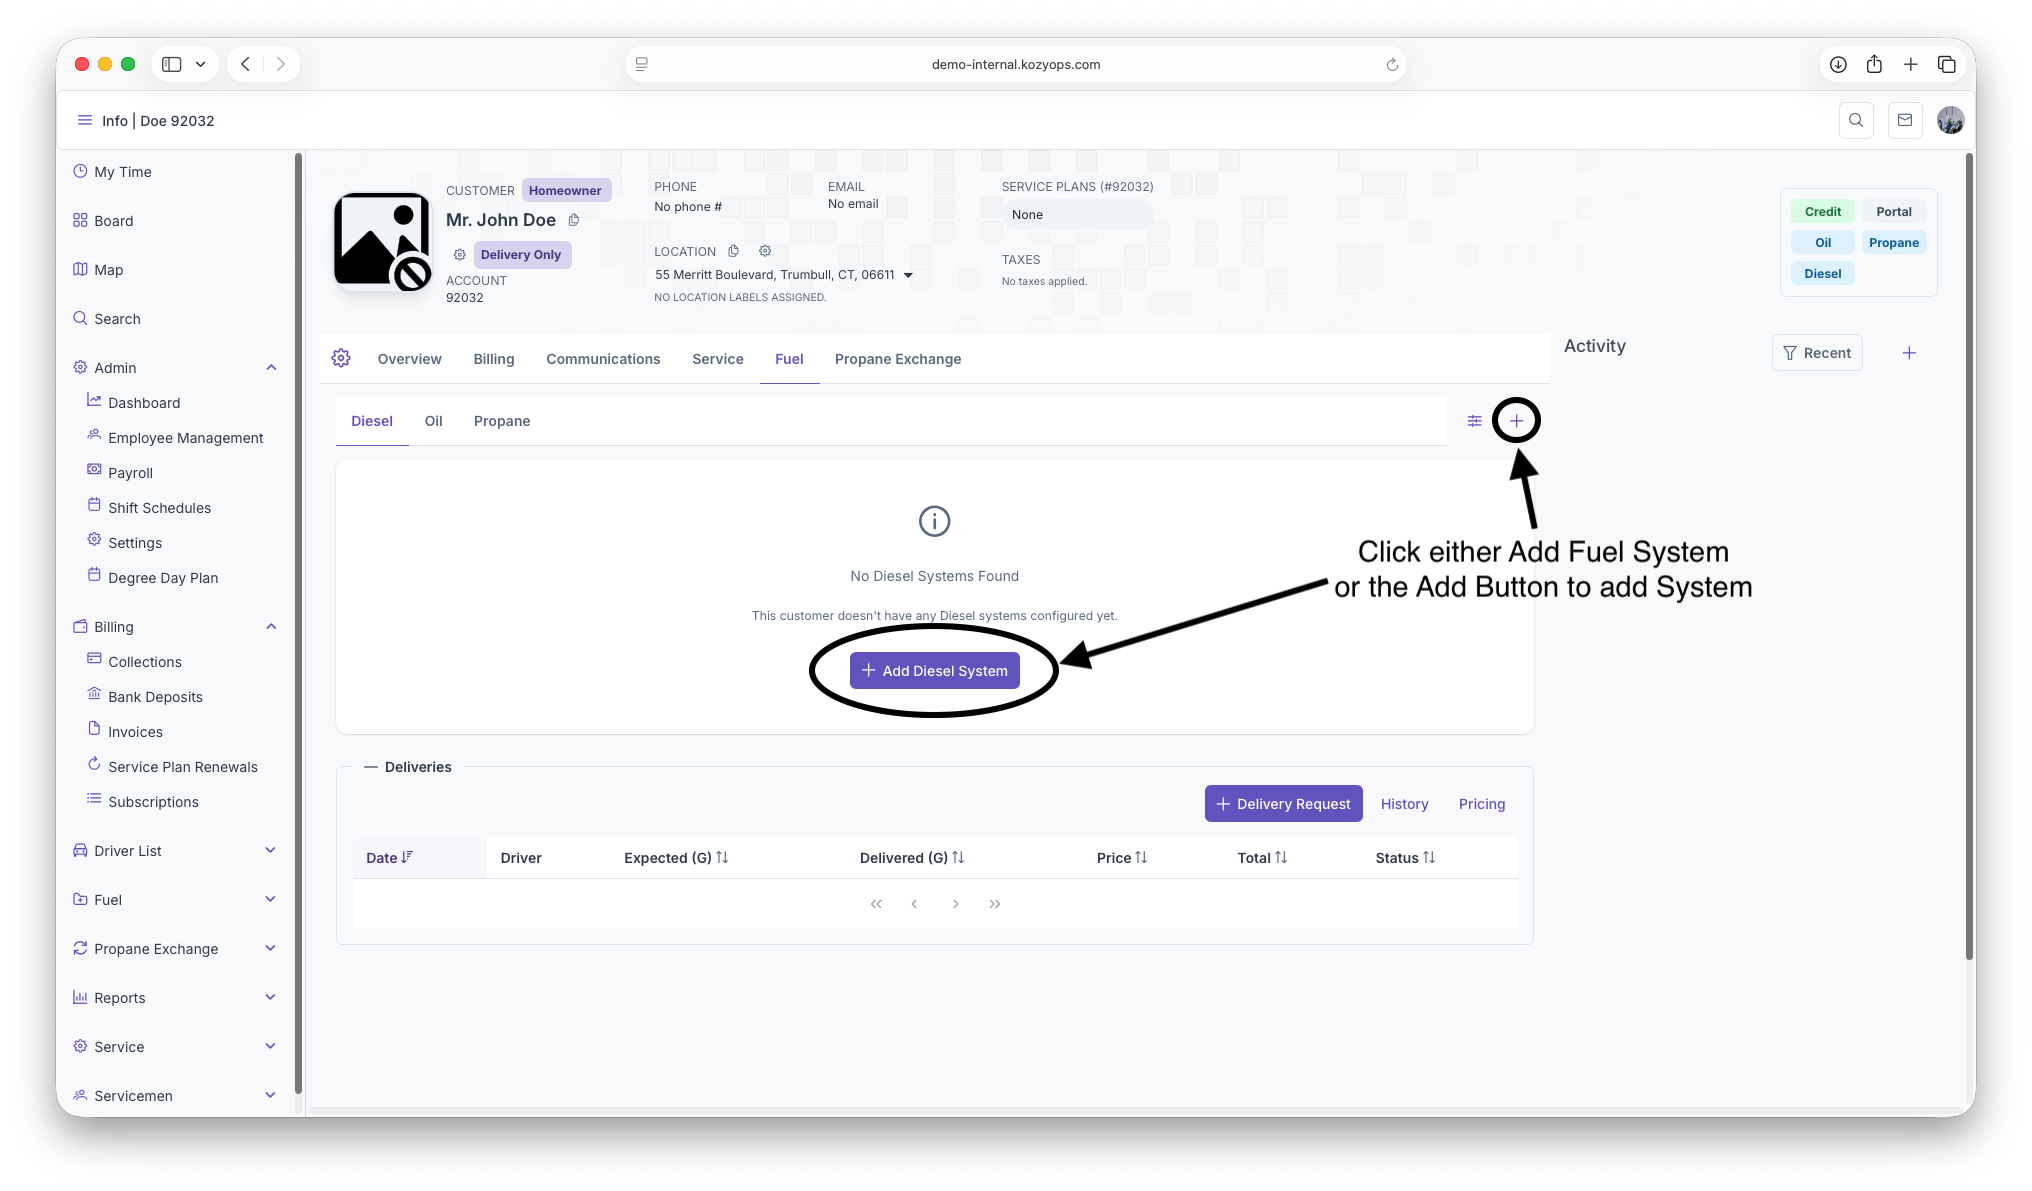
Click Add System.

-
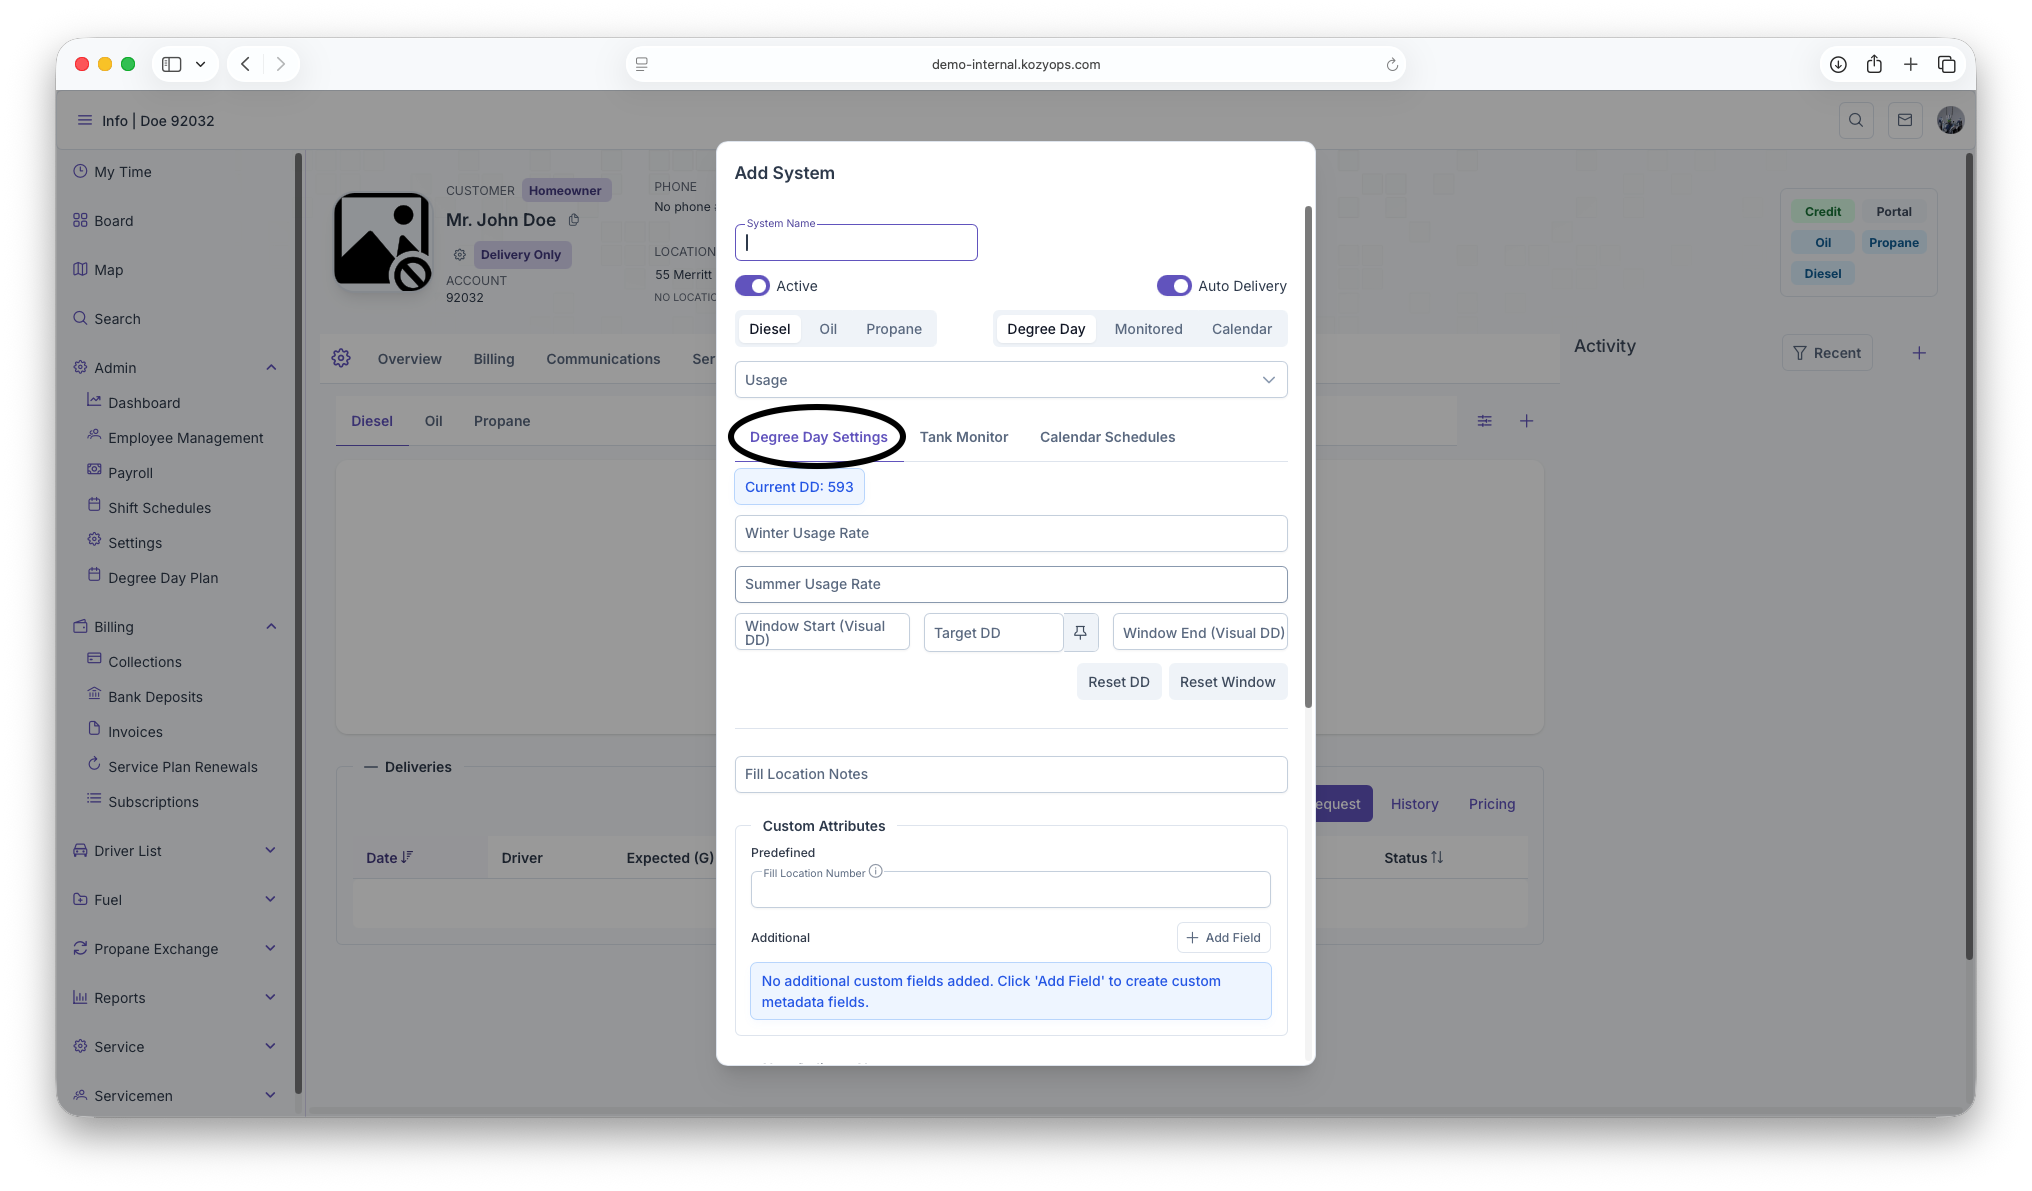
The Add System dialog opens with multiple configuration sections.


-
Complete the basic settings and select a window strategy.
-
Configure the strategy-specific settings in the appropriate tab.
-
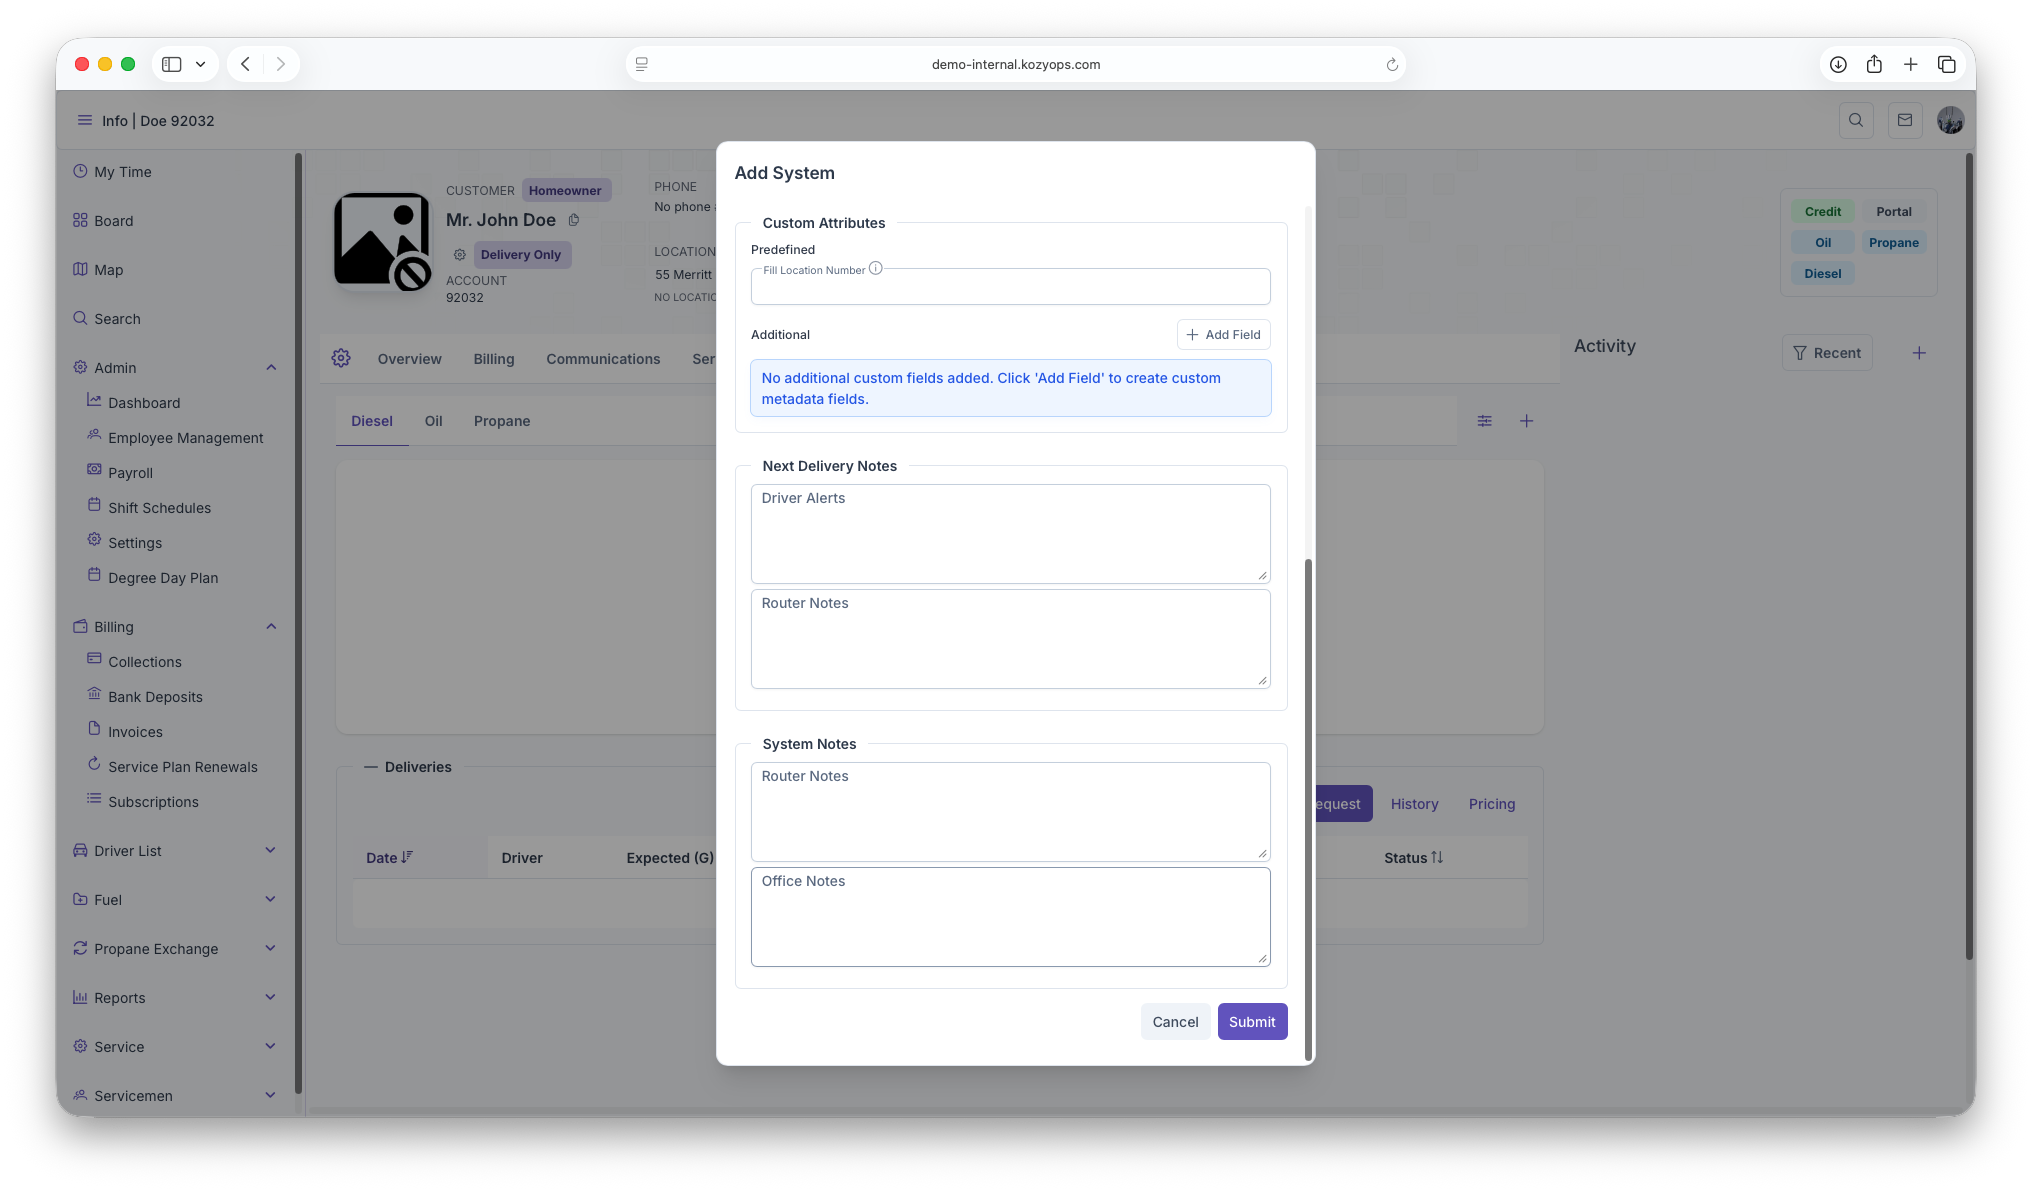
Click Submit to save.

Basic system settings
Required fields
- System Name: A clear label (e.g., "Main Oil System" or "Shop Propane")
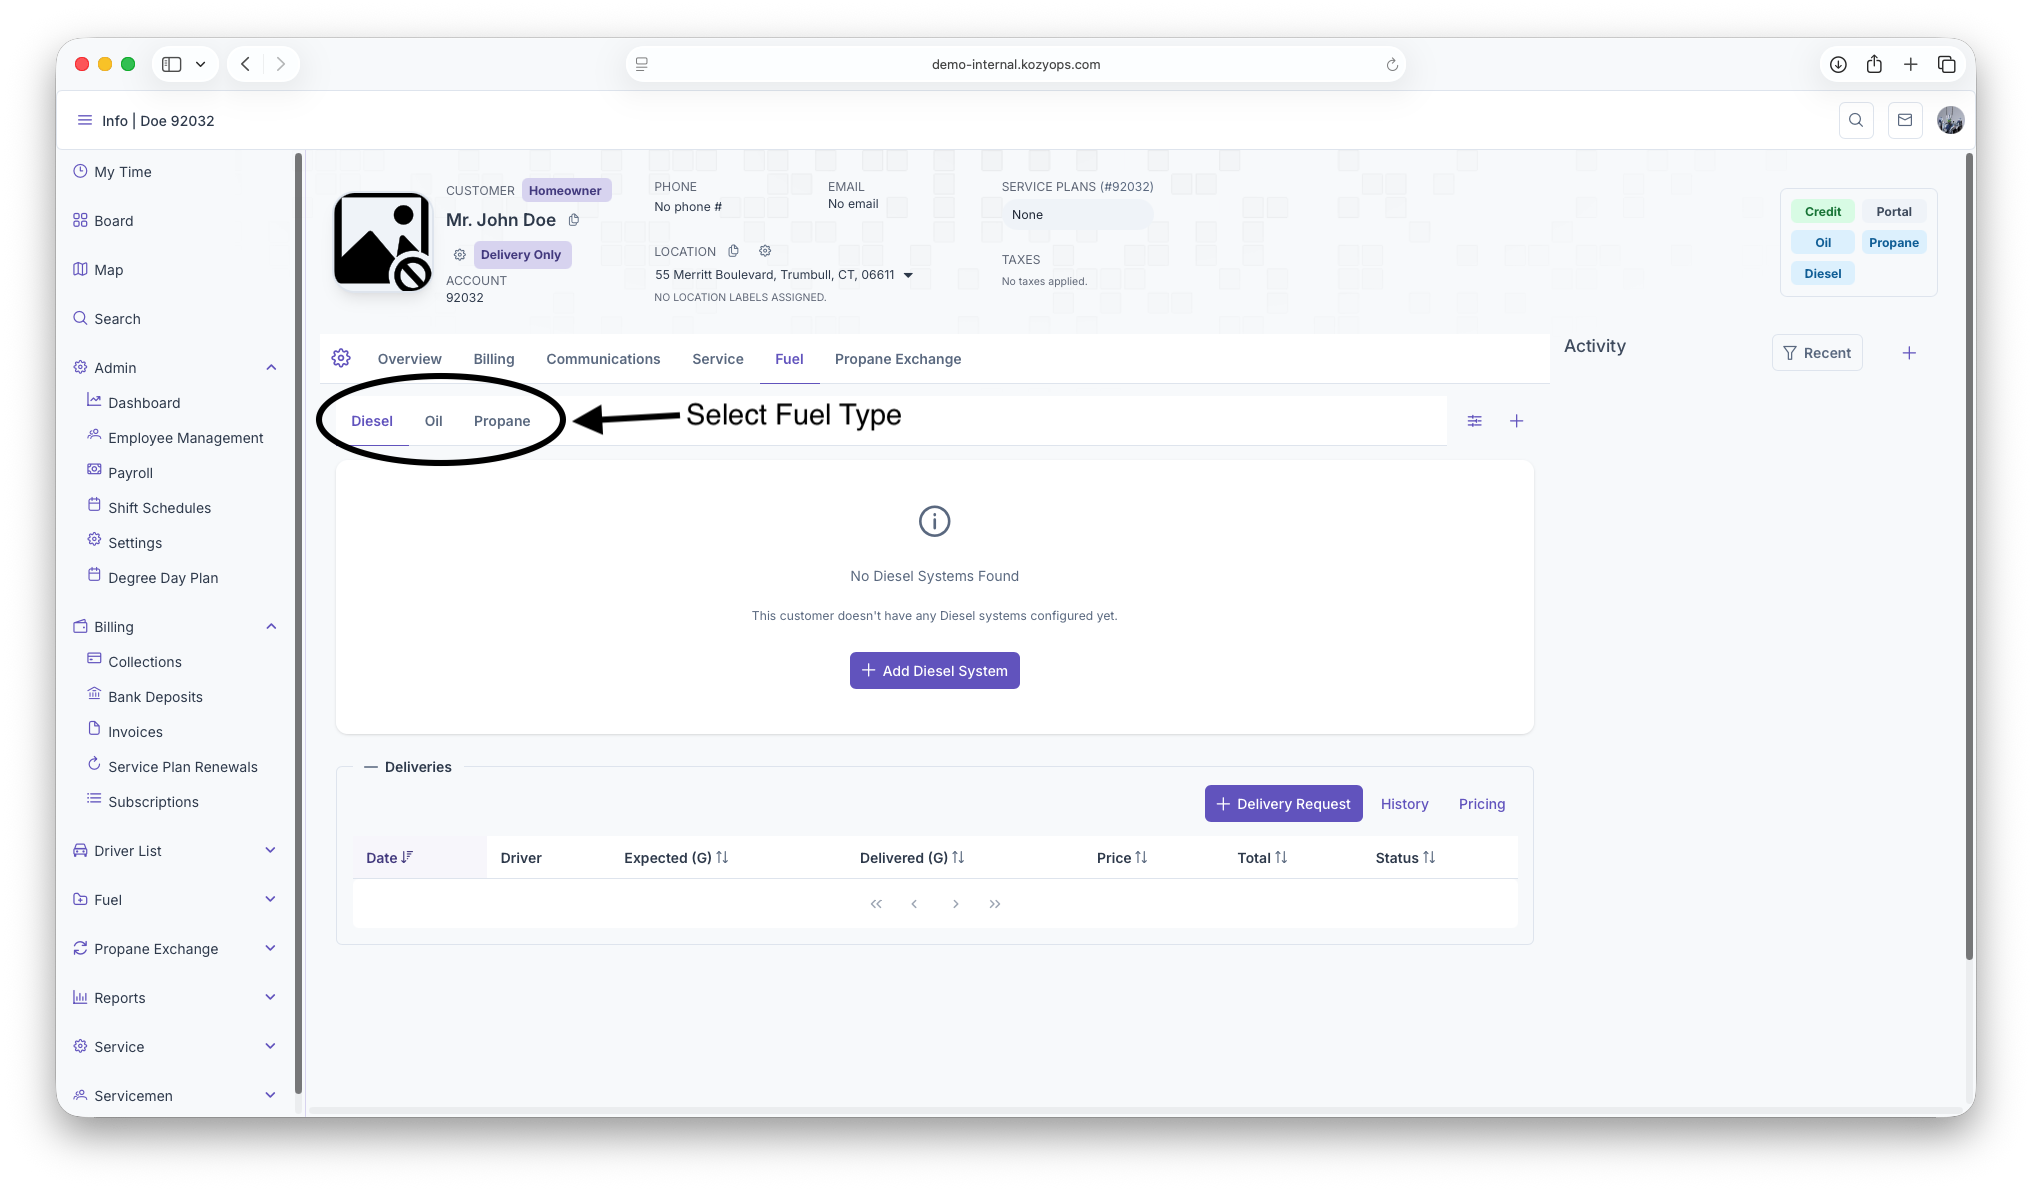
- Fuel: Propane, Oil, etc. (select button group)
- Window Strategy: Choose Degree Day, Monitored, or Calendar (select button group)
Toggles
- Active: Enable to activate the system immediately (default: on)
- Auto Delivery: Enable automatic delivery scheduling based on the selected window strategy
Optional fields
- Usage: Multi-select dropdown for usage types (heating, appliance, etc.)
Window strategy selection
Choose the delivery estimation method that best fits this system:
-
Degree Day: For temperature-based consumption estimation (best for heating oil)
-
Monitored: For systems with tank monitors providing real-time levels
-
Calendar: For recurring time-based delivery schedules
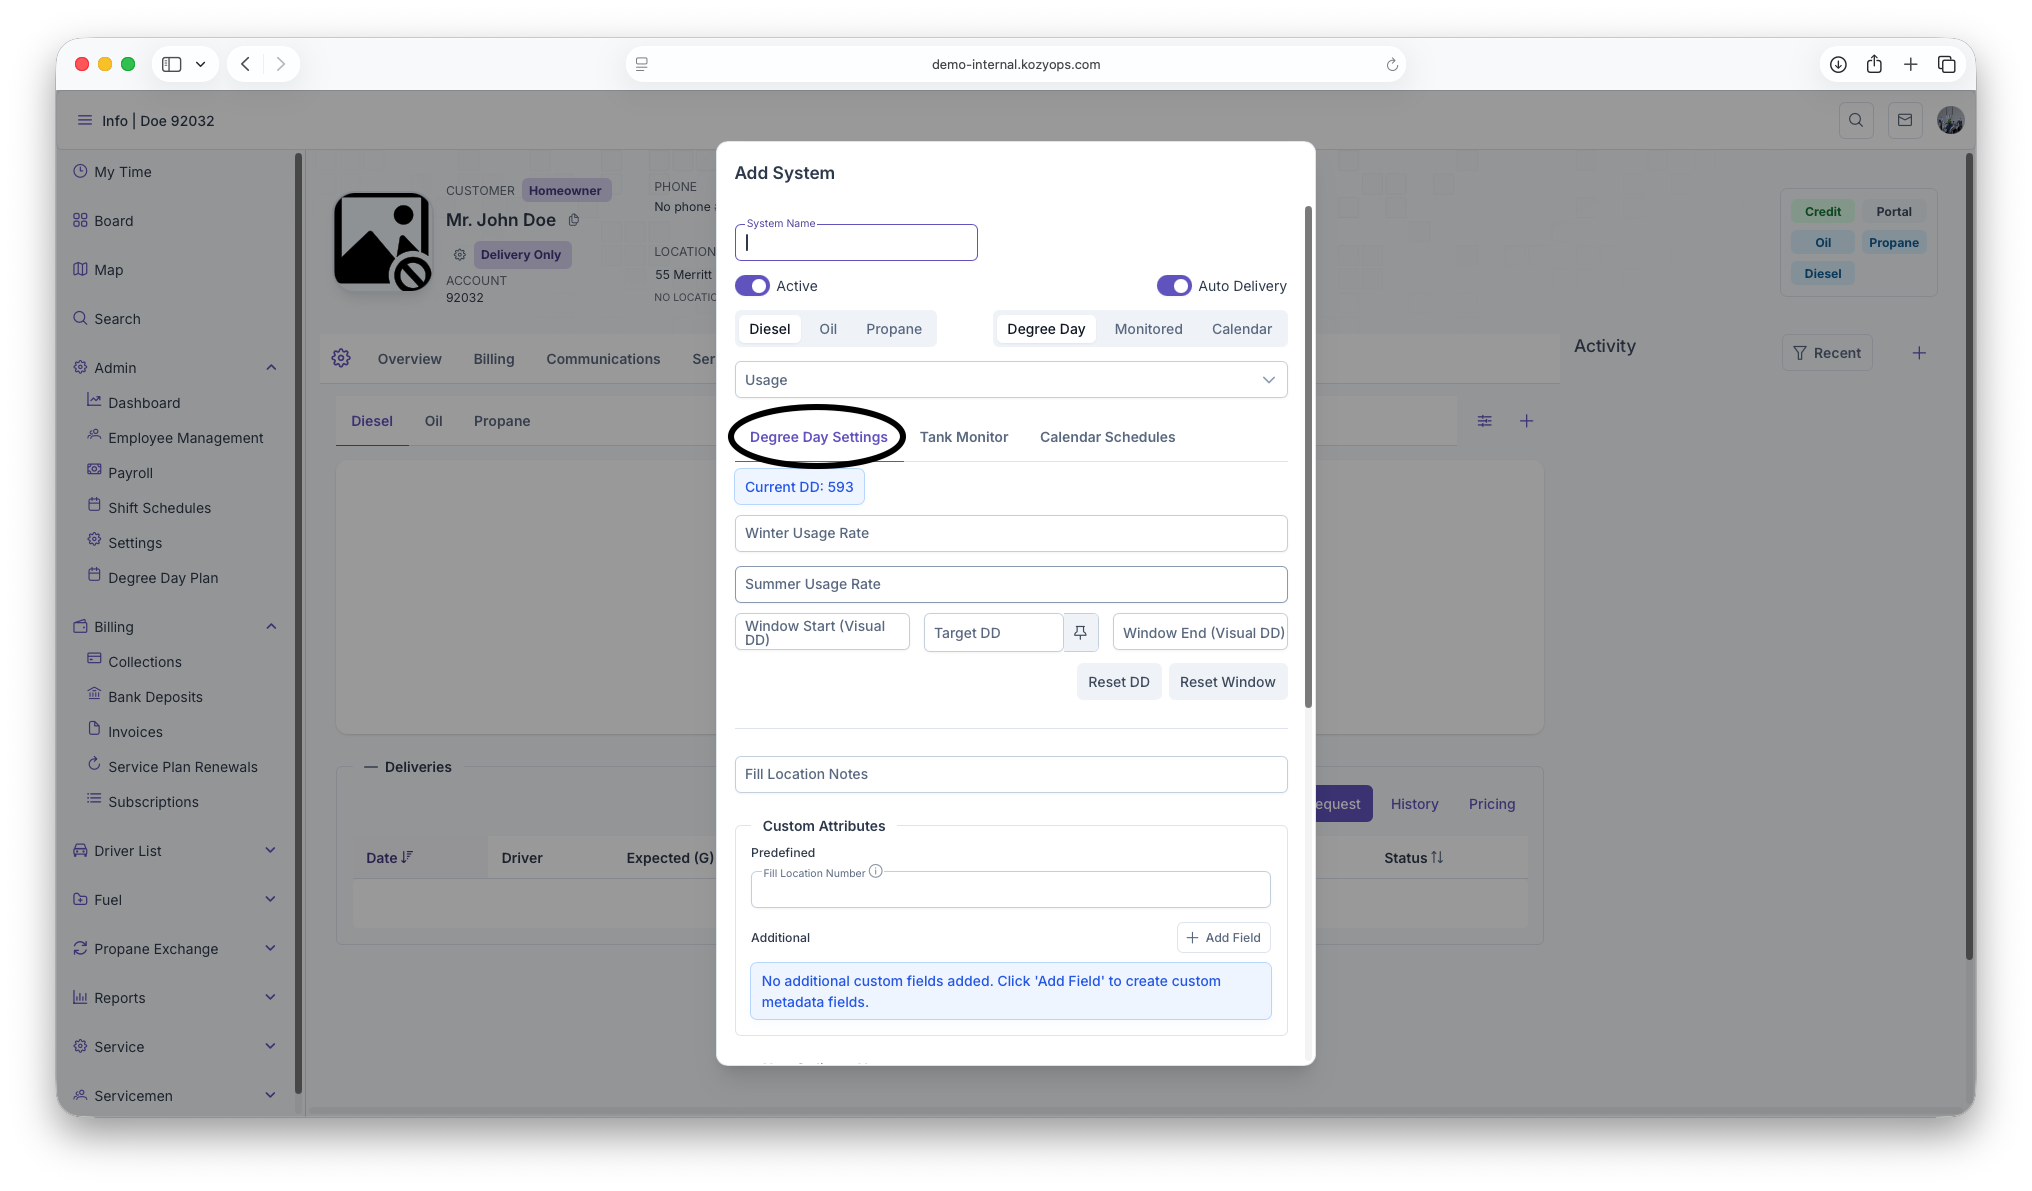
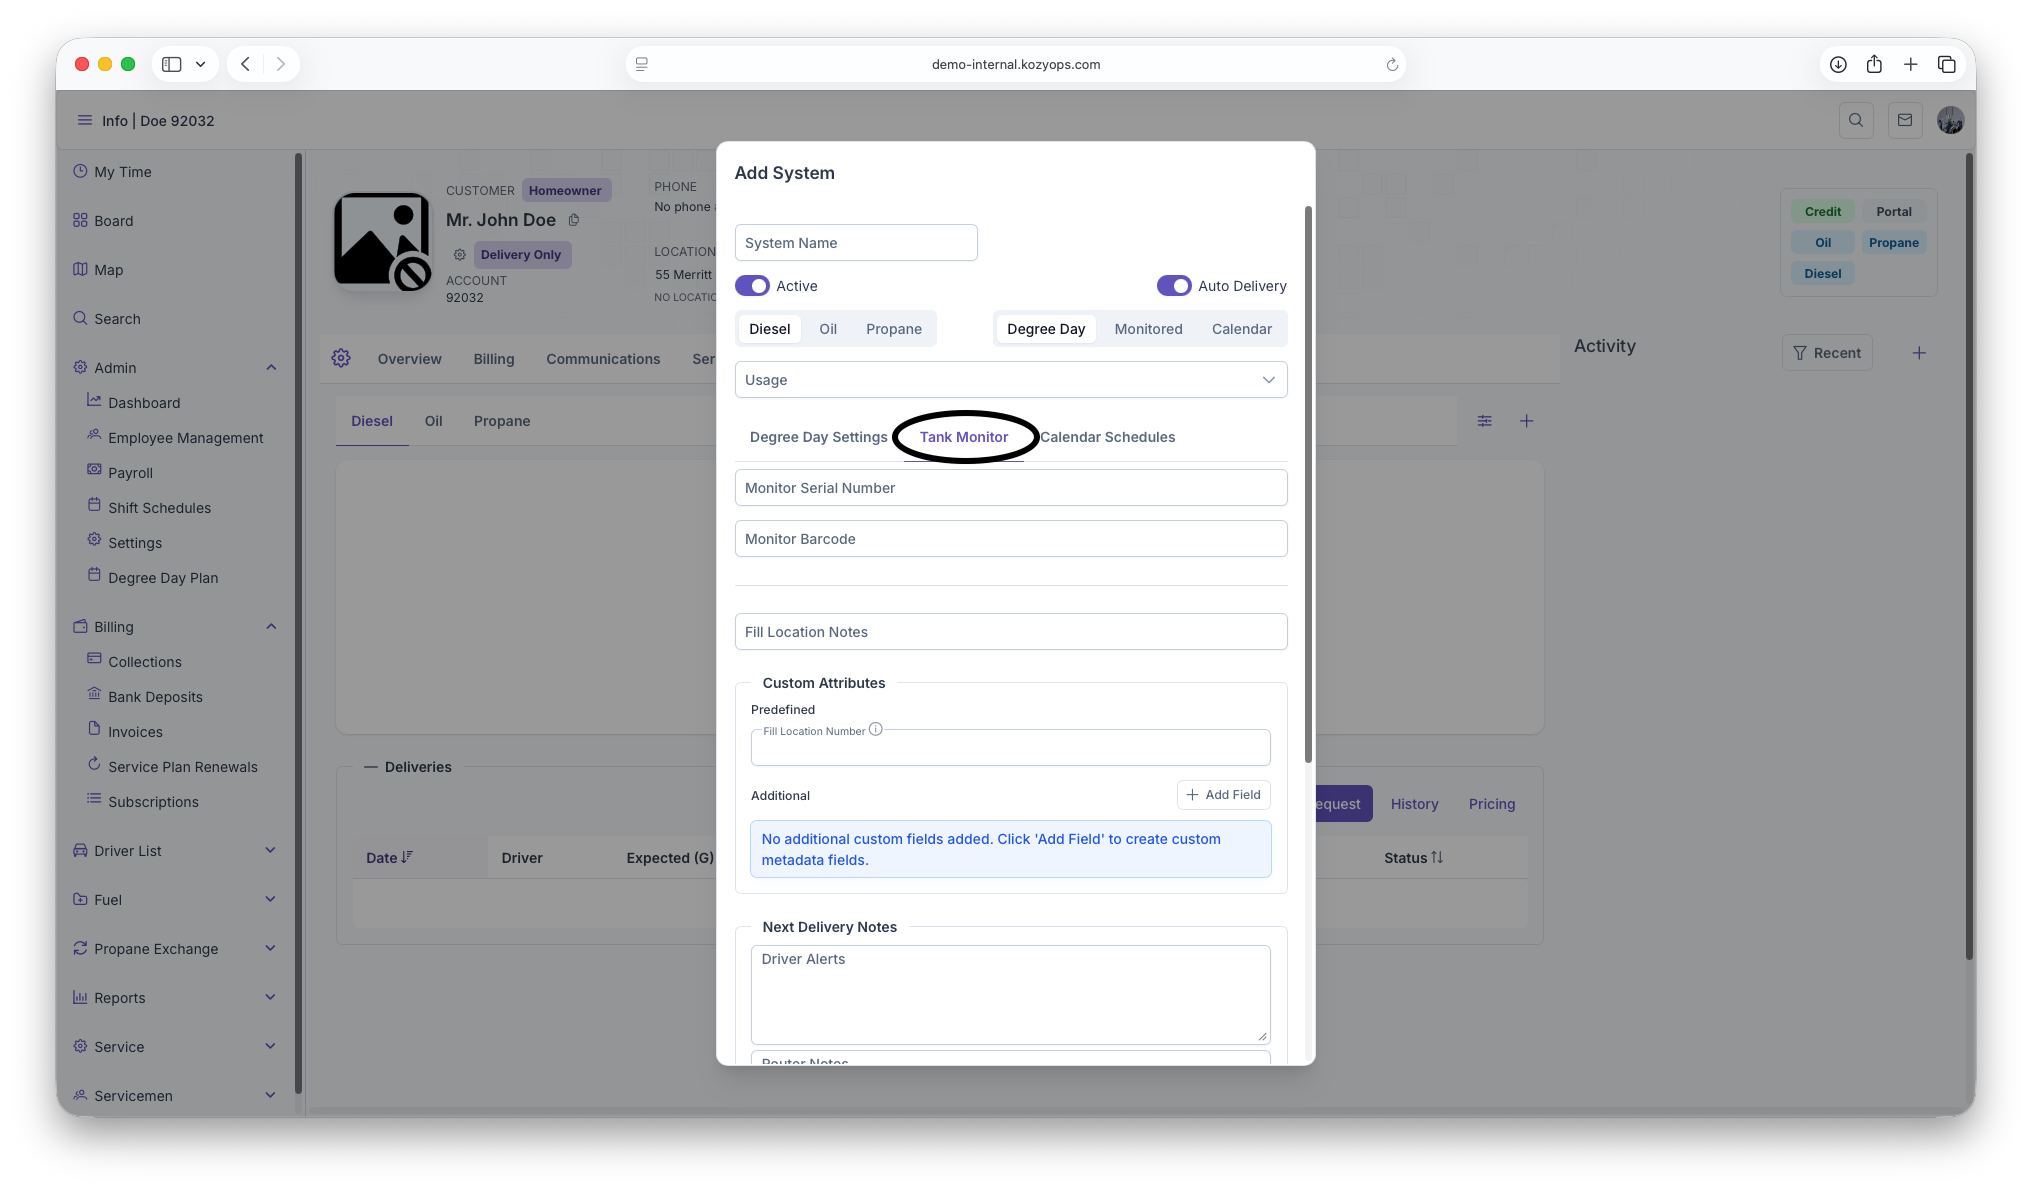
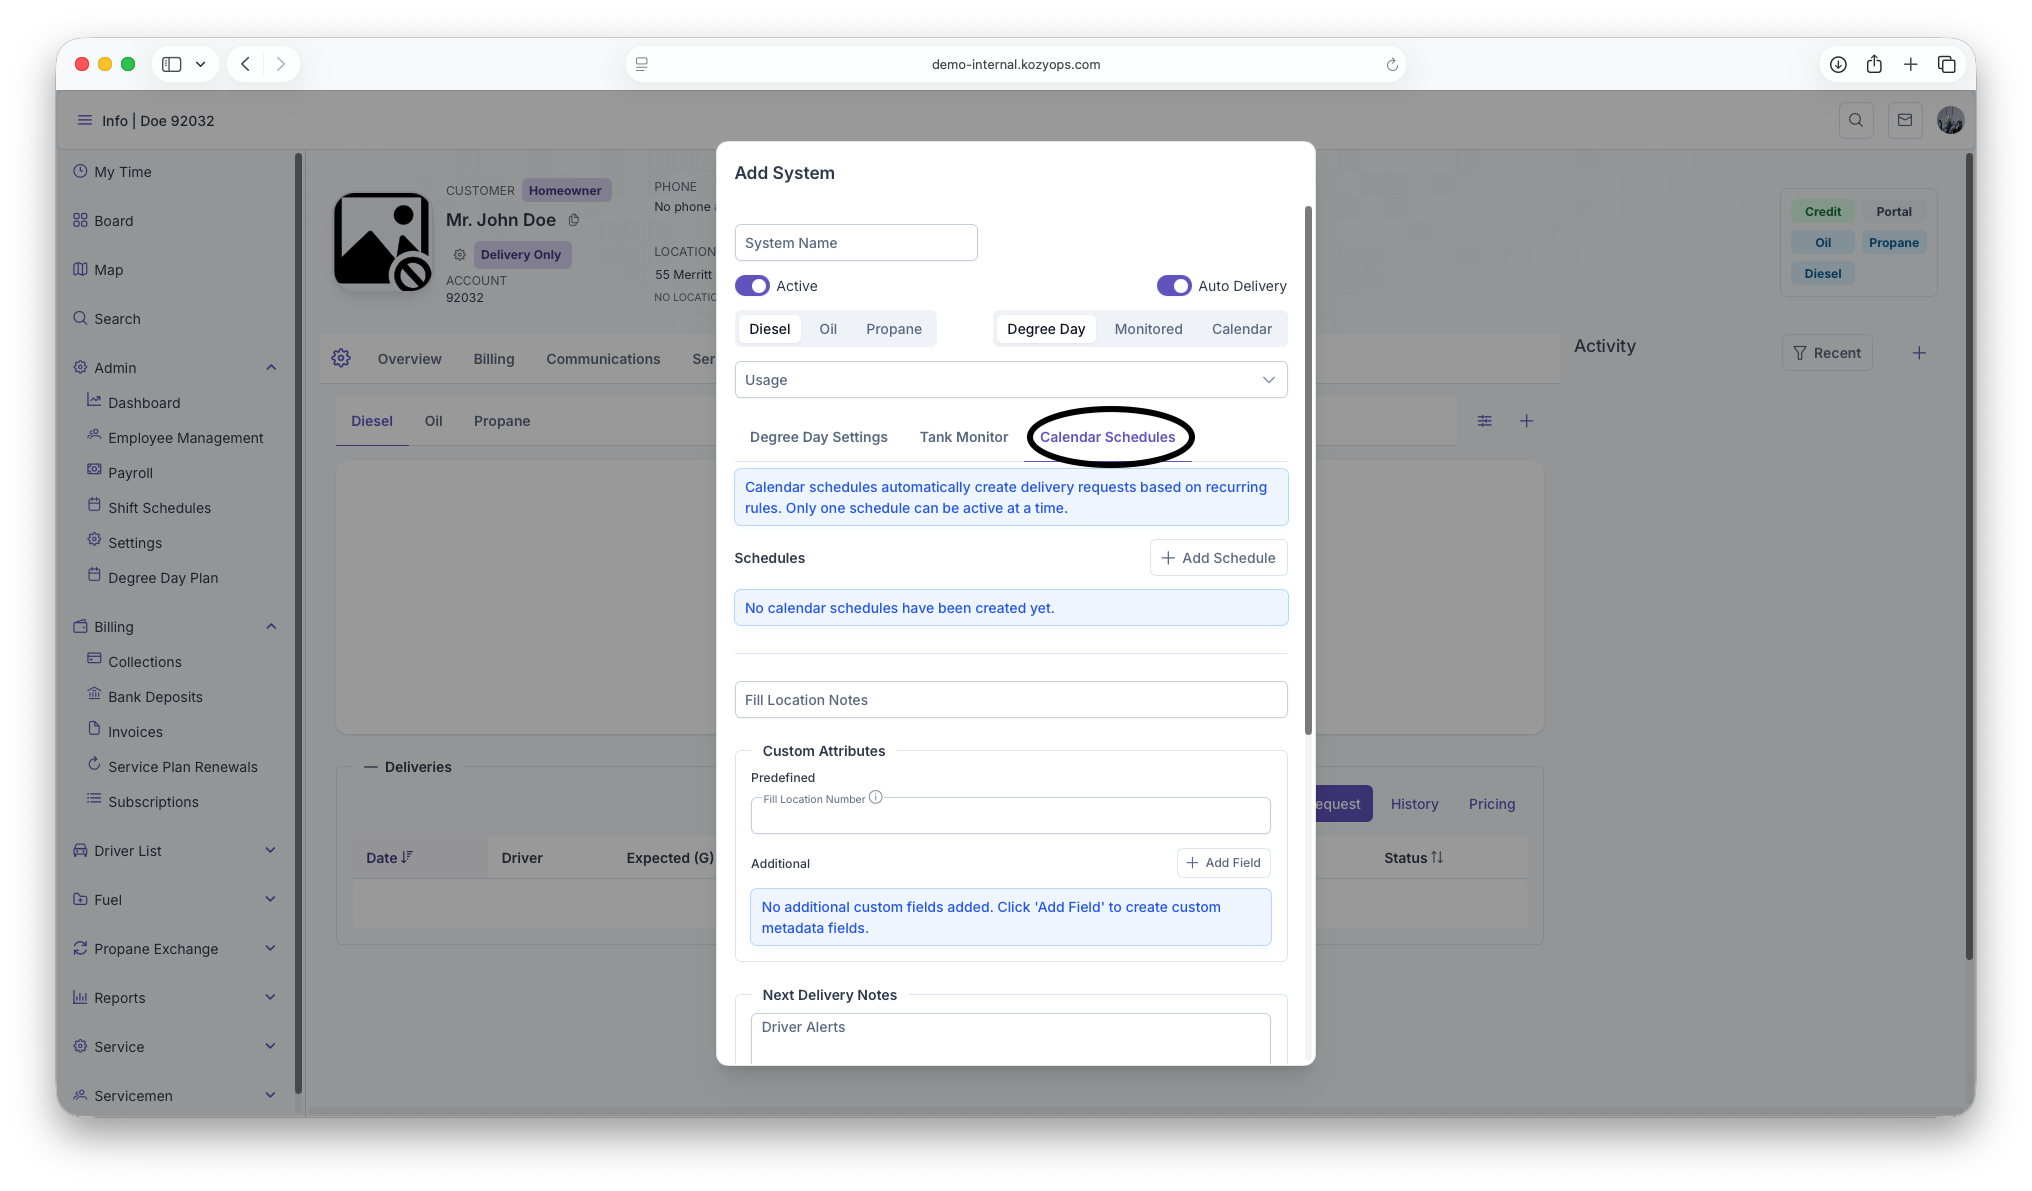
The selected strategy determines which configuration tab you'll use next.
See: Window Strategies Guide for detailed comparison and recommendations.
Strategy-specific configuration
Degree Day configuration
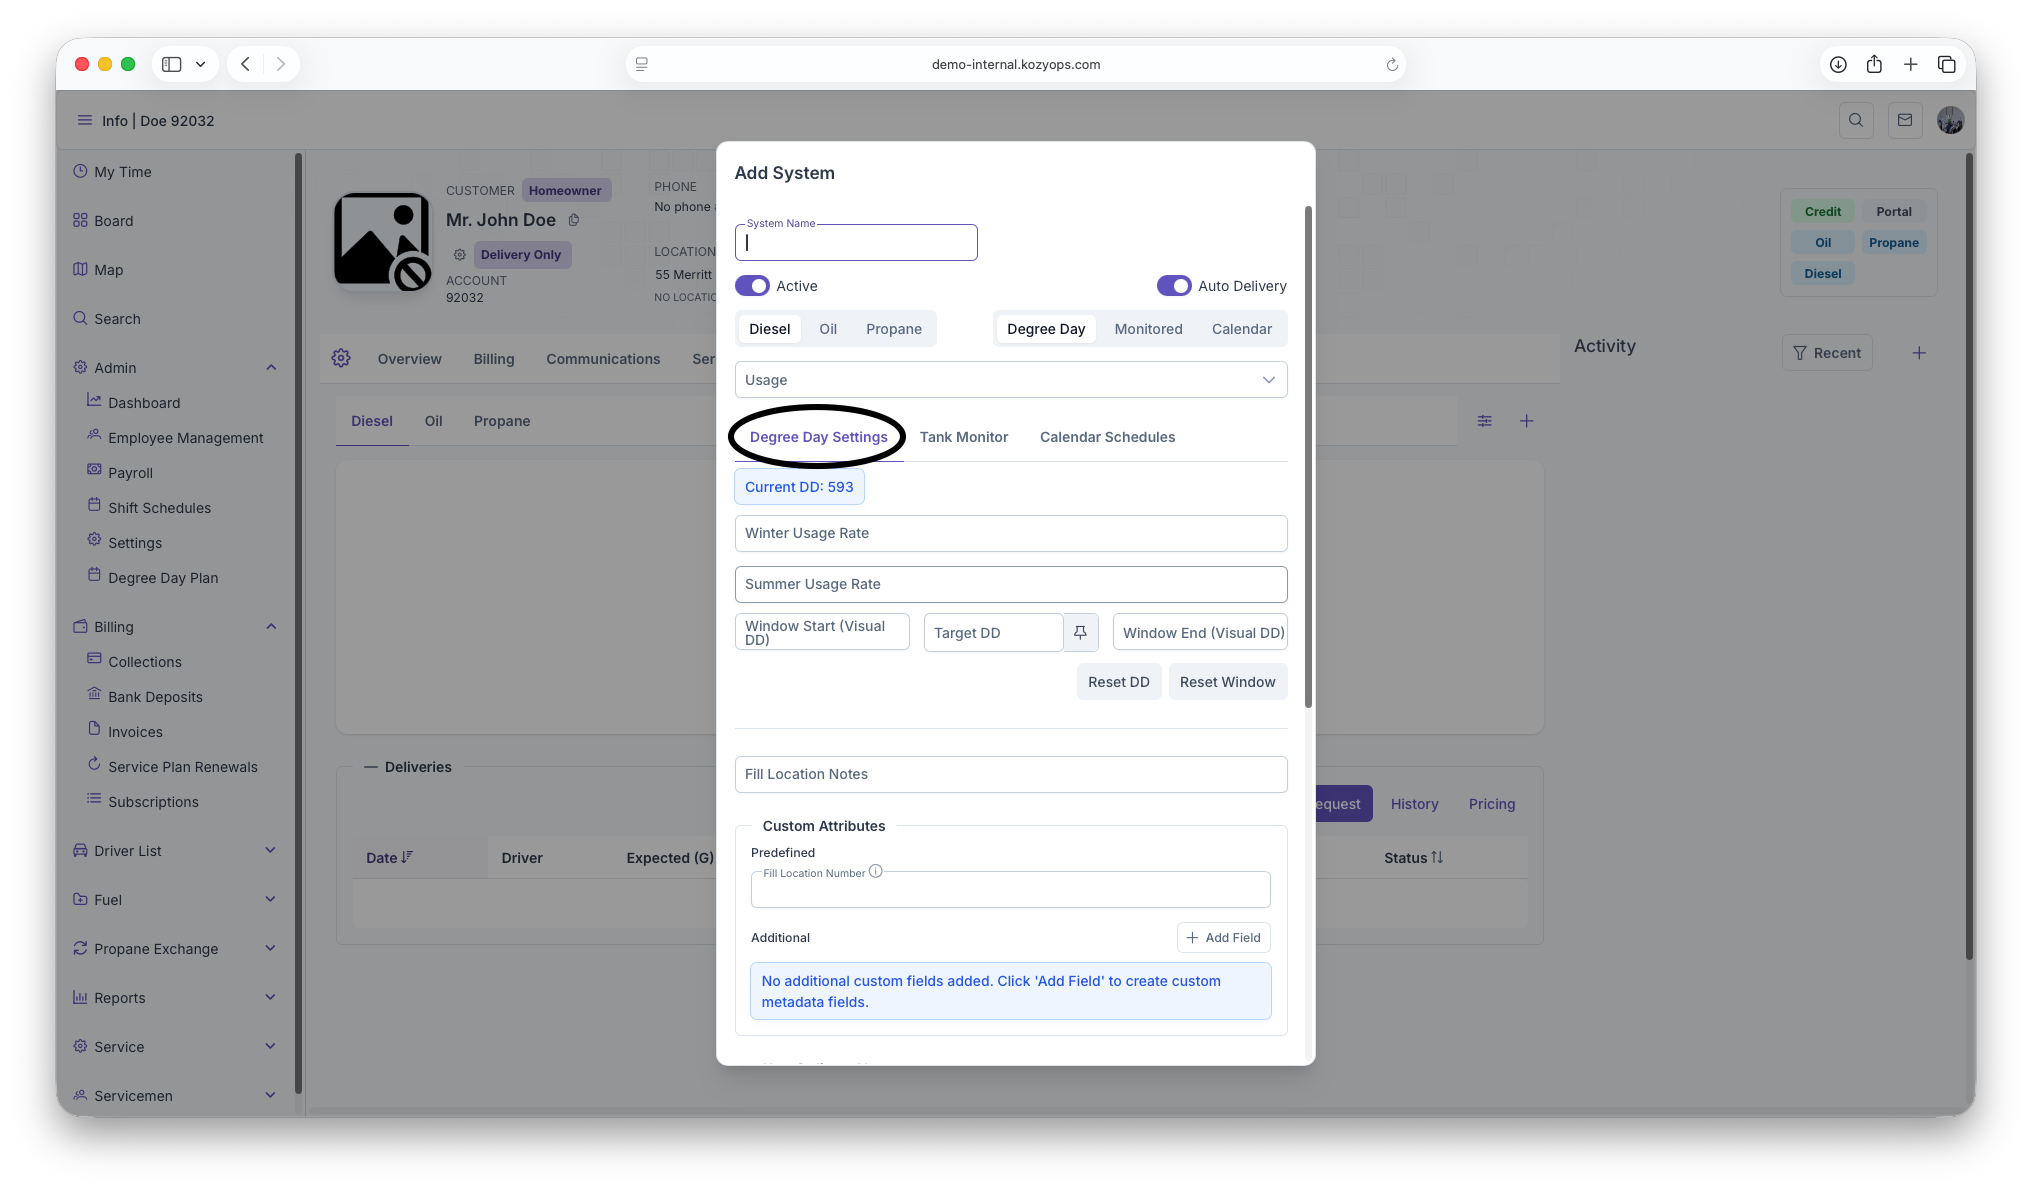
If you selected "Degree Day" as your window strategy:
Usage rates:
- Winter Usage Rate: Gallons per degree day during winter season (supports up to 4 decimal places)
- Summer Usage Rate: Gallons per degree day during summer season (supports up to 4 decimal places)
Delivery windows:
- Window Start (Visual DD): Lower boundary value for when deliveries can begin
- Target DD: The degree day value that triggers a delivery
- Window End (Visual DD): Upper boundary value for delivery window
Actions available:
- Force Degree Day button (thumbtack icon): Manually override and force the current target
- Reset DD and Reset Window buttons (only available after system is saved and has delivery history)
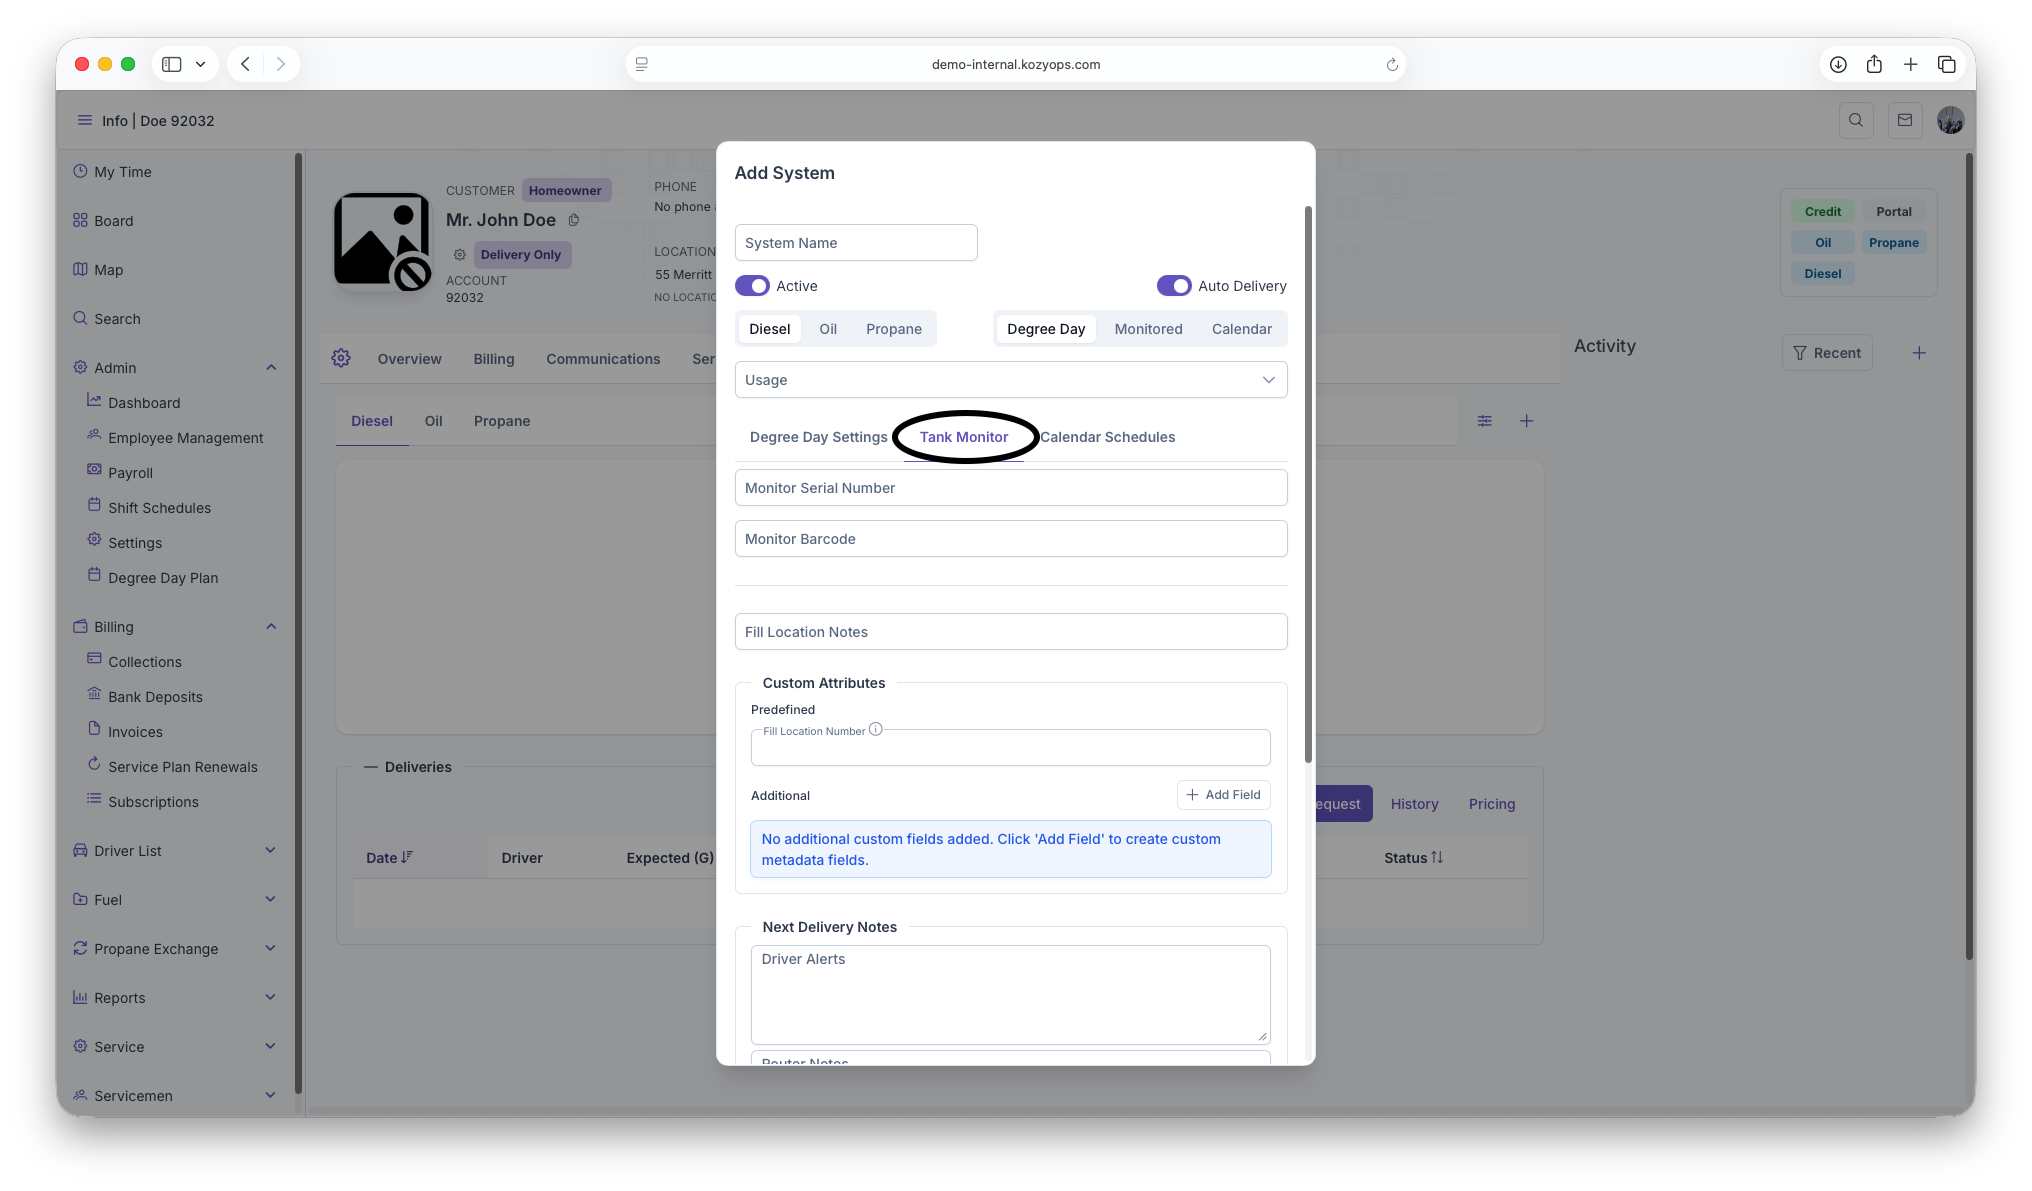
Monitored configuration
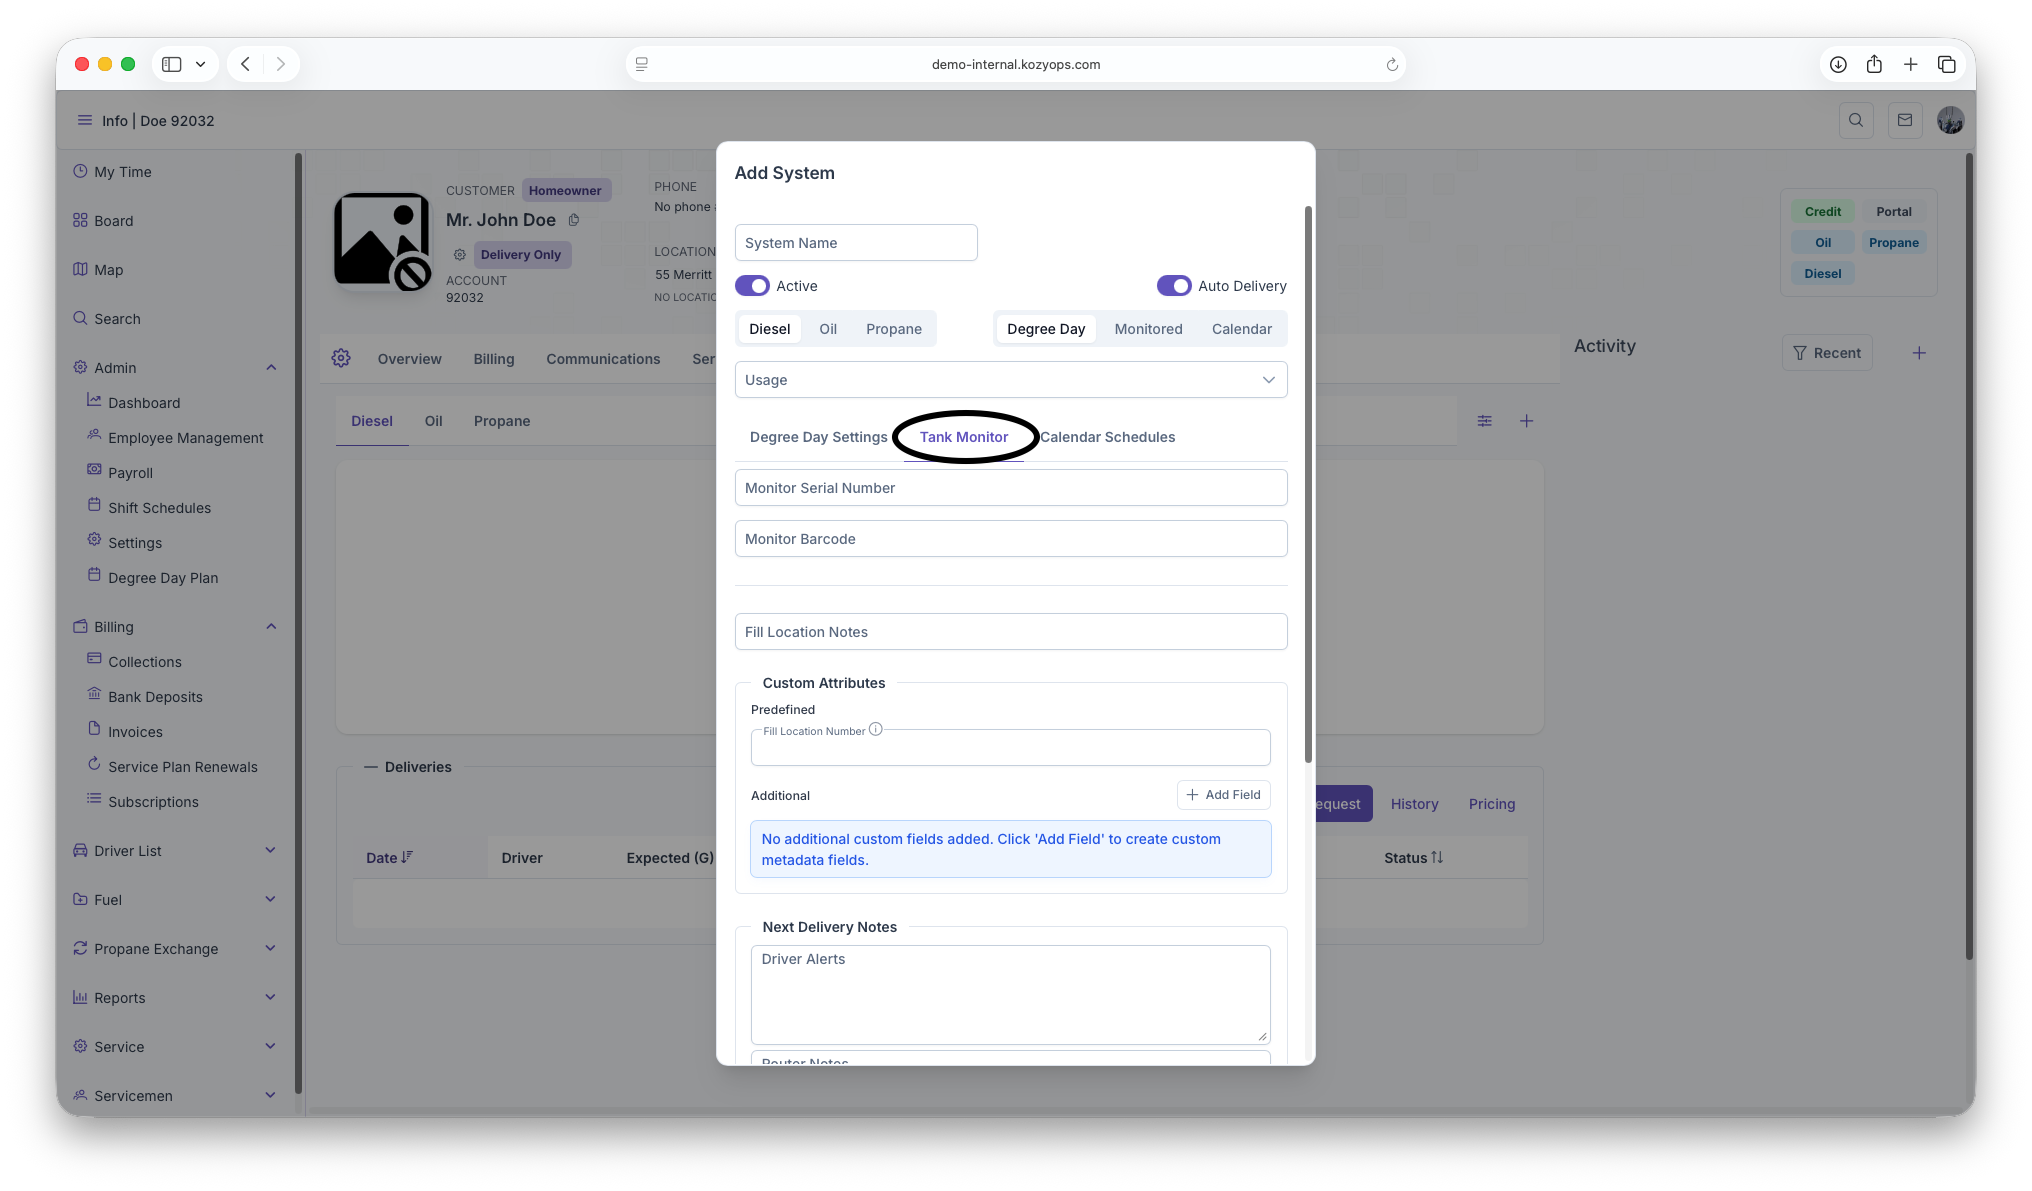
If you selected "Monitored" as your window strategy:
Required:
- Monitor Serial Number: The unique identifier for the tank monitoring device
Optional:
- Monitor Barcode: Additional identifier for the monitor
Note: The submit button will be disabled until you provide a monitor serial number for monitored systems.
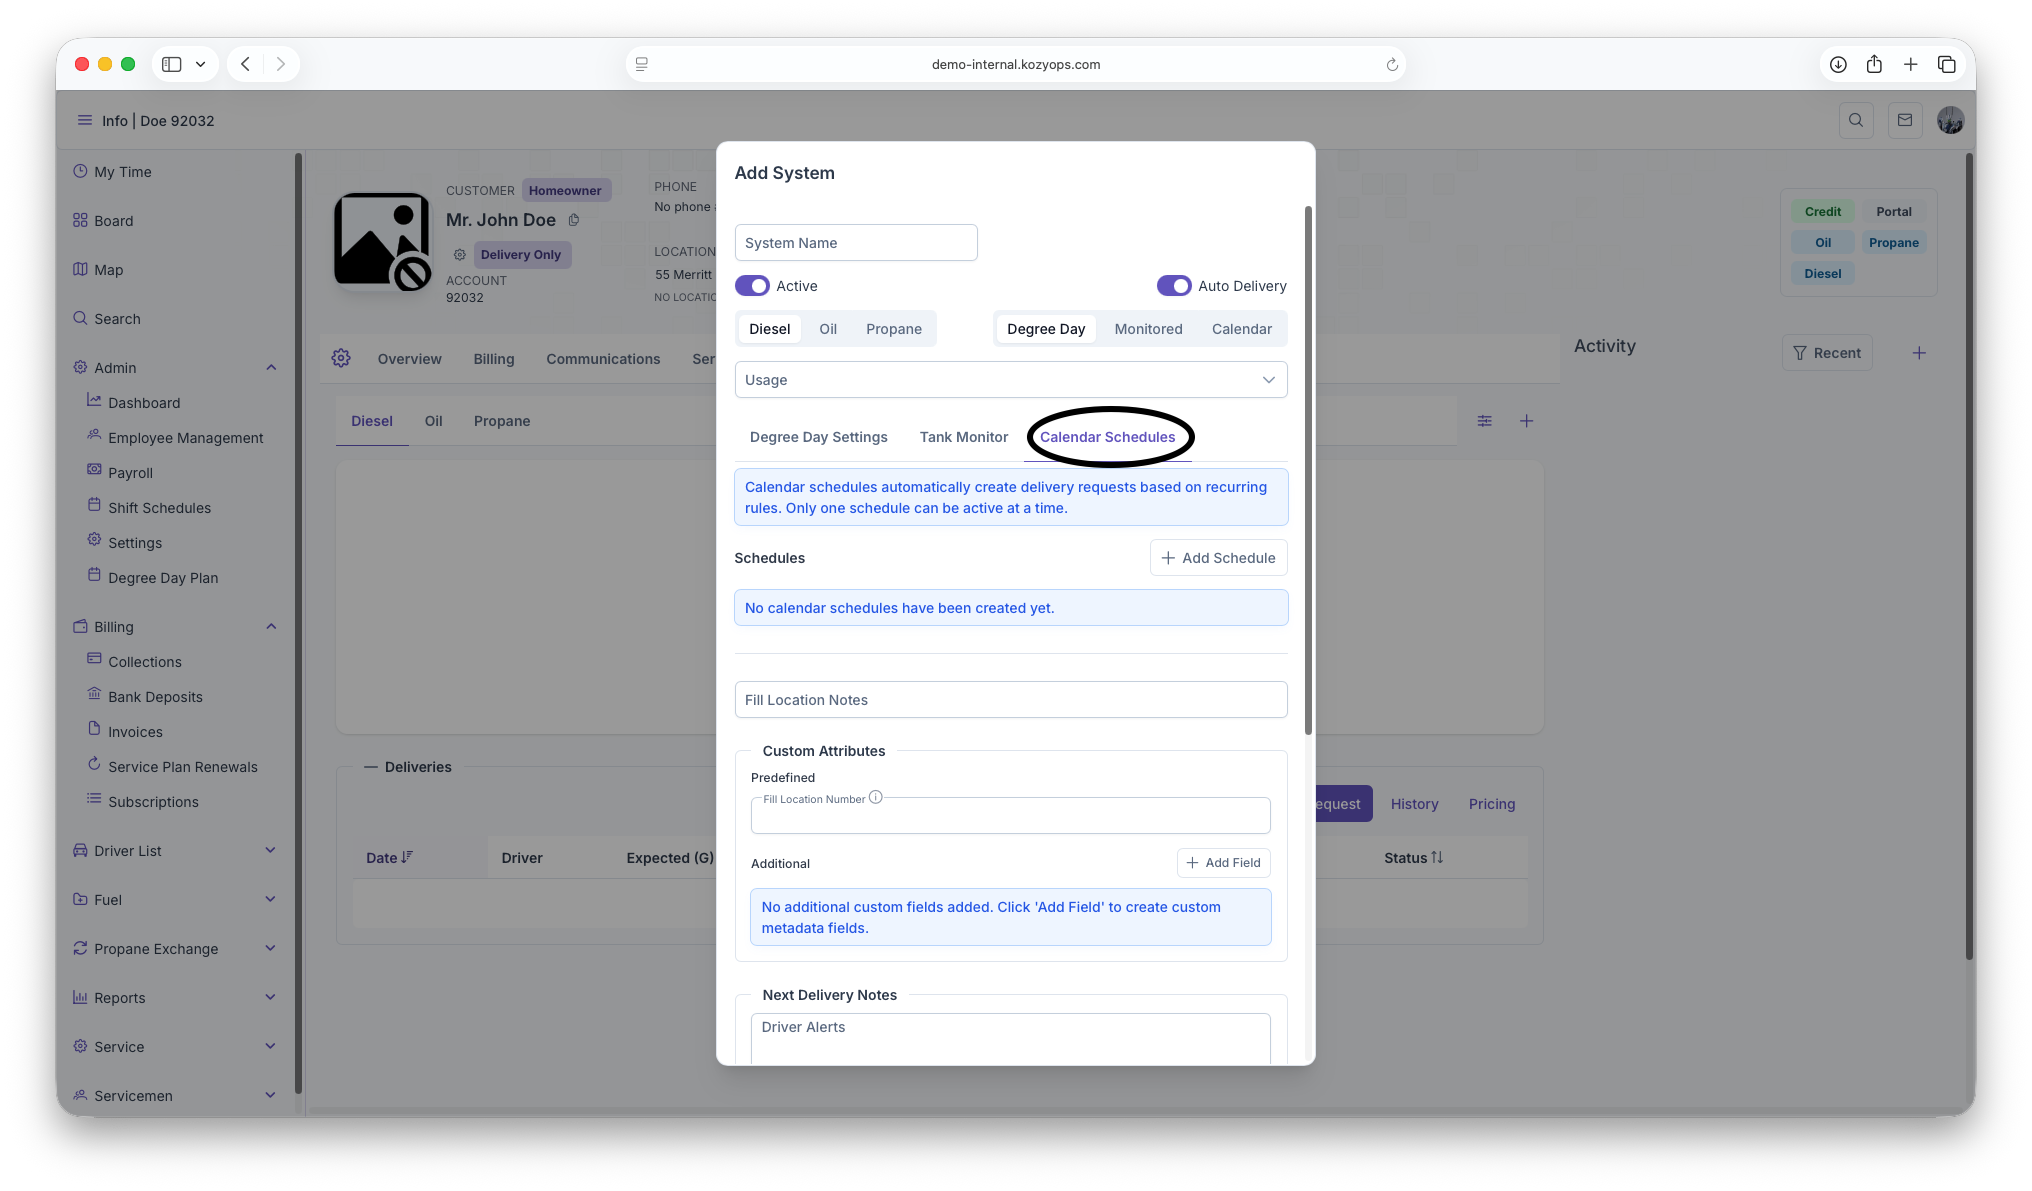
Calendar configuration
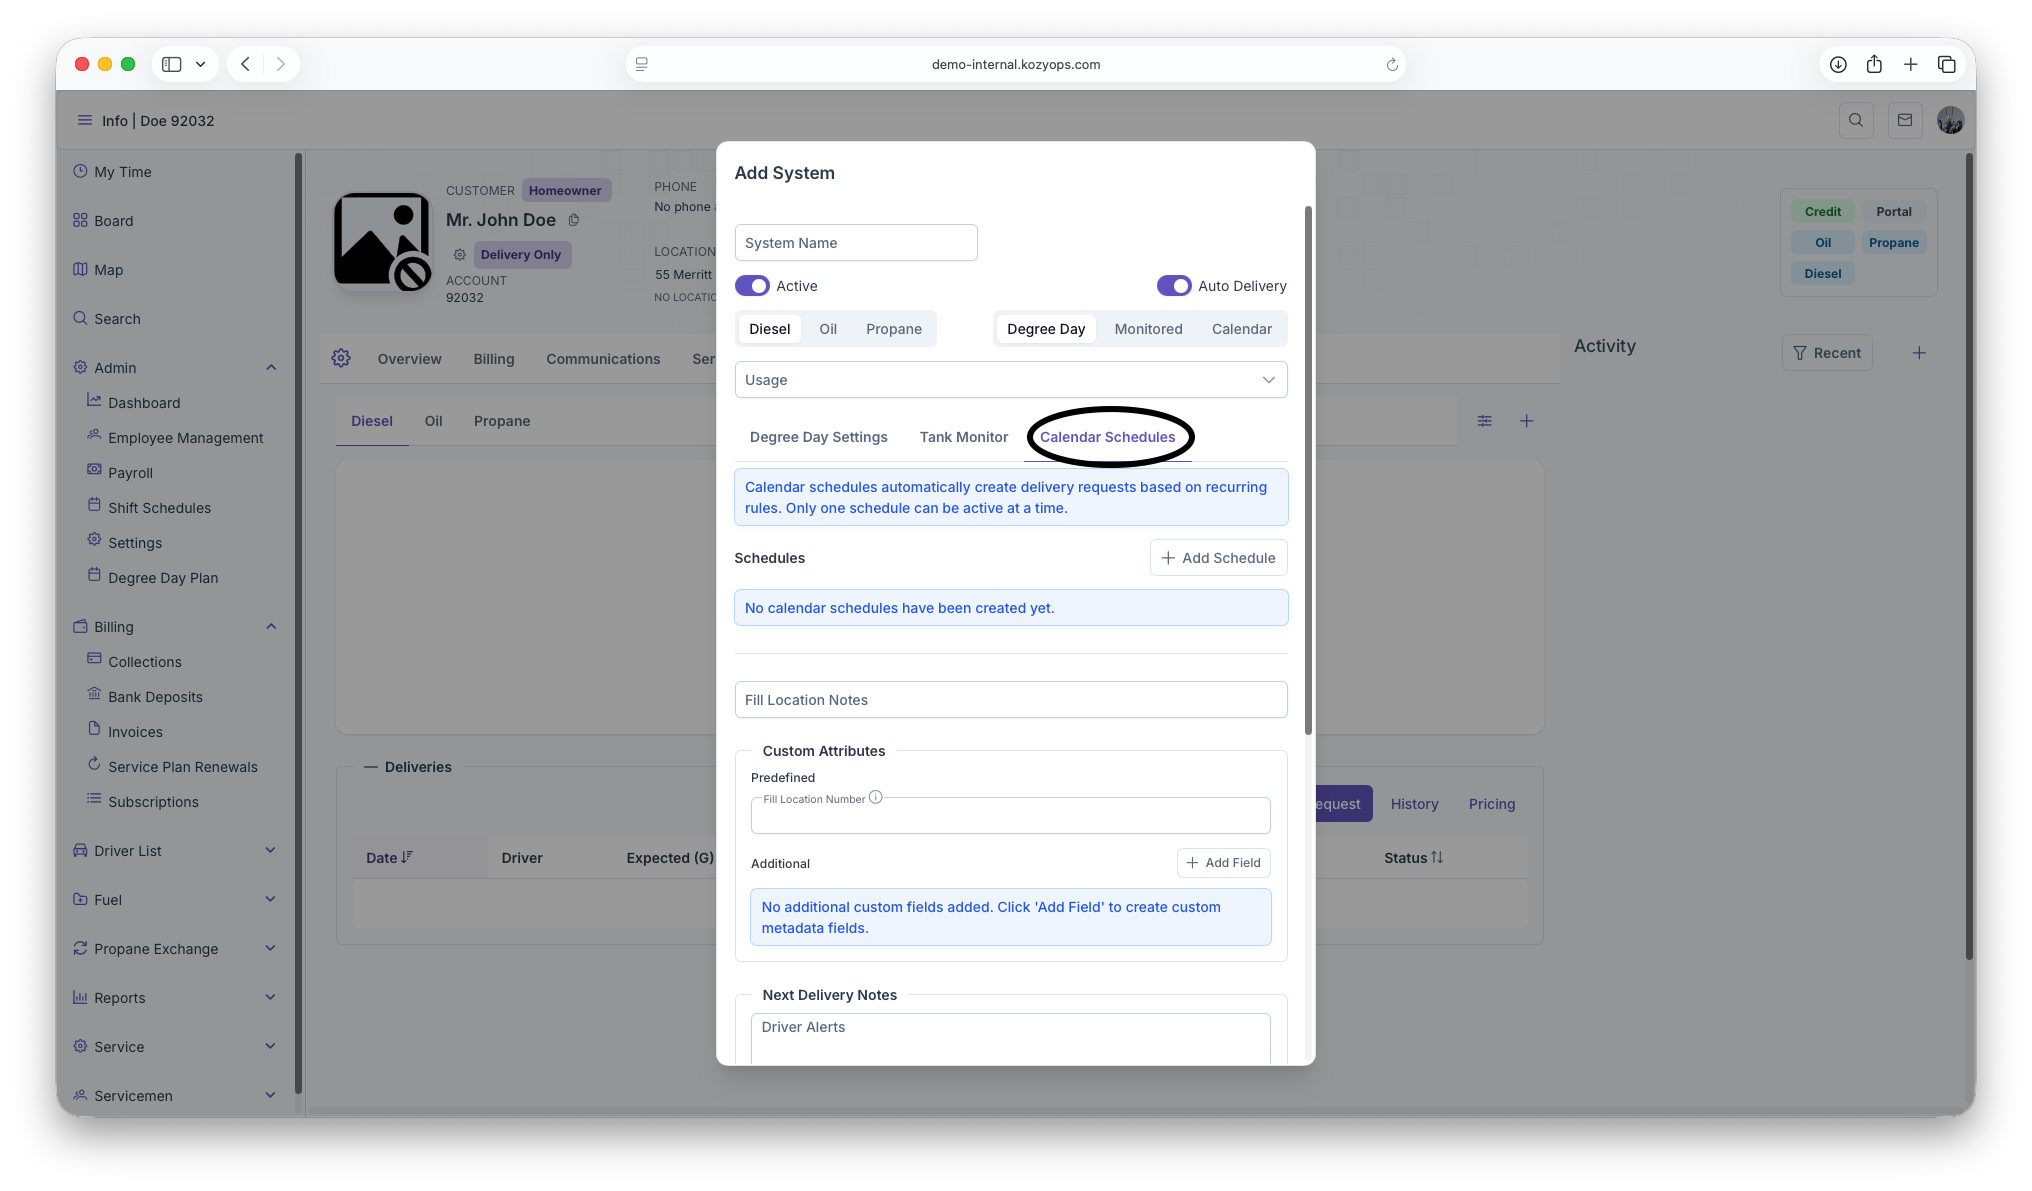
If you selected "Calendar" as your window strategy:
For new systems, calendar schedules must be configured after the system is saved. You'll see a warning message: "Save the system before managing calendar schedules."
After saving, you can create calendar schedules with:
- Frequency and units (days, weeks, months, years)
- Preferred day of week
- Seasonal start/end dates
- Requested delivery volume
- Active/inactive status
Only one calendar schedule can be active at a time.
See: Calendar Scheduling Guide for detailed schedule management.
Understanding systems and fills
A system is a logical grouping of equipment that all connect to the same fill point:
- If you have 2 manifolded tanks feeding one boiler, that's one system with multiple tanks attached to the same equipment.
- If you have separate heating and water heater systems at the same location, each with their own fill, those are two separate systems.
This grouping ensures accurate capacity tracking, delivery projections, and routing.
Additional system fields
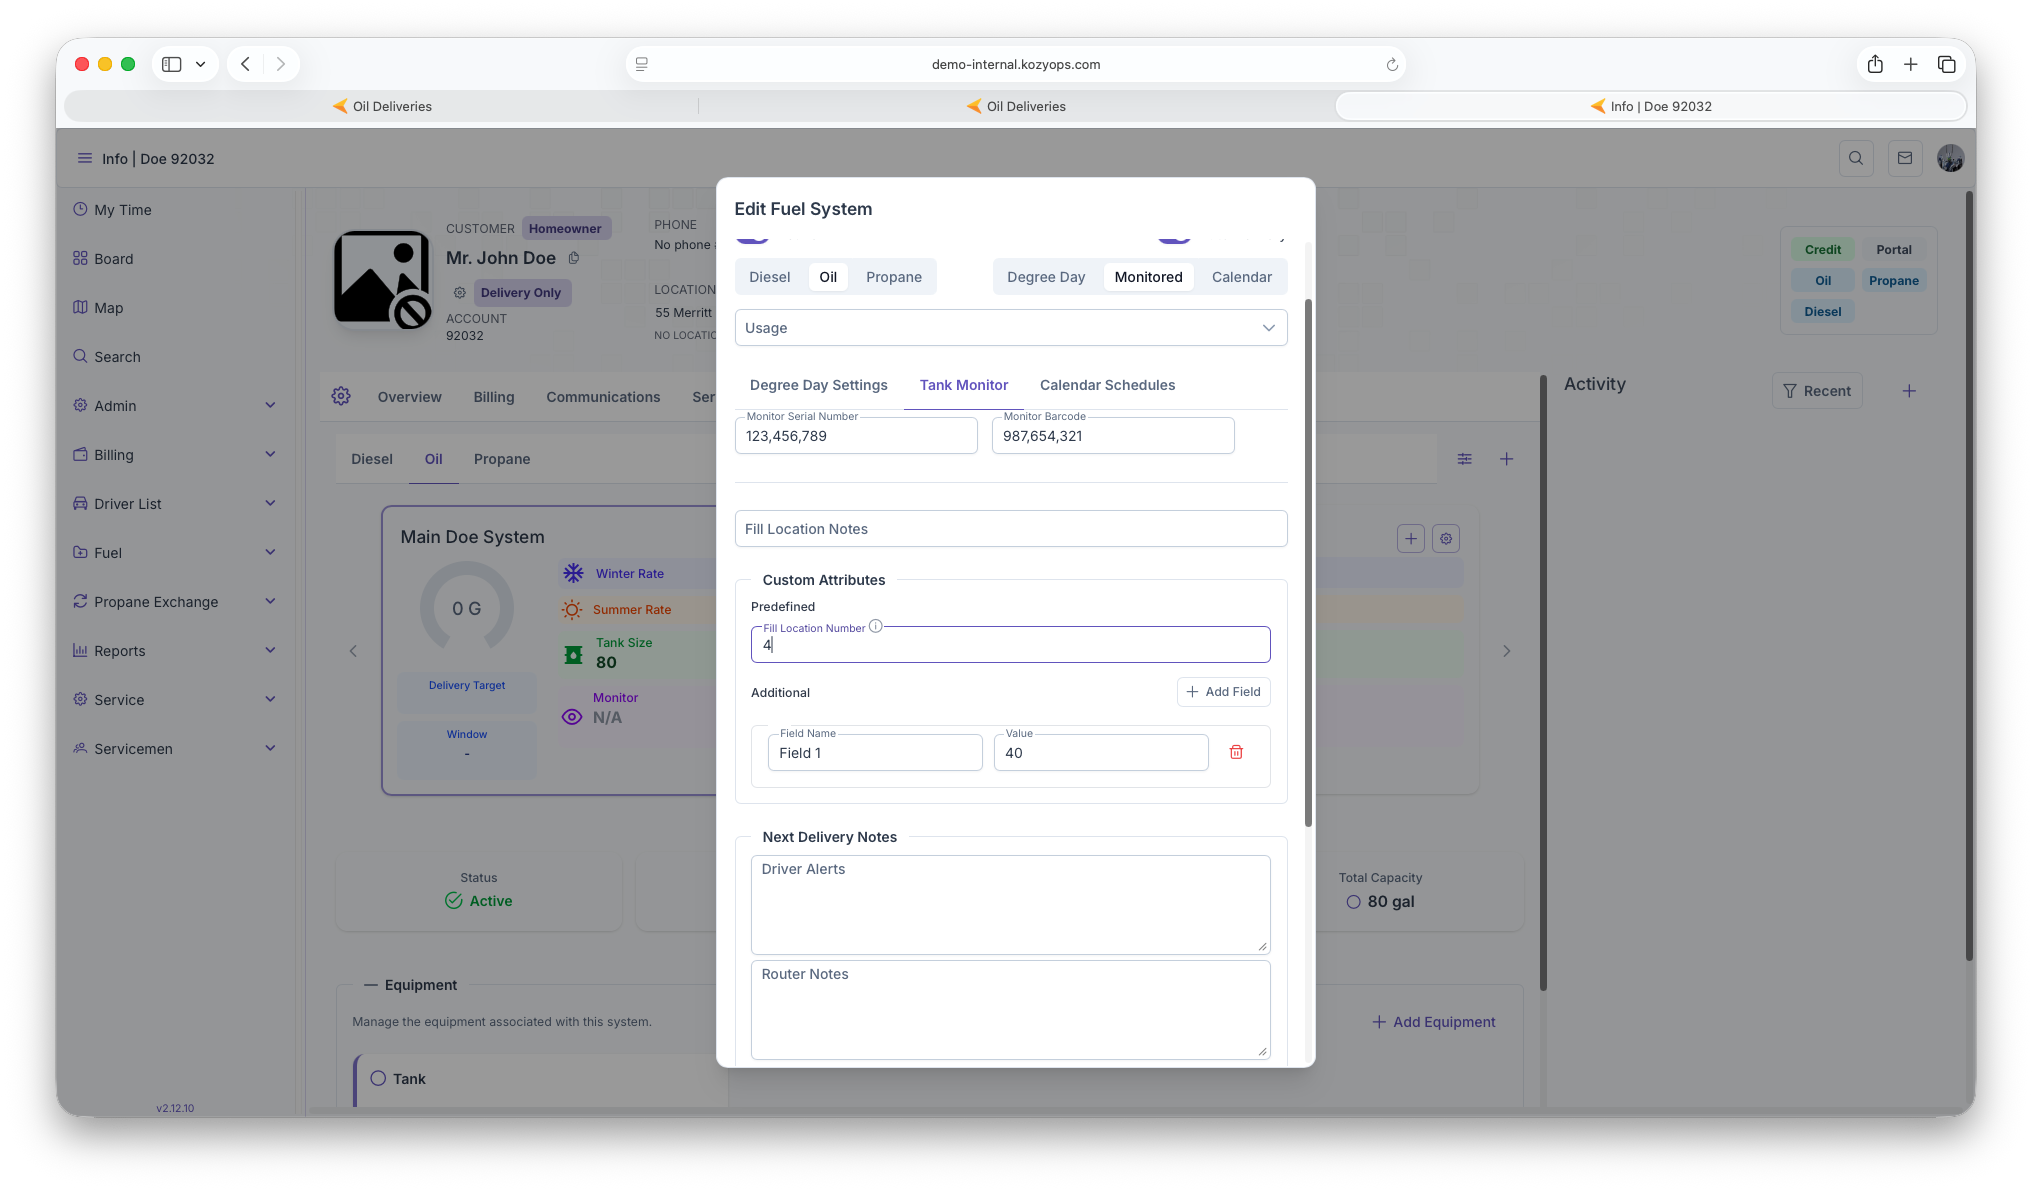
Fill Location Notes

- Text field for delivery access instructions (gate codes, driveway location, etc.)
Custom Attributes

Predefined fields:
- System-type-specific custom fields loaded from the API
- Each shows with label, optional description tooltip
Additional custom fields:
- Click "Add Field" to create custom key-value metadata pairs
- Enter field name and value
- Remove with trash icon
Next Delivery Notes
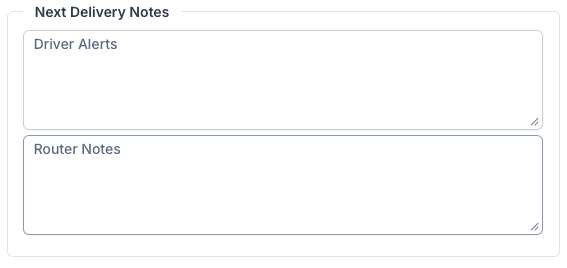
Driver Alerts:
- Important safety or access information for delivery drivers
- Displayed prominently during delivery
Router Notes:
- Instructions for routing and dispatching
- Helps with route planning and optimization
Office Notes

- Internal notes visible only to office staff
- General system information not needed by drivers
Next: Add equipment
After saving the system, add equipment under the system (tanks, boilers, furnaces, vaporizers, regulators, etc.).
For manifolded tanks feeding the same appliance/fill, attach multiple tanks to the same equipment set to represent one shared capacity.
See: Adding Equipment
Editing later
You can rename the system, adjust window strategy, or deactivate it. Be careful changing fill associations or window strategies after deliveries exist, as it can impact projections.
See: Editing a System
Related guides
- Window Strategies — Choosing and configuring the right delivery estimation method
- Add Services — Services are linked to locations or systems
- Location Management — Managing service locations
- Creating a New Customer — Full onboarding flow
Editing a System Guide
This guide explains how to edit an existing system using the Edit System dialog and what each field and setting controls.
Prerequisites
- The system exists and you have permission to modify it.
- You are on the Customer Dashboard with the Location selected.
Edit a system
-
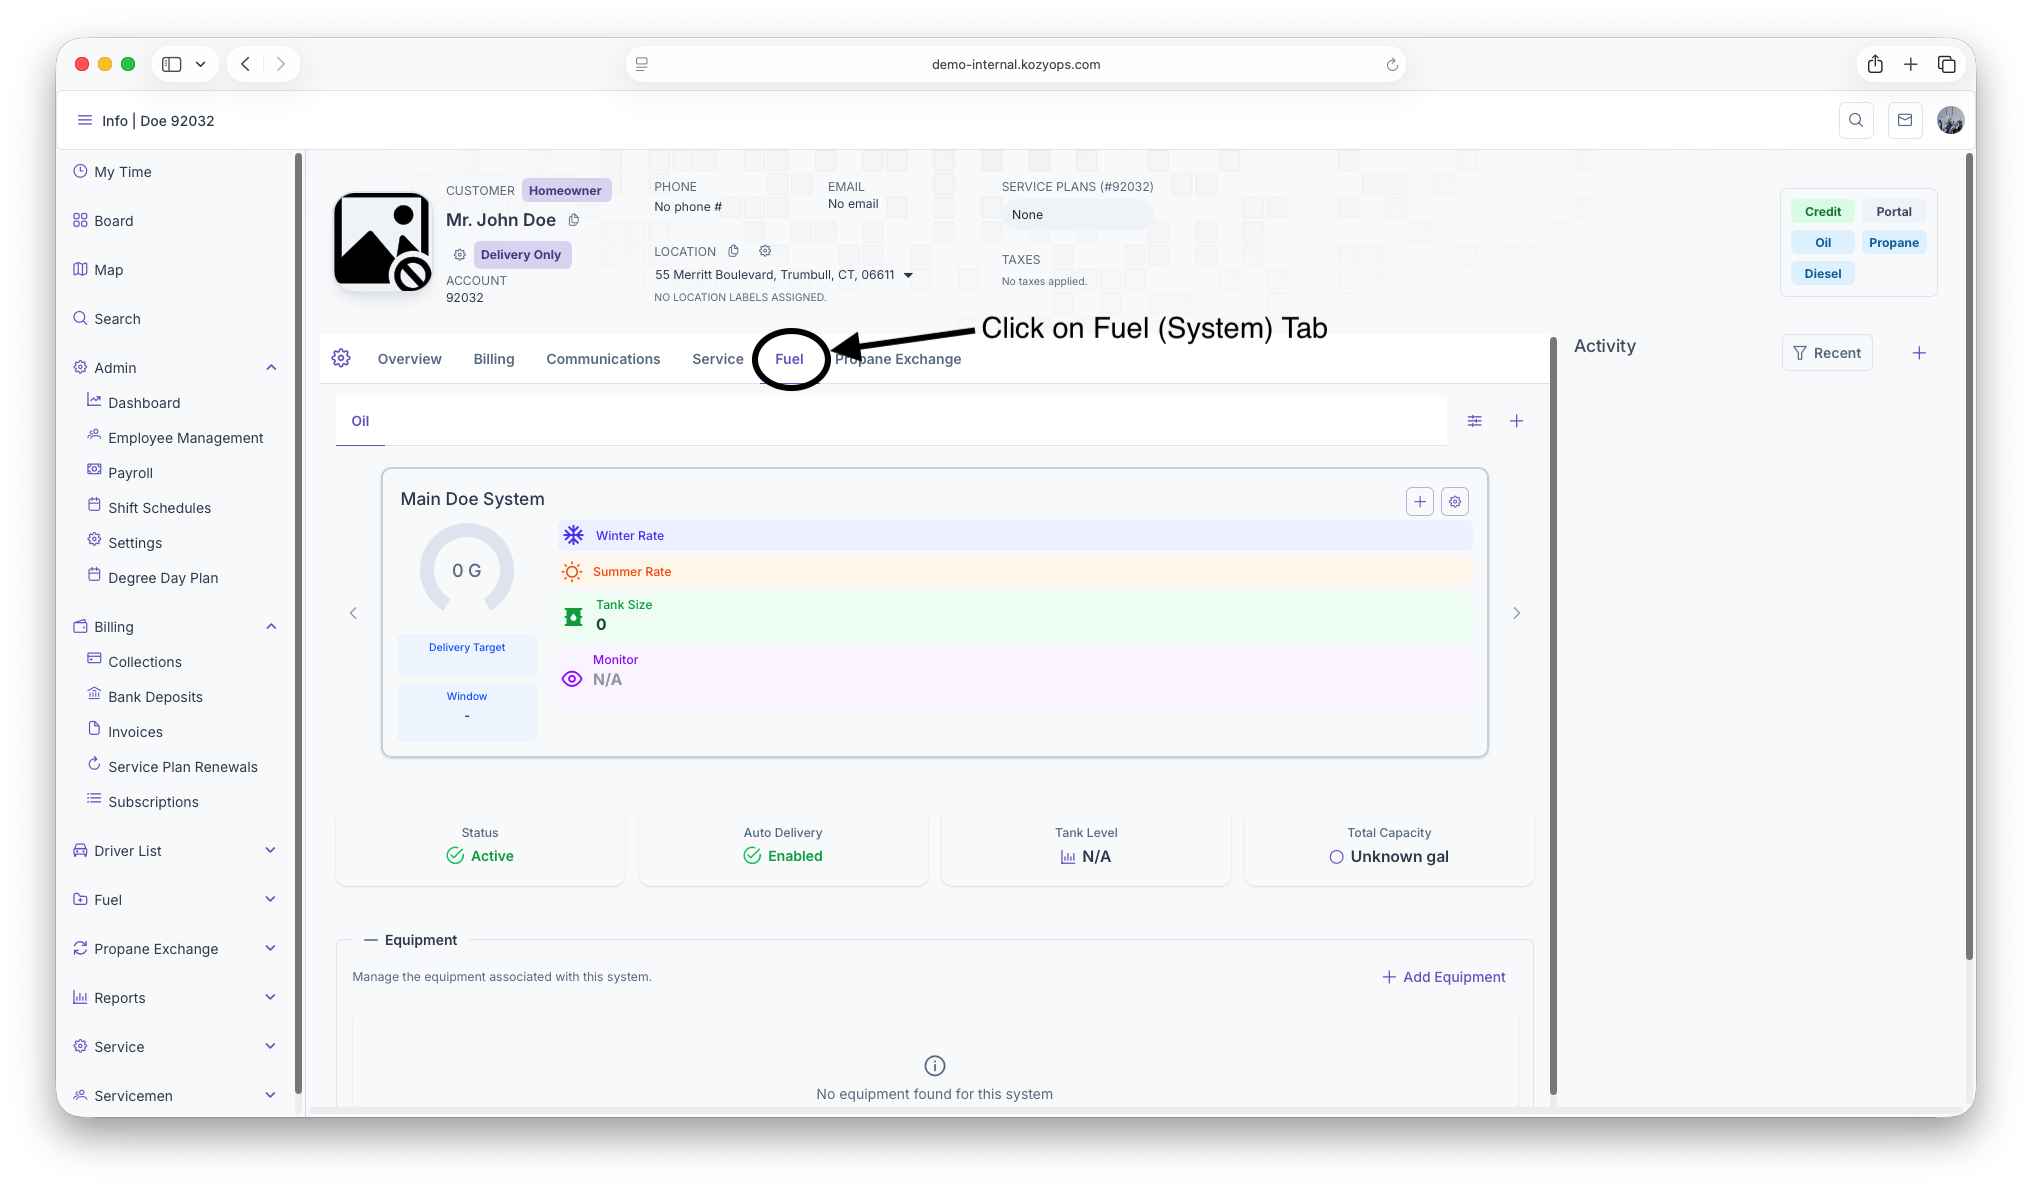
Navigate to Systems from the Customer Dashboard.

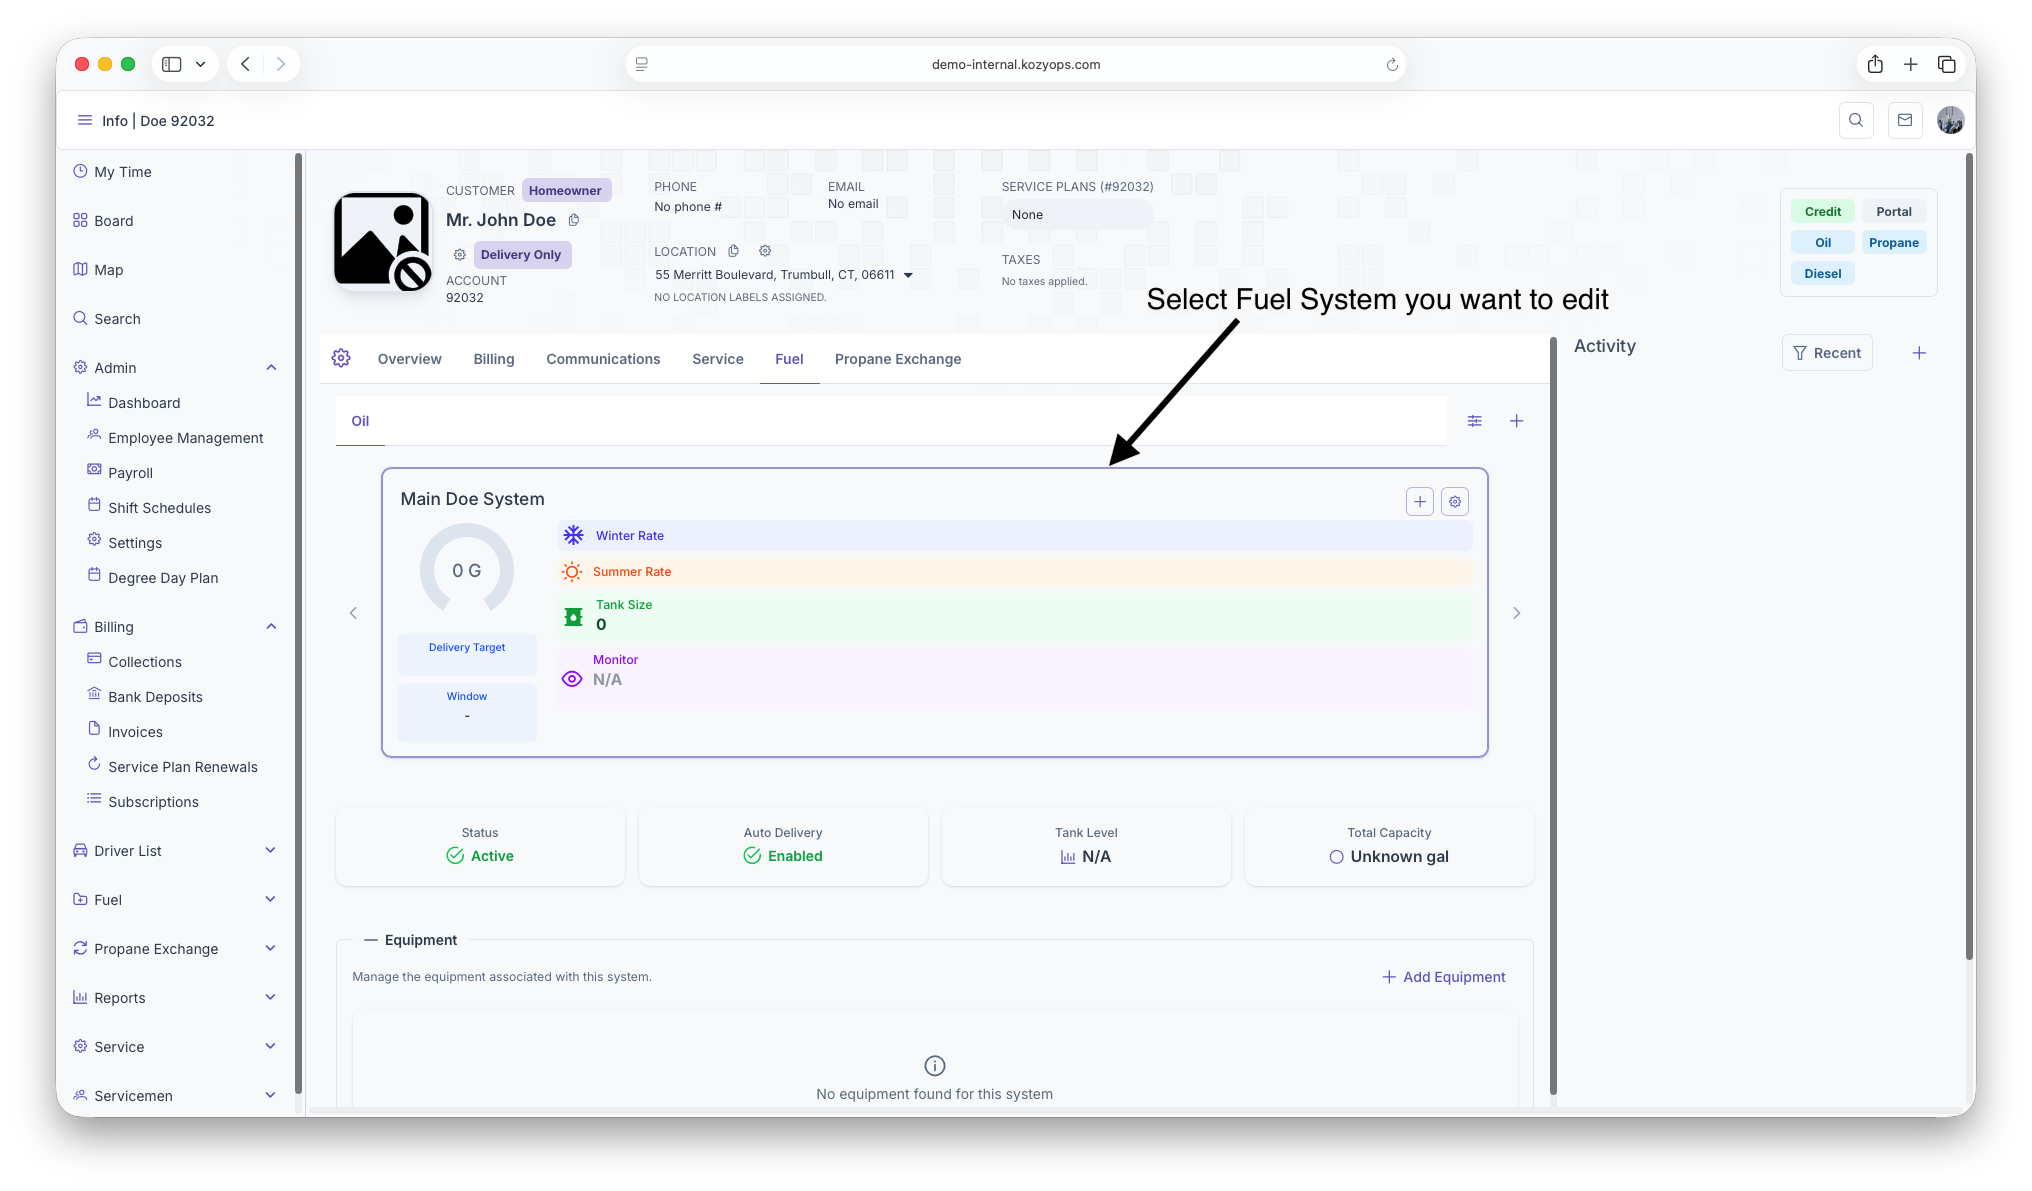
-
Find the system you want to edit.

-
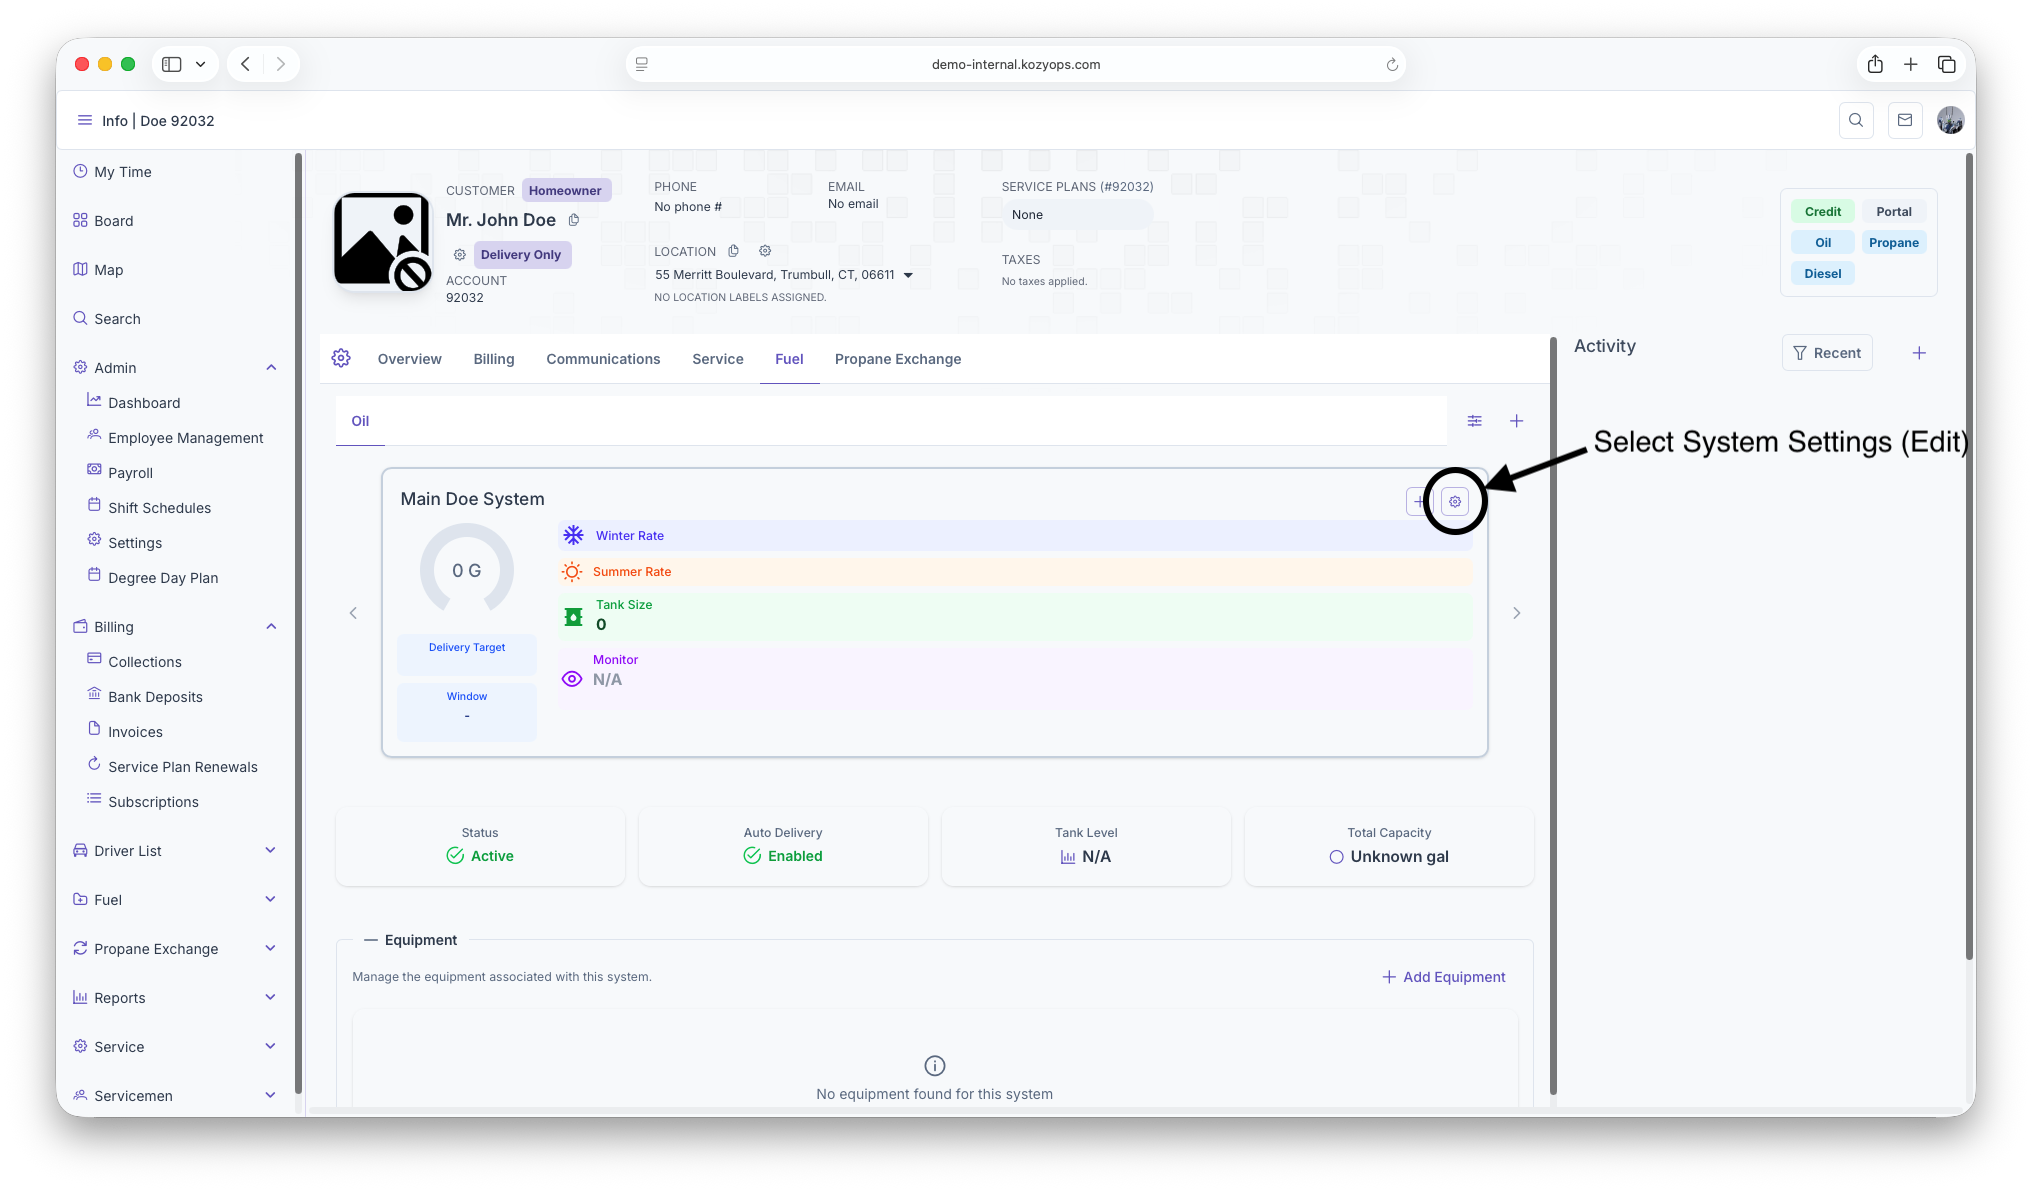
Click Edit on the system.

-
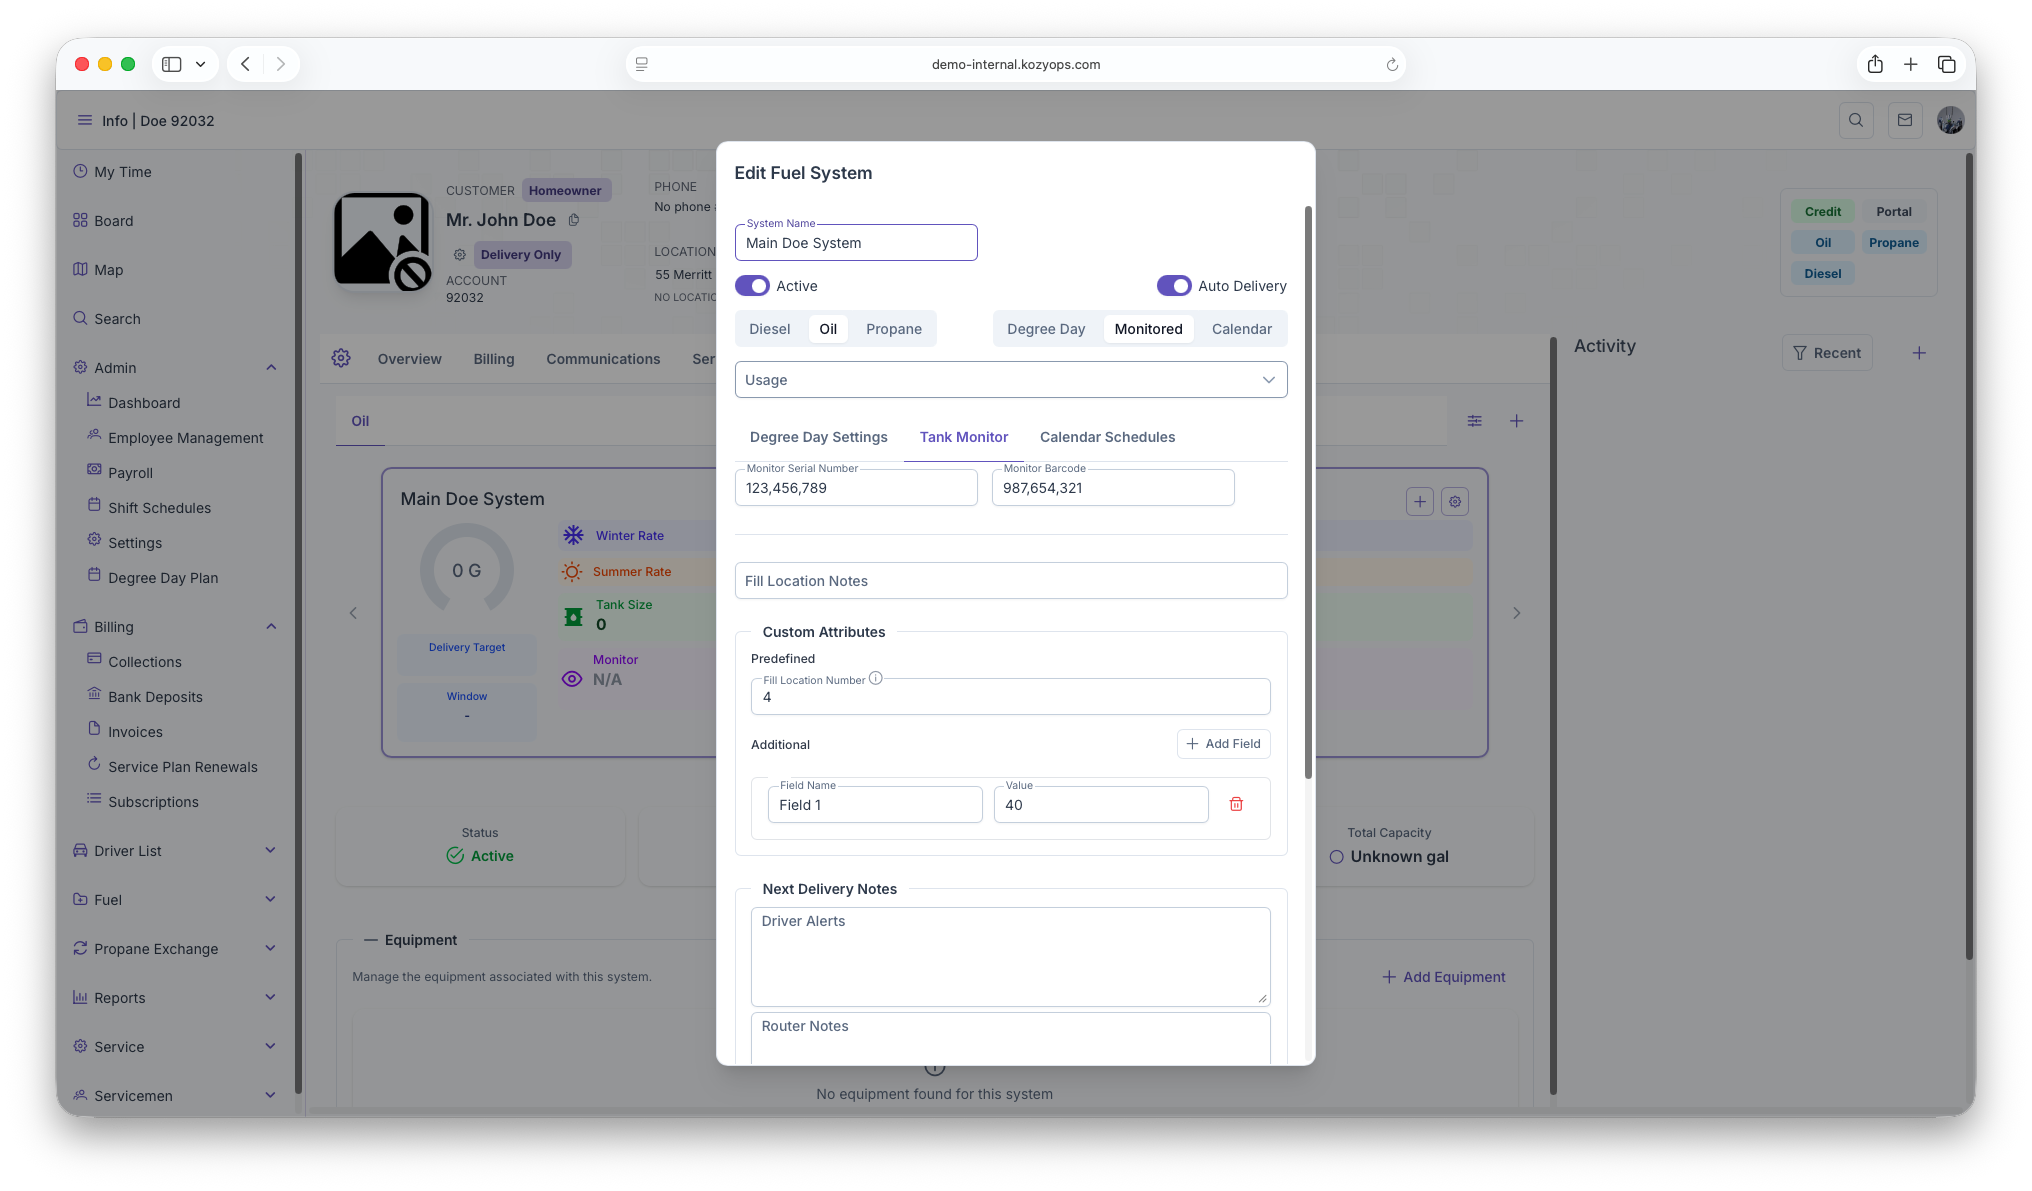
The Edit System dialog opens with all current settings.

-
Make your changes and click Submit.

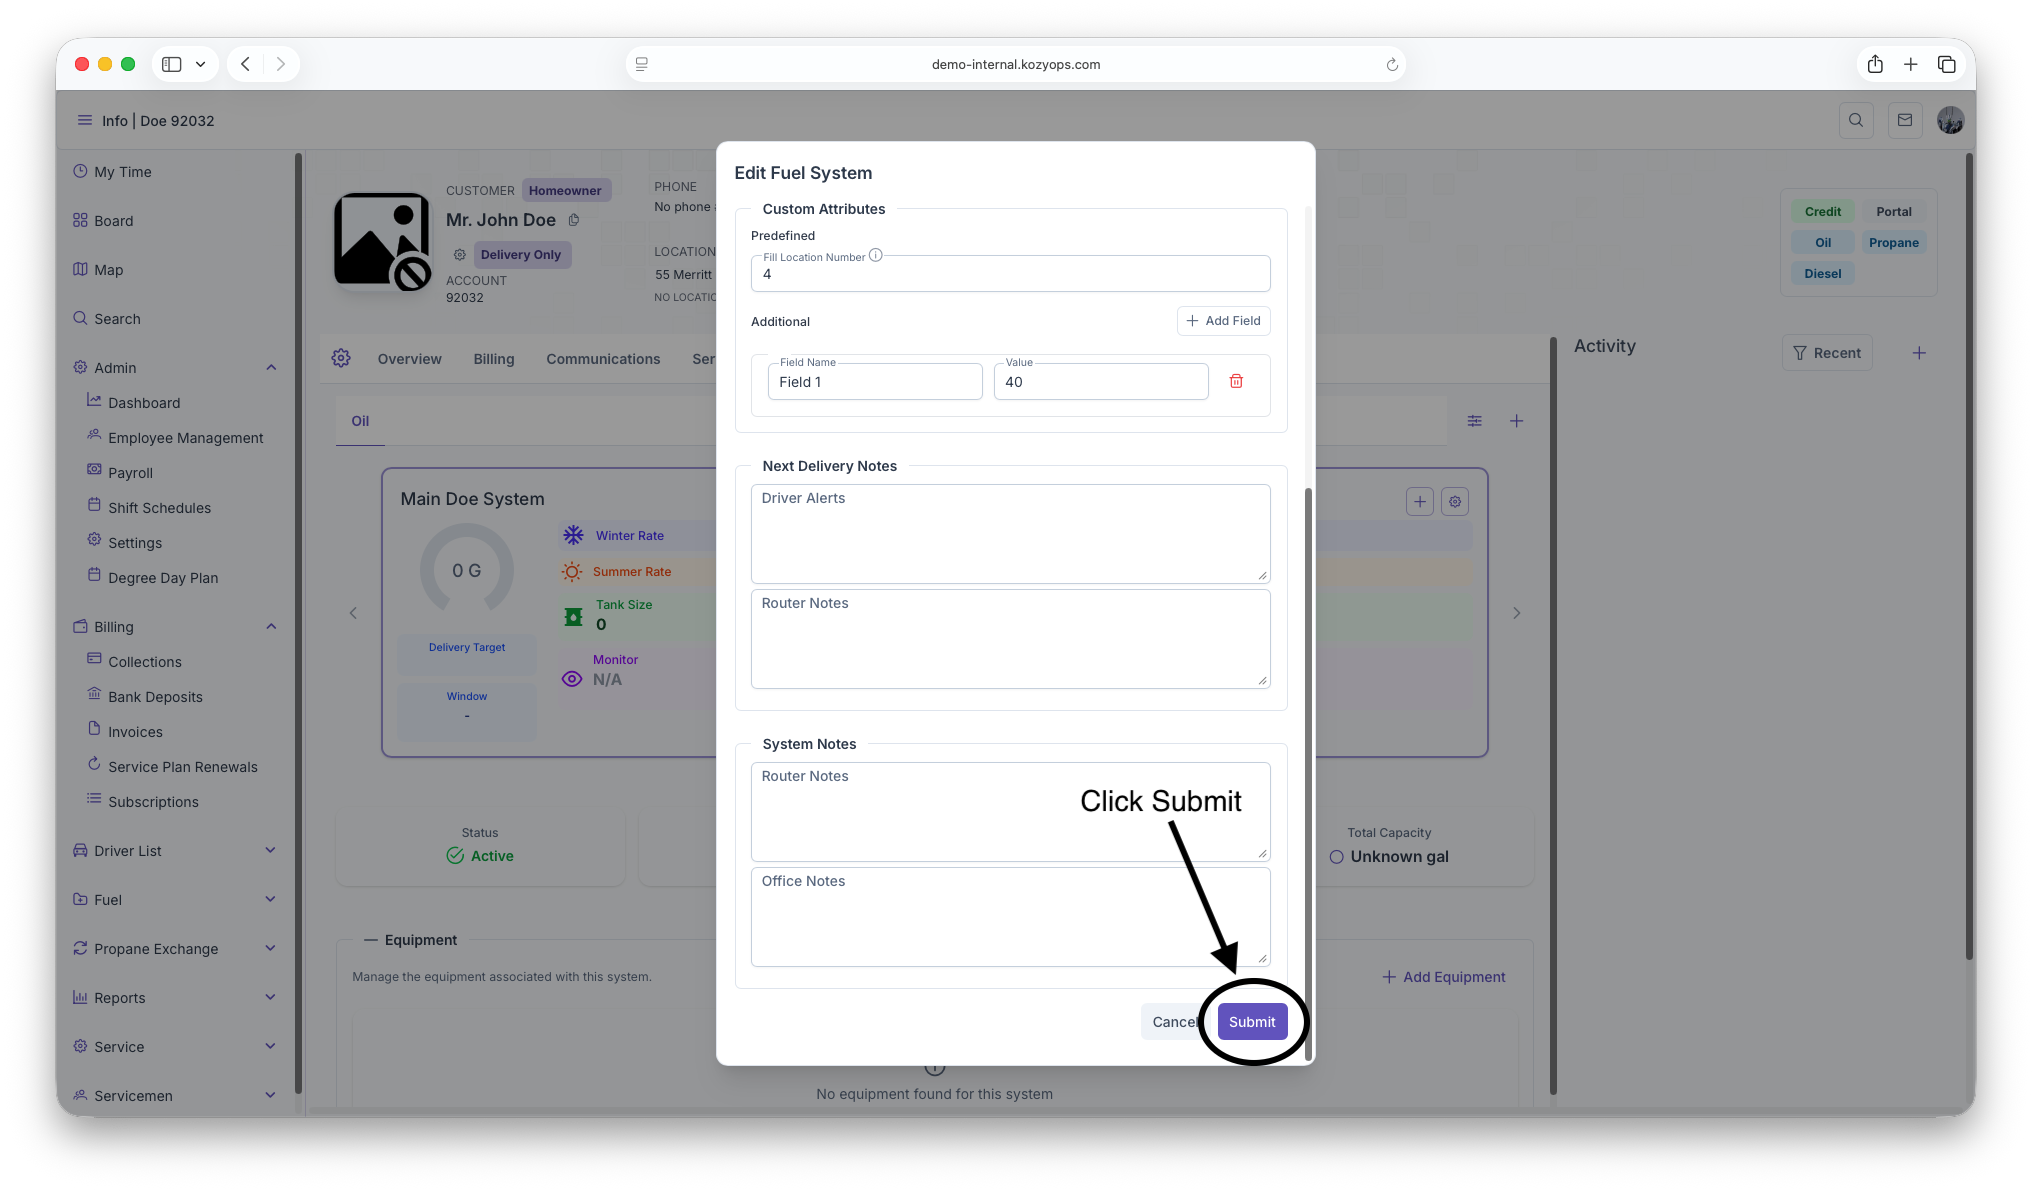
What you can edit
The Edit System dialog has the same structure as Add System, with all fields editable:
Basic system settings
System Name
- Text field for the system identifier
- Safe to change at any time for clarity
Active toggle
- Enable to keep the system active
- Disable to deactivate the system (stops delivery generation)
Auto Delivery toggle
- Enable to allow automatic delivery request generation based on window strategy
- Disable for manual/will-call only (system still tracks data but doesn't auto-generate requests)
Fuel selector (Propane, Oil, etc.)
- Caution: Only change if the physical system has been converted
- Changing fuel type may affect linked services and pricing
Window Strategy selector (Degree Day, Monitored, Calendar)
- Changes which tab's settings are used for delivery estimation
- Safe to switch, but verify the new strategy is properly configured
- See: Window Strategies
Usage multi-select
- Add or remove usage types (heating, appliance, etc.)
- Safe to change at any time
Window strategy tabs
After selecting a window strategy, configure its settings in the appropriate tab:
Degree Day Settings tab
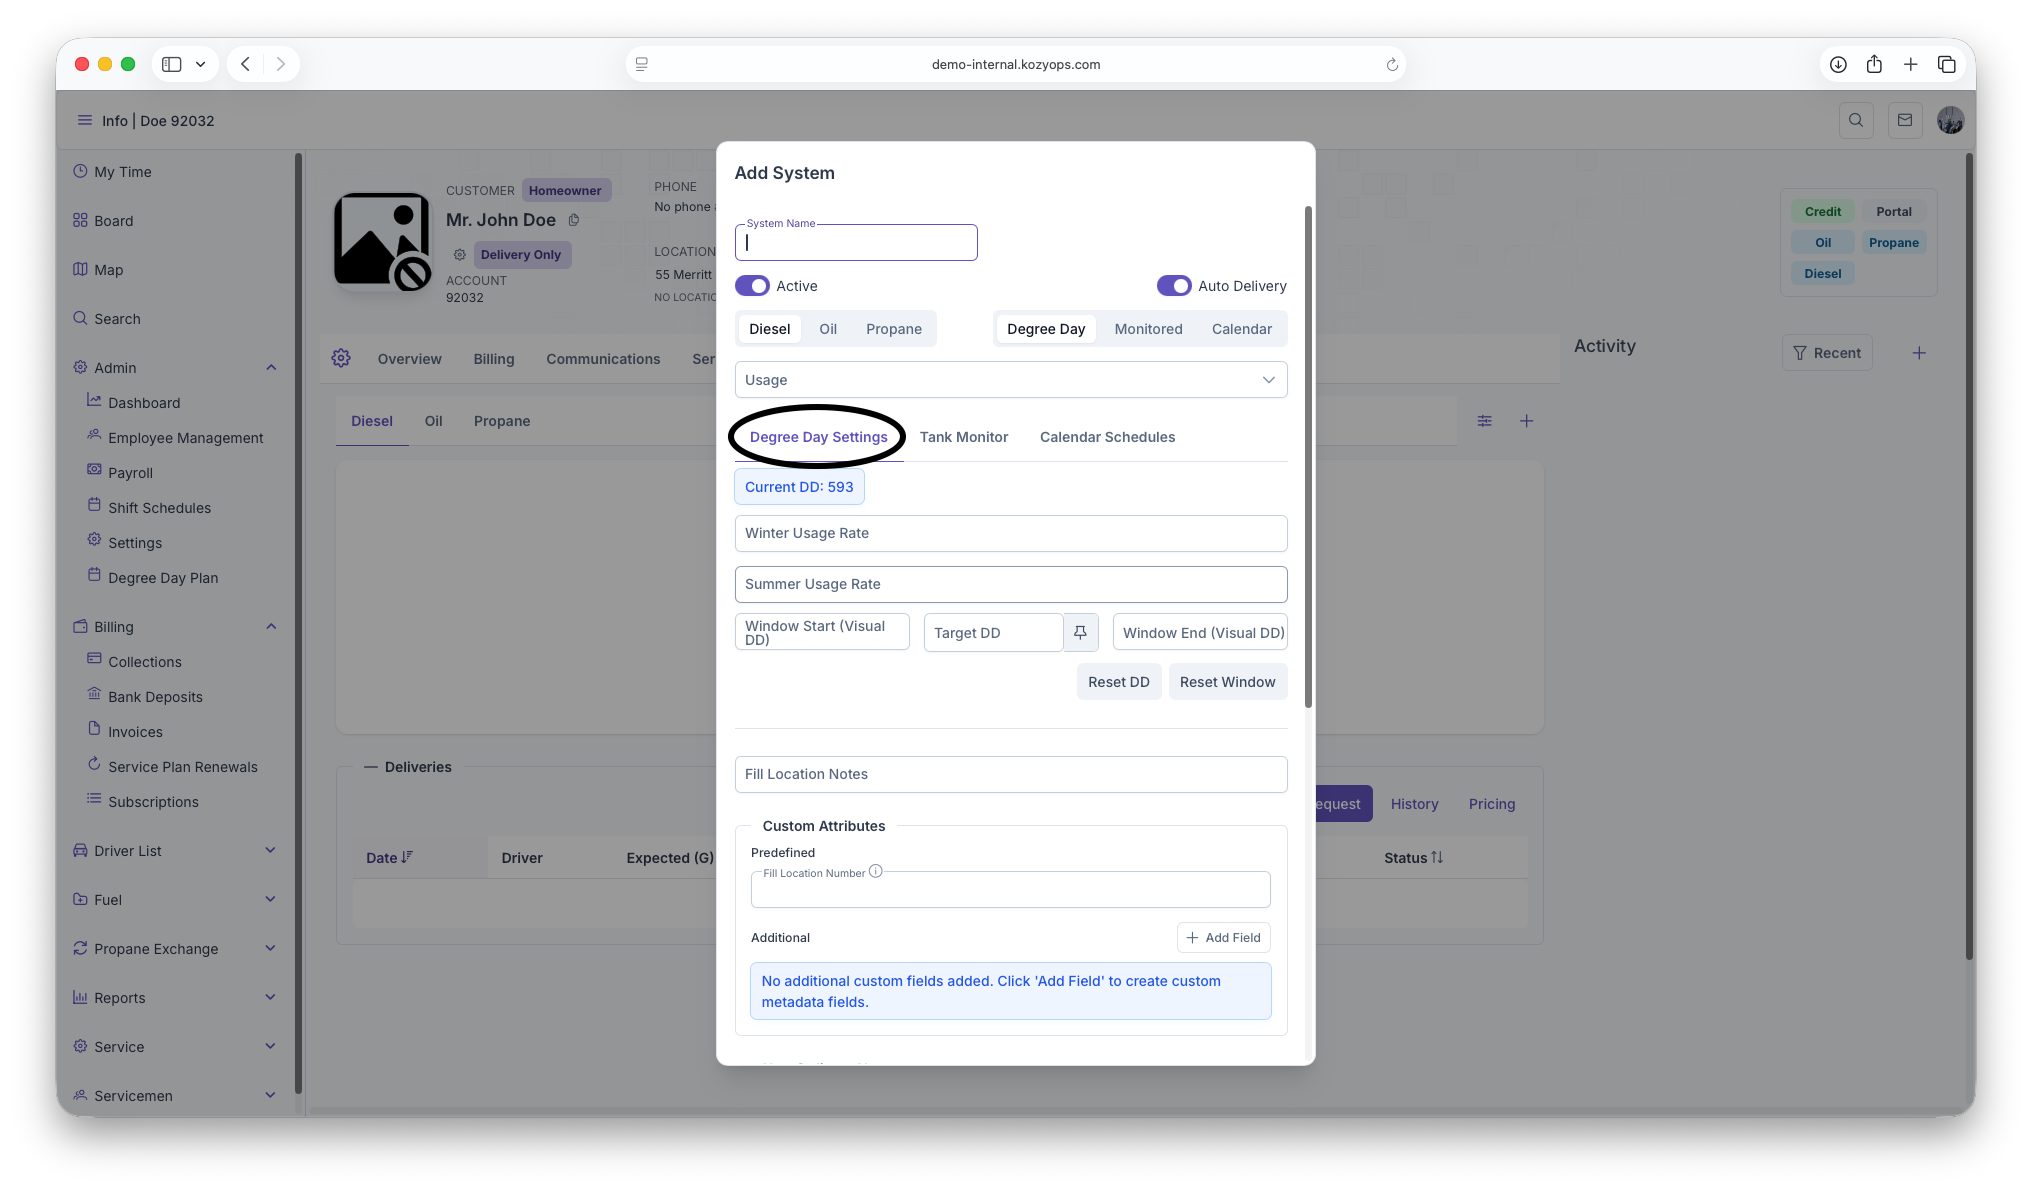
Usage Rates:
- Winter Usage Rate: Gallons per degree day (0-4 decimal places)
- Summer Usage Rate: Gallons per degree day (0-4 decimal places)
- Safe to adjust based on consumption history
Window boundaries:
- Window Start (Visual DD): Lower boundary
- Target DD: Trigger point for delivery
- Window End (Visual DD): Upper boundary
- Force Degree Day (thumbtack icon): Manually override the current target
- Reset DD: Resets degree day accumulation (only available for existing systems with delivery history)
- Reset Window: Resets window boundaries (only available for existing systems)
Info displays:
- Current DD, Last Delivery date, Visual DD, Actual DD values
- Warning messages if target DD change is pending or window is forced
Tank Monitor tab
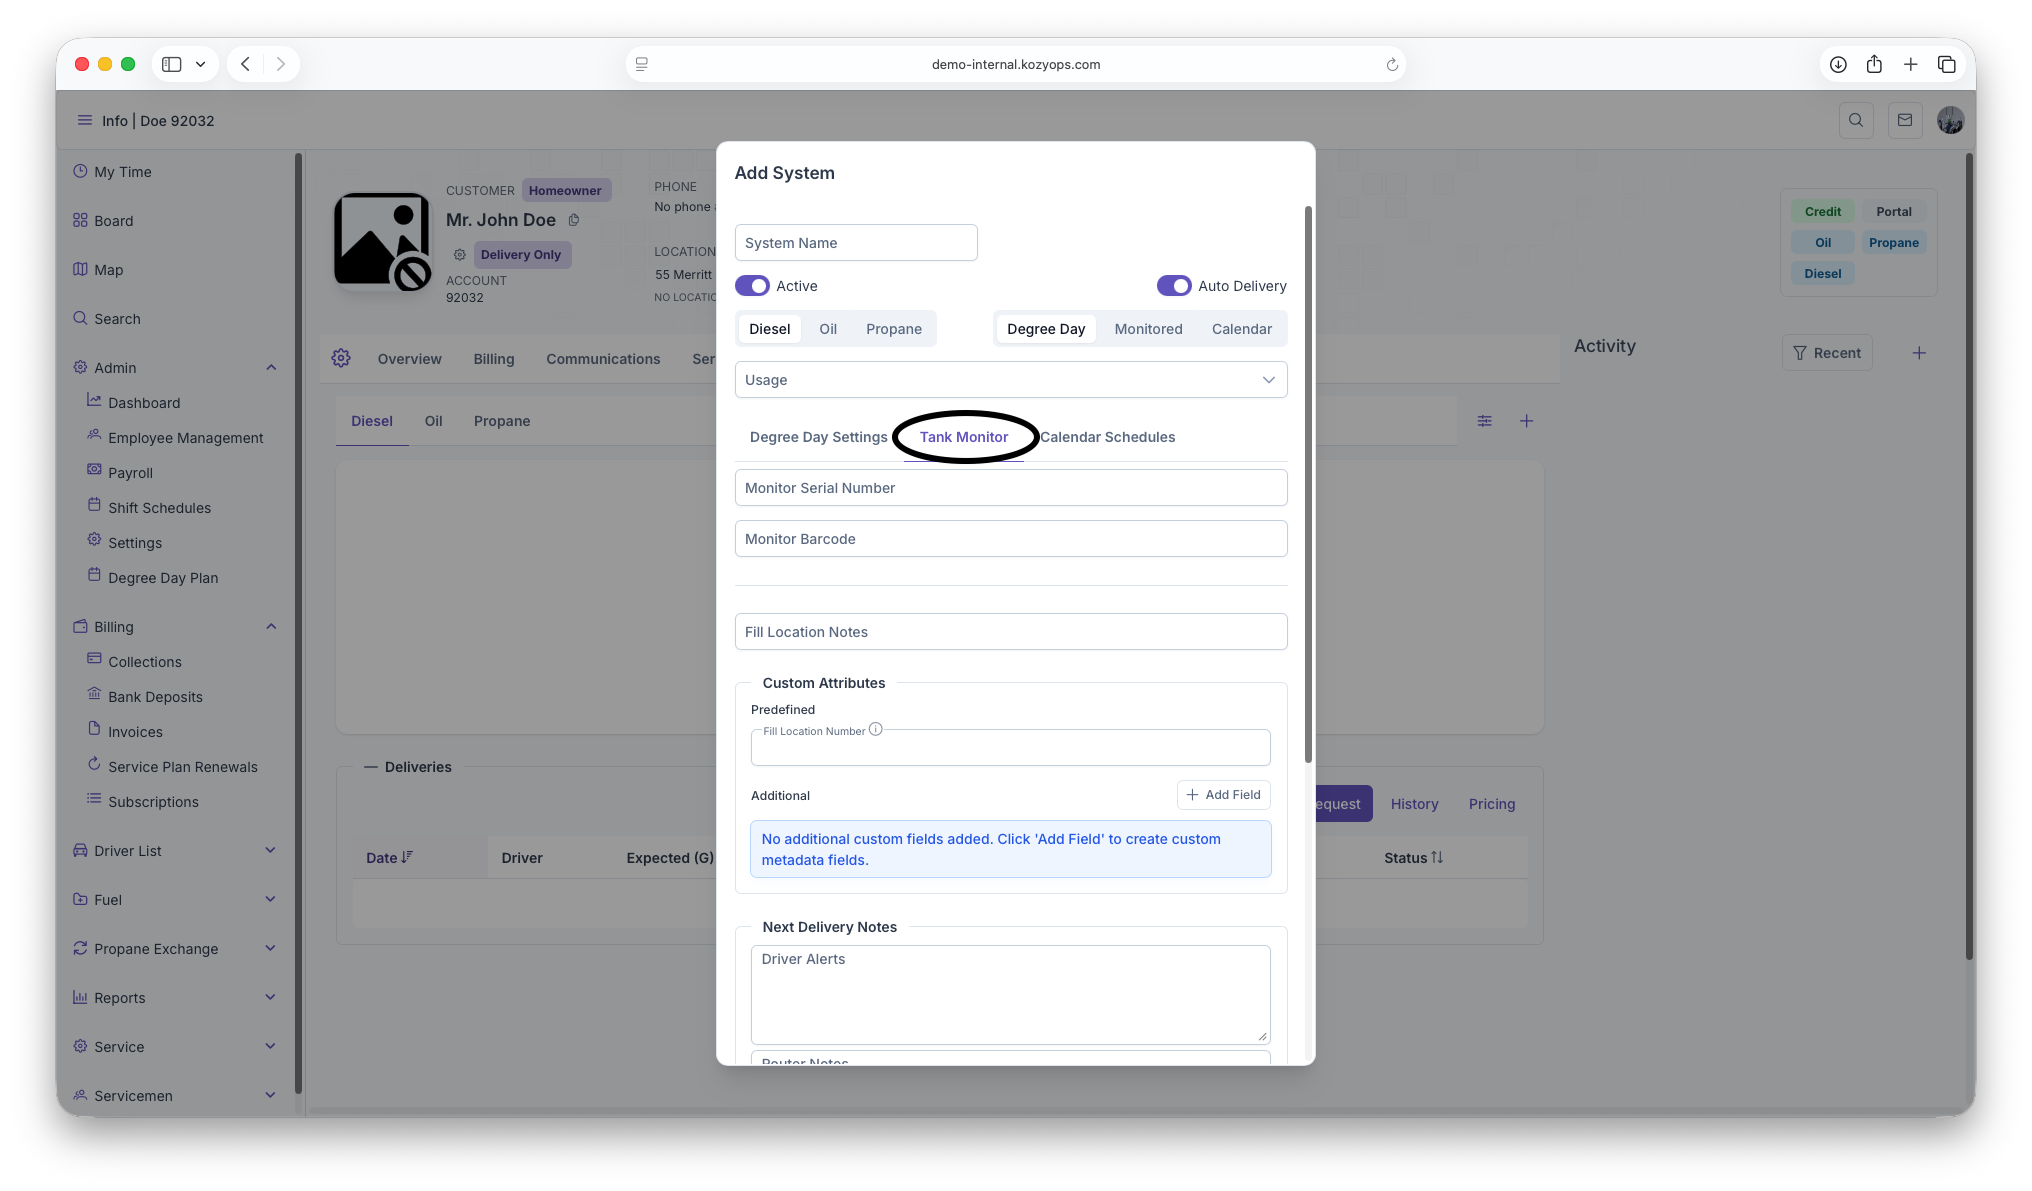
Monitor Serial Number
- Required if Window Strategy is set to Monitored
- Enter the device's serial identifier
- Submit button is disabled until provided for monitored systems
Monitor Barcode
- Optional additional identifier
Calendar Schedules tab
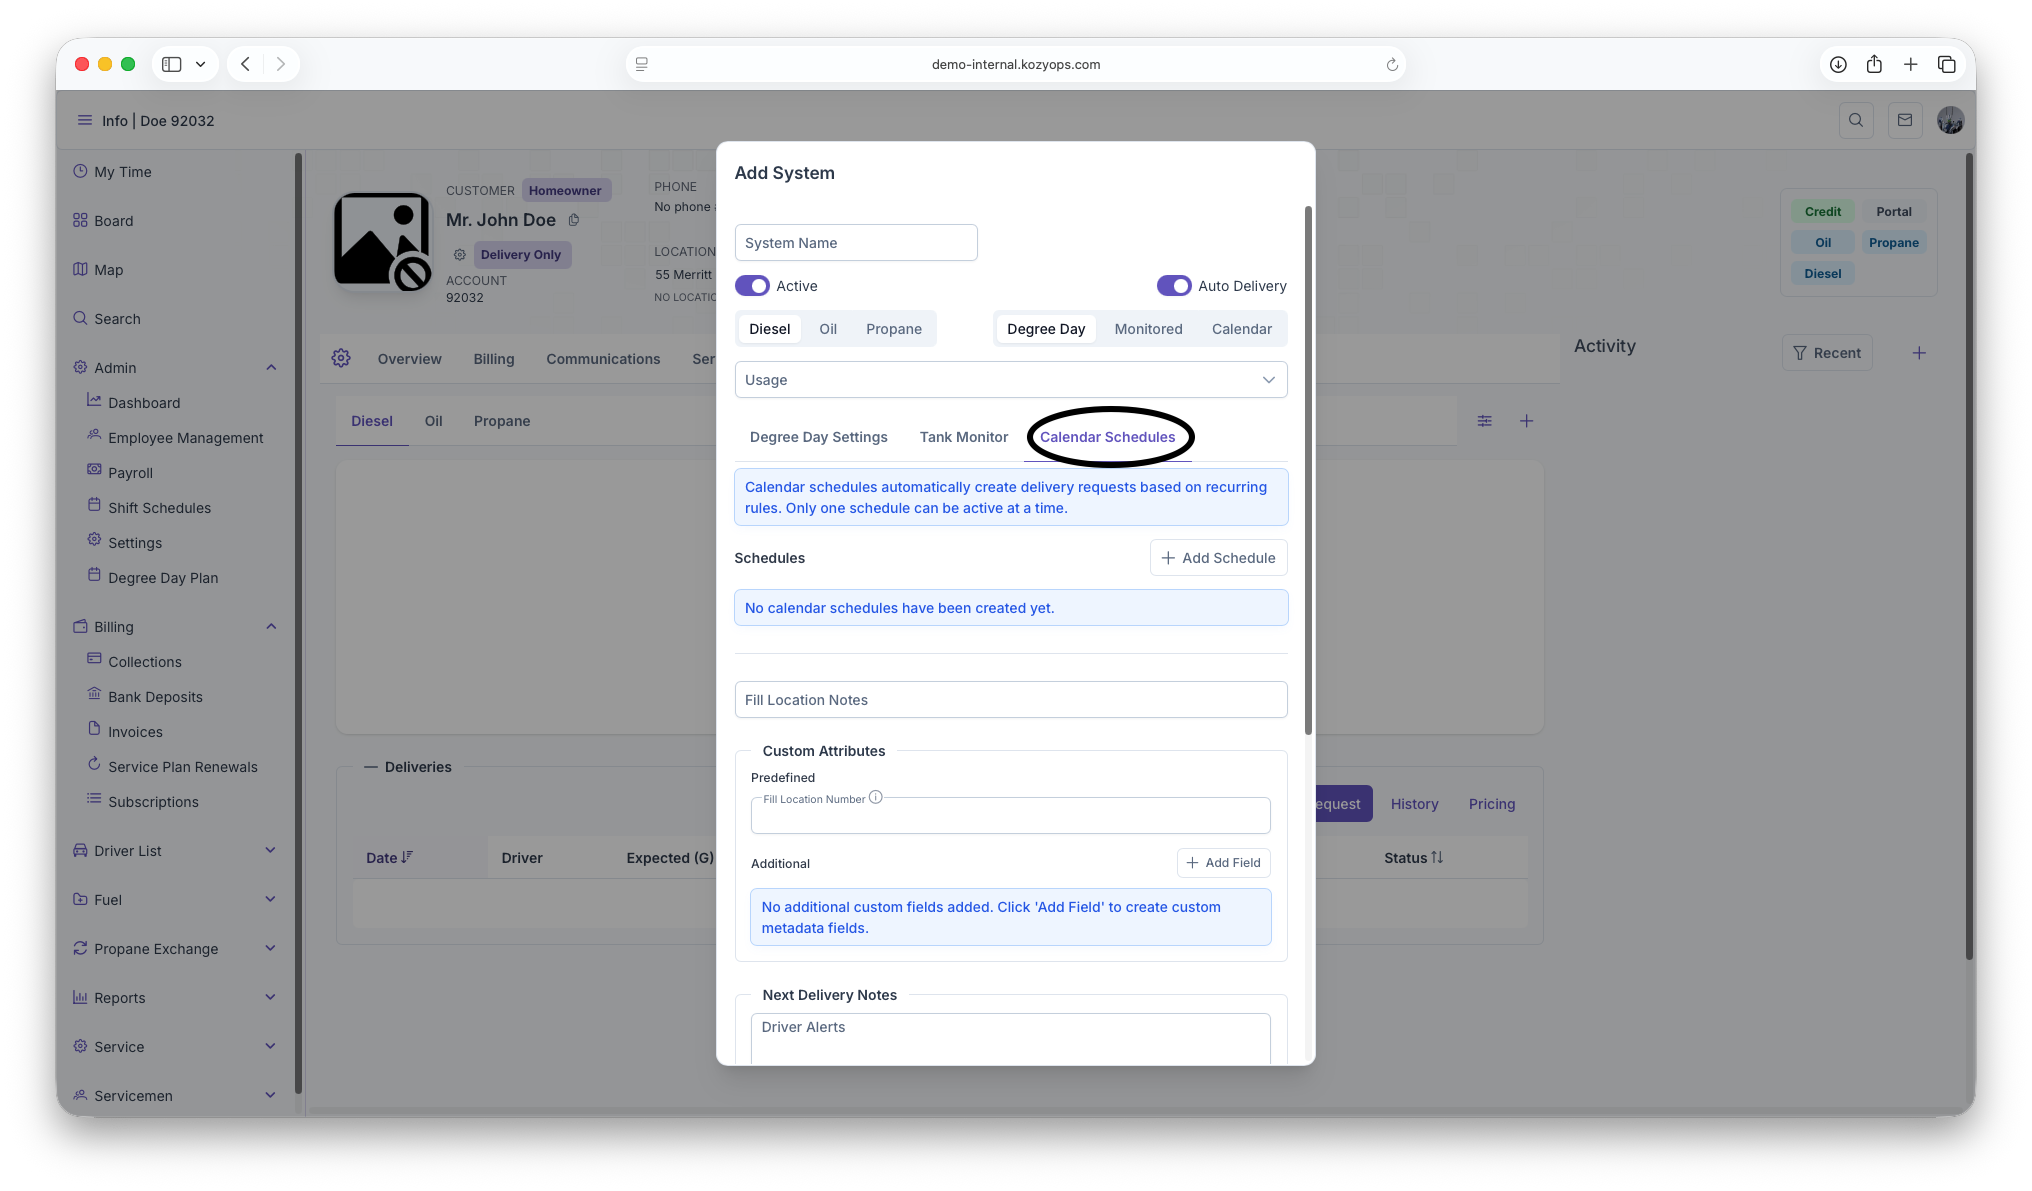
Manage recurring delivery schedules:
- Add Schedule, Edit, Set Active, Deactivate, Delete
- Only available for existing systems (must save first for new systems)
- See: Calendar Scheduling
Additional editable fields
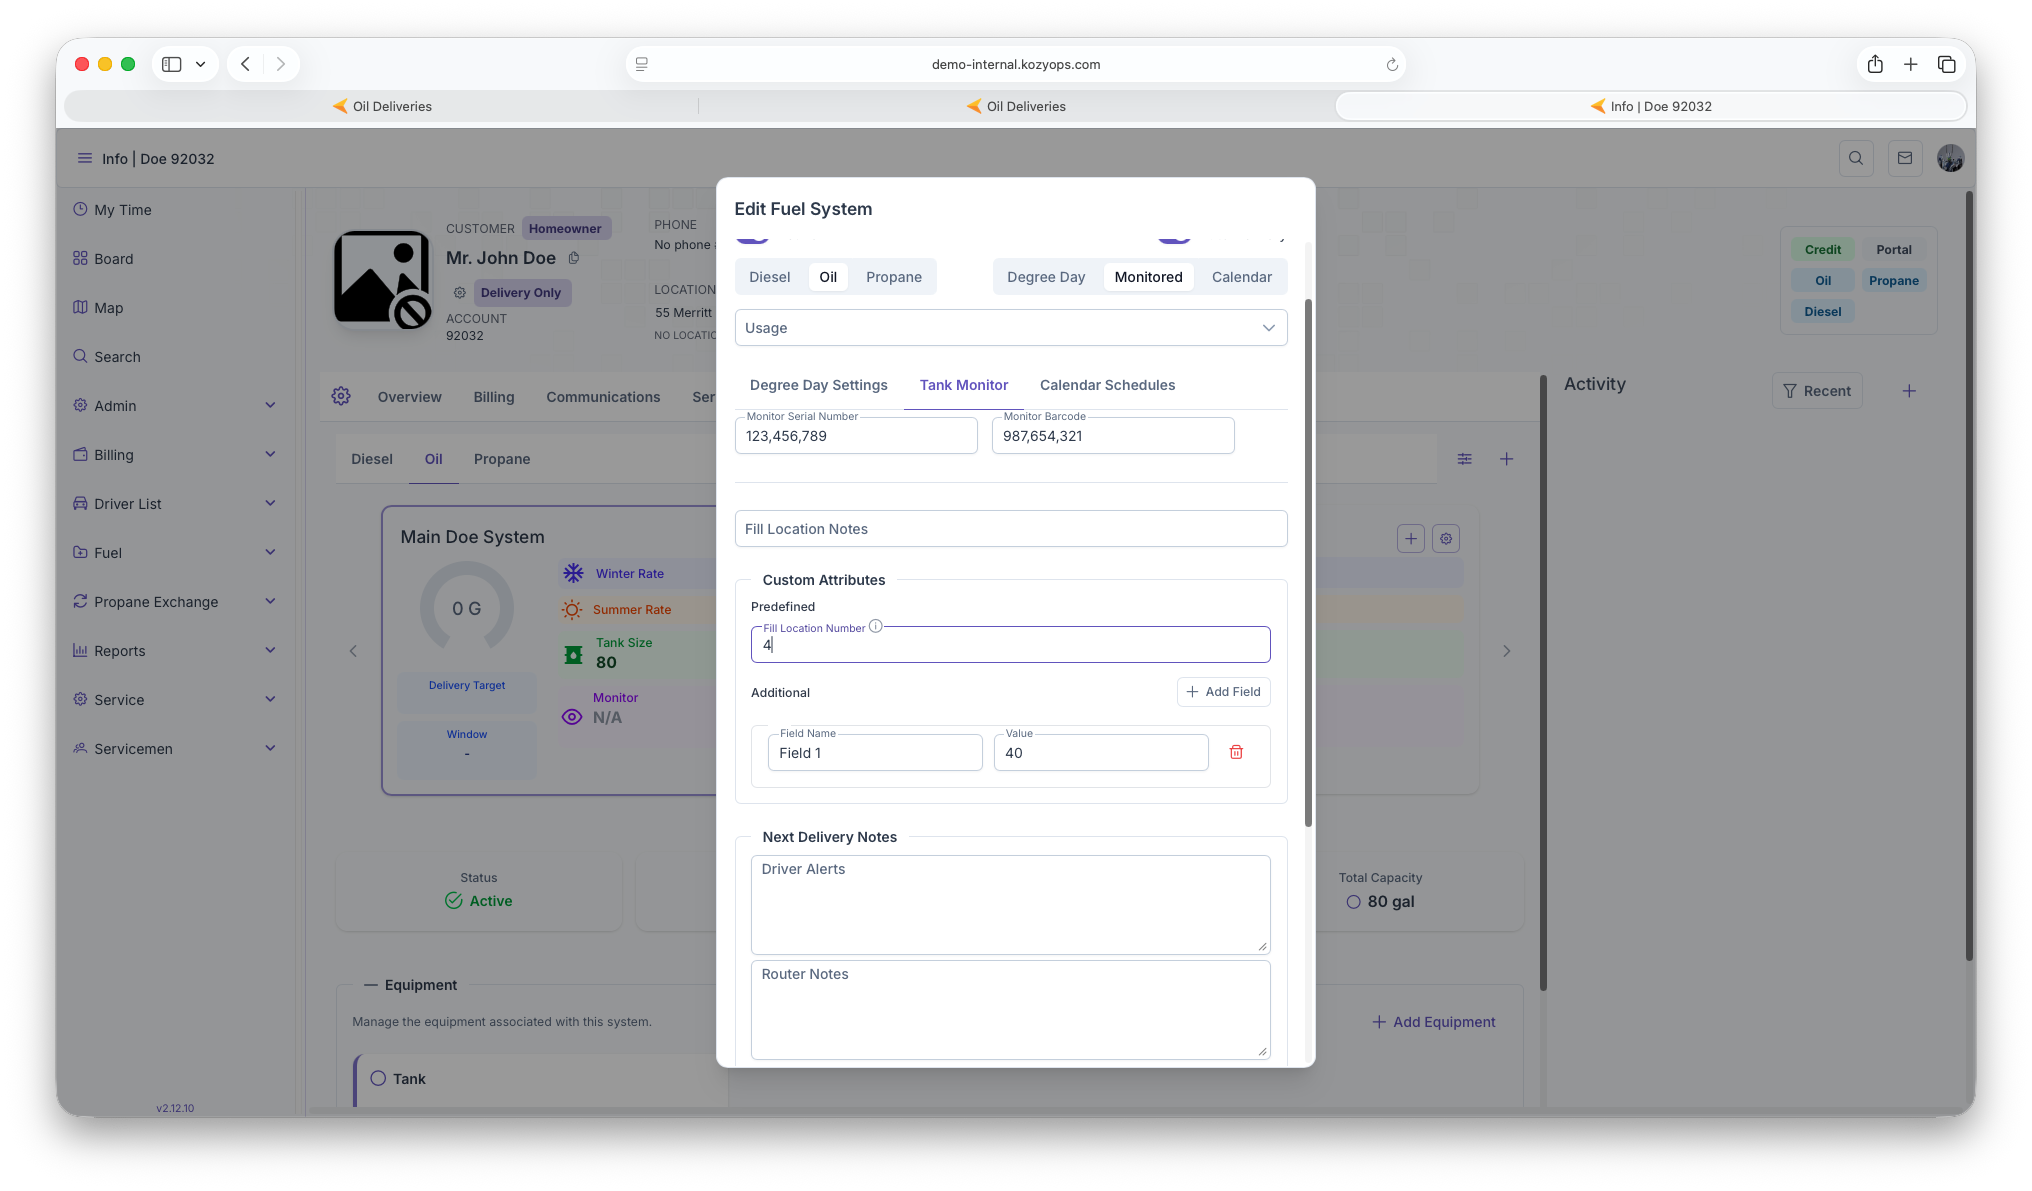
Fill Location Notes

- Text field for delivery access instructions
- Examples: gate codes, driveway location, fill pipe location
- Safe to update at any time
Custom Attributes
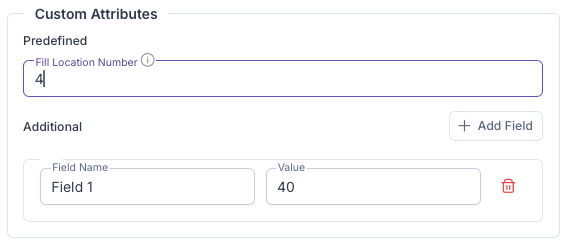
Predefined fields:
- System-type-specific fields loaded from API
- Each has a label and optional description tooltip
- Safe to fill out or update
Additional custom fields:
- Click "Add Field" to create key-value metadata
- Remove with trash icon
- Safe to add, edit, or remove
Next Delivery Notes

Driver Alerts:
- Important information for delivery drivers
- Displayed prominently during delivery
- Examples: safety warnings, access restrictions, special instructions
Router Notes:
- Instructions for routing and dispatch
- Examples: delivery window preferences, route-specific notes
Office Notes
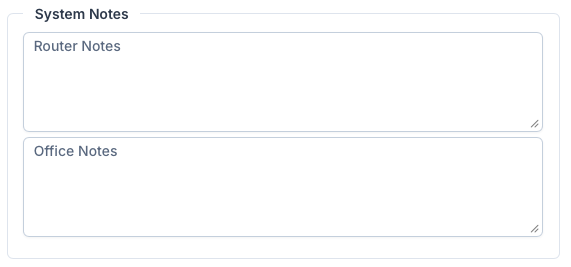
- Internal notes visible only to office staff
- General system information not needed by drivers
- Safe to update at any time
Safe edits (no delivery impact)
These changes can be made freely without affecting active deliveries:
- System Name: Rename for clarity
- Usage types: Add or remove usage categories
- Fill Location Notes: Update access instructions
- Custom Attributes: Add, edit, or remove metadata
- Driver/Router/Office Notes: Update any notes
- Degree Day usage rates: Adjust based on historical data
- Calendar schedules: Add, edit, activate, or deactivate schedules
Changes requiring caution
Deactivating the system (Active toggle off)
Impact:
- System stops tracking and generating deliveries
- Existing delivery requests may be canceled
- Equipment and monitors remain linked but inactive
When to use:
- Customer temporarily discontinues service
- System is being replaced or upgraded
- Account is on hold
Best practice: Verify no pending deliveries exist before deactivating
Disabling Auto Delivery toggle
Impact:
- System continues tracking data but stops generating automatic delivery requests
- Switches to manual/will-call mode
- Monitor/degree day data still calculated for reference
When to use:
- Customer switches to will-call
- Temporary pause in automatic deliveries
- Testing or troubleshooting
Changing Window Strategy
Impact:
- Changes which calculation method triggers deliveries
- Previous strategy data is preserved but not used
- New strategy must be fully configured
Example: Switching from Degree Day to Monitored
- Enter Monitor Serial Number
- Verify monitor is transmitting
- Old degree day settings remain but aren't used
Best practice: Configure the new strategy completely before switching
Changing Fuel type
Impact:
- May cause mismatches with equipment fuel types
- Affects pricing and product calculations
- Historical delivery data remains but context may be confusing
When to use: Only if the physical system has been converted (e.g., oil to propane)
Best practice:
- Update equipment fuel types to match
- Notify dispatch and billing teams
- Document the conversion date in notes
Forcing Degree Day or Resetting Windows
Impact:
- Overrides automatic calculations
- Can cause deliveries to trigger earlier or later than projected
- Resets may clear accumulated history
When to use:
- Manual delivery override needed
- Projections are significantly off
- After major system changes or repairs
Best practice: Document the reason in notes
Equipment management
Equipment is not edited directly in the system dialog. To manage equipment:
- View equipment list in the system details
- Click Edit on the specific equipment
- Use the Equipment dialog to modify
- See: Adding Equipment
Note: You cannot change which system equipment belongs to from this dialog. Edit the equipment itself to reassign it.
What you cannot edit
- System creation date: Historical timestamp, read-only
- Last delivery information: Calculated from delivery history
- Current degree day value: Real-time data from weather service
- Monitor readings: Real-time data from monitoring device
- Equipment list: Managed separately via equipment dialogs
Validation and errors
The dialog validates entries before allowing submission:
Common validation errors:
- Monitor serial number required when Window Strategy = Monitored
- Window strategy must be selected
- Fuel type must be selected
- Numeric fields must be valid numbers
Validation errors appear at the top or inline with red styling. The Submit button is disabled until all errors are resolved.
After saving changes
When you click Submit:
- Changes are saved immediately
- Dialog closes and returns to the system list
- System selector and displays update with new values
- Delivery projections recalculate based on new settings
Note: Changes to window strategy or usage rates may cause immediate recalculation of delivery windows and target dates.
Deactivating vs. deleting a system
Deactivate (Active toggle off):
- Preserves all historical data
- Can be reactivated later
- Recommended for systems temporarily out of service or that have been replaced.
Delete (via delete action):
- Permanently removes the system
- Deletes linked equipment
- Cannot be undone
- Only use if system was created in error
Best practice: Always deactivate rather than delete to maintain data integrity and history.
Related guides
- Add System — Creating new systems
- Window Strategies — Understanding and configuring window strategies
- Degree Day System — Degree day settings and calculations
- Monitoring — Tank monitor configuration
- Calendar Scheduling — Managing calendar schedules
- Adding Equipment — Managing equipment within systems
- Add Services — Products and service plans
Adding Equipment Guide
This guide explains how to add equipment to a system using the Add/Edit Equipment dialog. Equipment represents physical components like tanks, regulators, filters, and other equipment.
Key concept: You can add multiple tanks to a system when they share the same fill connection. Each piece of equipment is tracked separately within the system.
Prerequisites
- A system must exist for the location. See Add System if you need to create one first.
- You are on the Customer Dashboard with the correct Location selected.
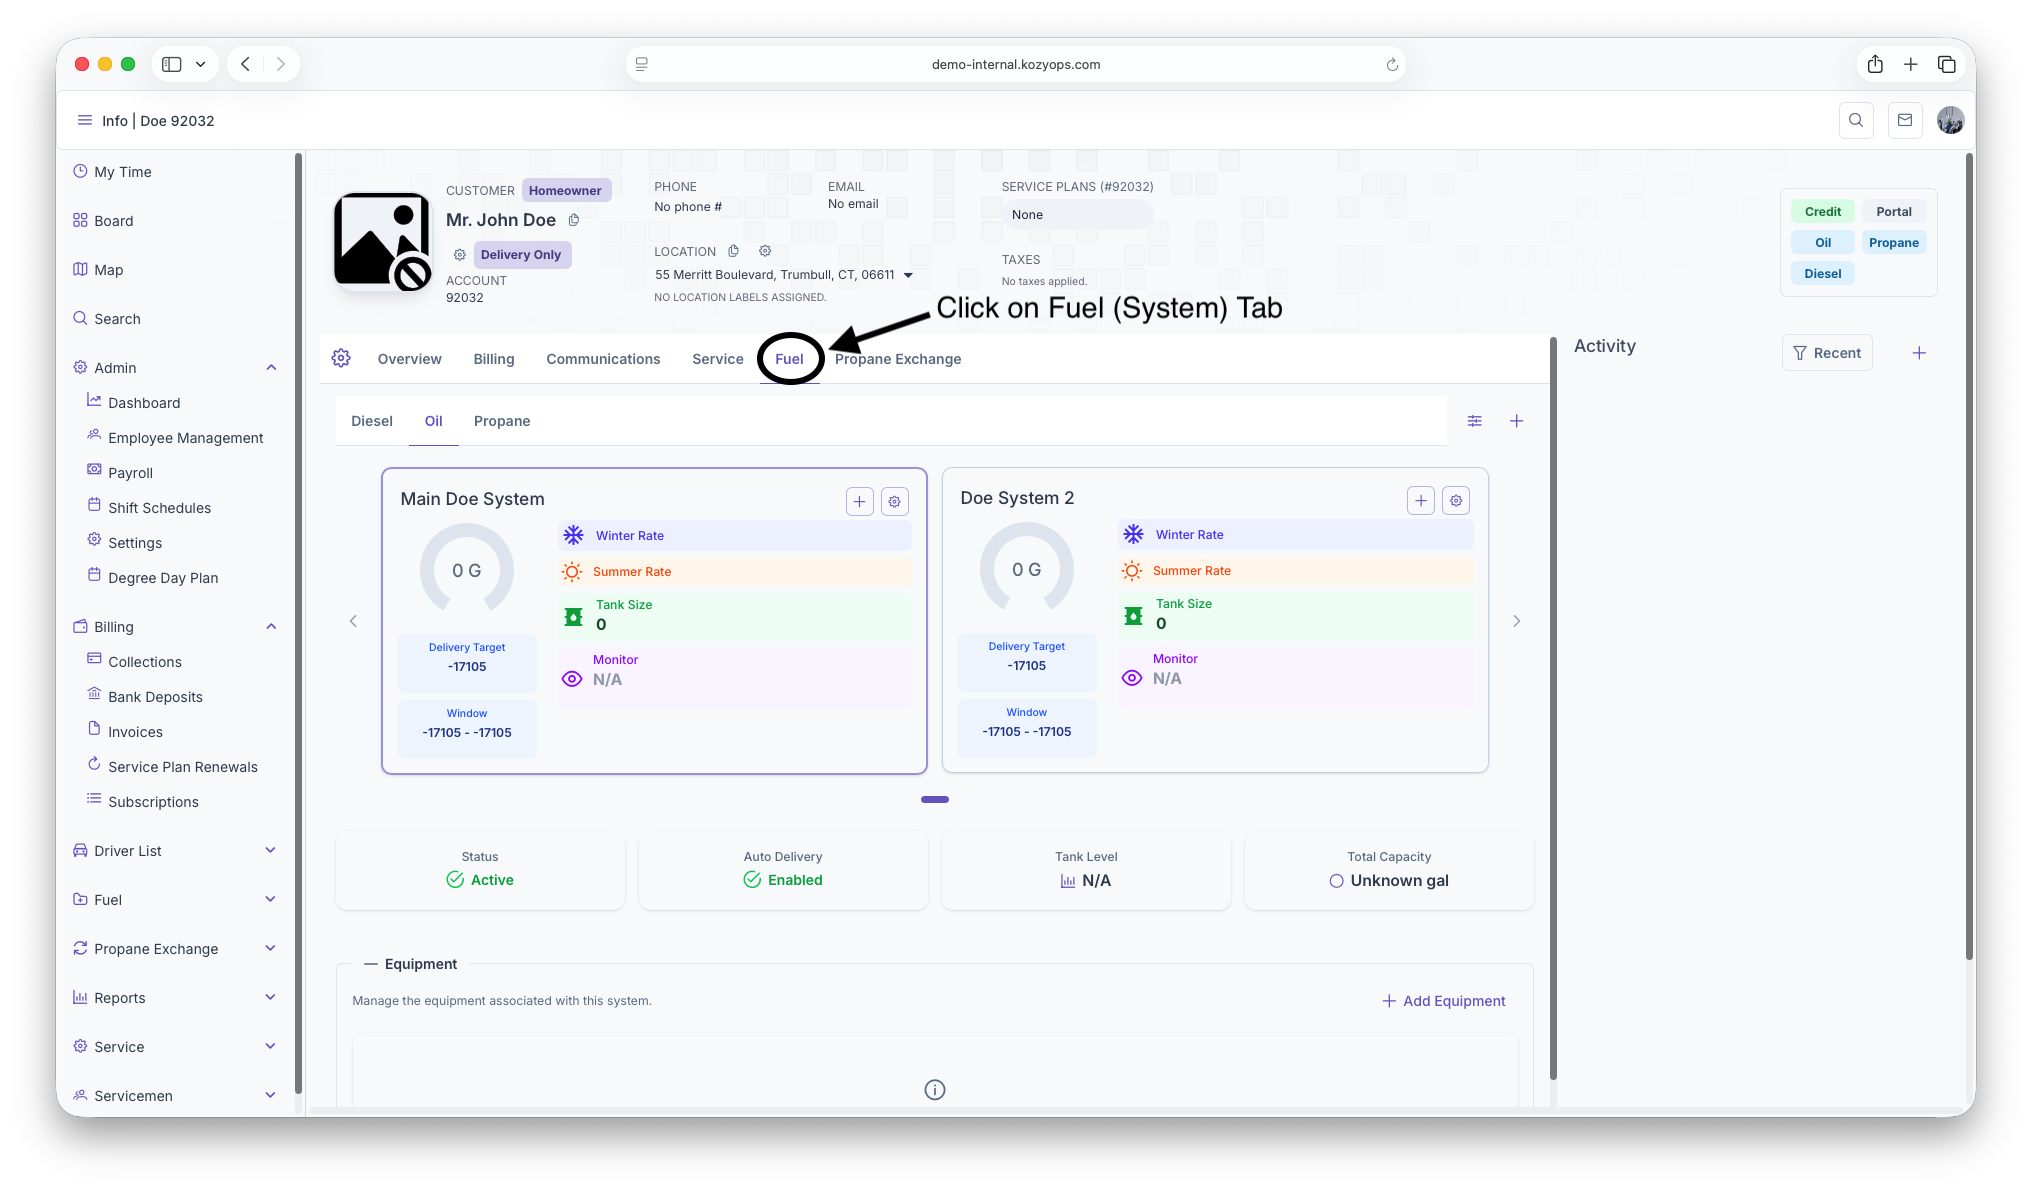
Add equipment to a system
-
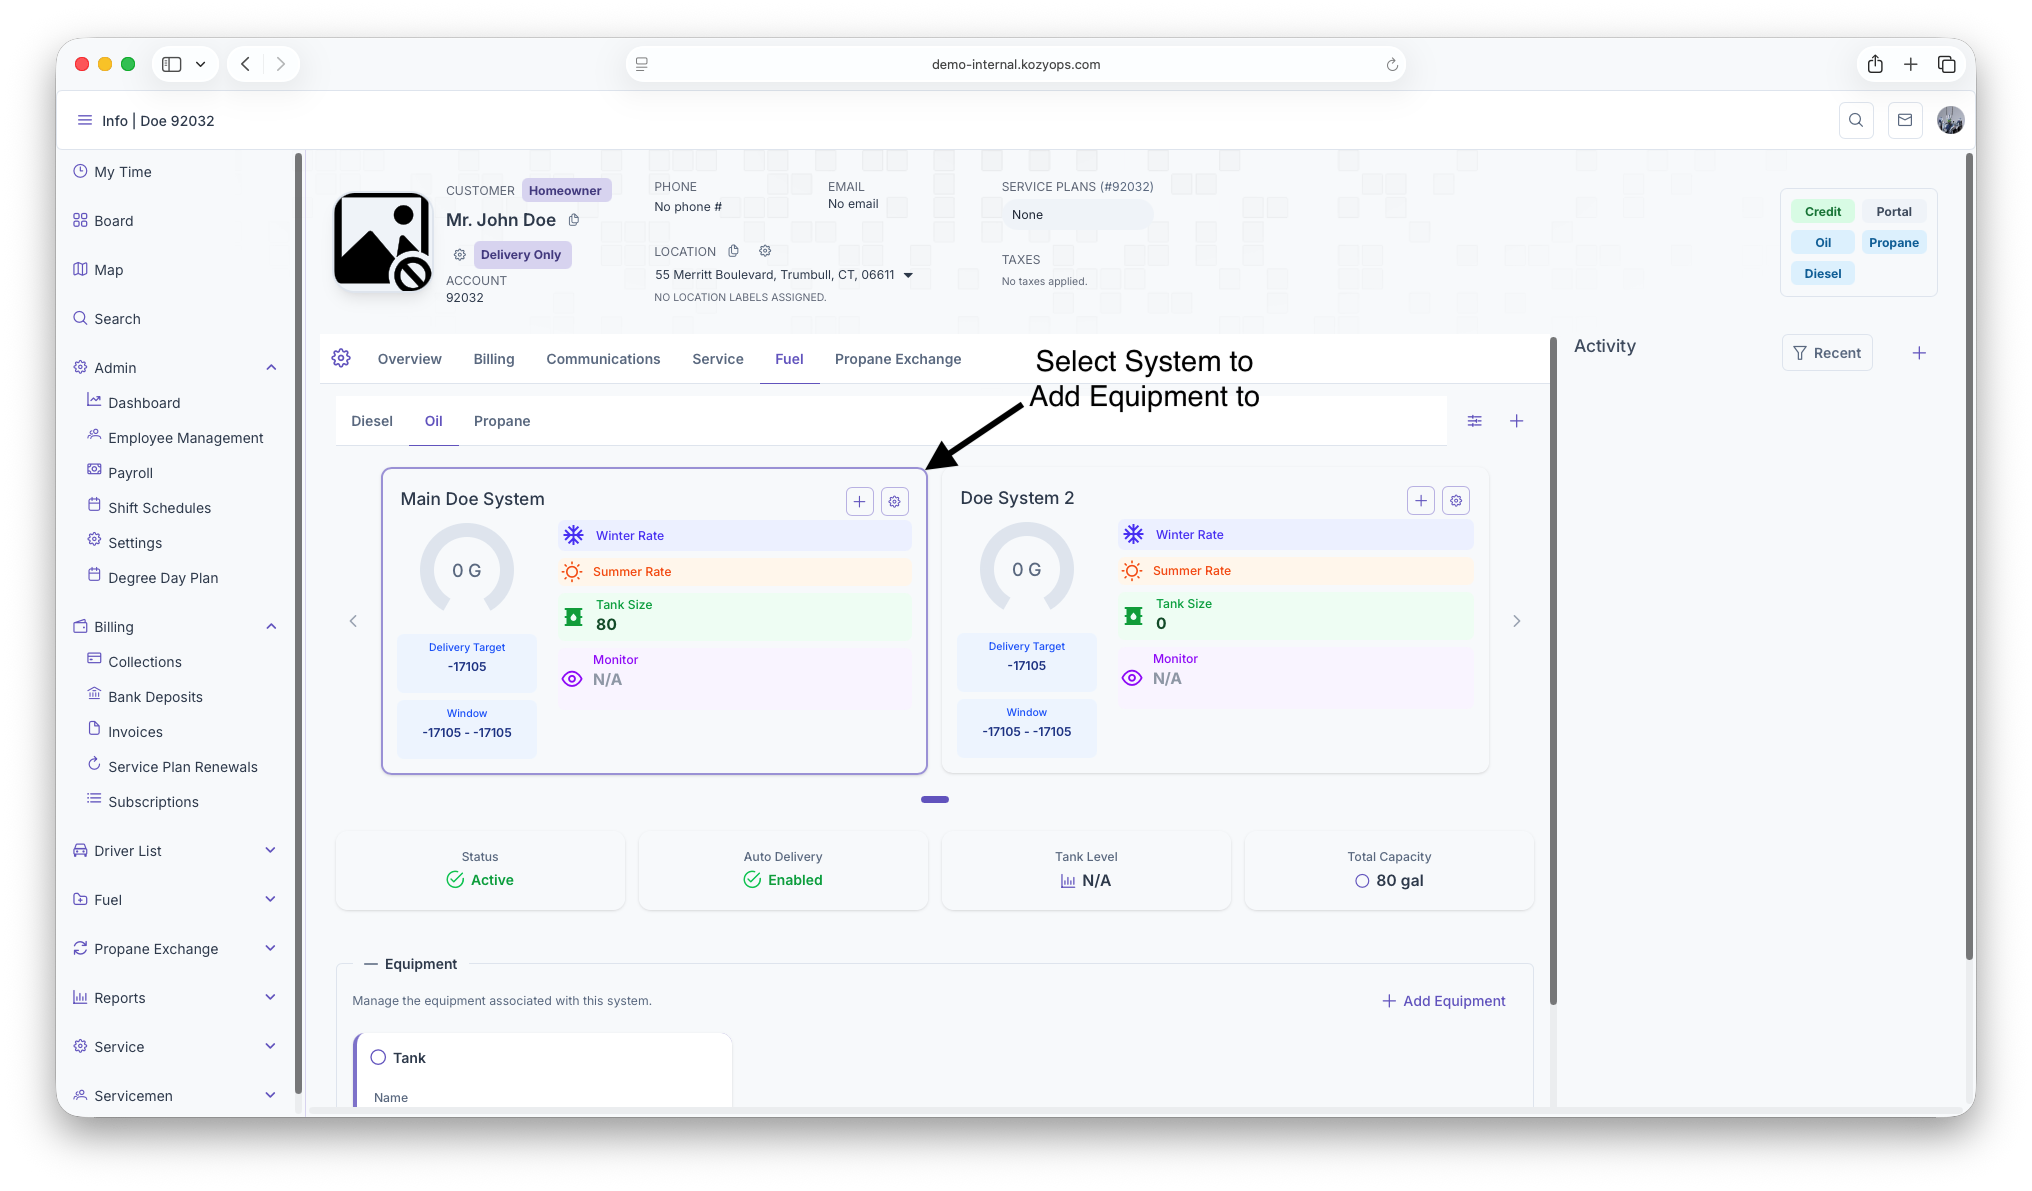
Navigate to the Systems section from the Customer Dashboard.

-
Select the system you want to add equipment to.

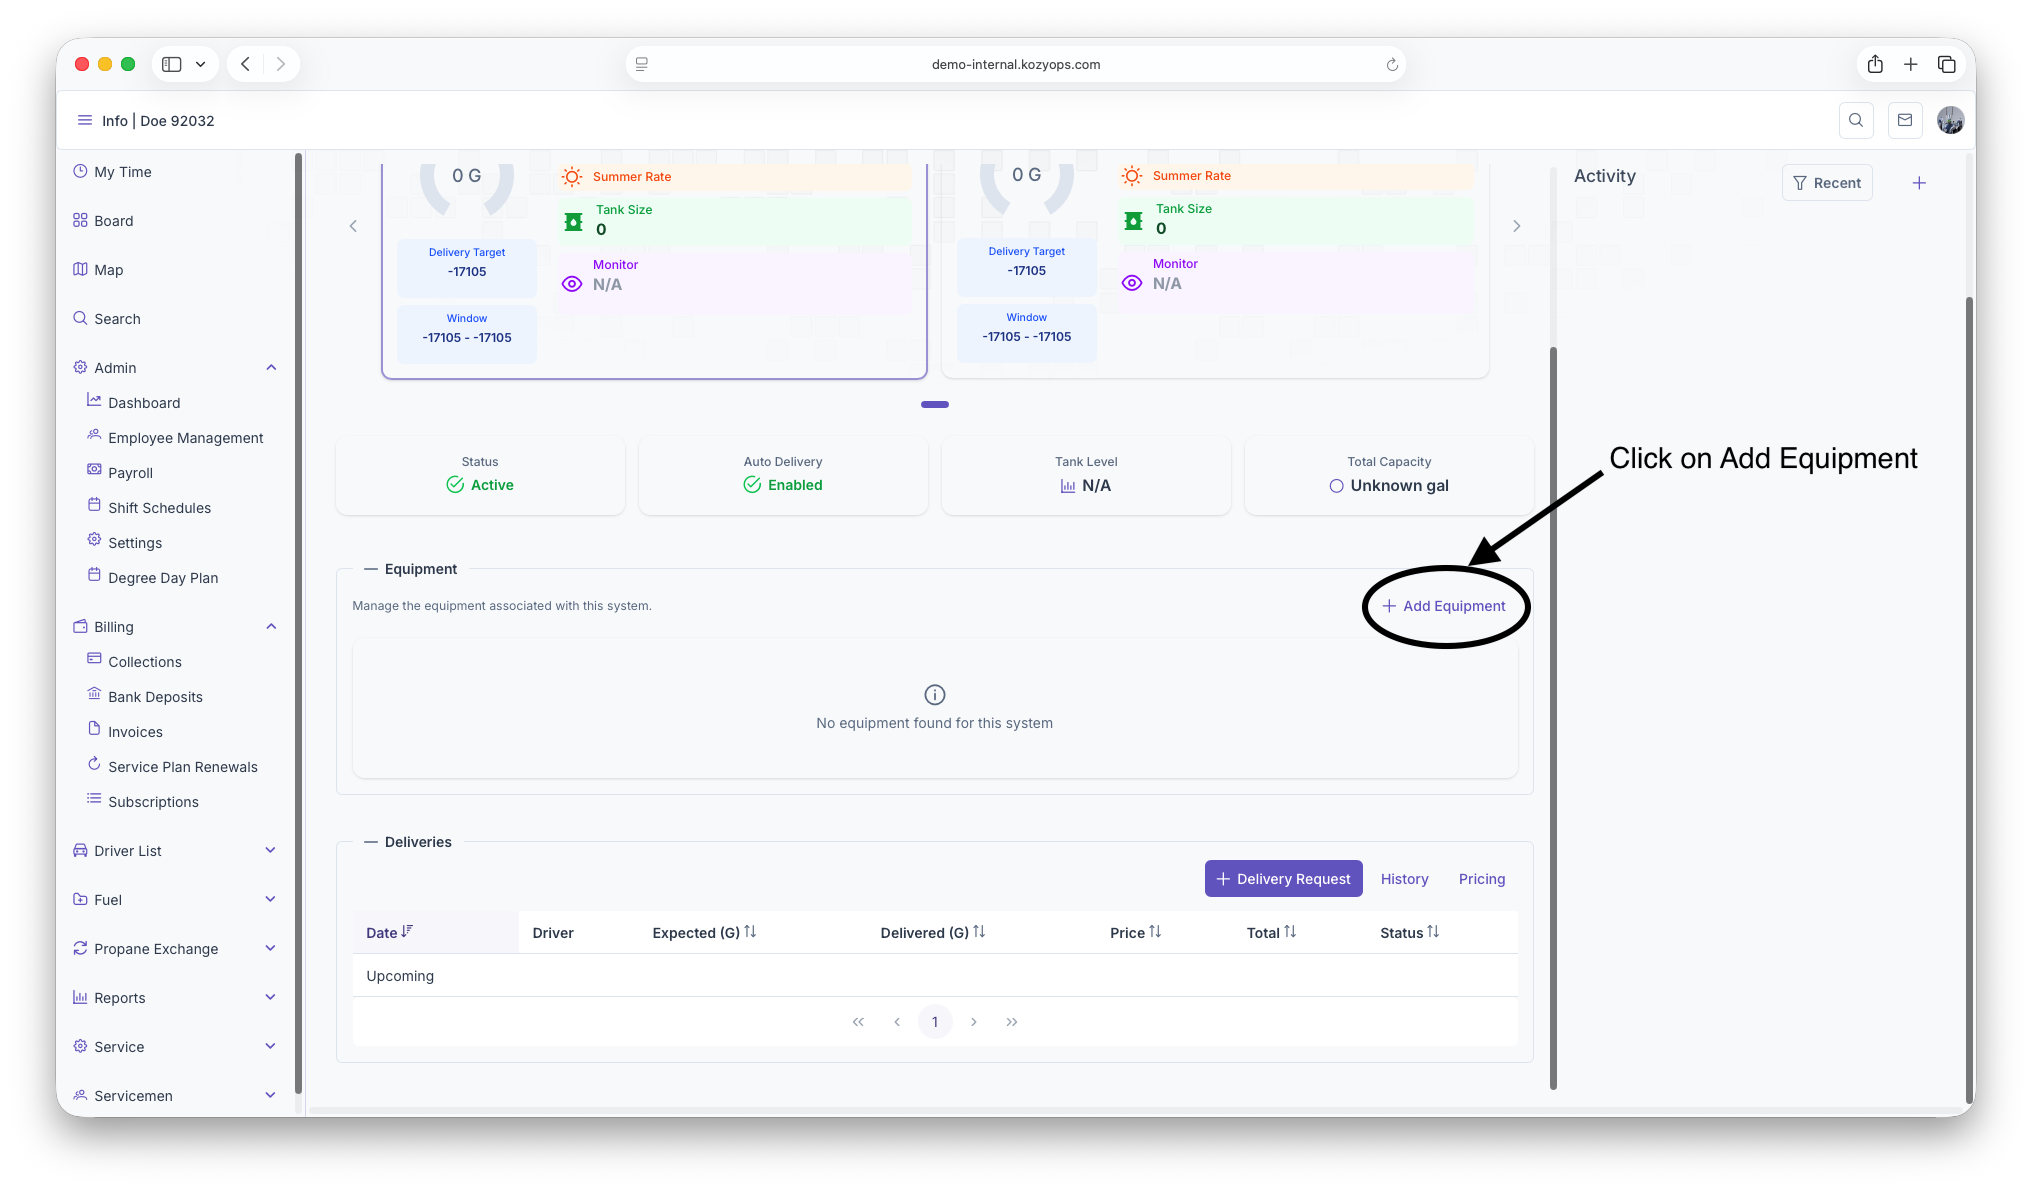
-
Click Add Tank or Add Equipment.

-
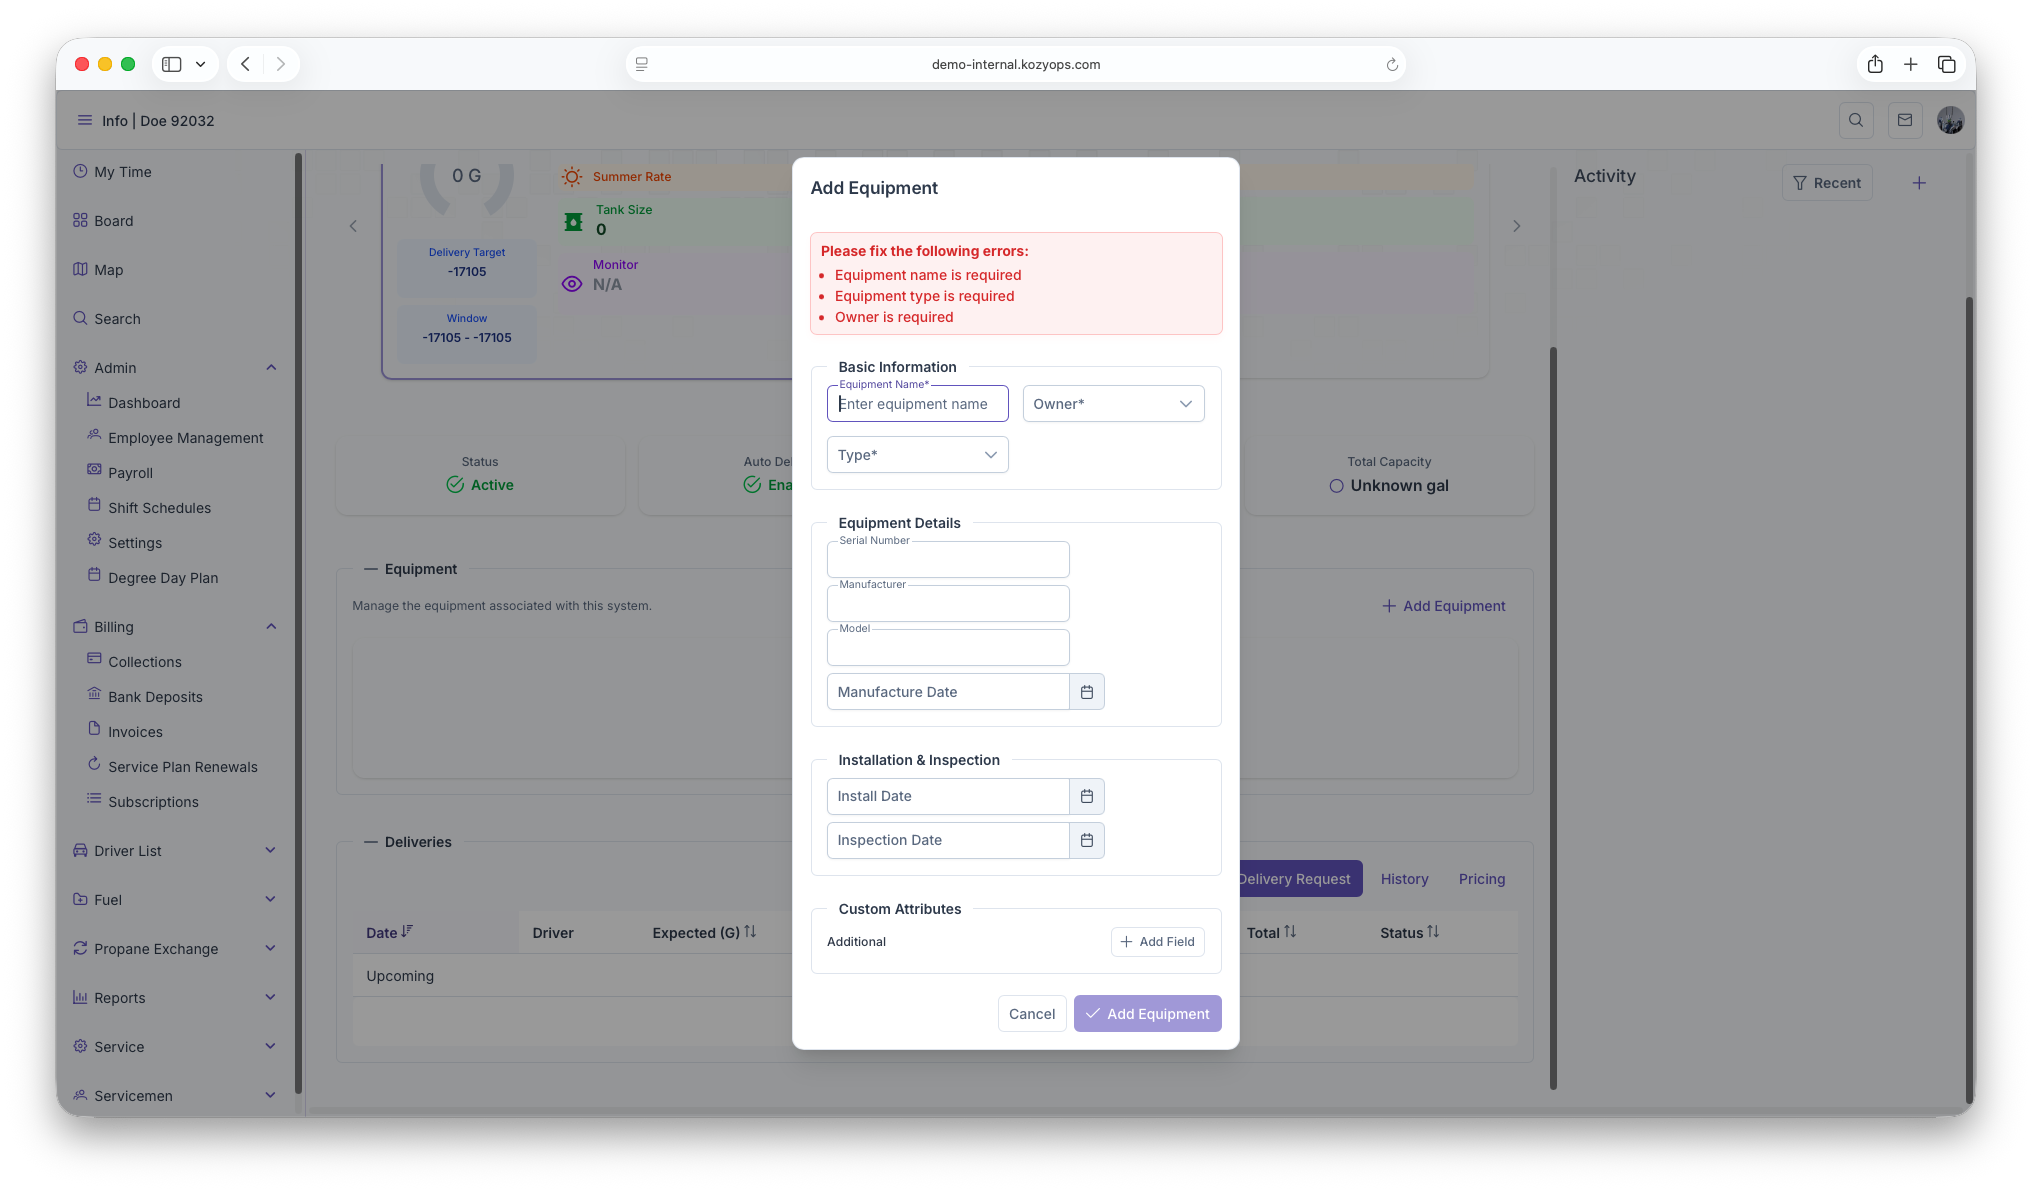
The Add Equipment dialog opens with multiple sections.

-
Fill out the required fields and click Add Equipment or Update Equipment.



Equipment types
The dialog supports these equipment types:
- Tank: Storage tanks for fuel (propane, oil)
- Regulator: Pressure regulation equipment (requires expiration date)
- Filter: Filtration equipment
- Other Equipment: Custom equipment types
Basic Information section
Required fields
- Equipment Name: Clear identifier for the equipment
- Owner: Select "Customer" or "Internal"
- Type: Tank, Regulator, Filter, or Other Equipment
All three fields are required to proceed.
Equipment Details section
Serial Number
- Required if Owner is "Internal"
- Optional for customer-owned equipment
- Used for warranty and service tracking
Optional fields
- Manufacturer: Equipment manufacturer name
- Model: Model number or designation
- Manufacture Date: When the equipment was manufactured (date picker with Luxon support)
Installation & Inspection section
Both fields are optional:
- Install Date: When the equipment was installed or replaced
- Inspection Date: Most recent inspection date
Use date pickers to select dates.
Regulator Information (regulators only)
If you selected Type = Regulator, an additional section appears:
Required field
- Expiration Date: When the regulator expires and needs replacement (required for regulators)
This field uses a date picker and is mandatory for regulator equipment.
Tank Information (tanks only)
If you selected Type = Tank, an additional section appears with three required fields:
Required fields (all with gallon suffix)
-
Size (Gallons): Total tank size capacity
- Supports up to 3 decimal places
- Minimum value: 1 gallon
-
Recommended Capacity: The recommended fill capacity (typically 80-90% of total size)
- Supports up to 3 decimal places
- Minimum value: 1 gallon
- Used for delivery calculations
-
Optimum Delivery: The optimal delivery amount for this tank
- Supports up to 3 decimal places
- Minimum value: 1 gallon
- Used for routing and delivery planning
Example for a 275-gallon tank:
- Size: 275 gallons
- Recommended Capacity: 247 gallons (90% of 275)
- Optimum Delivery: 200 gallons
Multiple tanks on one system
When you have multiple tanks sharing the same fill connection:
- Add each tank as separate equipment to the same system
- Enter accurate Size, Recommended Capacity, and Optimum Delivery for each tank
- The system automatically aggregates capacity across all tanks for delivery calculations
Example setup:
- System: "Main Propane System"
- Tank 1: 500 gallons (450 recommended, 400 optimum)
- Tank 2: 500 gallons (450 recommended, 400 optimum)
- Total system capacity: 1000 gallons (900 recommended)
This approach allows accurate tracking of individual tanks while calculating deliveries for the combined system.
Custom Attributes section
Always visible at the bottom of the dialog:
Predefined custom fields
- Loaded from the API based on equipment type
- Each field shows with a label and optional description tooltip
- Enter values as needed for your tracking requirements
Additional custom fields
- Click Add Field to create custom key-value metadata
- Enter Field Name and Value
- Remove fields with the trash icon button
- Useful for tracking location-specific or custom attributes
Validation and submission
The dialog validates your entries:
- Validation errors appear at the top in a red message box
- Common errors:
- Missing required fields (Name, Owner, Type)
- Serial number required for Internal-owned equipment
- Expiration date required for regulators
- Tank size, recommended capacity, and optimum delivery required for tanks
- Values must be > 0 for numeric fields
The Add Equipment or Update Equipment button is disabled until all validation passes.
Dialog actions
- Cancel: Close the dialog without saving changes
- Add Equipment (for new): Save the new equipment to the system
- Update Equipment (for existing): Save changes to existing equipment
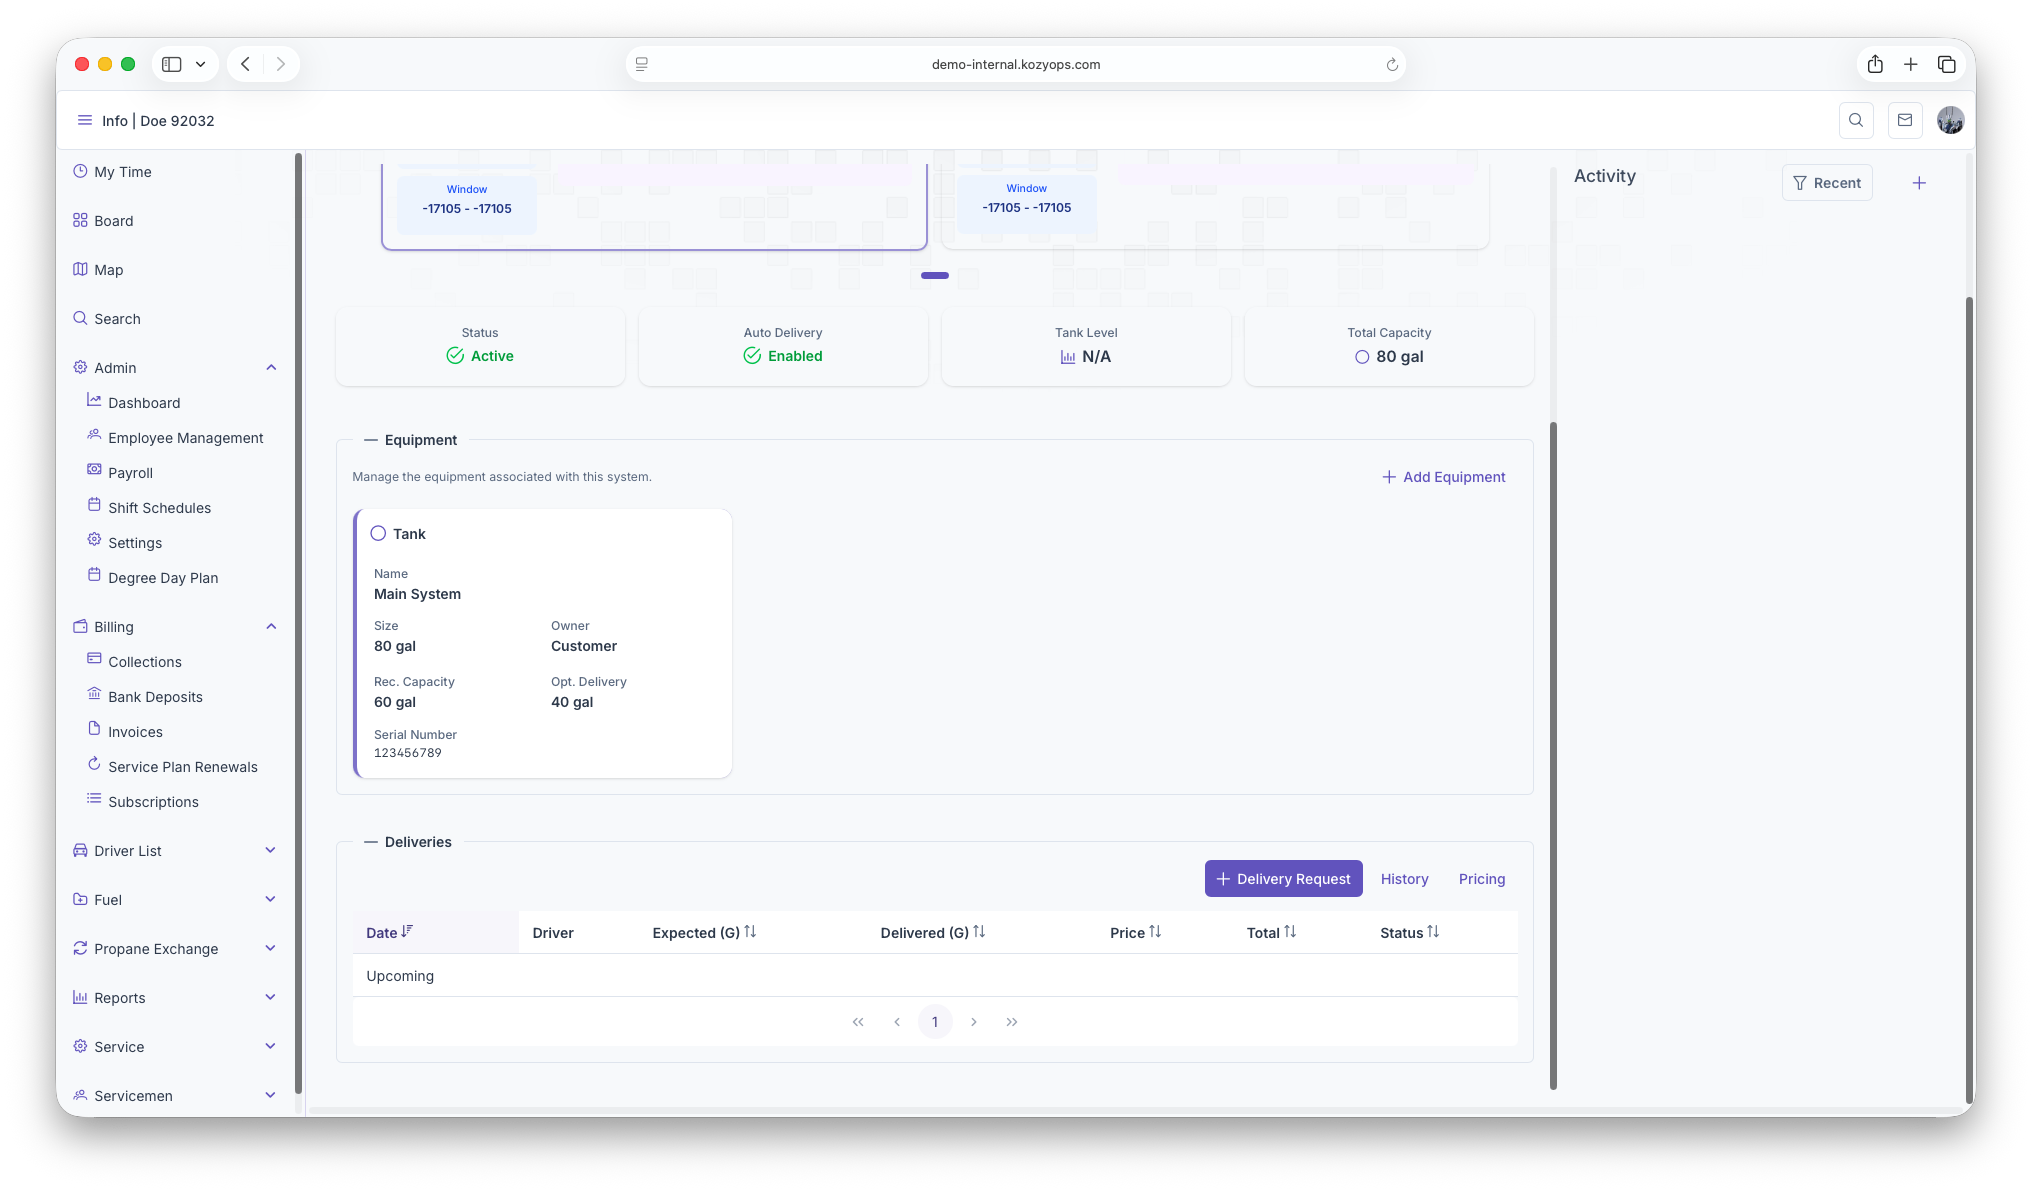
After saving, the equipment appears in the system's equipment list and can be used for delivery projections, monitoring, and service tracking.
Editing or removing equipment
- To edit: Click the equipment row or Edit button, make changes, and click Update Equipment
- To remove: Use the delete/remove action (typically with confirmation)
- Be cautious if the equipment is linked to active monitors or services
Related guides
- Add System — Create the parent system first
- Editing a System — Modify system details
- Monitoring — Link tank monitors to equipment
- Window Strategies — Configure delivery estimation using equipment data
- Add Services — Products and service plans for the customer
Deliveries
Introduction
The Deliveries part on the Fuel section of the Customer Account is where Customer Delivery Request can be input when made by the customer and not in Auto Delivery. A history Search and Pricing search can also be made here by clicking on the History or Pricing tabs.
Deliveries
When first seeing this sction, all Fuel Delivery Requests that are made will show up here. They'll show up as line items with the following columns
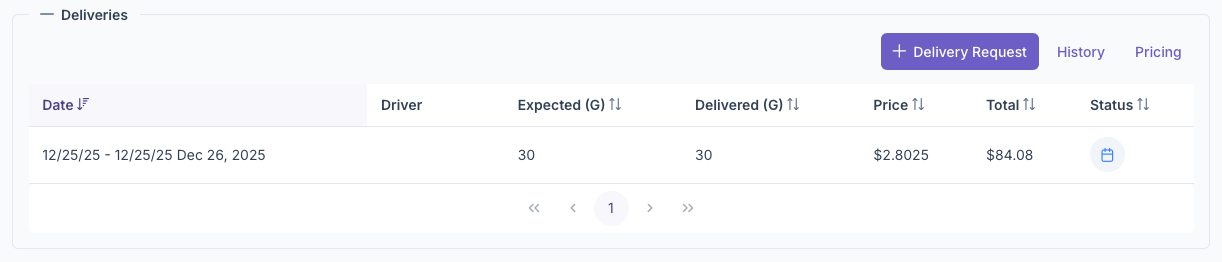
- Date - The date of the requested delivery
- Driver - The Driver selected to delivery the fuel
- Expected - How many gallons are expected to be delivered
- Delivered - How many gallons were delivered
- Price - How much per gallon
- Total - Total amount based on what was delivered
- Status - Shows the status of the request. Clicking on the status will also delete the request if not delivered yet
Delivery Request
Delivery Request for Customers can be made here. By clicking on the +Delivery Request, The Add Deliveries popup will appear and the following fields must be filled out
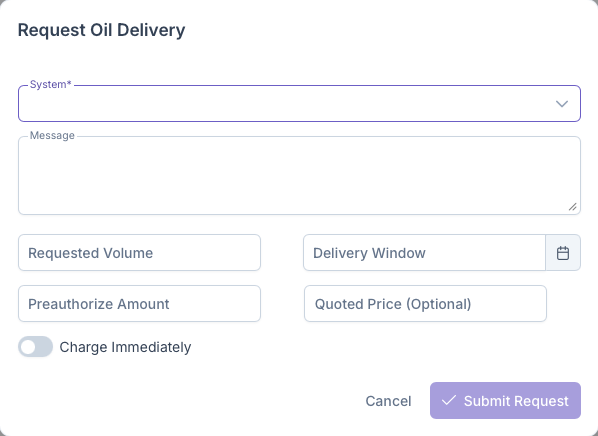
- System - Select a system the customer has that need a delivery
- Message - Any messages or notes regarding the request
- Requested Volume - How much was requested for Delivery
- Delivery Window - The given date window for a delivery
- Credit Card Hold Amount - The hold placed on the customers card for delivery
- Quoted Price - The price that was quoted for the customer when the delivery was requested
- Charge Card - Toggling here will allow a card to be charged for a delivery request if the customer wants to be charged right away. Toggling this on will expand the menu and now it will also show
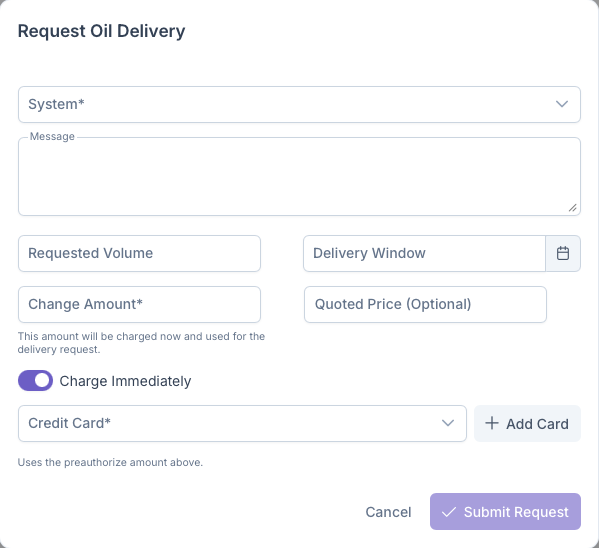
- Credit Card - A dropdown that shows all cards that the customer has on file. Selecting one will the charge the card the amount that is placed on hold as shown above
- Add Card - Clicking here will open up the Add Payment Card popup in order to immediately add a card to the customers account if one is not already in the system. See below for more information
Once all fields have been filled out, clicking on Submit Request will create the delivery request and charge the customers card if the customer wanted to have it charged. This will show up partially filled on the Deliveries section and will fill up as the the order is routed, priced and delivered. This request will also show up on the request section of the Setting Up a Route page. Clicking on cancel will close out the window and delete any information filled out
Add Payment Card
If a customer chooses to have a card added to their account to use for a delivery request, the Add Payment Card popup will appear and the following information needs to be filled out
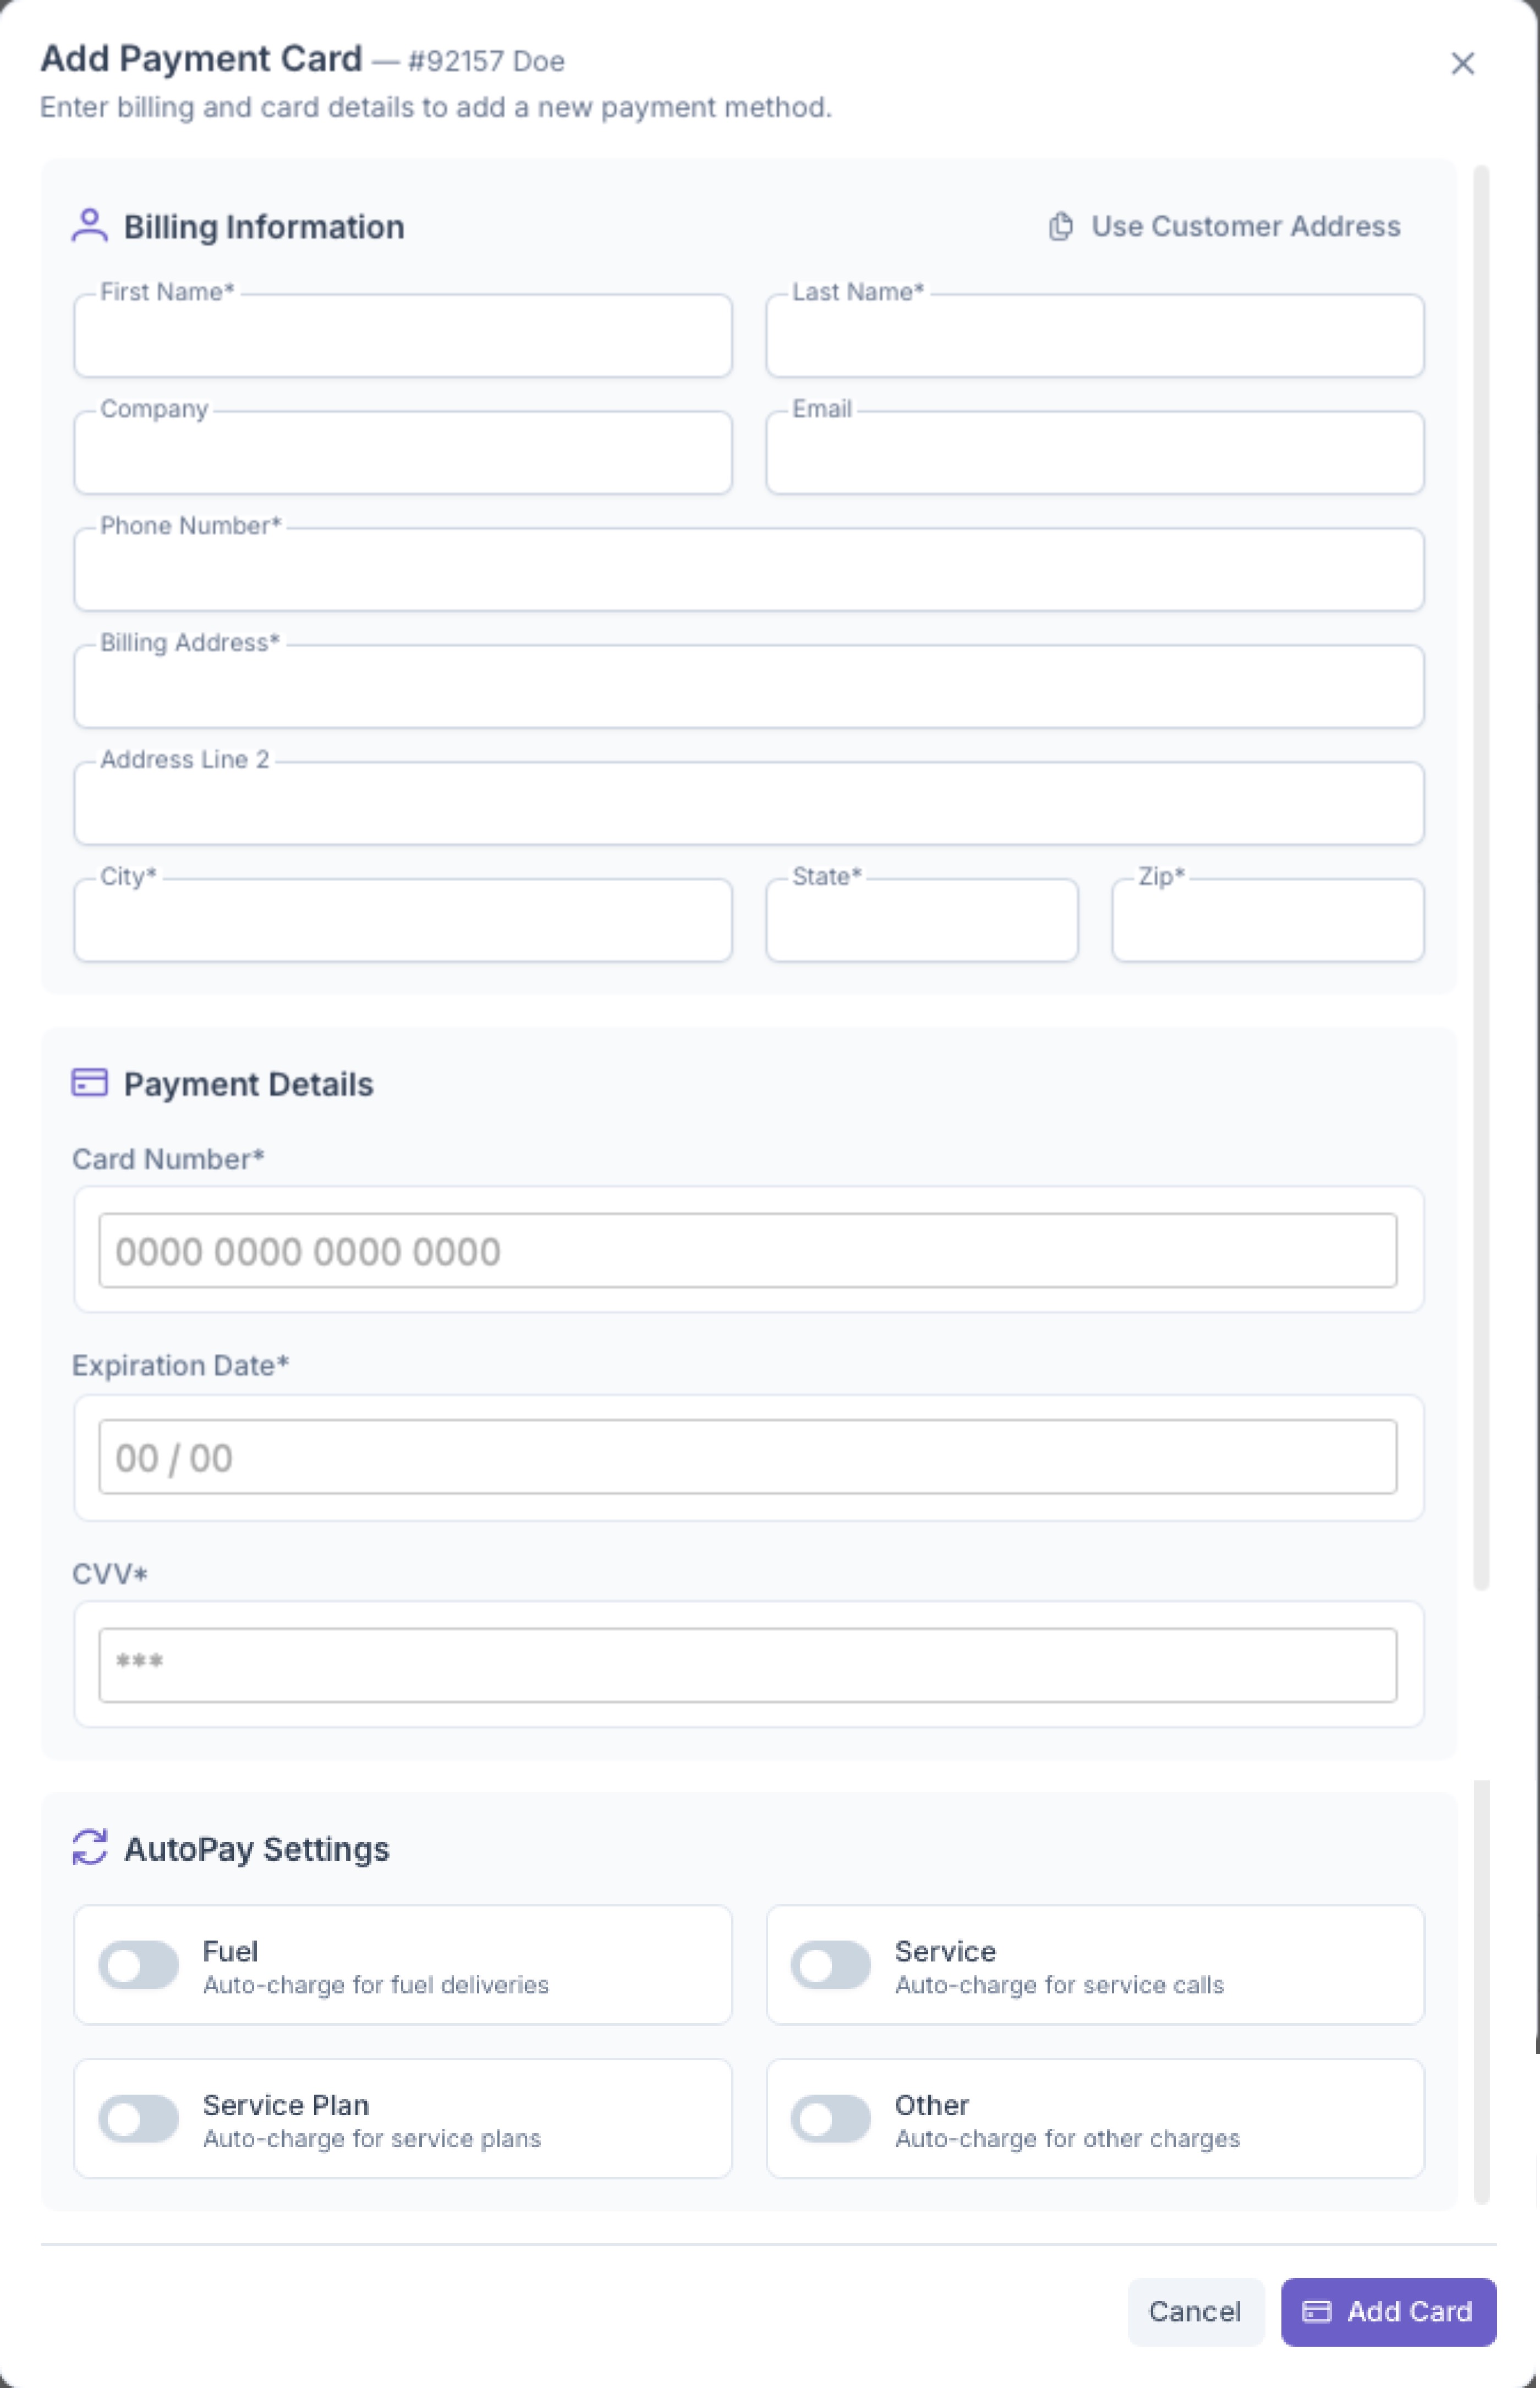
- Billing Information
- First Name, Last Name
- Company
- Phone Number
- Billing Address
- Billing Address 2
- City
- State
- Zip
- Payment Details
- Card Number
- Expiration Date
- CVV
- AutoPay Settings - Toggle the folowing for automatic payments
- Fuel
- Service
- Serviec Paln
- Other
History
Clicking on the History tab under Deliveries will bring up the Deliveries History for The Customer. Once brought up, it'll show all systems that the customer has and clicking on each one will bring up a detailed page for that systems delivery history. The page will show details about the following, The system itself, The Usage Rates, Delivery Windows, Delivery Analytics, Rate Configurations and Delivery History. A much more detailed view of this page can be seen on the Delivery History page.
Pricing
Clicking on the Pricing Tab under Deliveries will bring up the Pricing page for deliveries. Once brought up, a system can be selected which will then generate the pricing for that system. The Following information is then displayed, Pricing, Transitions, Services, Contracts, Custom Points and a graph depicting Recent deliveries. A much more in depth look at the pricing page can be seen on the Pricing page.