Customer
Customer Account
Introduction
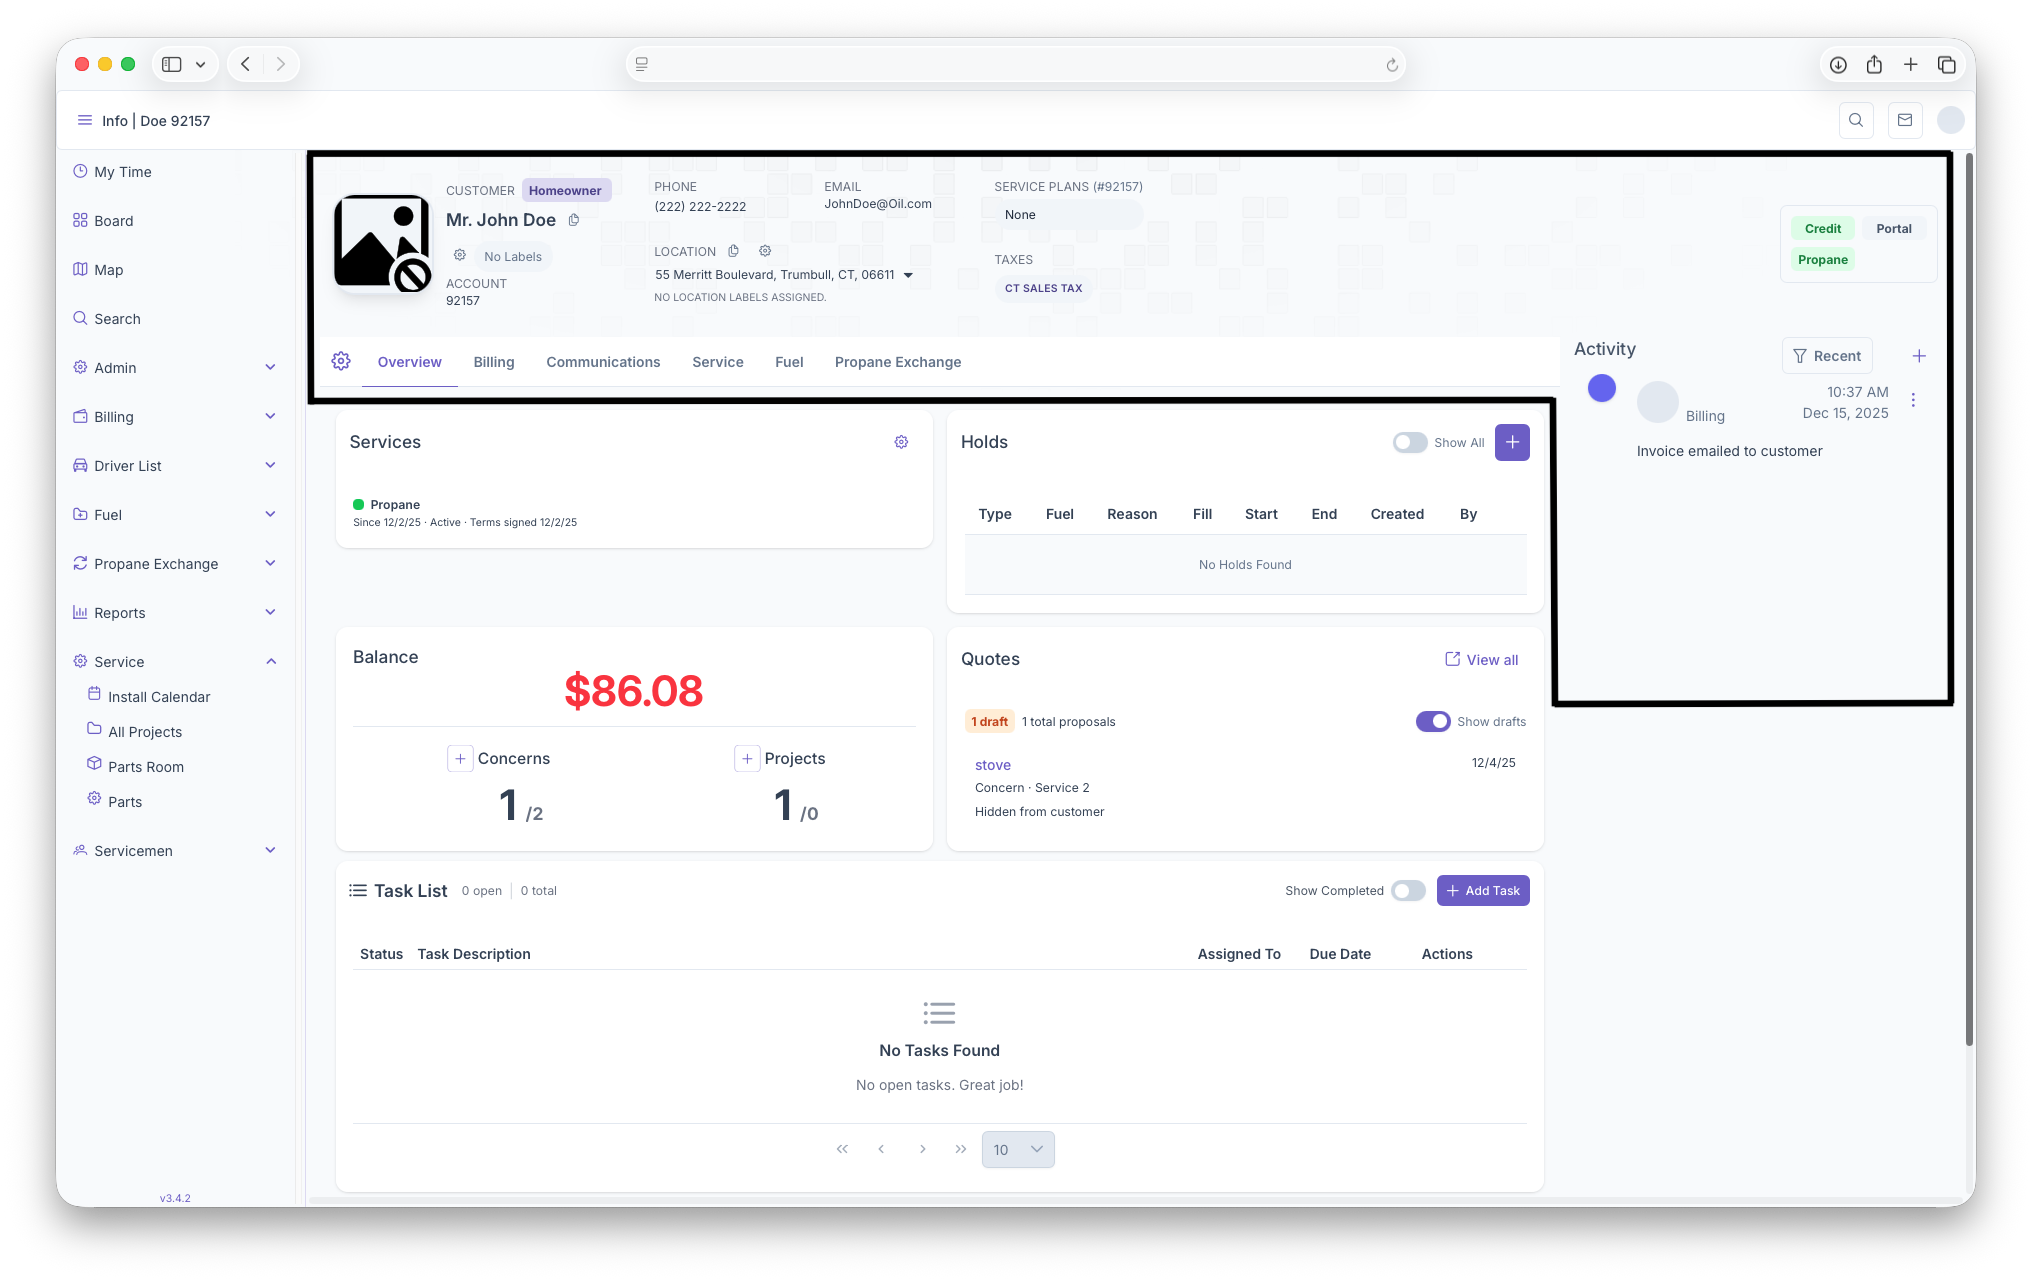
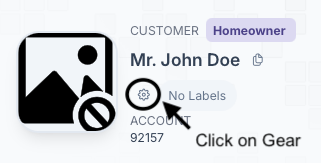
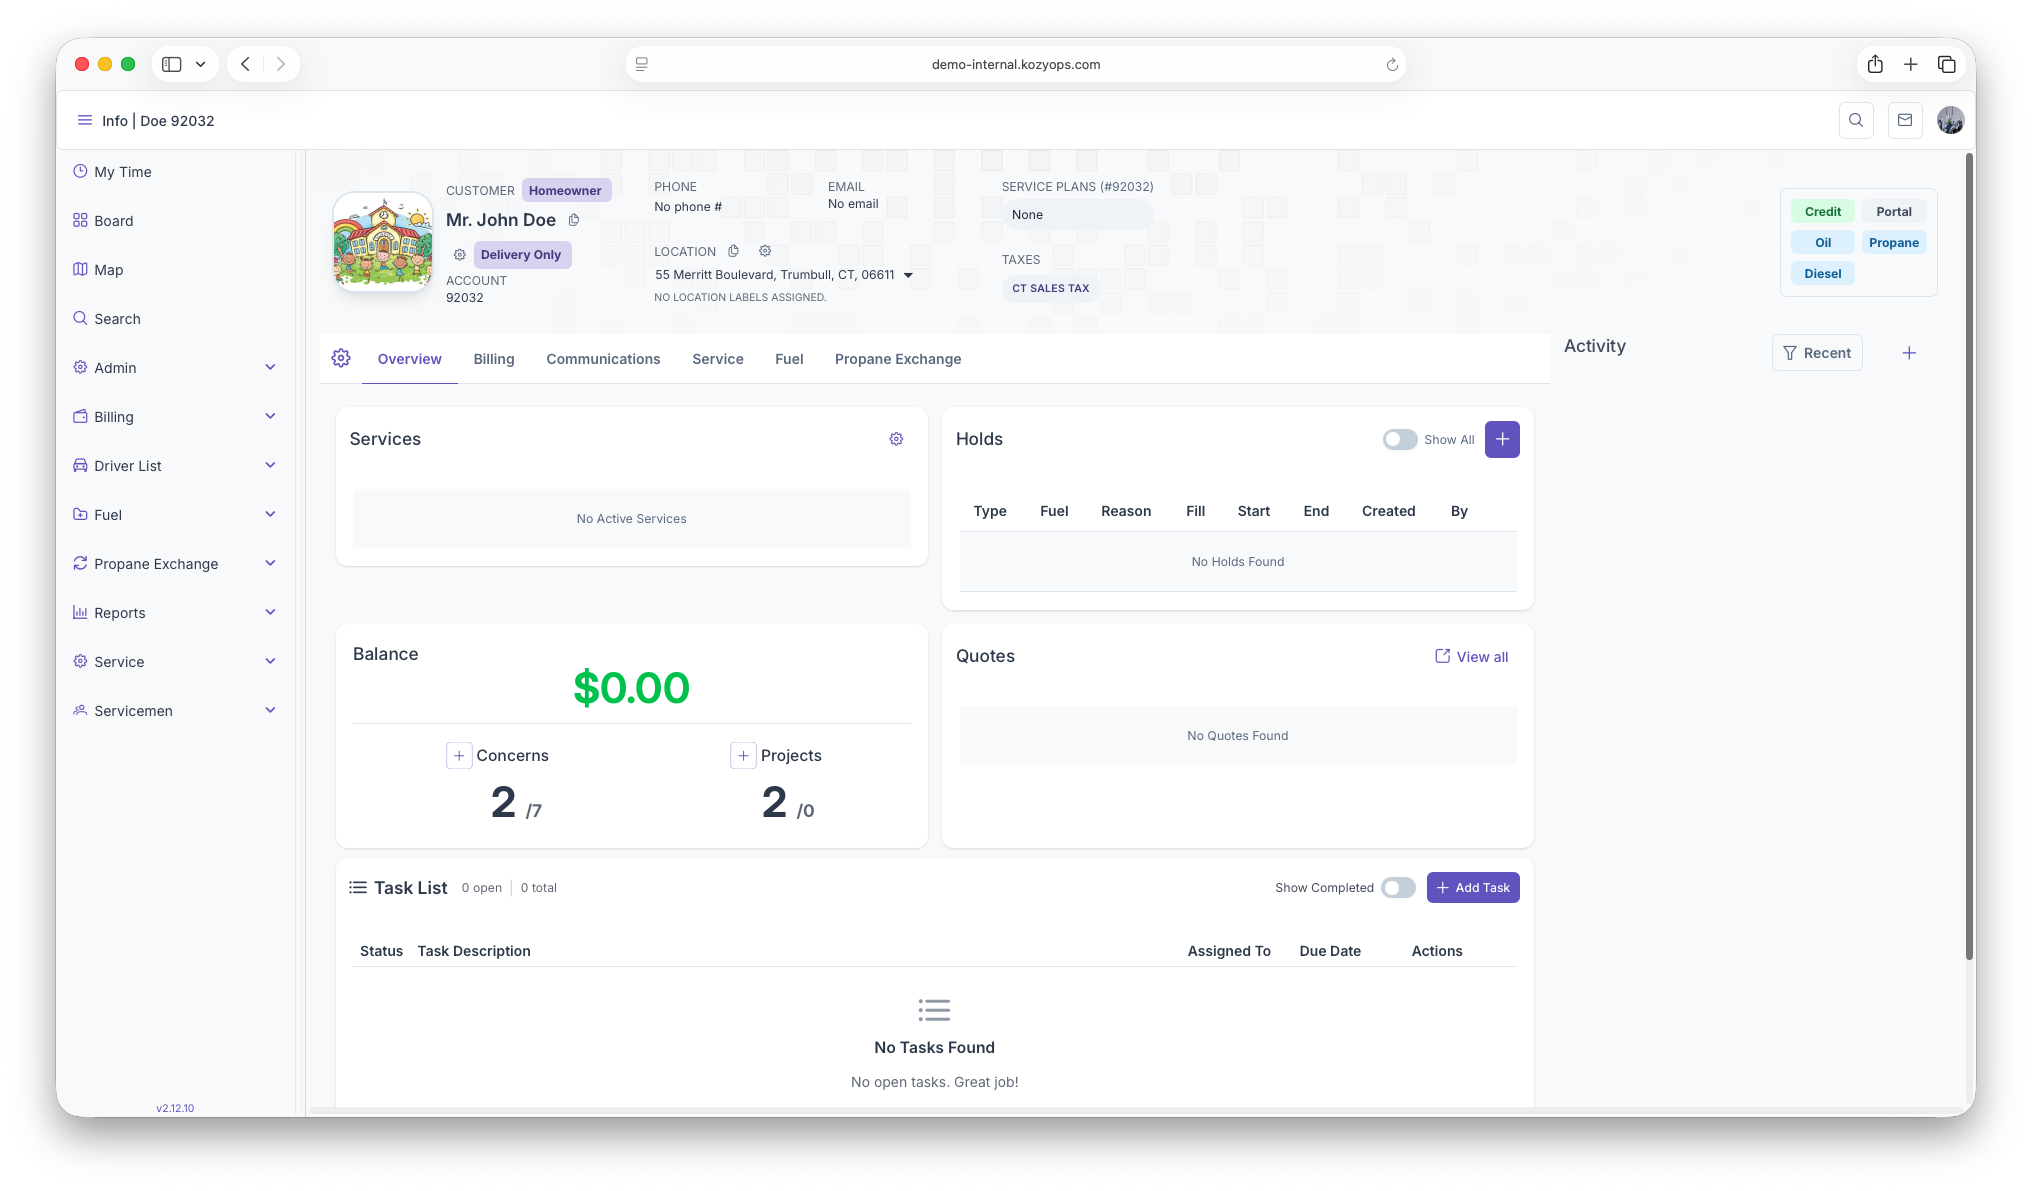
Upon landing on the customer account page, the Customers basic information will be displayed on the top of the page. This includes the customers Profile Picture, Customers Name, their Account Number, Phone Number, Email, Service Plans, Location, and Taxes. The customers basic information can be edited by clicking on the gear button right below the the customers Profile Picture. The right side of the screen will also show the status of the customers account. Below that will be the communications board. The customers account can alse be edited on this page as well.
Profile Picture
Clicking on the Customers Profile Picture allows images, videos and or documents to be uploaded to the customers account. Note that anything uploaded is tied to the selected address of the customer and will change when selecting a new address.
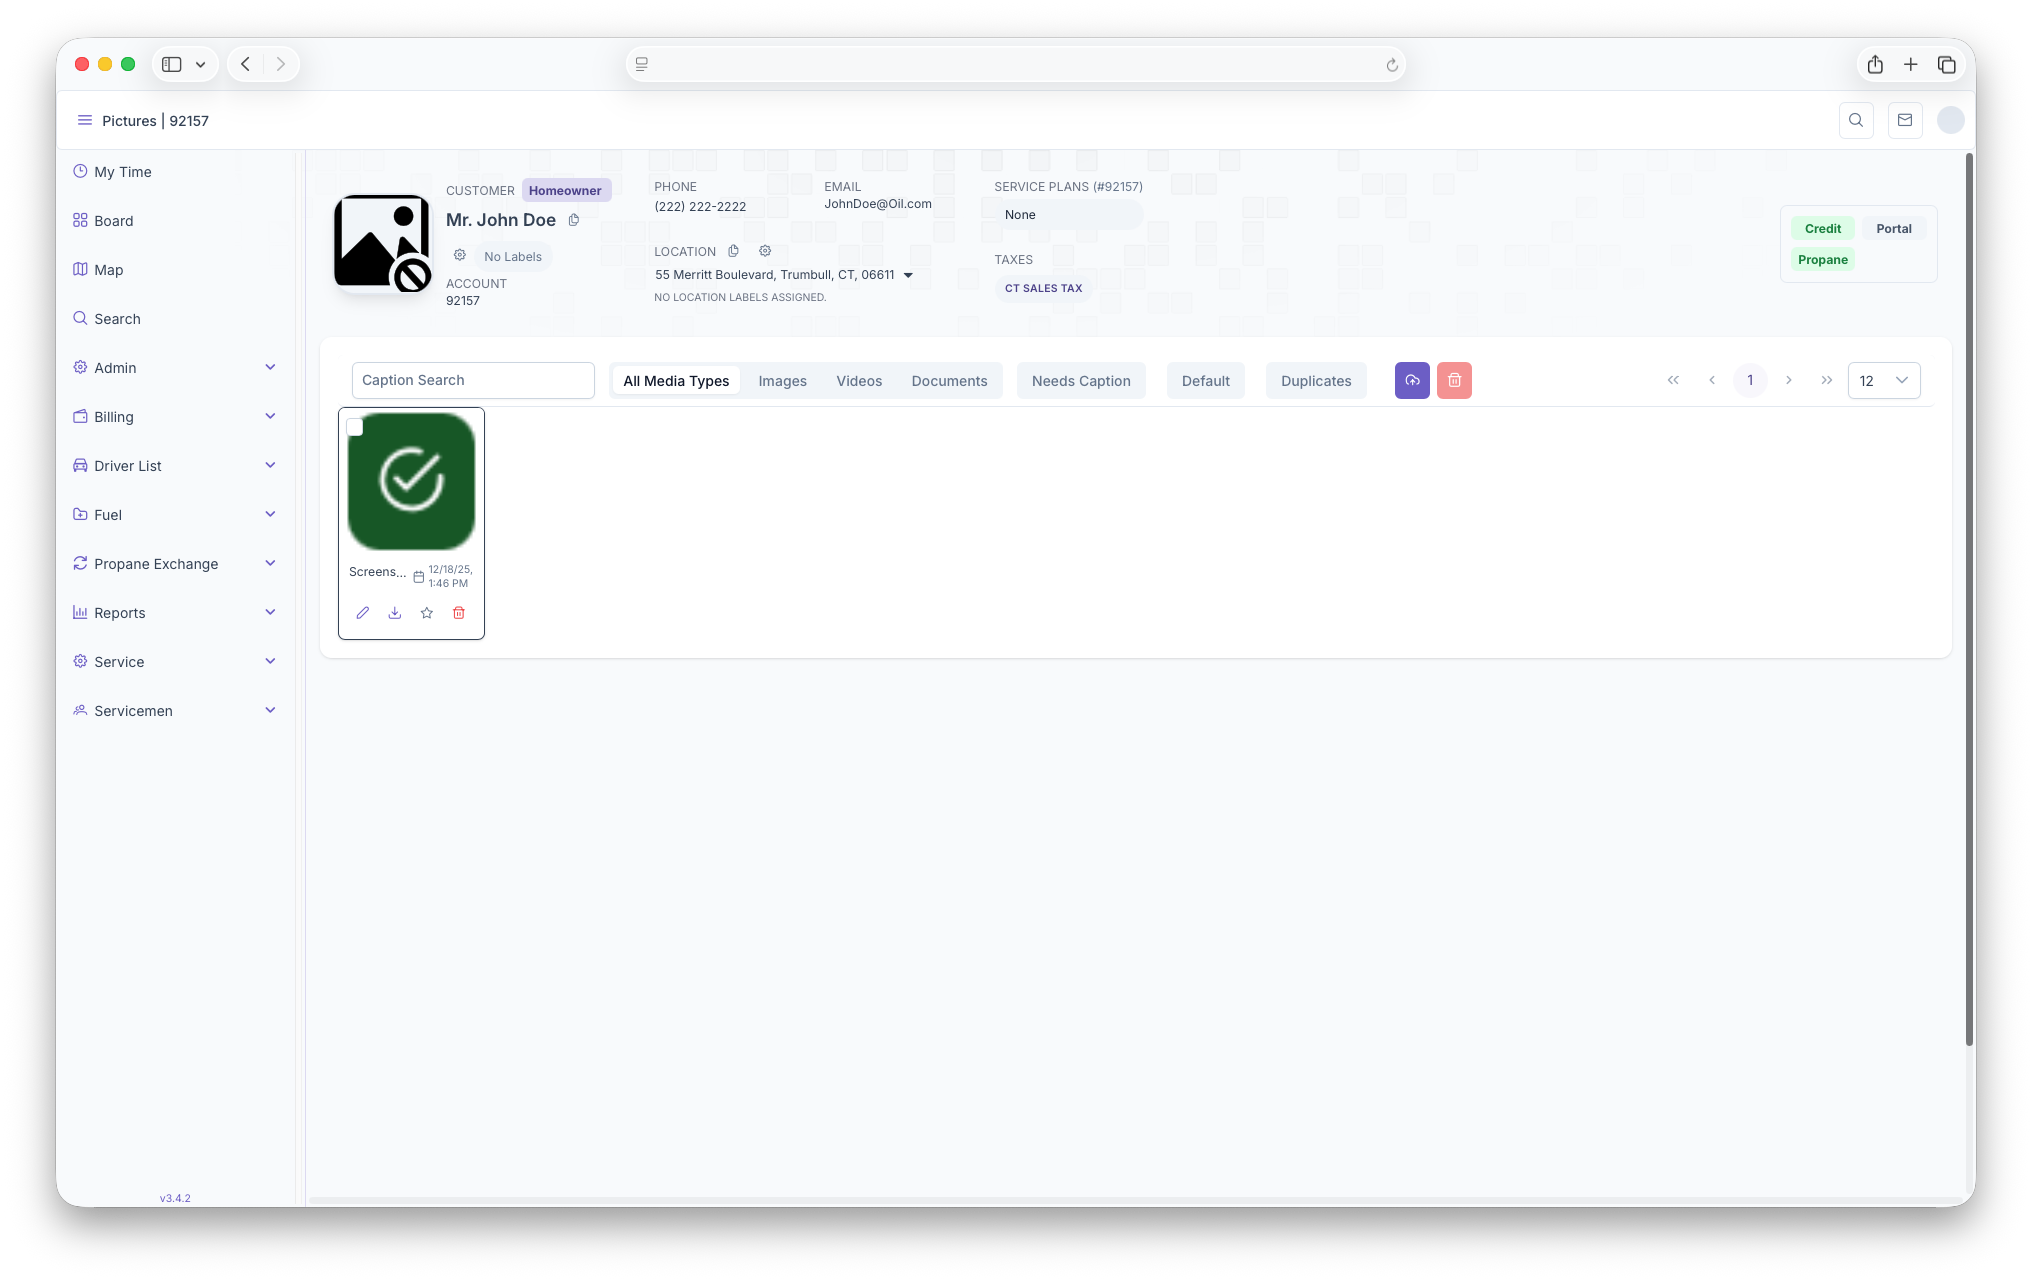
- Click on the space for a profile picture to enter the add page
- Next click on the Upload button to upload any images, videos or documents, captions can also be added to said media
- From here, clicking on the star under an image will make that image the customers Profile Picture for the selected address (note that each address for each customer will require their own uploads and profile pictures)
From here all media can be filtered by selecting a media type, whether an image needs a caption added to it, whether it's the default and/or if there are any duplicates. This page is handy for uploading all media to be referenced back to for the customer
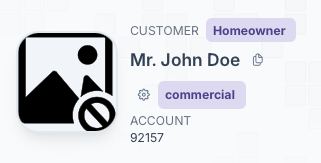
Customer Name
Next to the Profile Picture will be the Customers name as well as their association to the location, eg. Homeowner, Tennant, Price Customer, Fuel Customer or Service Customer. Clicking on the Customer Name will bring the page back to the default overview of the page for any easy access to the customers account
Label
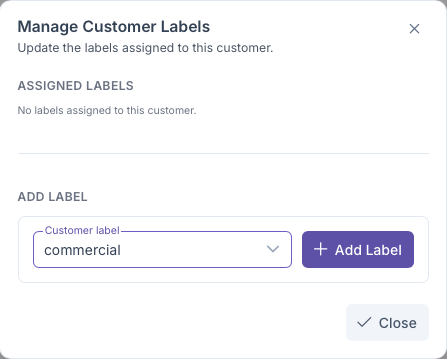
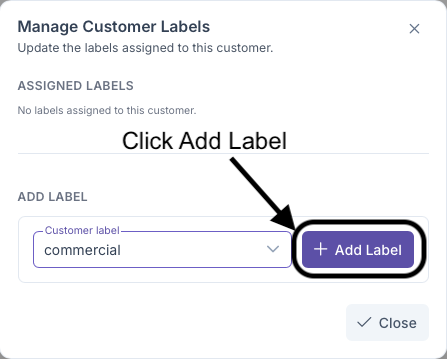
Under the Customer Name is the option to add a label to a customers account. Adding a label to the customer adds additonal information about the customer, such as the customer being a commericial customer. To add a label
-
Clicking on the gear next to No Label to bring up the Manage Customer Labels popup


-
Click on the Customer Label dropdown

-
Select a label

-
Click on Add Label


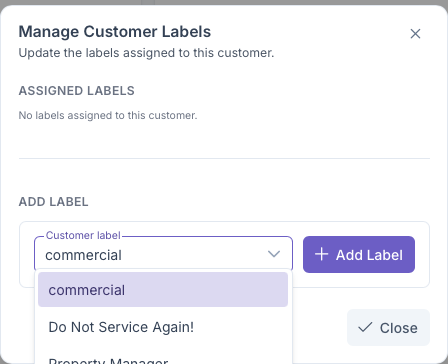
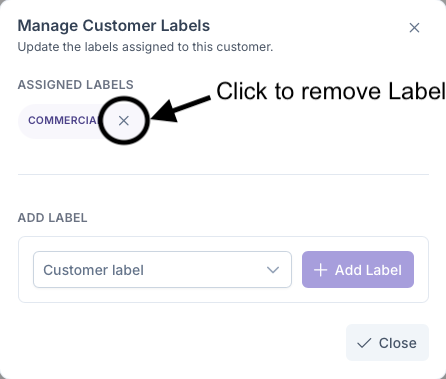
Once added, the label will show up under assigned label on the Manage Customer Labels as well as under the customers name. Clicking on the X next to the label in the Manage Customer Labels will remove the label from the customers account.
Additional Labels can be created under the settings page under Admin, see the Labels page for a more detailed look on how.
Phone
Here, the customers main phone number will be displayed. Clicking on the phone number allows for adding, editing or deleting phone numbers. The page generates in rows that includes the phone number, name, type, default and actions.
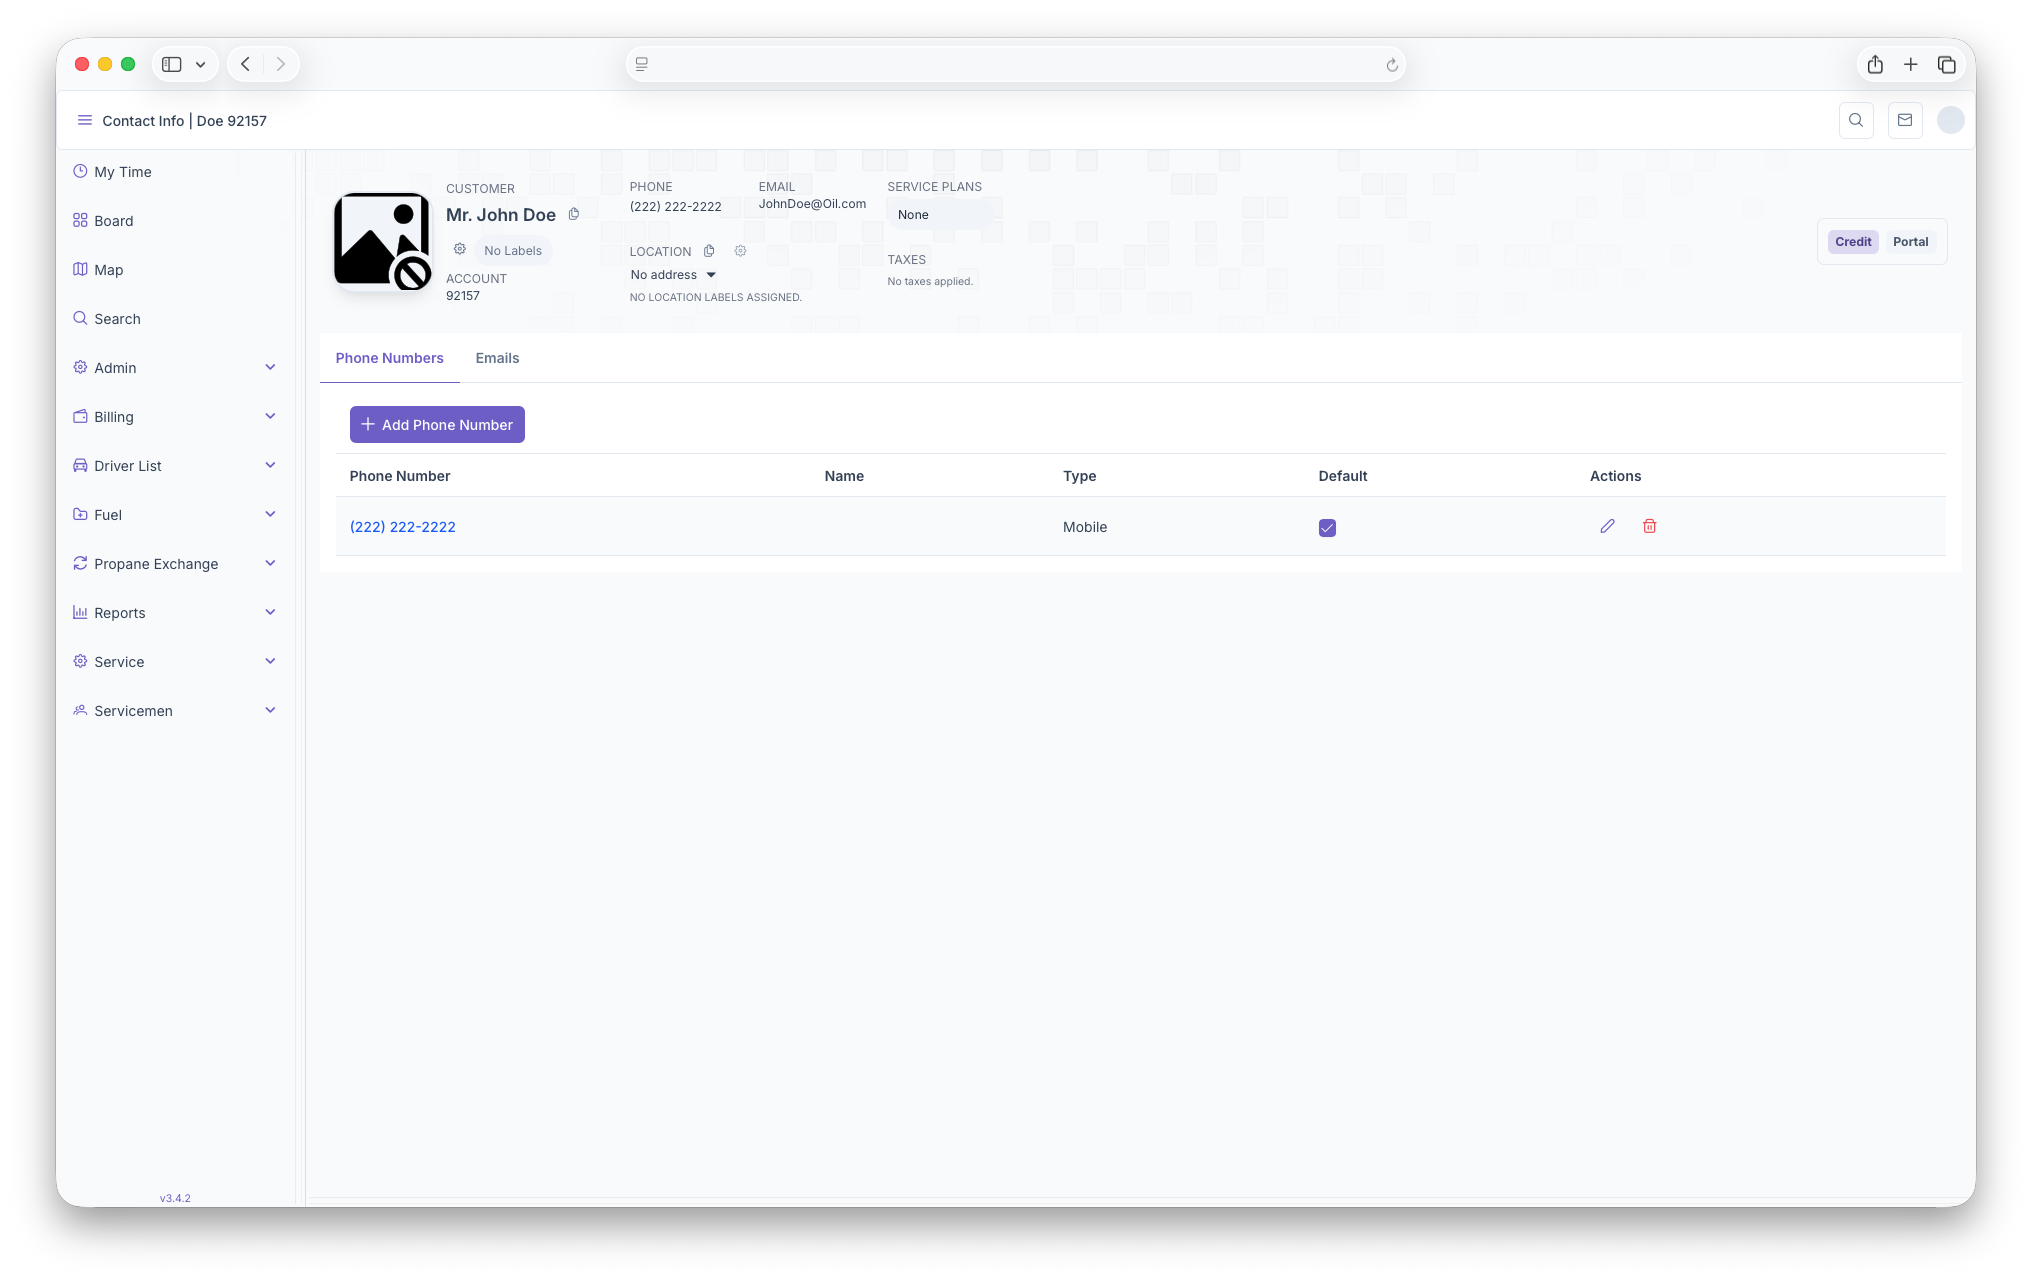
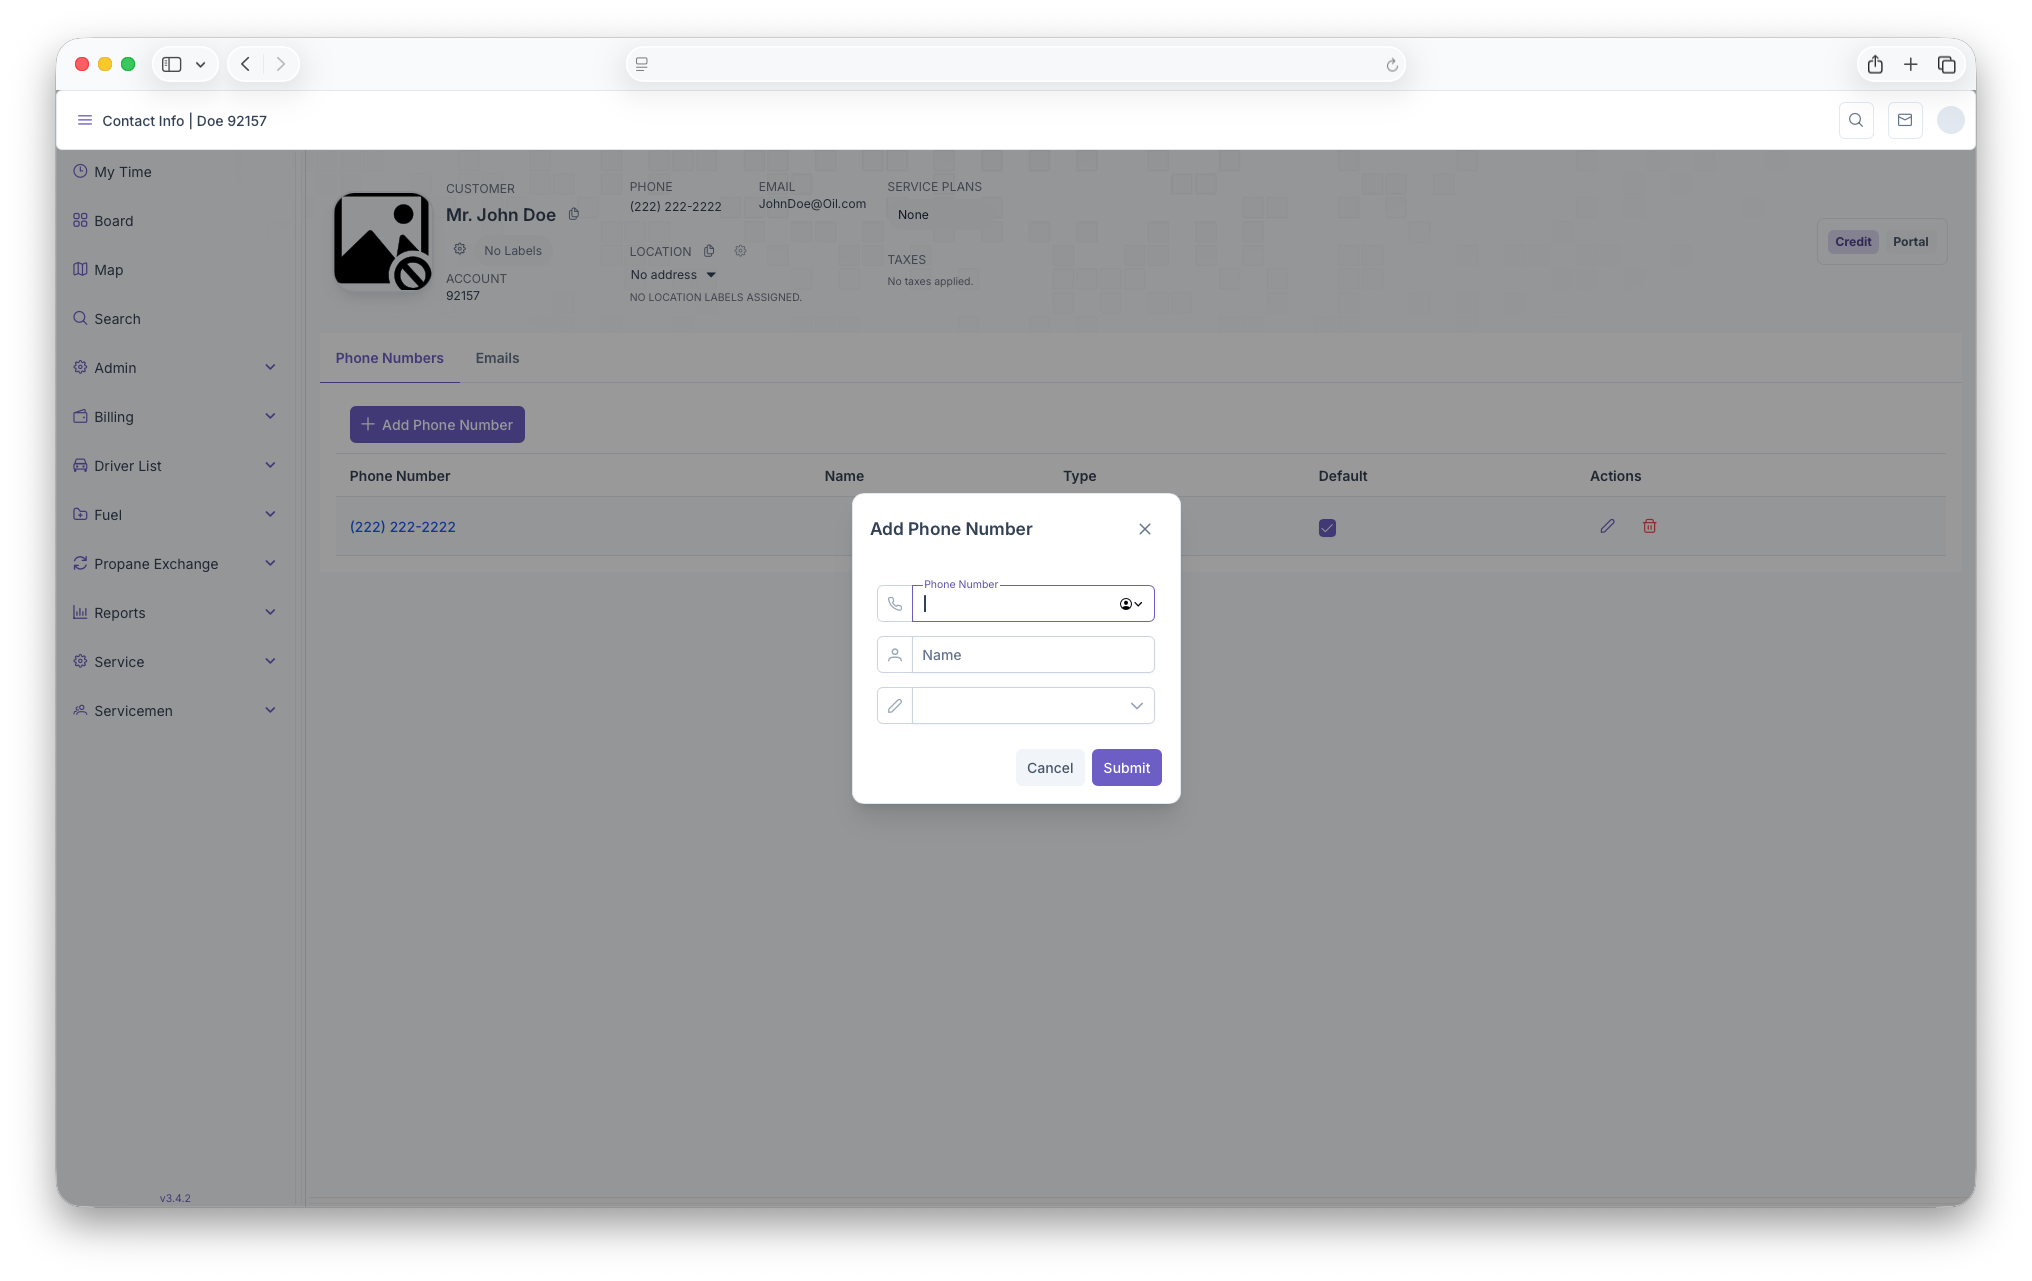
- Click on the customers Phone Number to bring up the Add/Edit Page
- Click on The Add Phone Number button to bring up the add page
- Next fill out the phone number, customer name and what the primary use of the phone is, then click on save to add the new phone number
- Once back on the Phone Number page, clicking on the edit button on phone number row will allow the phone number to be edited.
- The edit page will then apear and the phone number can be edited (page is the same as the add page)
- Back on the phone number page, clicking on the trash can will delete the phone number
Here, the customers main email will be displayed. Clicking on the email allows for adding, editing or deleting emails. The page generates in rows that includes the email, name, default and actions.
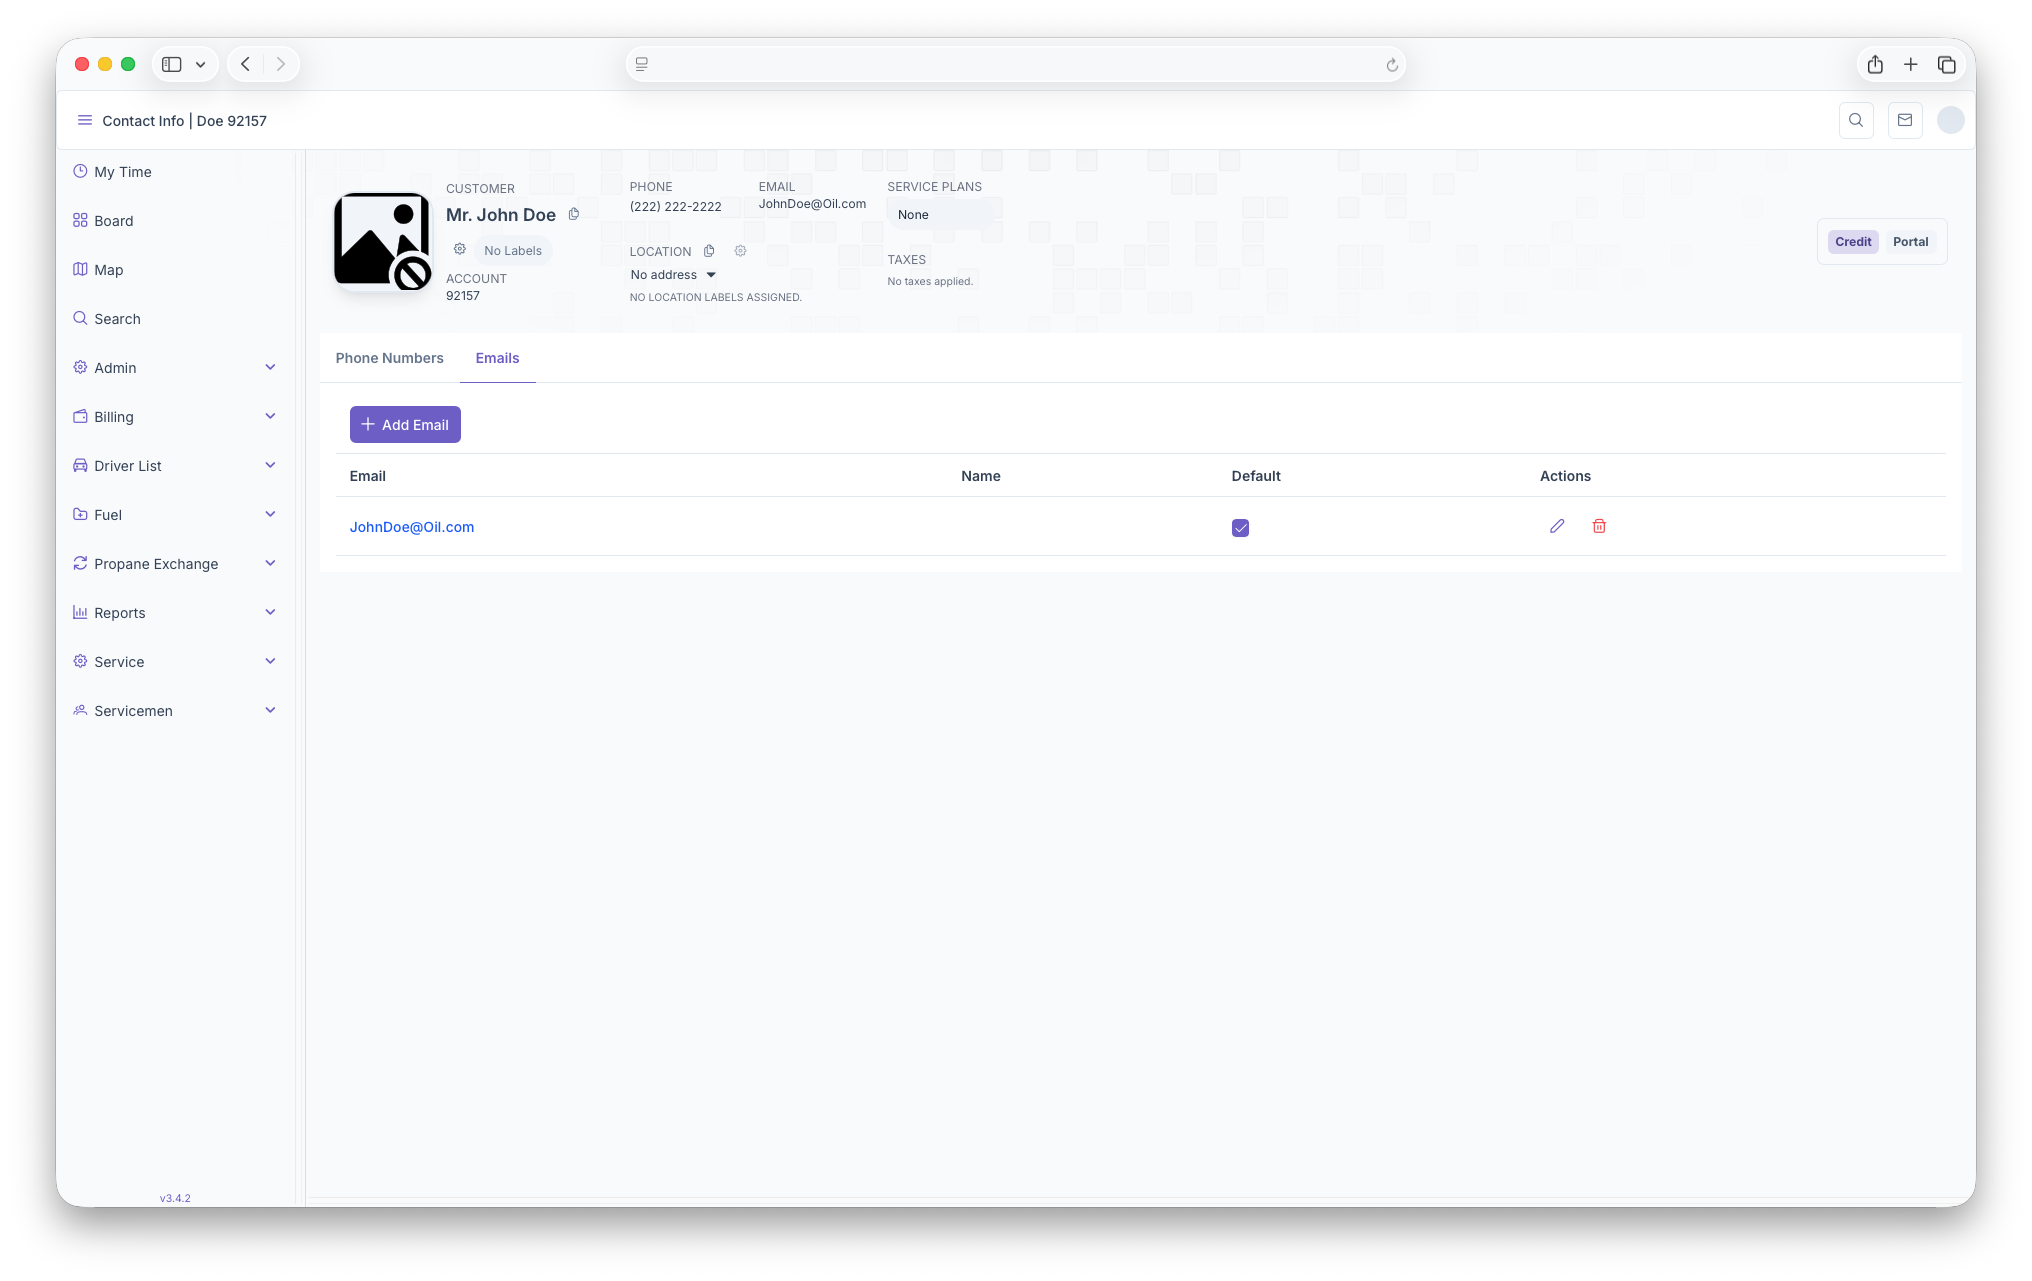
- Click on the customers email to bring up the Add/Edit Page
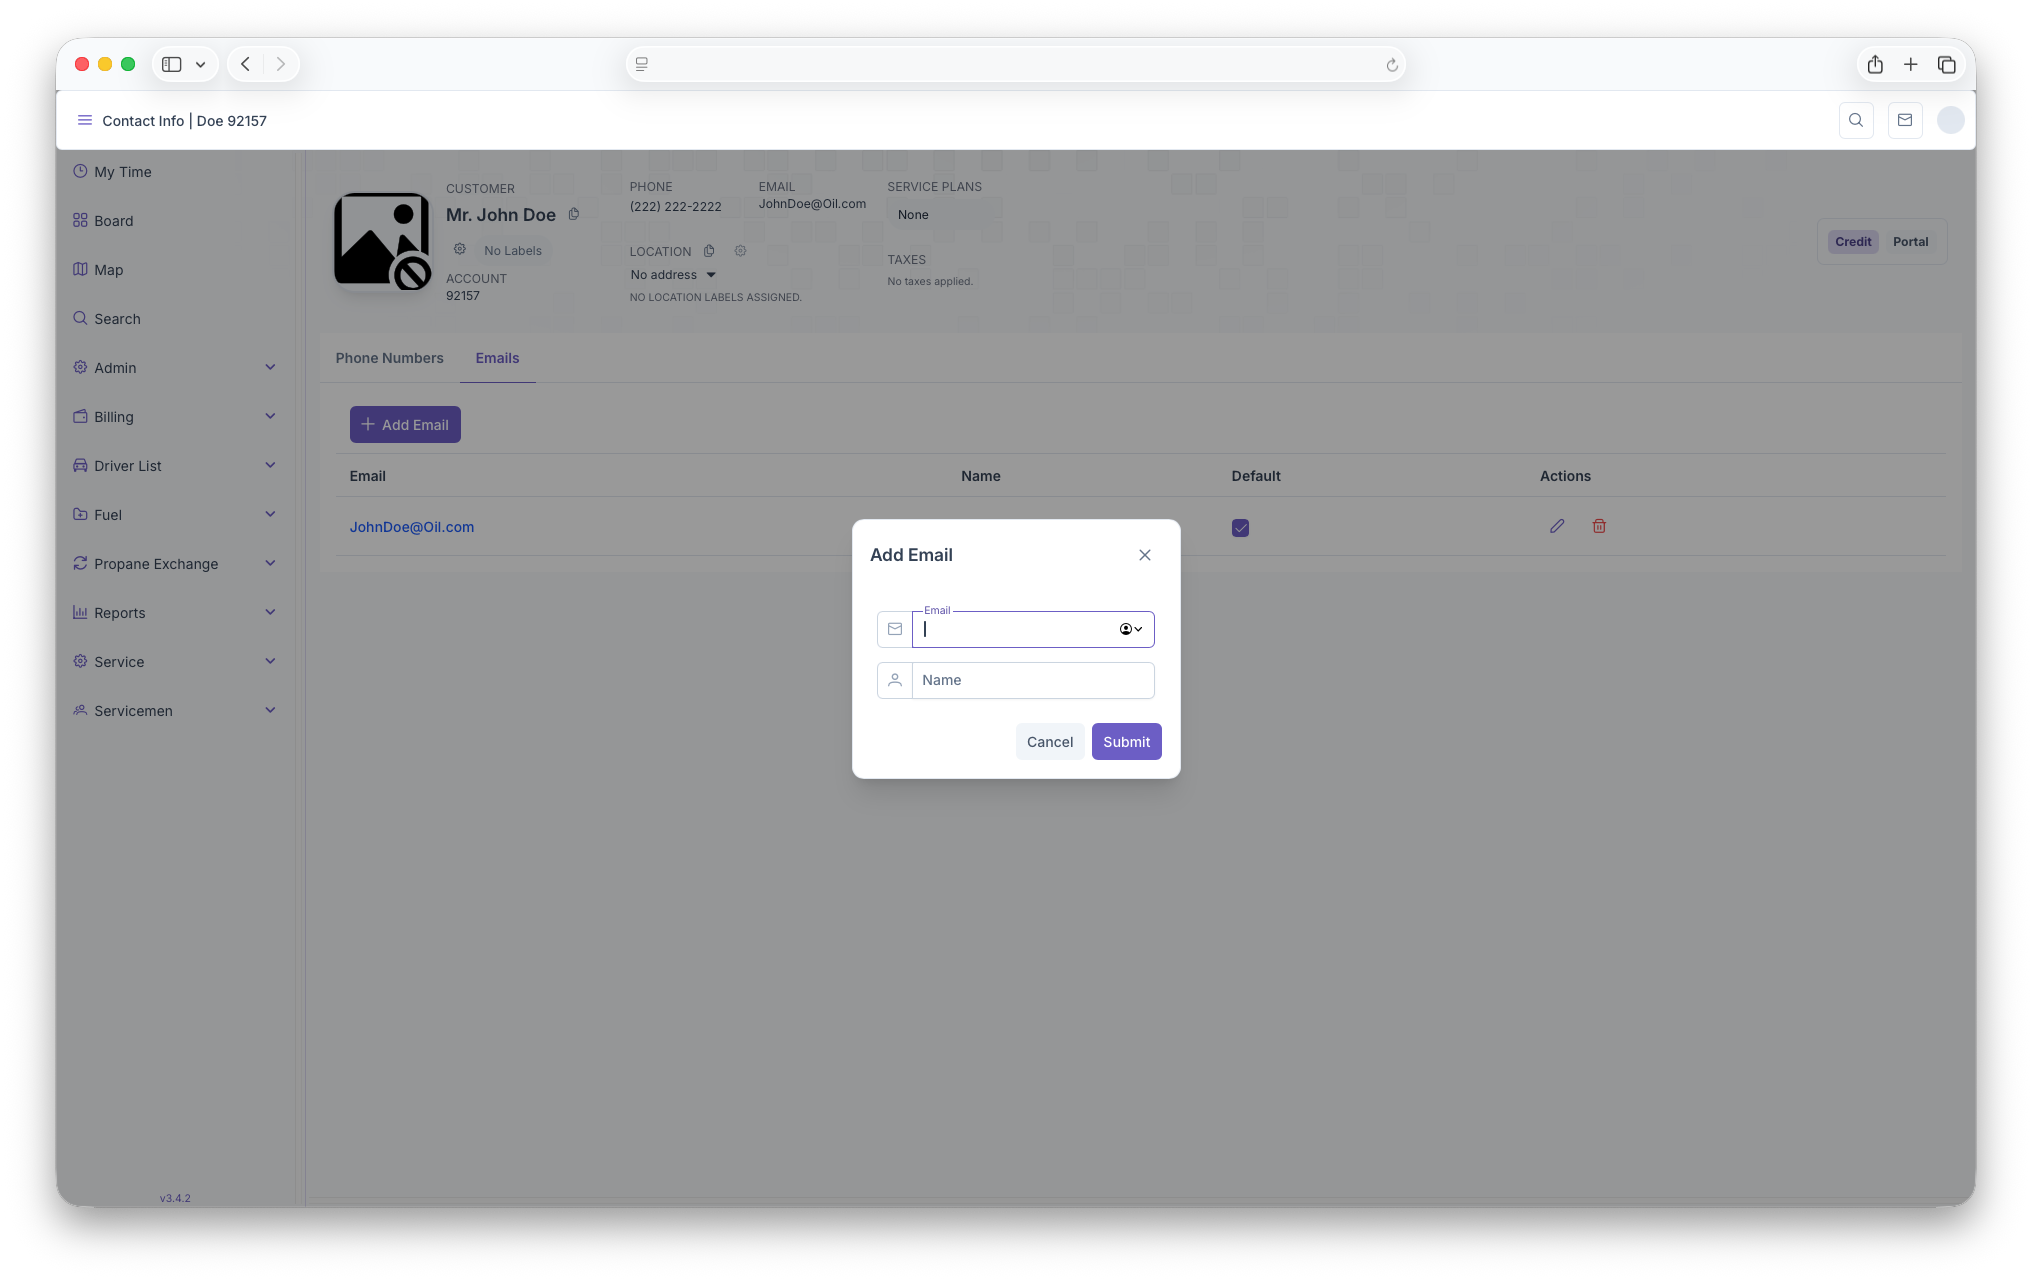
- Click on The Add Email button to bring up the add page
- Next fill out the Email and customer name, then click on save to add the new Email
- Once back on the Email page, clicking on the edit button on email row will allow the phone number to be edited.
- The edit page will then apear and the email can be edited (page is the same as the add page)
- Back on the email page, clicking on the trash can will delete the email
Service Plans
Here The Customers active Service Plan for the address will be shown. Service plans are also tied to each location that the Customer has on their accounts. The Adding Services page shows a more detailed look in Service plans and how to add them
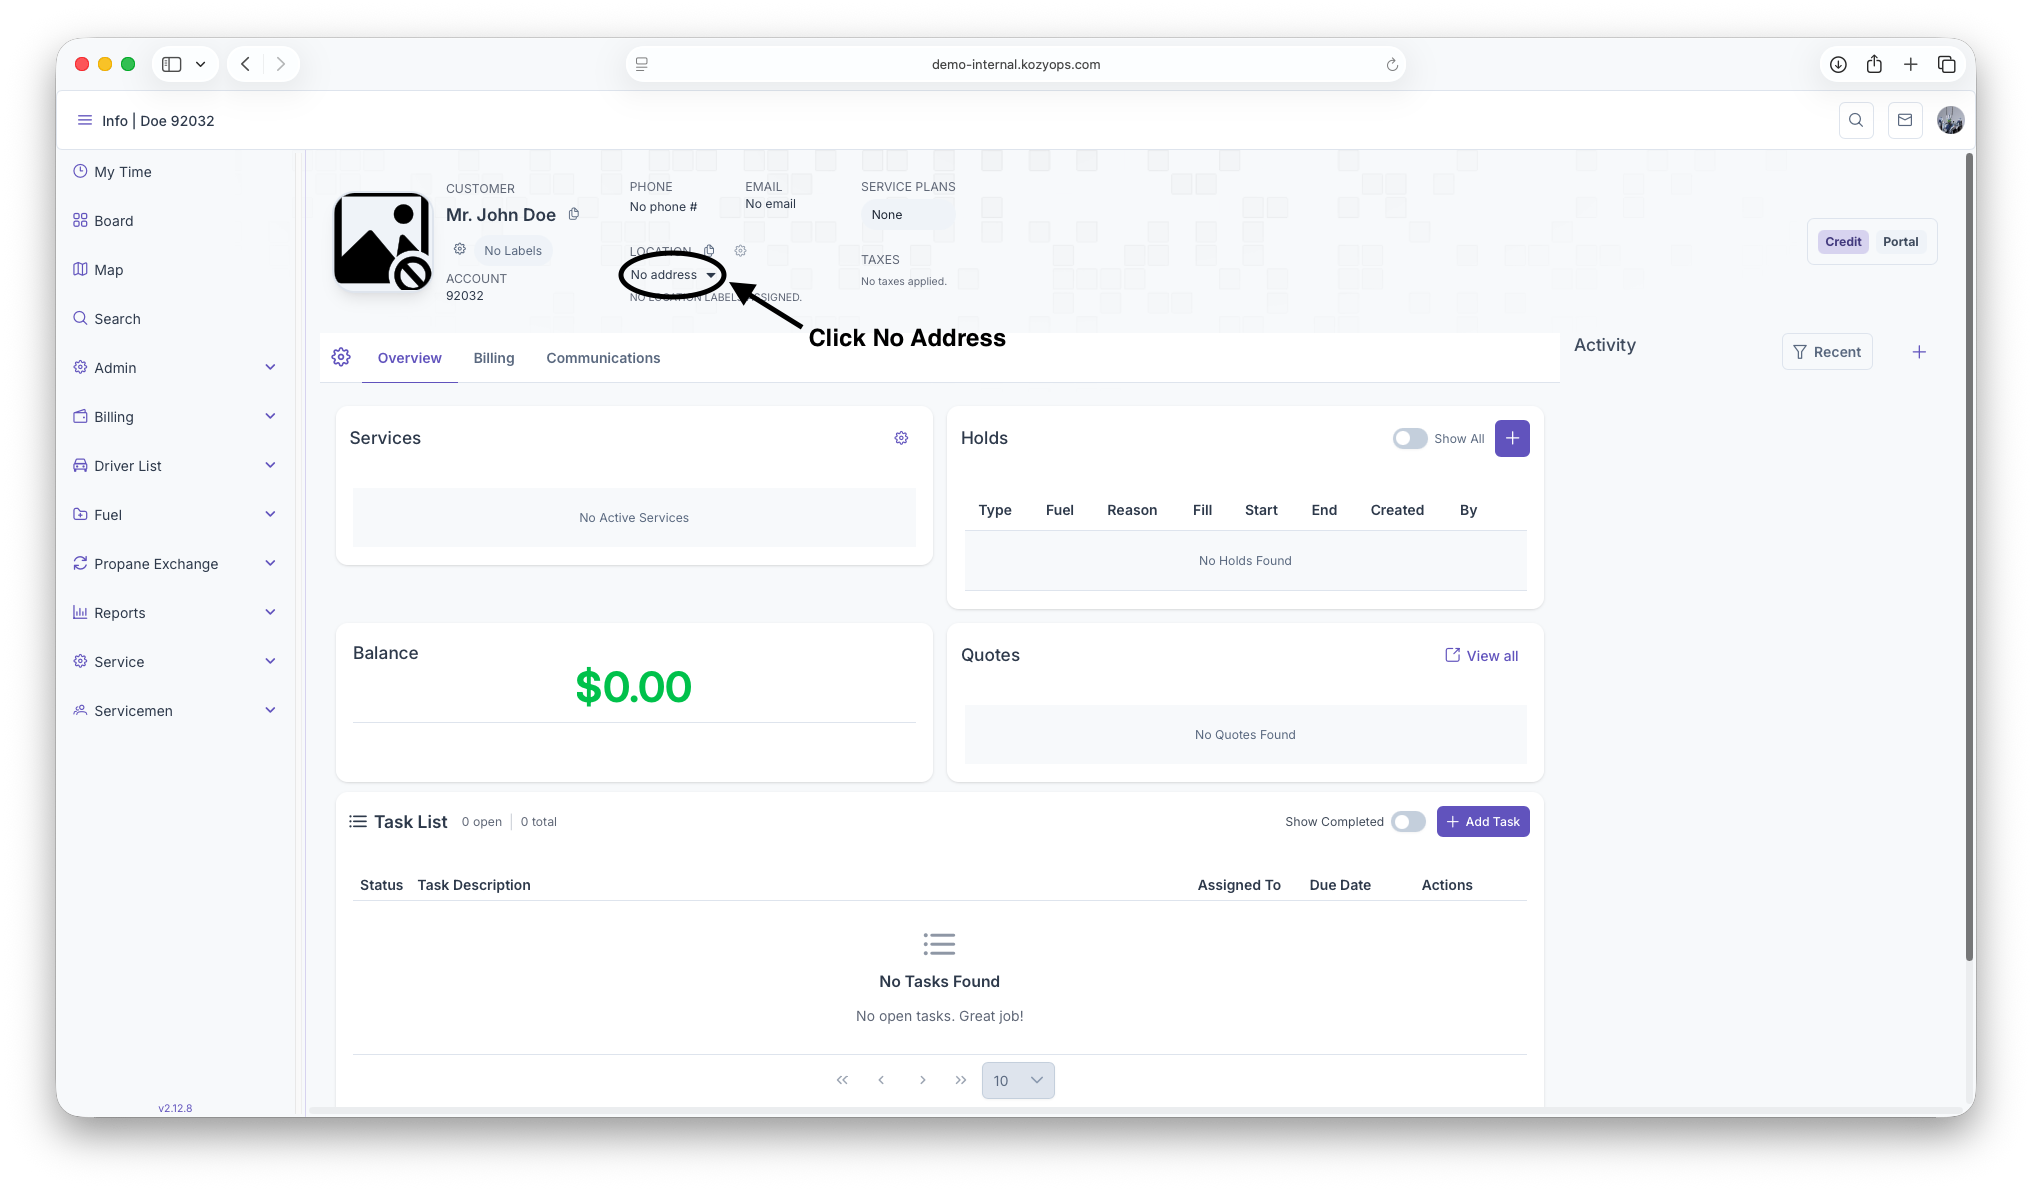
Location
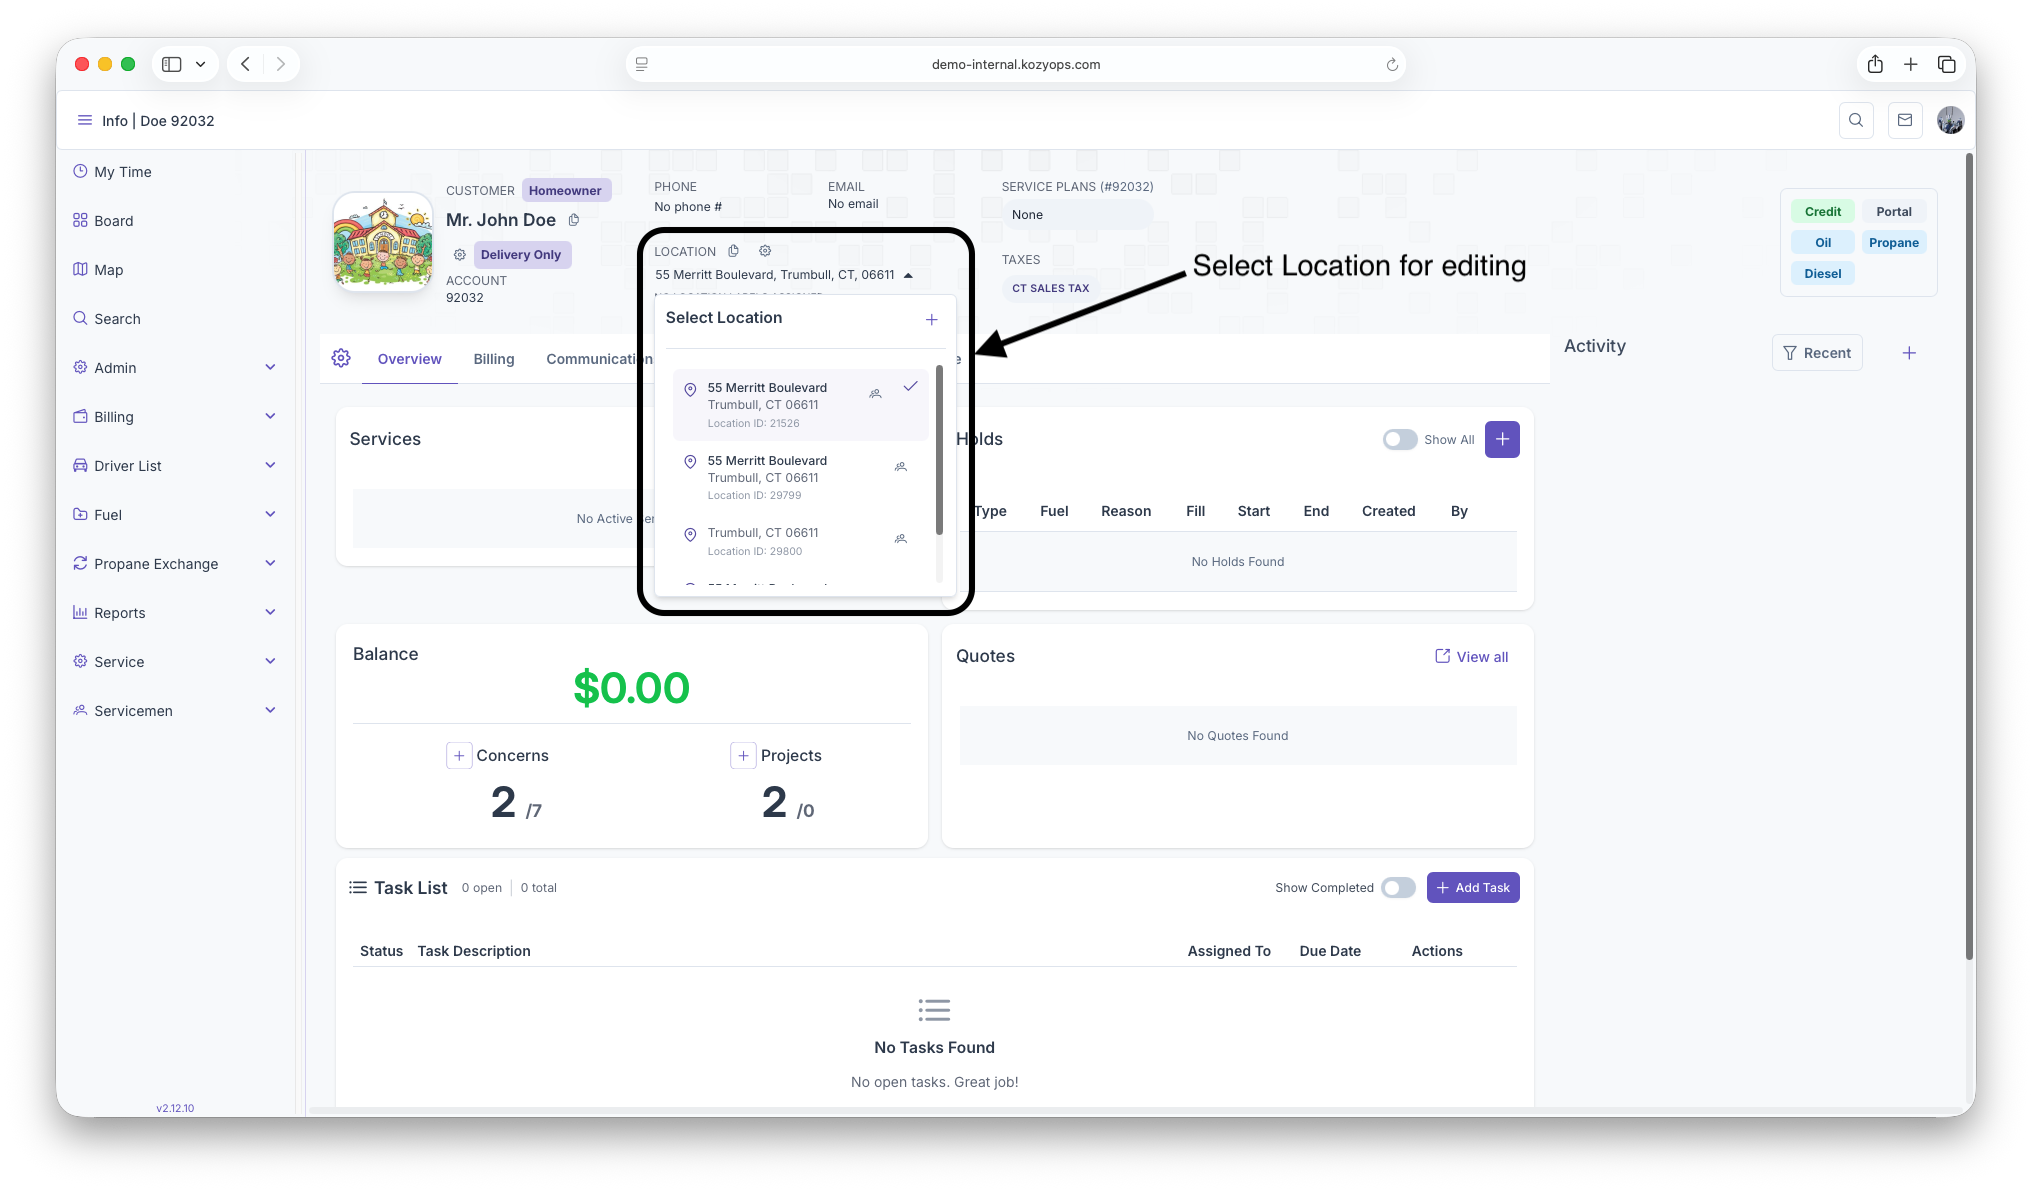
Here is where the customers location for any services will be shown. Customers can have more than one location tied to their accounts, but every locations has their own Service Plans and information attached to them. Clicking on the address and selecting a different one will change the information to display only what is tied to that location. Clicking on Location Management gives a more detailed look into Location
Taxes
This is where the State Taxes can be seen for the address. Every location will have it's own taxes based on locations and will vary by state.
Communication Board
The Communications board is for seeing and/or adding any notes on the customers account regarding any projects that are currently being done or simply if an invoice was sent to the customer.
- To add a note, click on the Add button on the middle right of the page.
- The Create new event page will pop up
- Fill out the Event Type and then write up the note
- Click on Save to add the note to the commincations board. Clicking on cancel will cancel out the popup and no note will be added
Notes can also be edited by clicking on the 3 dots next to the comment. Once clicked, the option to Pin, Edit and Delete will show up. Clicking on Pin will pin the comment to the top of the message board for prioritizing any urgent notes and clicking on delete will delete the selected comment. Clicking on Edit will allow for a comment to be edited
- Click on Edit
- The Modify event page will popup, this looks like the Add Event page with all fields filled out
- After adjusting any information, clicking on Update will update the note, clicking on cancel will close out the popup and delete any updates made to the note
Editing Account
By clicking on the gear under the customers profile picture, the edit account page will pop up, from here basics edits to the costumers account can be made.
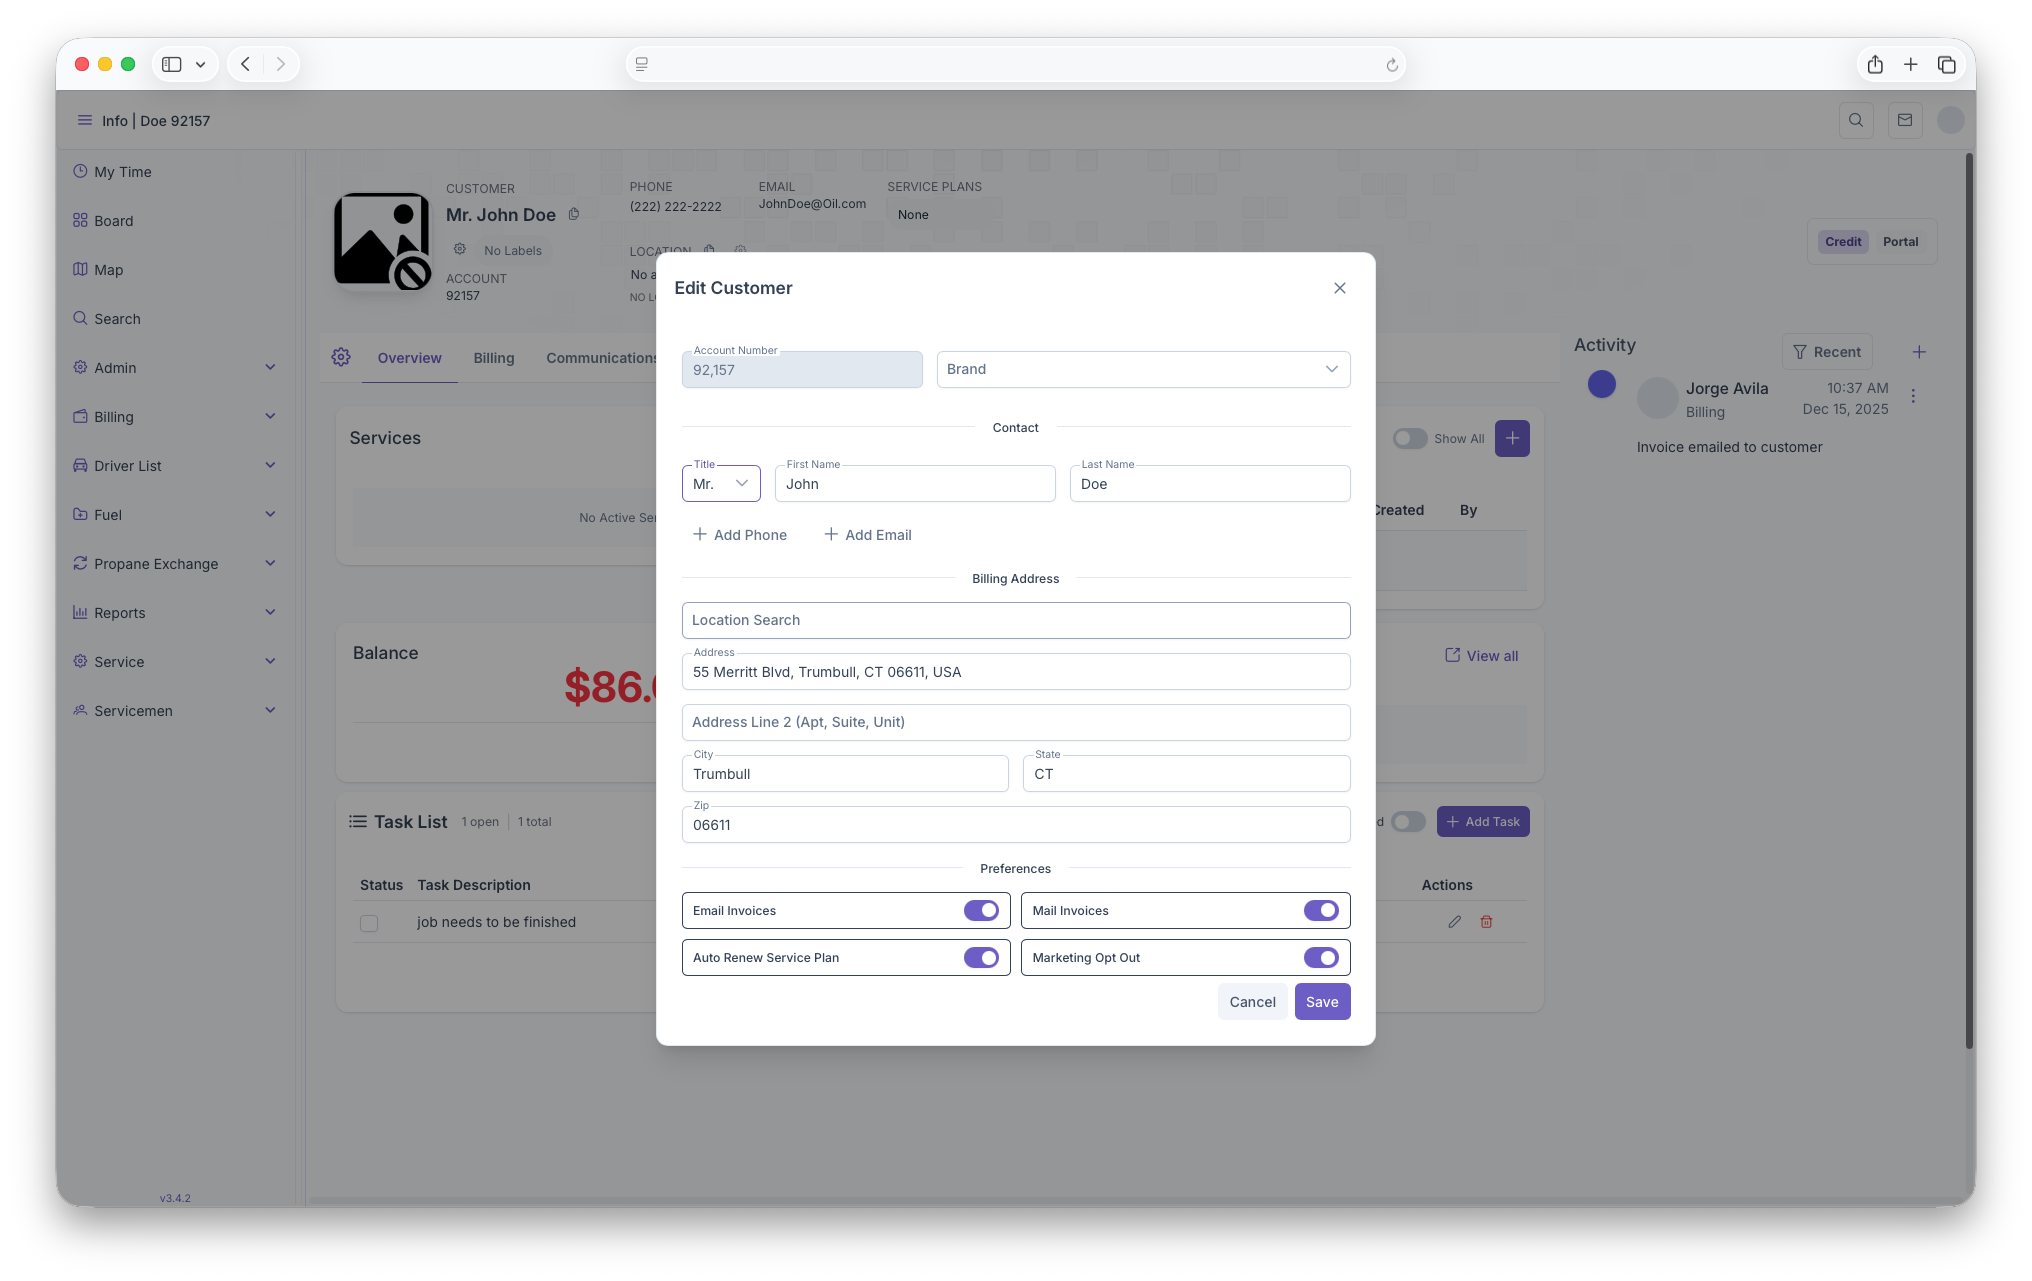
- Brand - Here the branding information for this account can be edited
- Contact - Contact information can be edited here, their Title, First Name, Last Name. Phone Numbers and Emails can also be added here by clicking on Add Phone and Add Email
- Billing Addres - Here a location search can be done, but if not, basic information on the customers address can be done here. Address, City, State and Zip
- Preferences - Here the customers preferences can be set, whether they want their invoices to be emailed or mailed to them, if they want to Auto Renew their Serviece Plan and if they want to opt in or out of any Marketing.
Once finished, clicking on the save button will save any edited information on to the customers account, clicking on cancel will close out the window and any information that was edited will be deleted
Location Management
Overview
This guide explains how to create and edit service locations for customers in the Kozy system.
Locations represent physical addresses where services are performed. Each location can be linked to multiple customers with different relationship types (homeowner, tenant, etc.). The location management system includes:
- Google Places integration for accurate address lookup
- Interactive map with draggable markers for precise coordinates
- Existing location detection to prevent duplicates
- Full address editing capabilities
Creating a New Location
Step 1: Open the Add Location Dialog
- Navigate to the customer's profile
- Click the "Add Location" button in the locations section


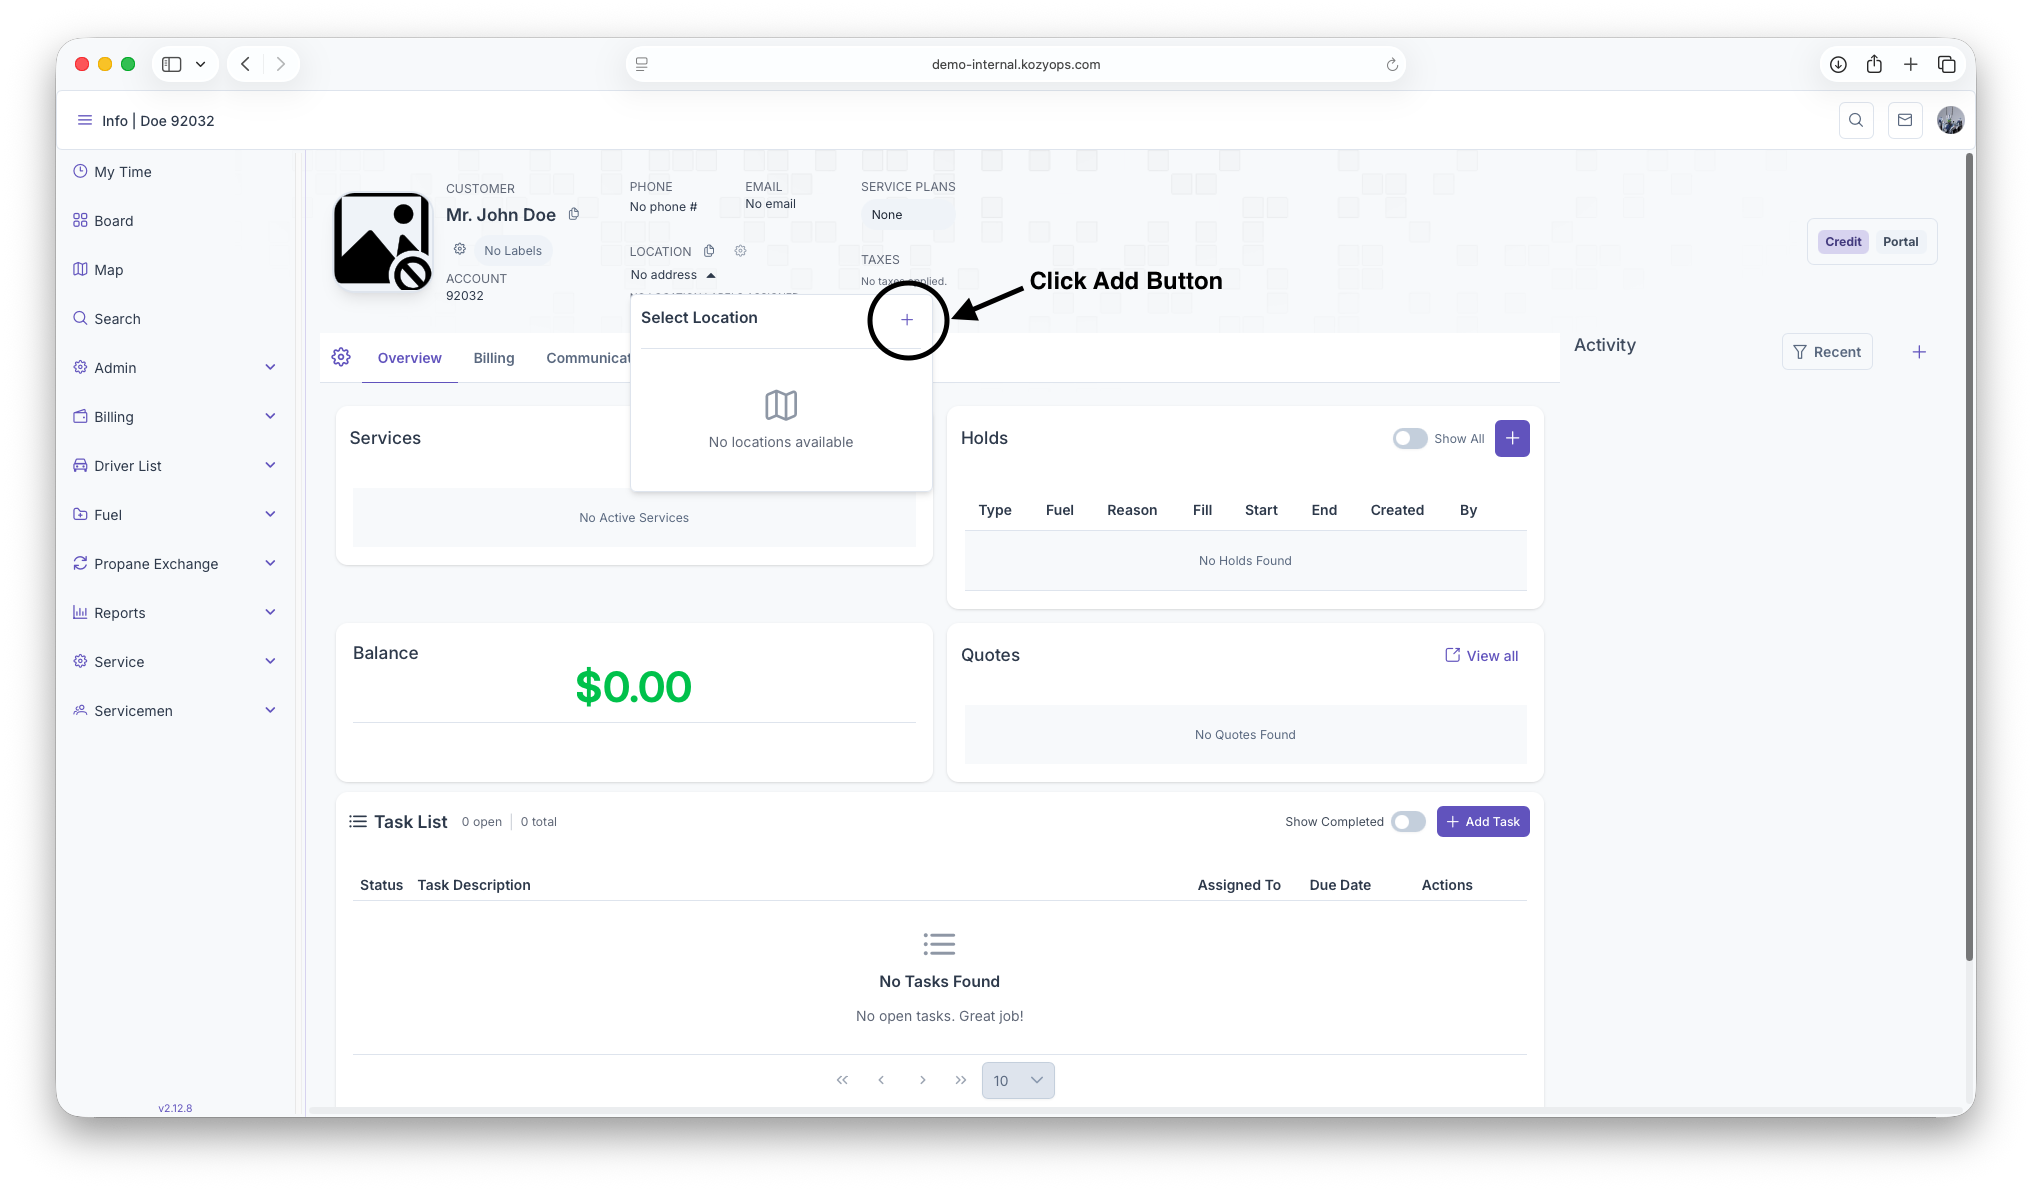
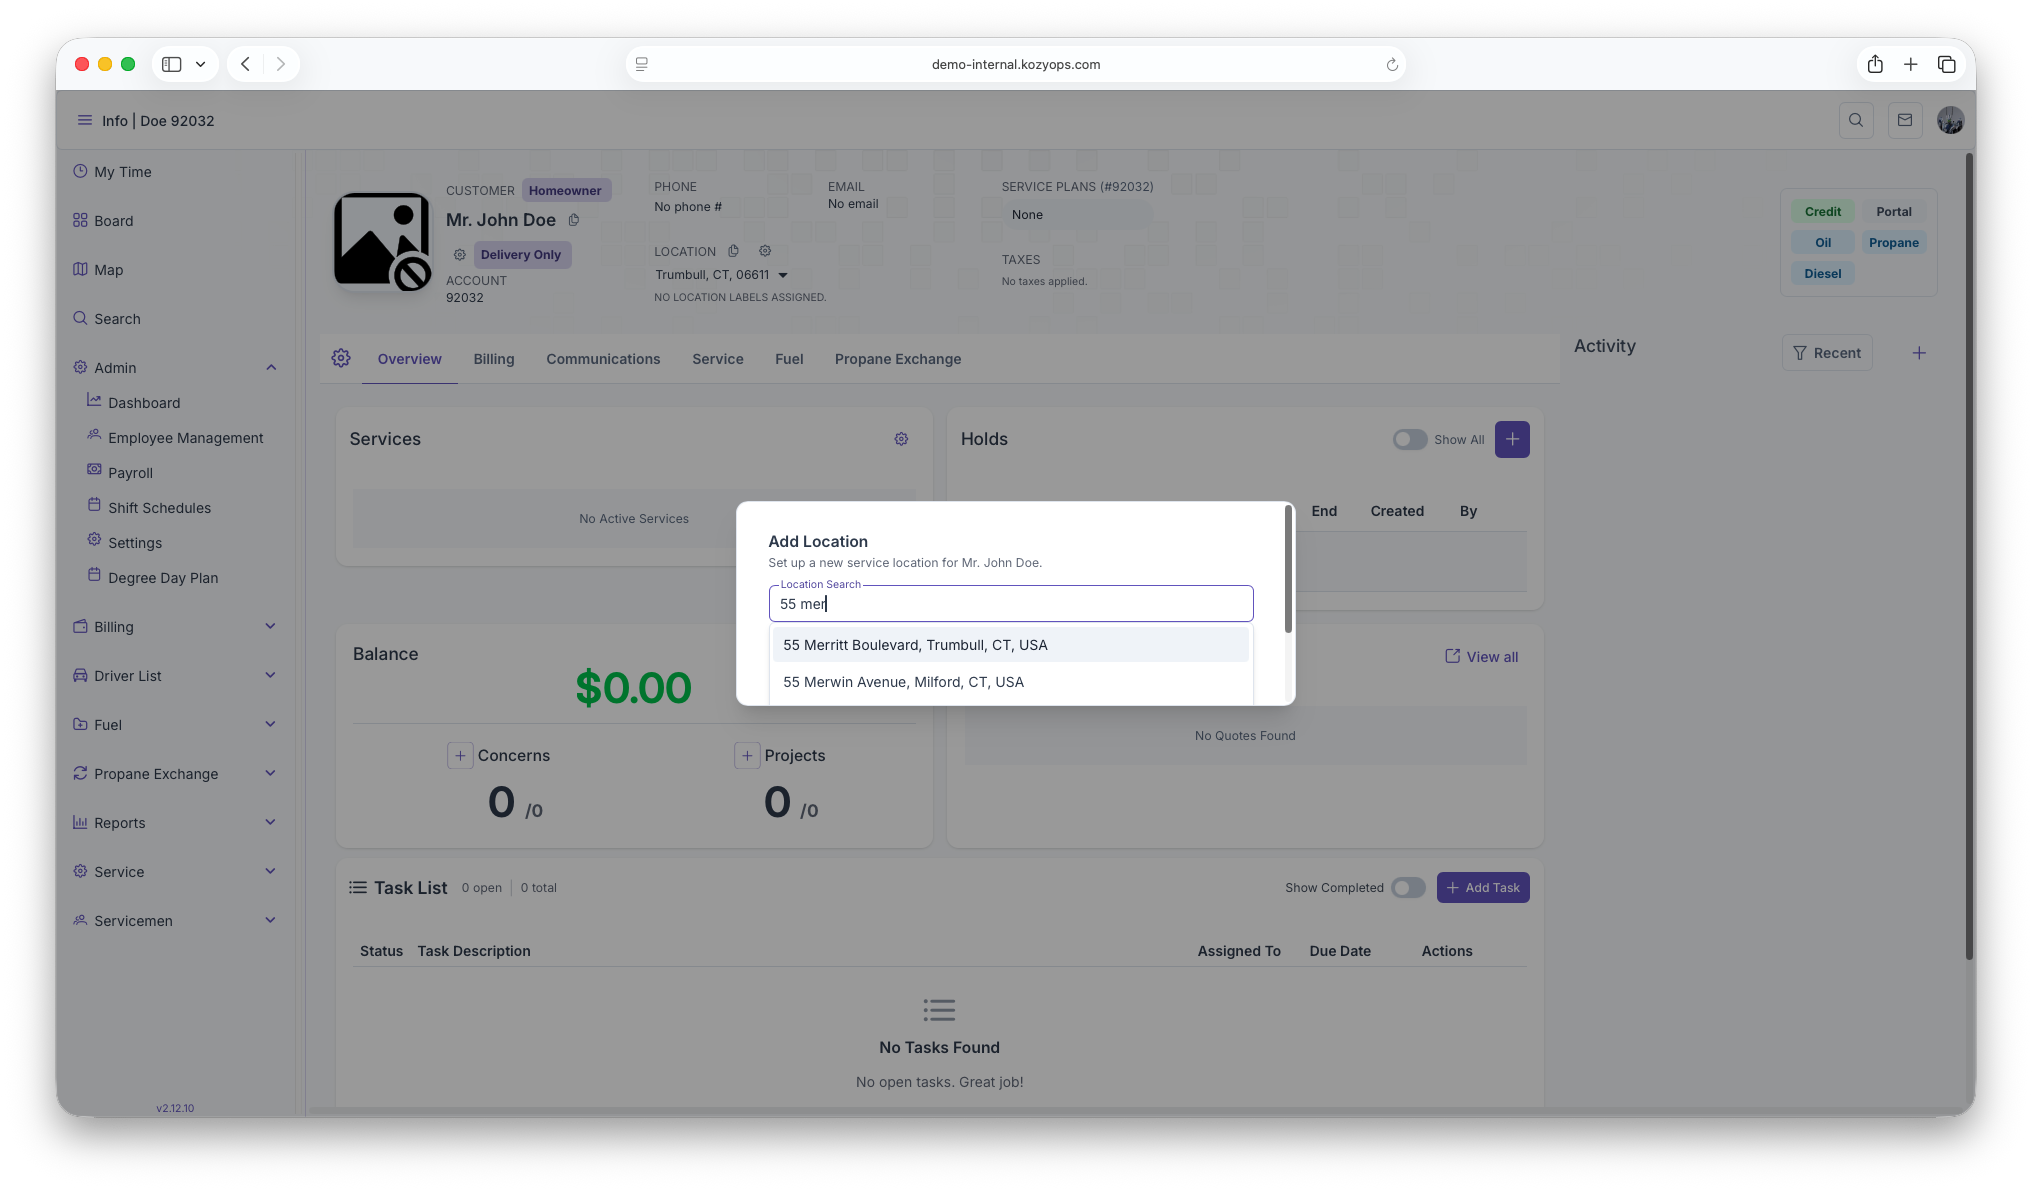
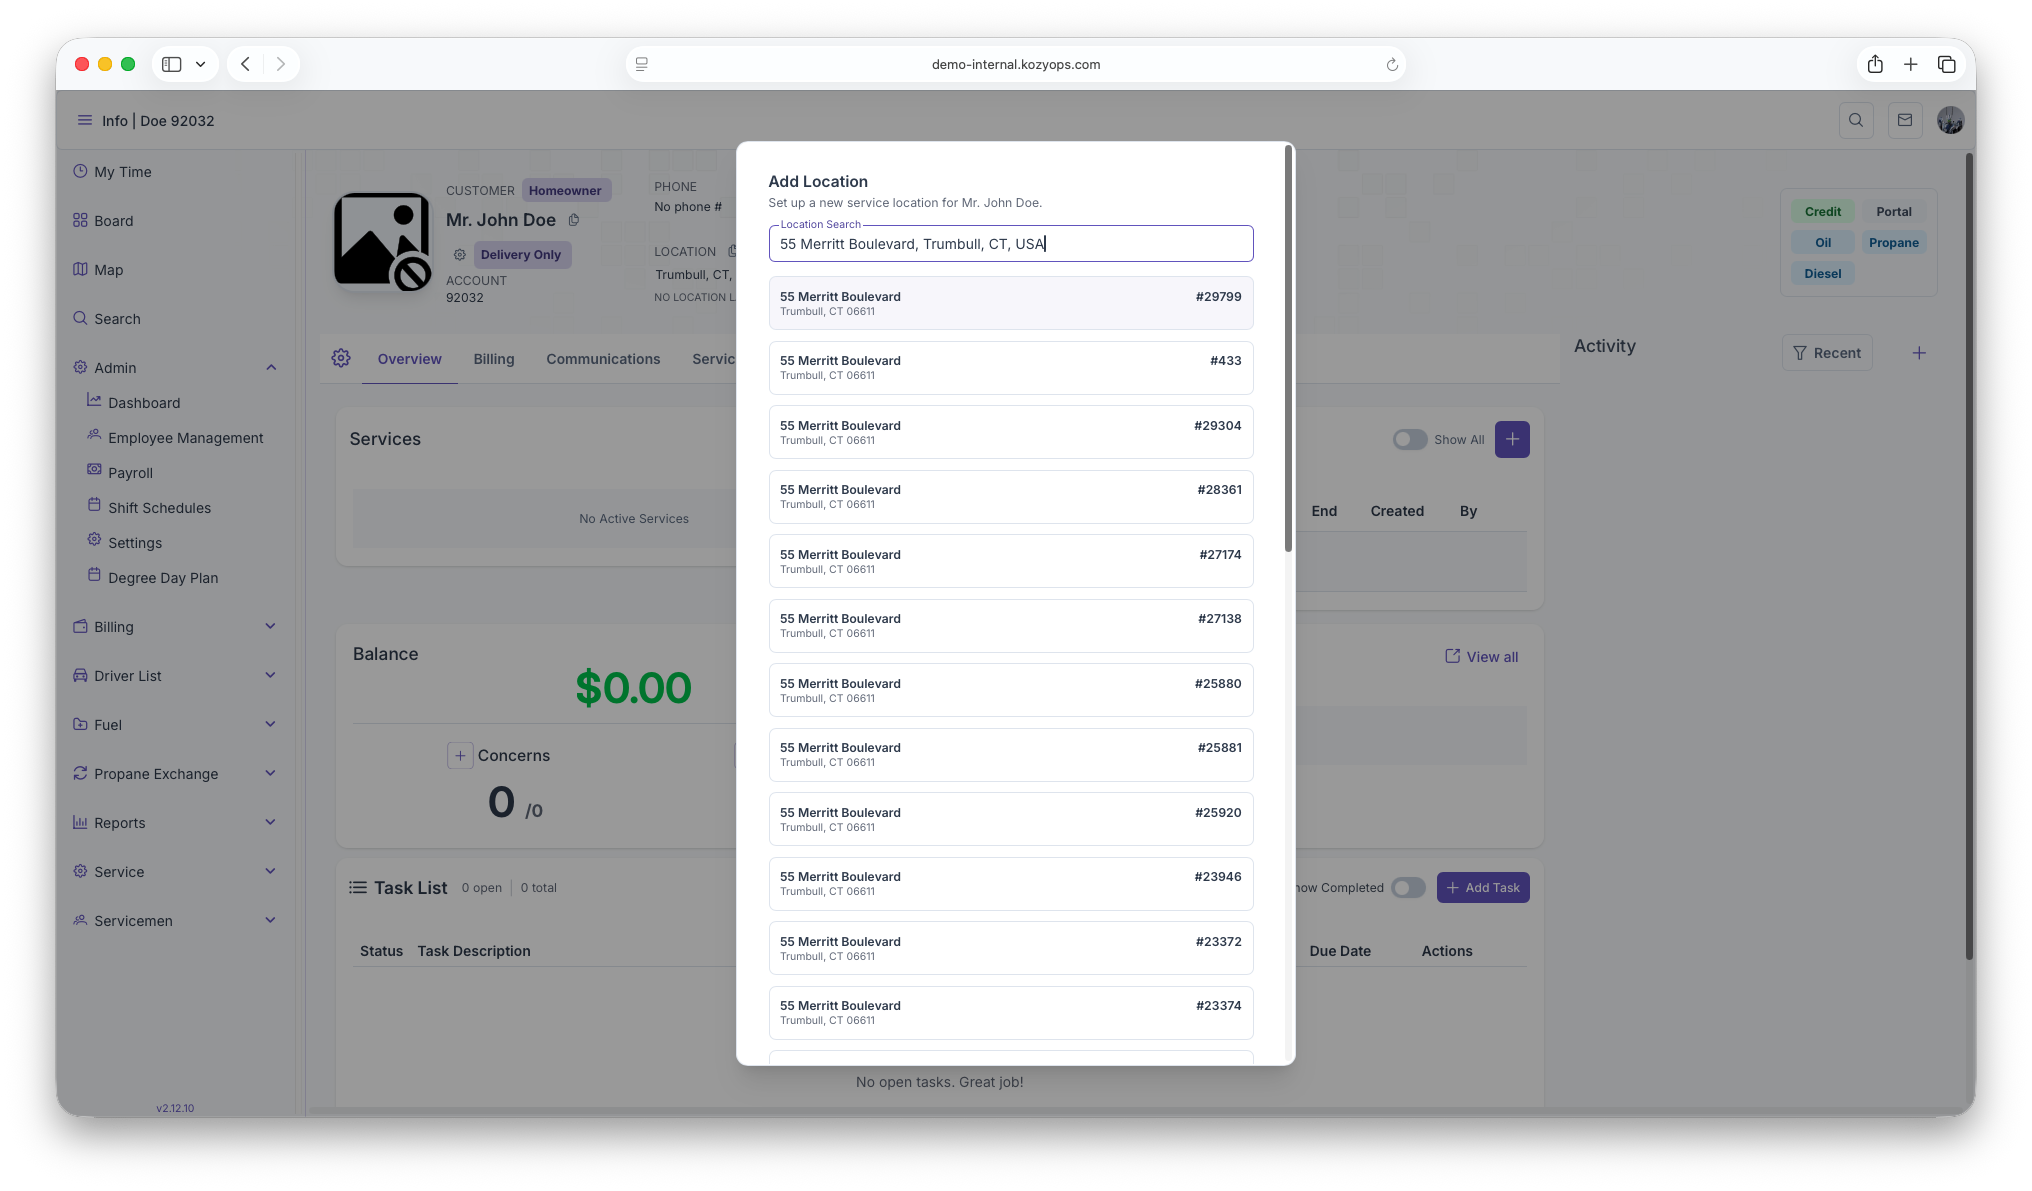
Step 2: Search for an Address
-
Type the address in the Google Places search field

-
Select the correct address from the autocomplete dropdown

-
The system will automatically:
- Parse the address into components (street, city, state, ZIP)
- Retrieve GPS coordinates (latitude/longitude)
- Search for existing matching locations


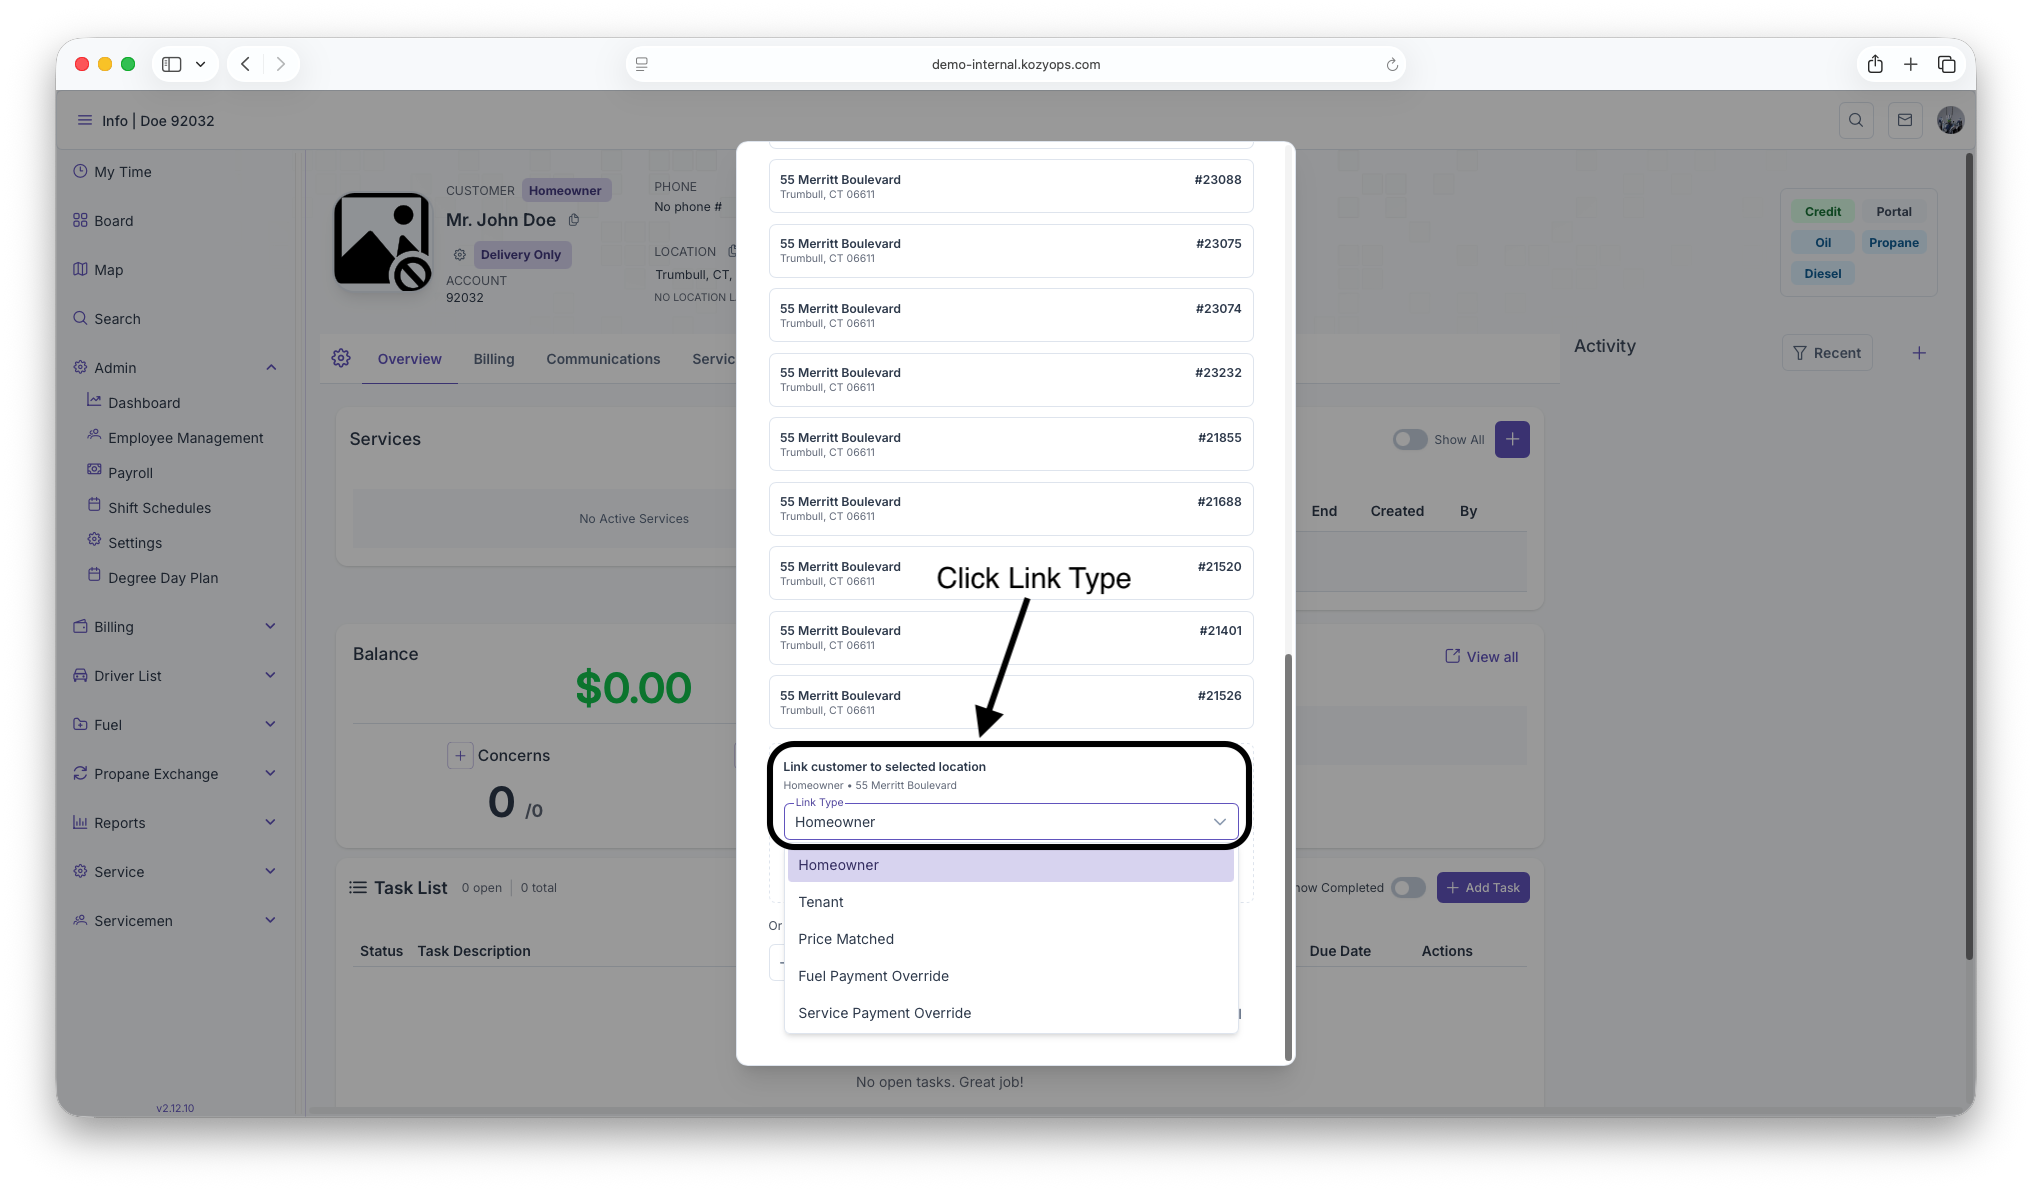
Step 3: Link to Existing Location (if found)
If the system finds matching locations in the database:
-
Review the matches displayed in the
-
Select the correct location (if applicable)
-
Choose the relationship type:
- Homeowner
- Tenant
- Price Matched
- Fuel Payment Override
- Service Payment Override

-
Click "Link Customer"

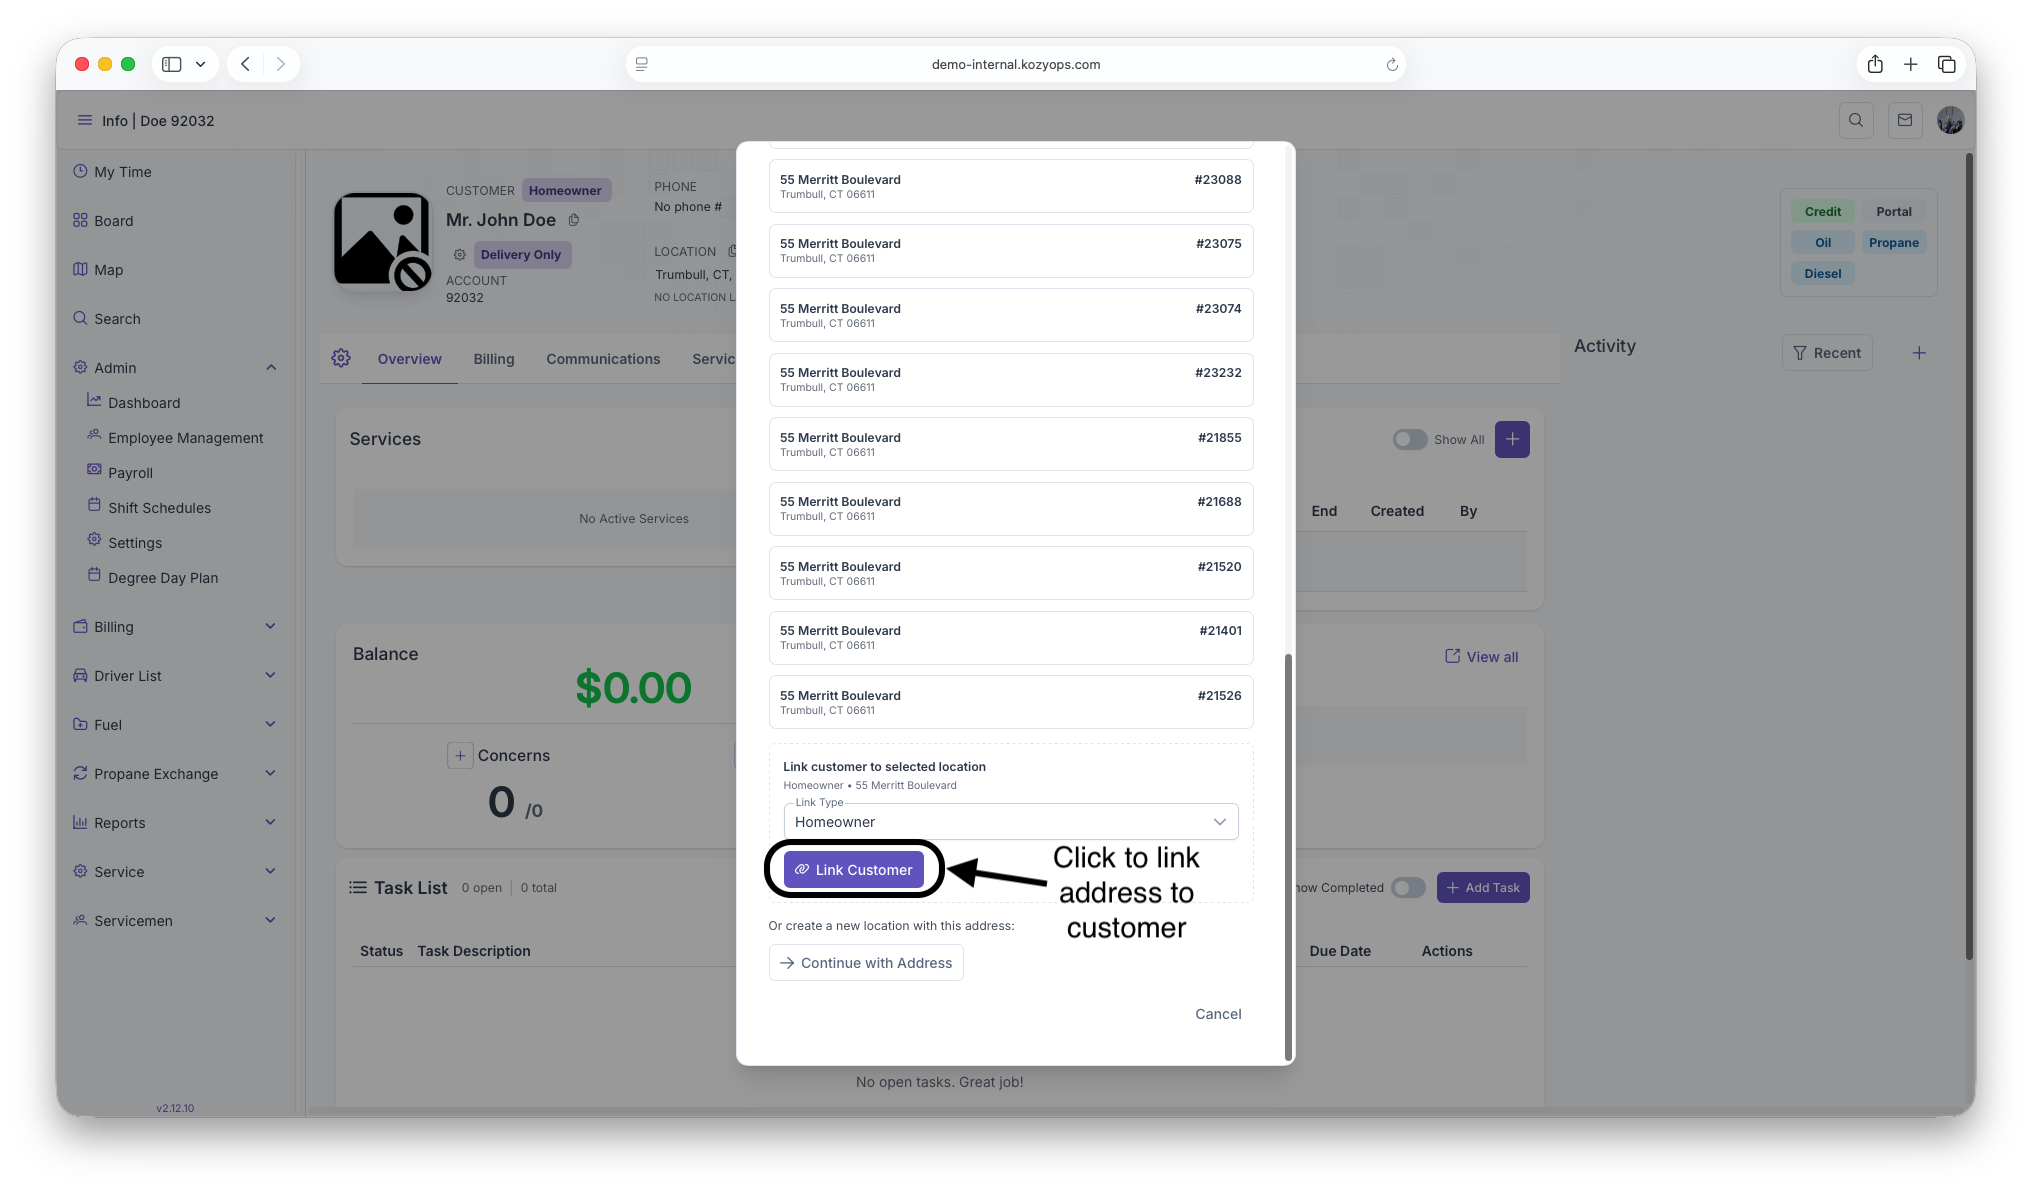
Note: Linking to an existing location maintains data consistency and prevents duplicate addresses in the system.
Step 4: Create a New Location (if no matches)
If no existing locations are found, or the matches are incorrect:
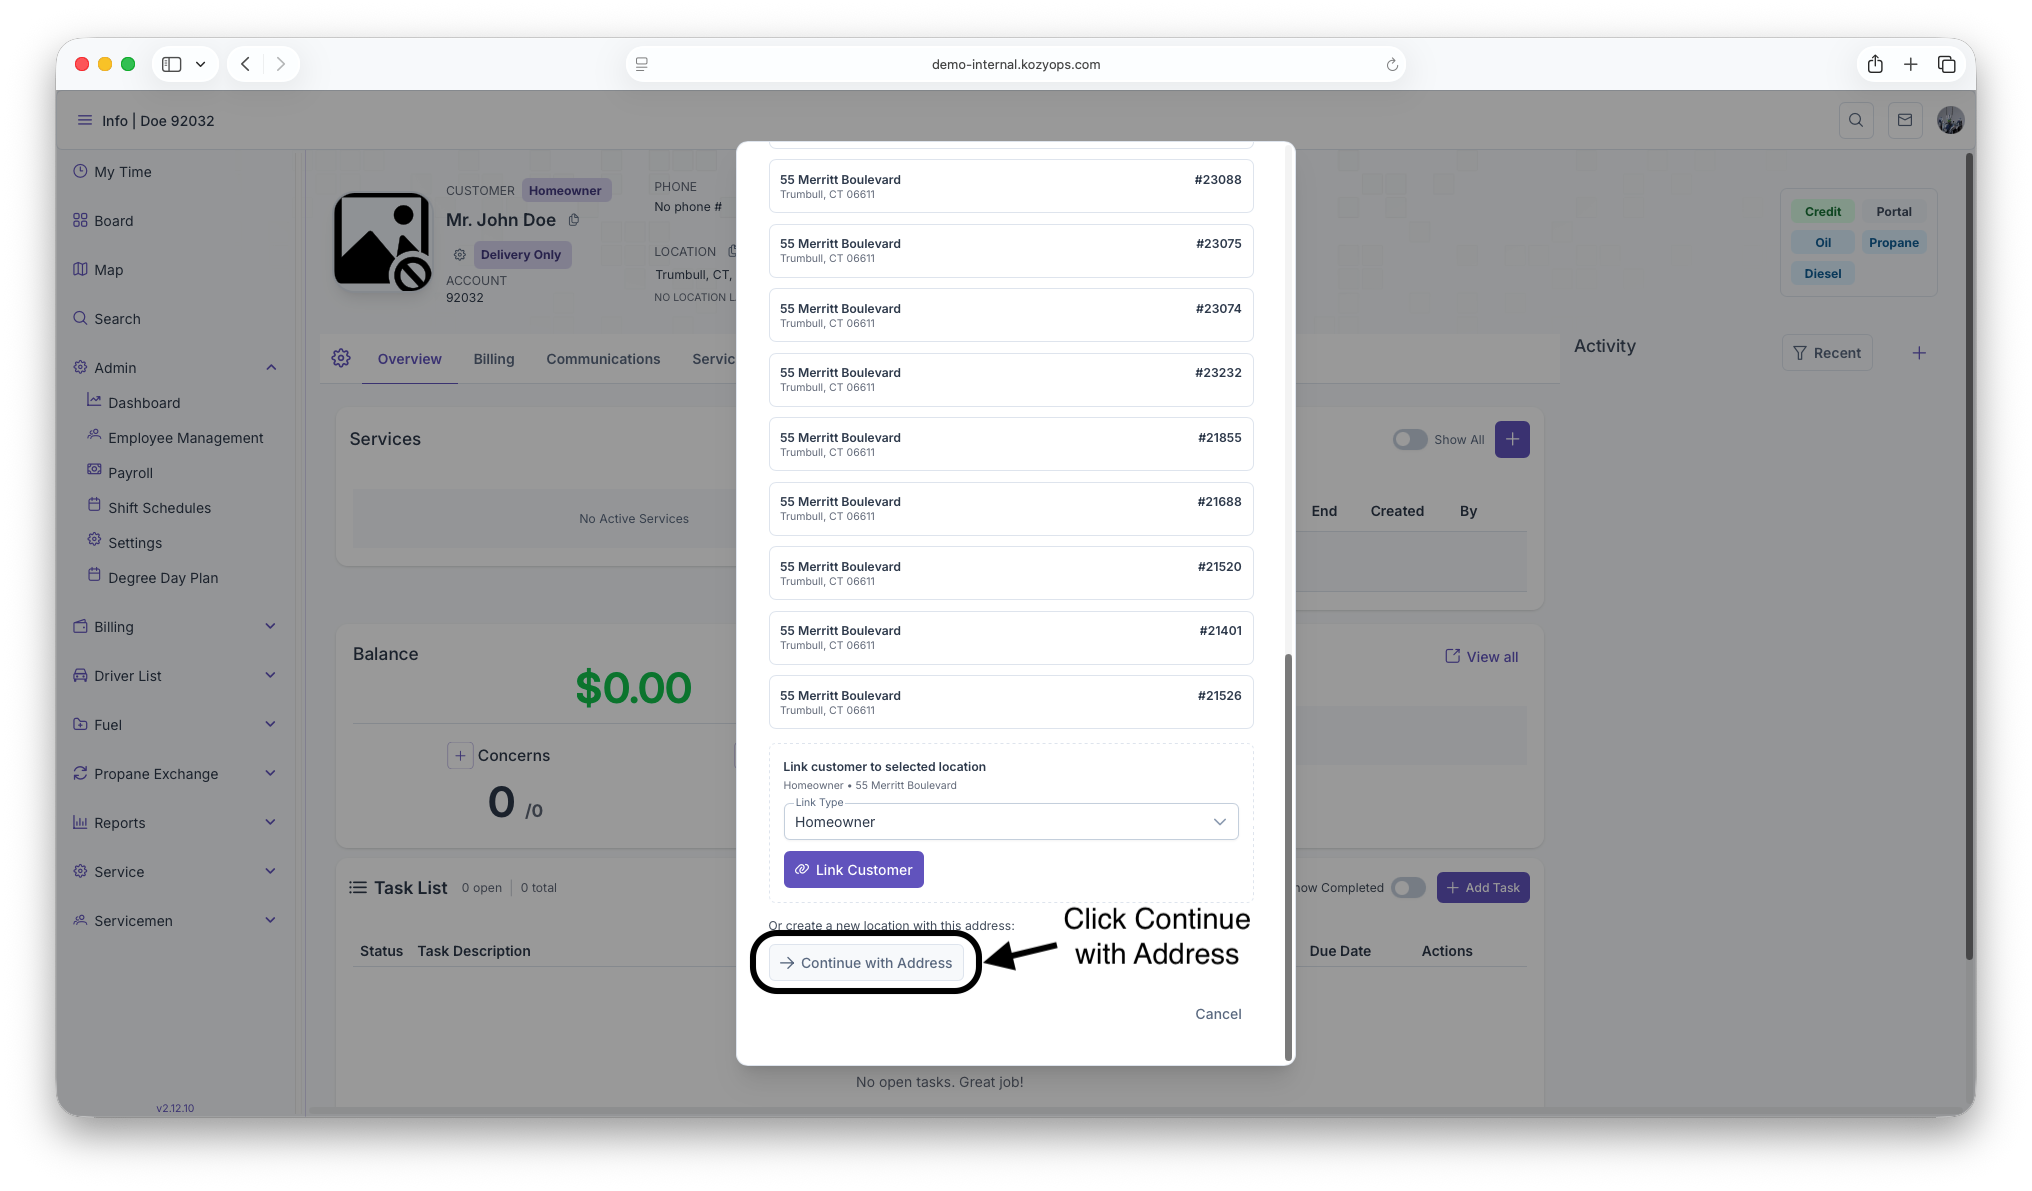
- Click "Continue with Address"
- The Edit Address Details form will appear
Step 5: Edit Address Details
The form displays all address components with the following fields:
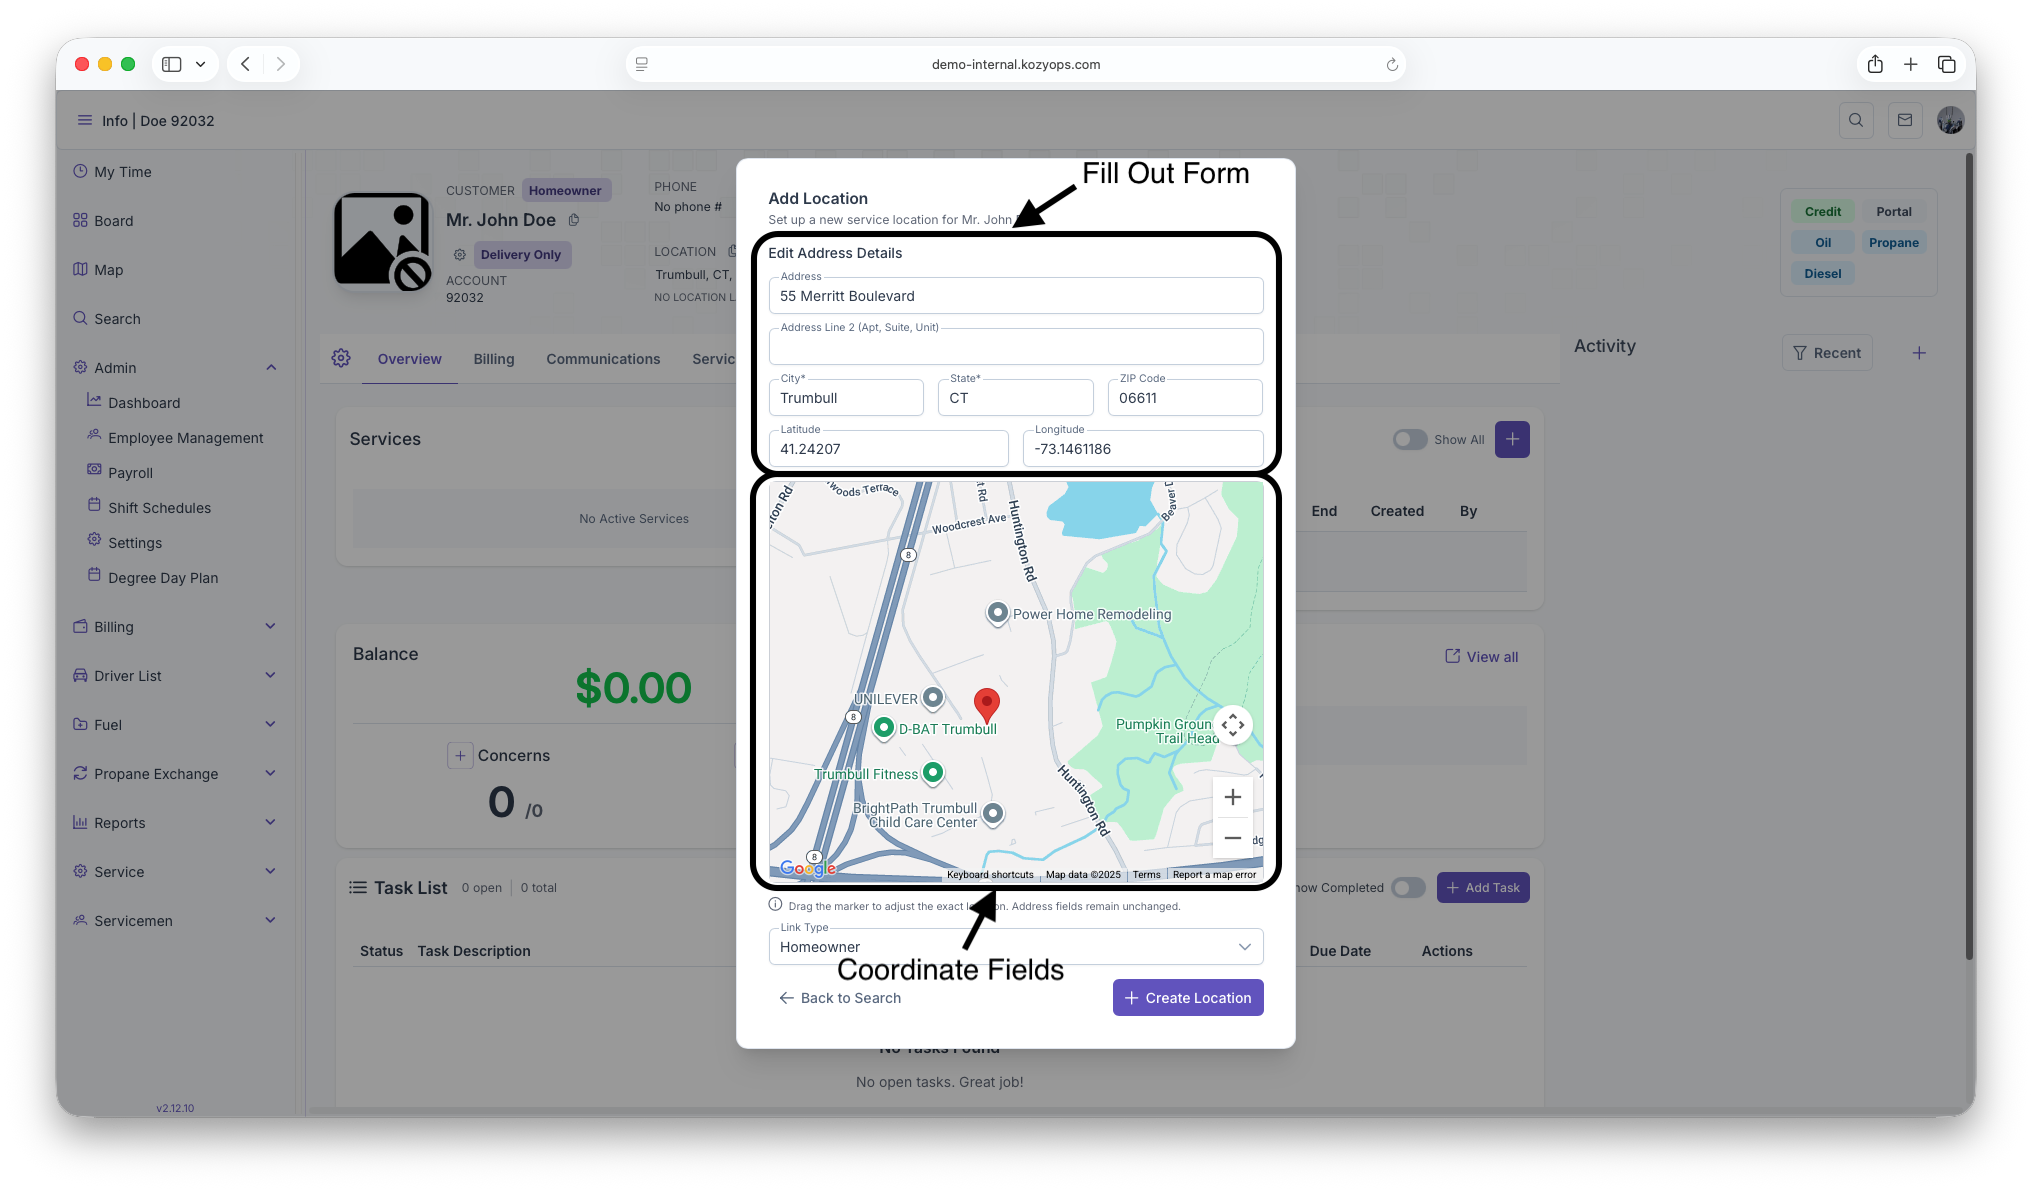
Address Fields:
- Street Number (e.g., "123")
- Street* (required, e.g., "Main St")
- City* (required, e.g., "Springfield")
- State* (required, e.g., "MA")
- ZIP Code (e.g., "01101")
Coordinate Fields (read-only):
- Latitude (displayed with 8 decimal precision)
- Longitude (displayed with 8 decimal precision)
Required fields are marked with an asterisk (*).
Step 6: Adjust Location on Map
An interactive Google Map displays below the form:

- View the marker at the initial coordinates from Google Places
- Drag the red marker to adjust the exact location
- This is useful when the address pin is slightly off
- Only the coordinates update—address fields remain unchanged
- Use zoom controls to get a better view
Tip: Accurate coordinates are important for route planning and service dispatch.
Step 7: Select Relationship Type
Choose how this location relates to the customer:
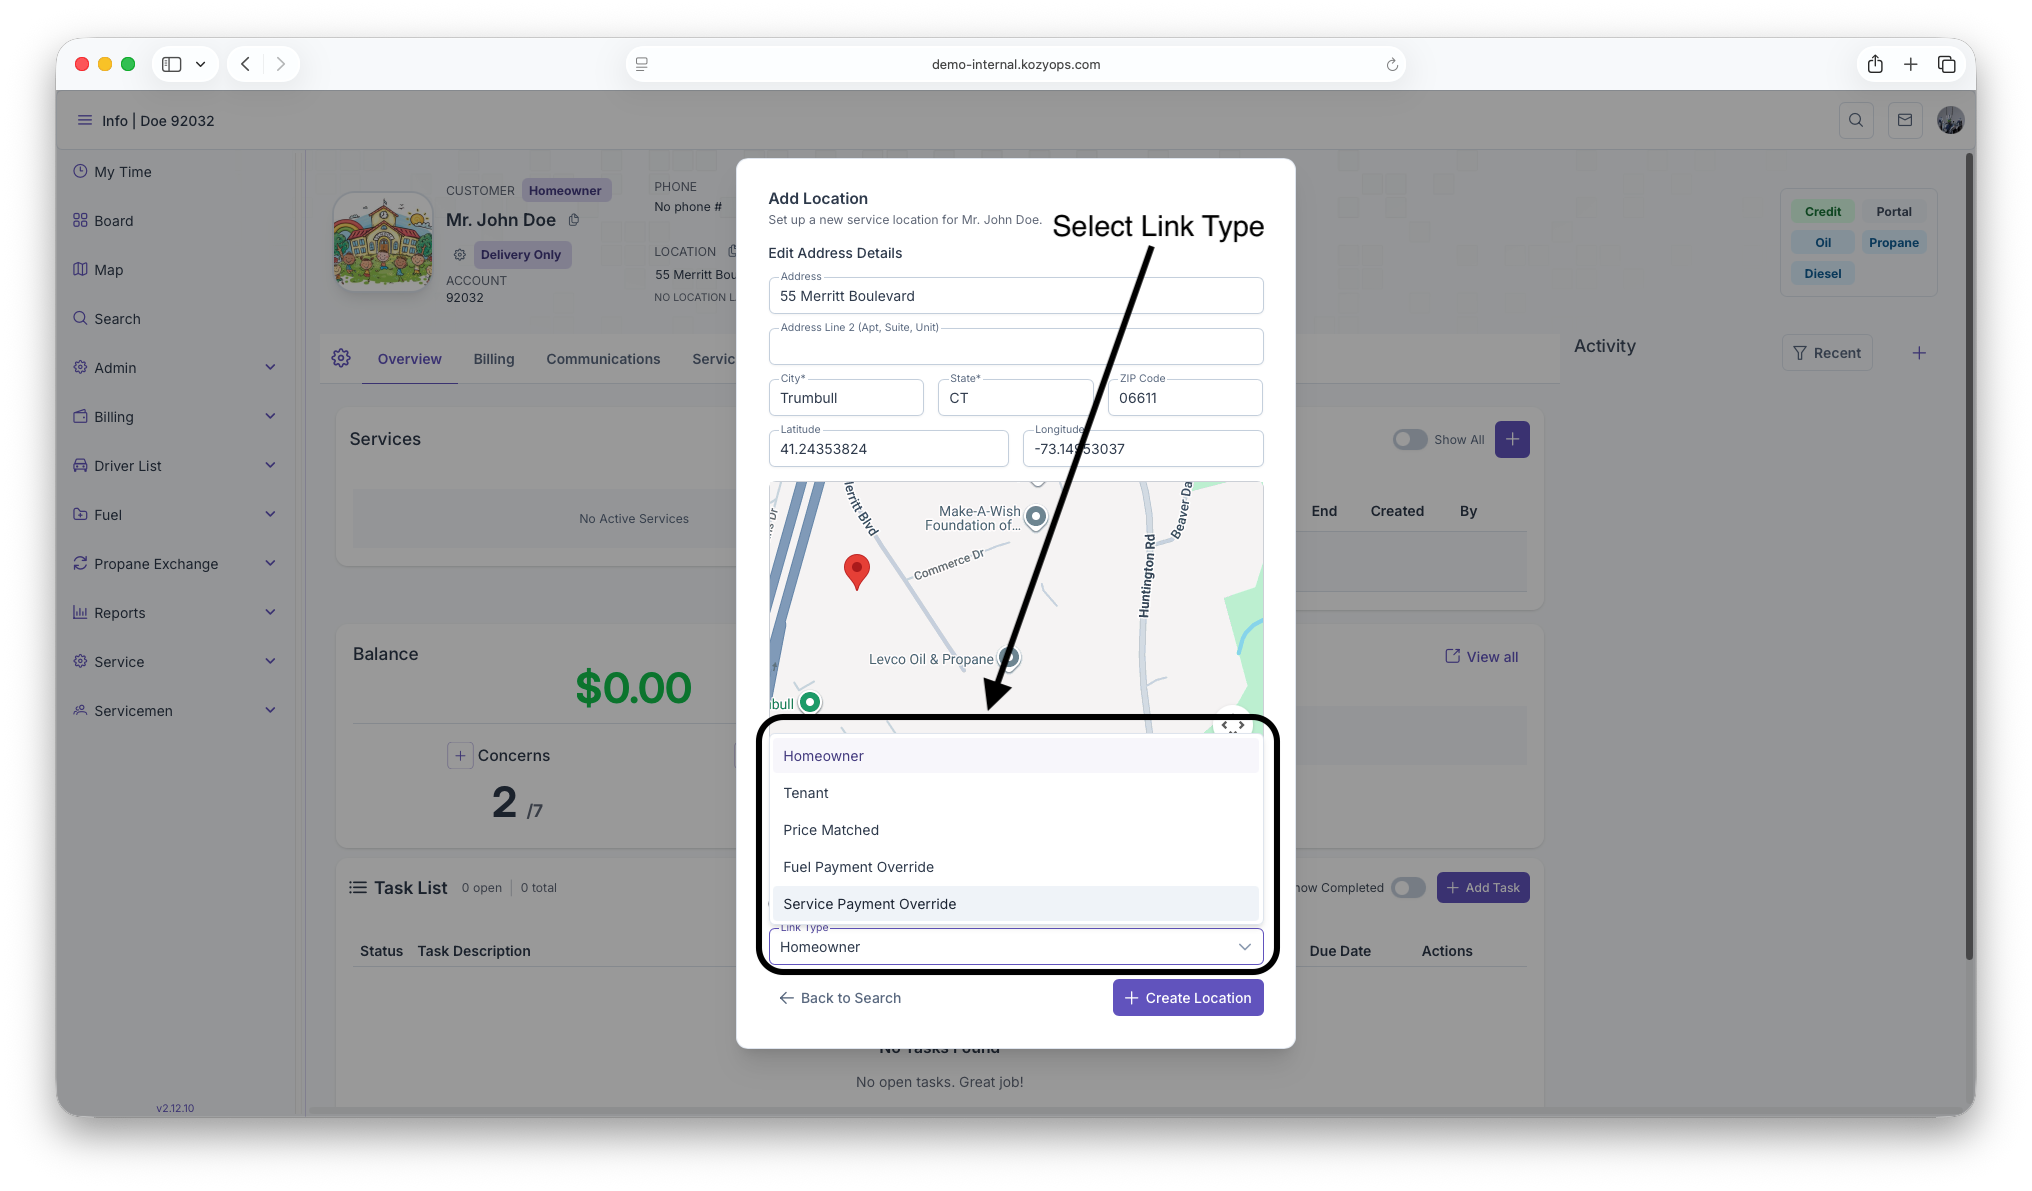
- Homeowner - Customer owns the property
- Tenant - Customer rents/leases the property
- Price Matched - Uses customer's pricing for this location
- Fuel Payment Override - Custom fuel payment settings
- Service Payment Override - Custom service payment settings
Step 8: Create the Location
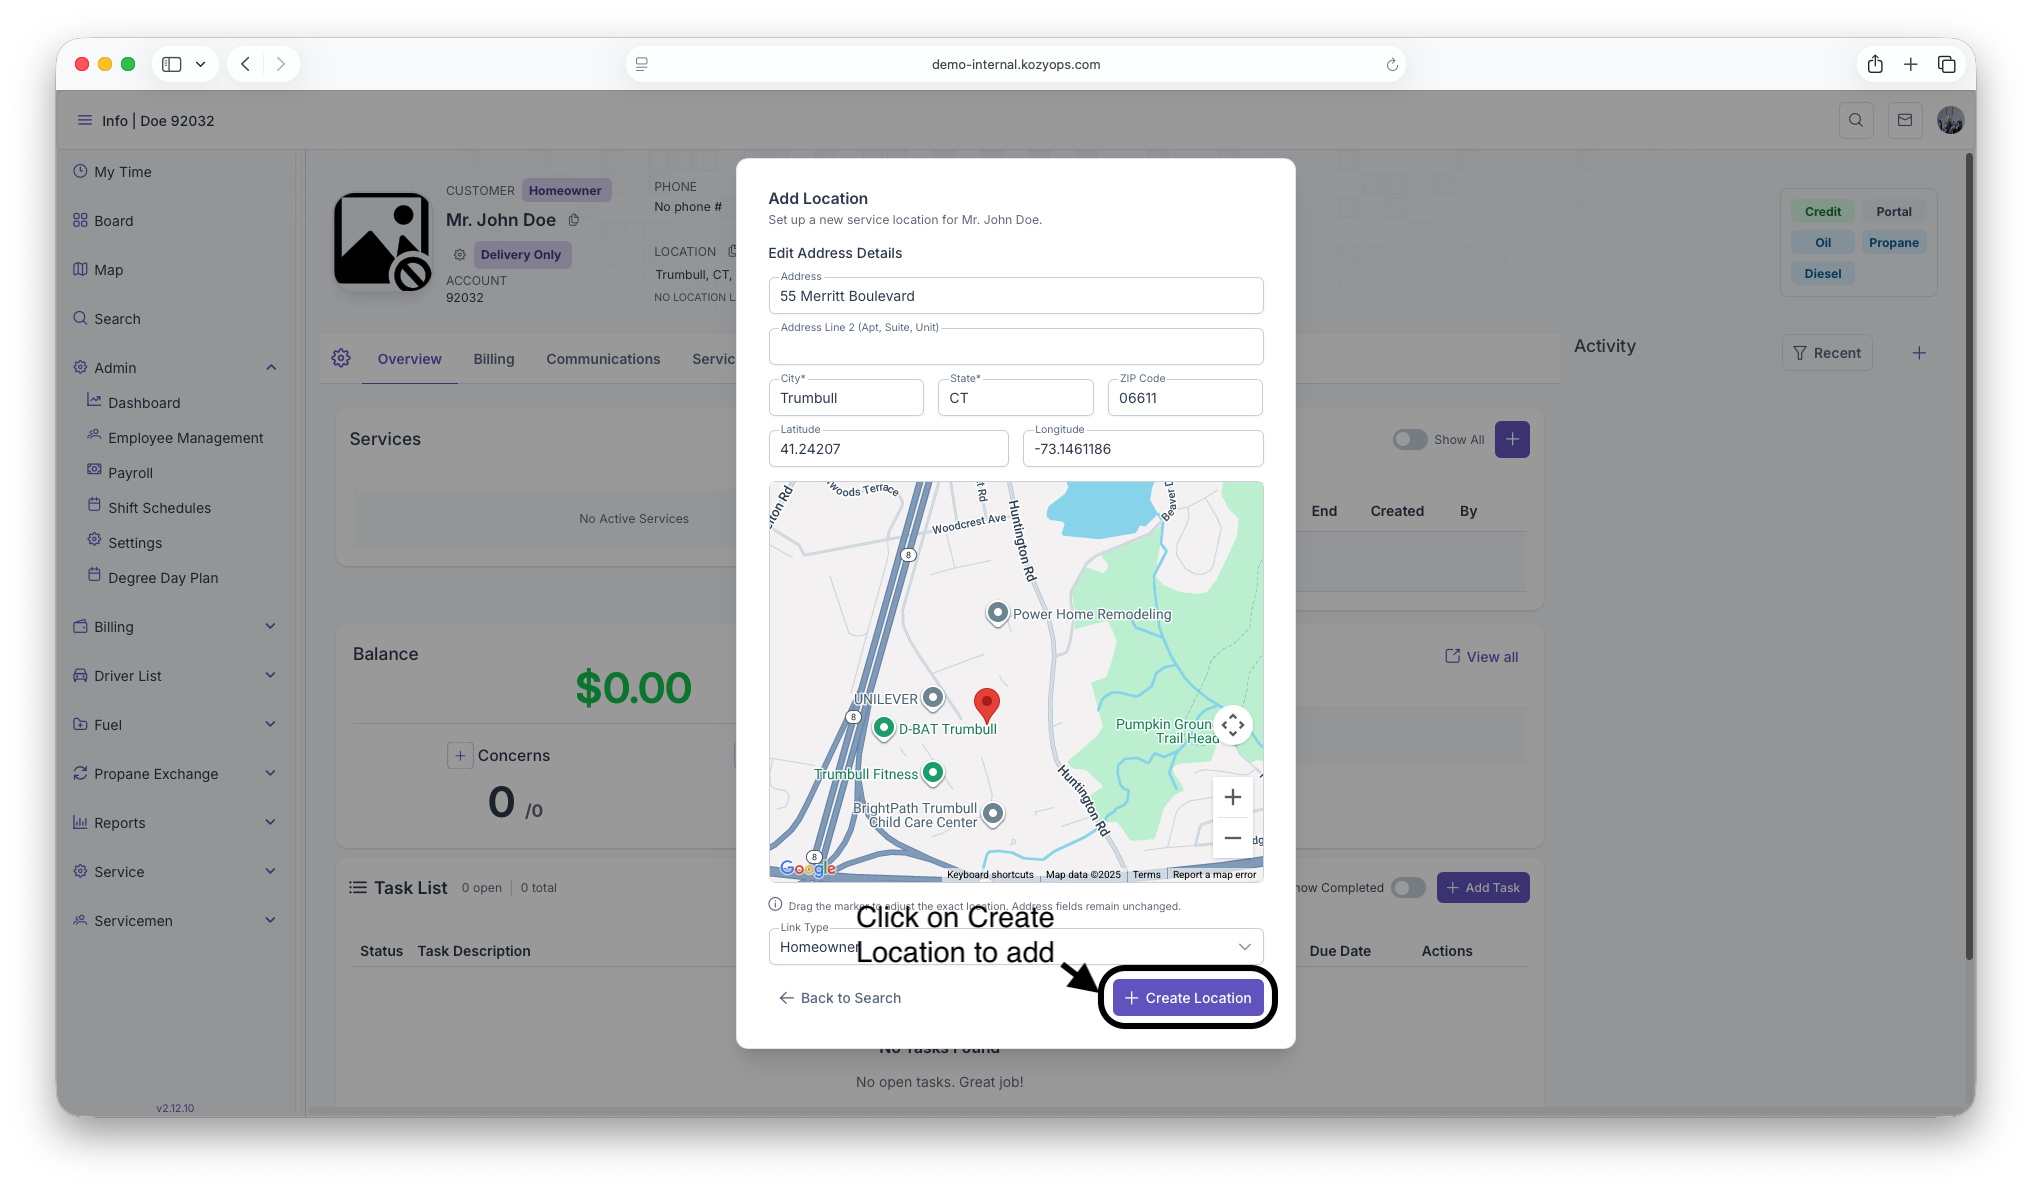
- Review all address details and coordinates
- Click "Create Location"
- The system will:
- Create the new location in the database
- Link it to the customer with the selected relationship type
- Close the dialog
- Refresh the customer's location list
Canceling
-
Click "Back to Search" to return to the address search

-
Click "Cancel" to close the dialog without saving


Editing an Existing Location
Step 1: Open Location Settings
-
Navigate to the customer's profile

-
Find the location you want to edit

-
Click the settings/gear icon next to the location

-
The Location Settings dialog opens


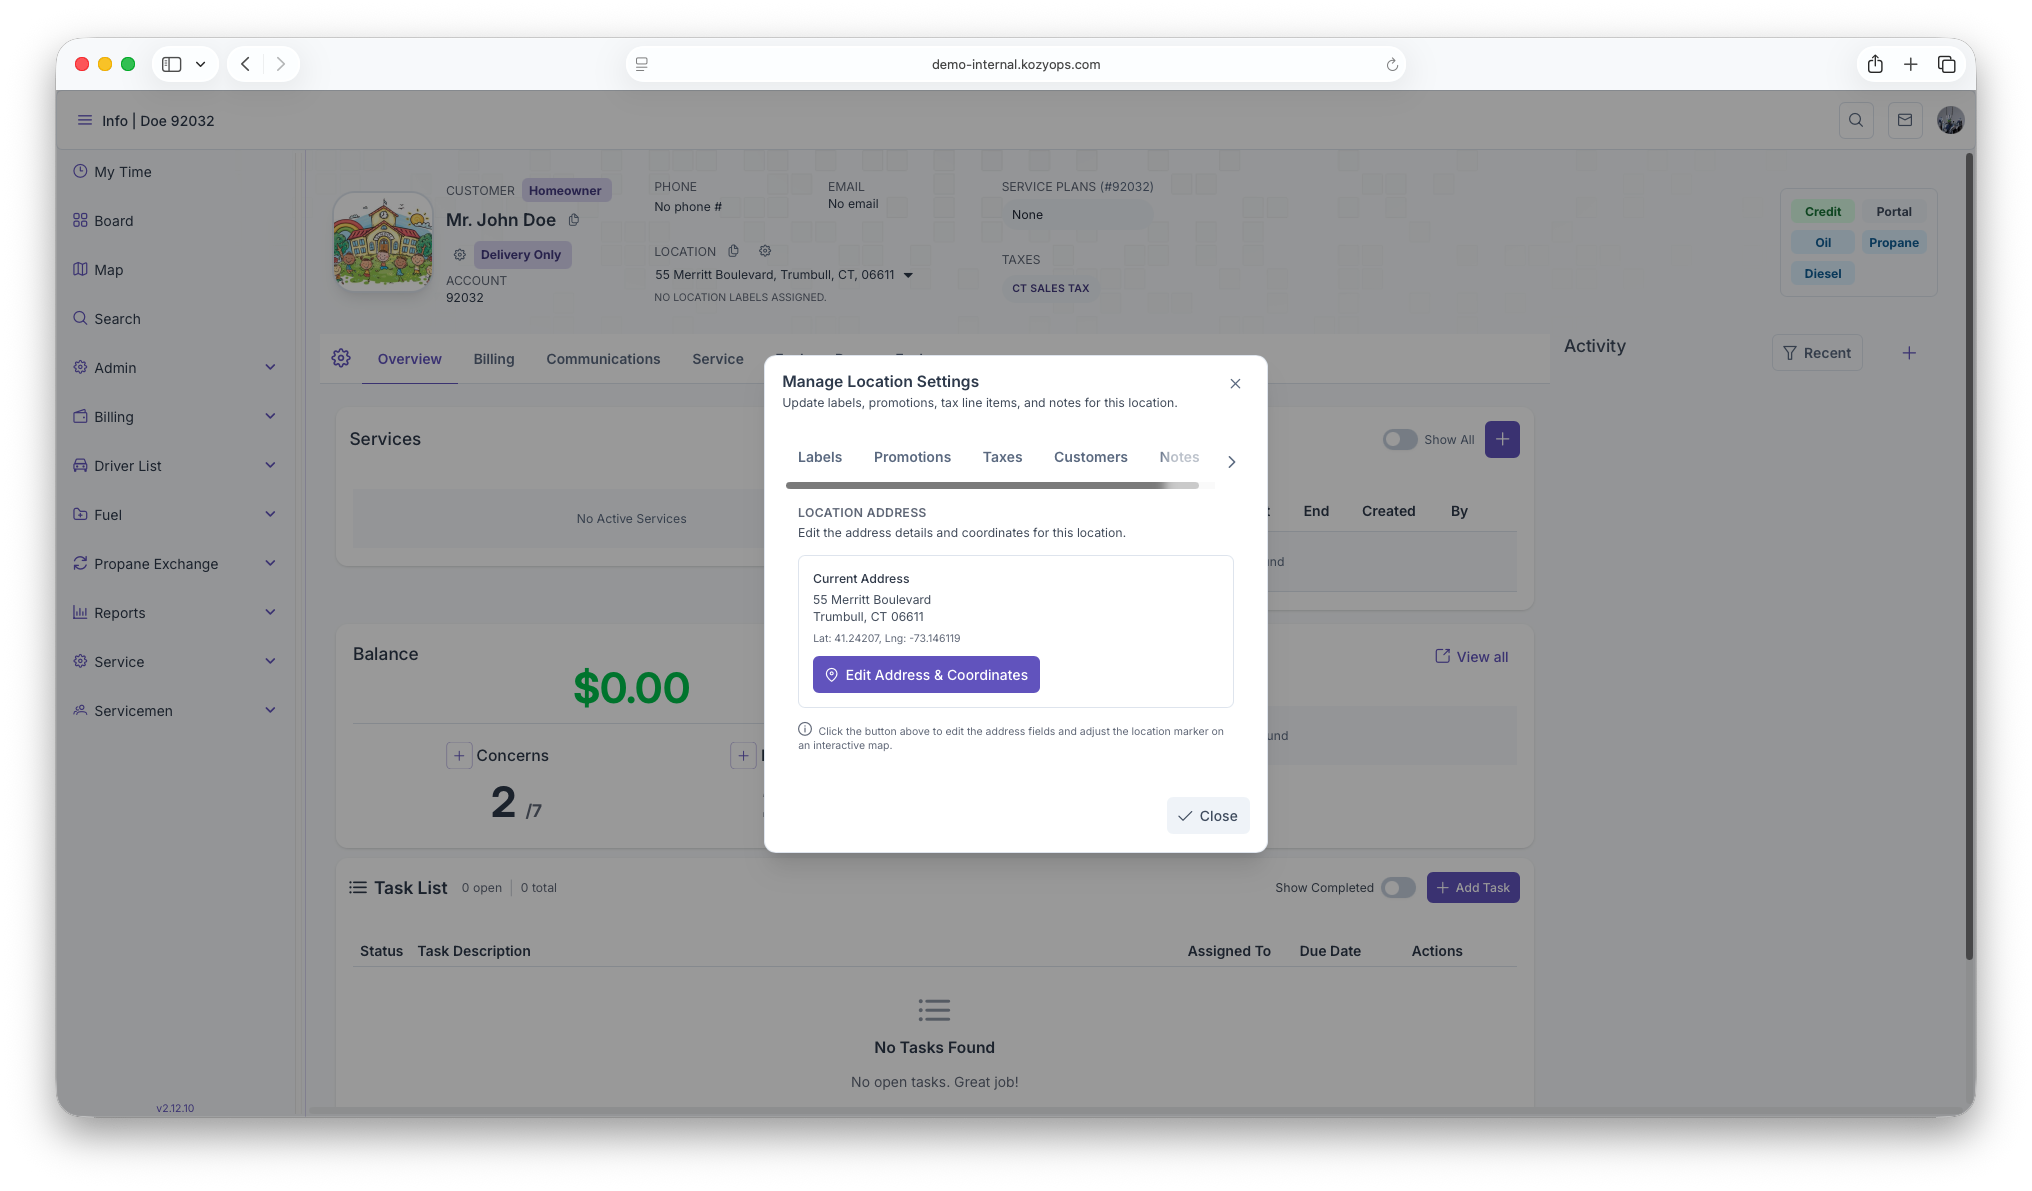
Step 2: Navigate to the Address Tab
The Location Settings dialog has multiple tabs:

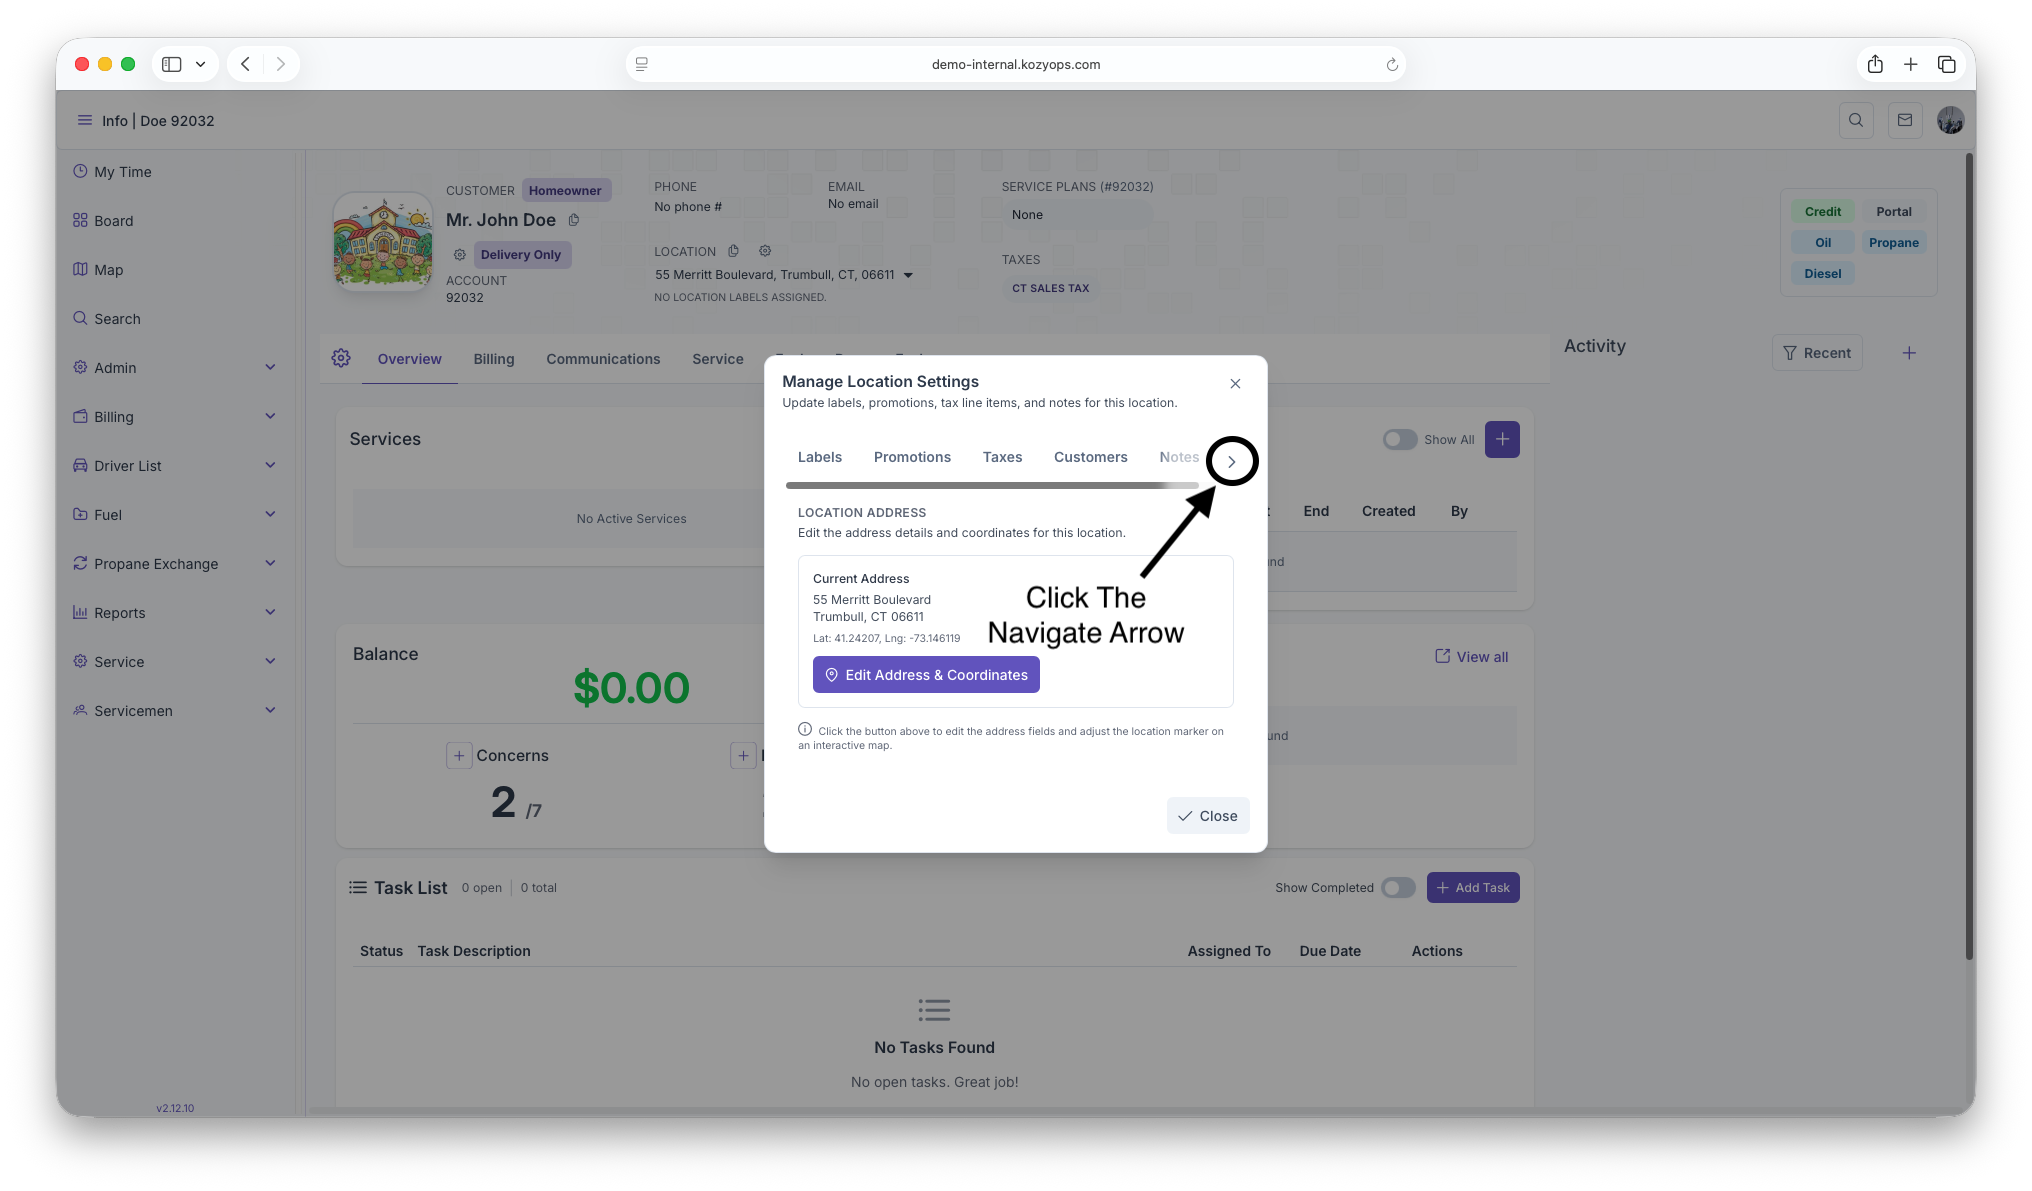
- Labels
- Taxes
- Customers
- Notes
- Address ← Select this tab
Step 3: Review Current Address
The Address tab displays:
- Current full address (street, city, state, ZIP)
- Current GPS coordinates (latitude/longitude)
Step 4: Open the Edit Dialog
Click "Edit Address & Coordinates"

The edit dialog opens with all fields pre-populated.
Step 5: Modify Address Details
Editable Fields:
- Street Number
- Street (required)
- City (required)
- State (required)
- ZIP Code
- Latitude (updated by dragging map marker)
- Longitude (updated by dragging map marker)
Making Changes:
- Type directly in any address field to update it
- Drag the map marker to adjust coordinates precisely
- Zoom the map for better accuracy
Important: When you drag the marker, only the latitude/longitude change. The address fields do NOT auto-update to maintain your manual entries.
Step 6: Save Changes
- Review all modifications
- Click "Update Location"
- The system will:
- Update the location in the database
- Close the edit dialog
- Refresh the Location Settings dialog
- Show a success message
Canceling
Click "Cancel" to close the dialog without saving changes.
Best Practices
Address Entry
✅ Do:
- Use Google Places autocomplete for initial address lookup
- Verify the address components are correct
- Check that city, state, and ZIP are properly filled
- Use standard postal abbreviations (e.g., "St" not "Street")
❌ Don't:
- Manually type addresses without using Google Places first
- Leave required fields empty
- Use non-standard address formats
- Enter apartment numbers in the street number field
Coordinate Adjustment
✅ Do:
- Zoom in on the map before adjusting the marker
- Drag the marker to the exact building/entrance location
- Use satellite view (if available) for precision
- Verify coordinates match the visible location
❌ Don't:
- Skip coordinate adjustment for rural/ambiguous addresses
- Place markers on roads instead of buildings
- Ignore coordinate discrepancies
Linking vs. Creating
✅ Do:
- Always review existing location matches before creating new ones
- Link to existing locations when the address matches exactly
- Consider minor variations (Apt 1 vs Unit 1) as the same location
- Use different relationship types for the same location when appropriate
❌ Don't:
- Create duplicate locations for the same address
- Ignore existing location matches without reviewing them
- Link to locations with different addresses
Common Scenarios
Scenario 1: Multiple Customers at One Address
Example: A landlord owns a building, and tenants also need service.
Solution:
- Create the location linked to the landlord as "Homeowner"
- For each tenant, open the Add Location dialog
- Search for the same address
- Select the existing location from matches
- Link each tenant as "Tenant"
Result: One location with multiple customer relationships.
Scenario 2: Google Places Returns Wrong Coordinates
Example: Address autocomplete works, but the map marker is 100 feet off.
Solution:
- Proceed with the Google Places address
- Click "Continue with Address"
- Zoom in on the interactive map
- Drag the marker to the correct building location
- Create/update the location with accurate coordinates
Scenario 3: Address Not Found in Google Places
Example: New construction or rural address not in Google's database.
Solution:
- Find the closest known address in Google Places
- Click "Continue with Address"
- Manually edit all address fields to the correct values
- Drag the map marker to the approximate location
- Create the location
Note: For addresses without Google data, you may need to manually enter latitude/longitude from another source or estimate using the map.
Scenario 4: Need to Fix Typo in Existing Address
Example: Street name misspelled or wrong ZIP code.
Solution:
- Open Location Settings for the affected location
- Go to the "Address" tab
- Click "Edit Address & Coordinates"
- Correct the typo in the appropriate field
- Click "Update Location"
Result: The address is corrected for all customers linked to this location.
Field Reference
Address Component Fields
| Field | Required | Format | Example | Notes |
|---|---|---|---|---|
| Street Number | No | Numeric or alphanumeric | "123", "123A" | Leave empty if N/A |
| Street | Yes | Text | "Main St" | Use standard abbreviations |
| City | Yes | Text | "Springfield" | Full city name |
| State | Yes | 2-letter code | "MA" | Uppercase state abbreviation |
| ZIP Code | No | 5 or 9 digits | "01101", "01101-1234" | Include ZIP+4 if known |
| Latitude | Yes | Decimal degrees | "42.101234" | Auto-filled, read-only in form |
| Longitude | Yes | Decimal degrees | "-72.589876" | Auto-filled, read-only in form |
Relationship Types
| Type | Use Case | Billing Impact |
|---|---|---|
| Homeowner | Property owner receiving service | Uses customer's default billing |
| Tenant | Renter/lessee receiving service | Uses customer's default billing |
| Price Matched | Special pricing applies | Uses custom pricing for this location |
| Fuel Payment Override | Custom fuel billing | Overrides default fuel payment terms |
| Service Payment Override | Custom service billing | Overrides default service payment terms |
Troubleshooting
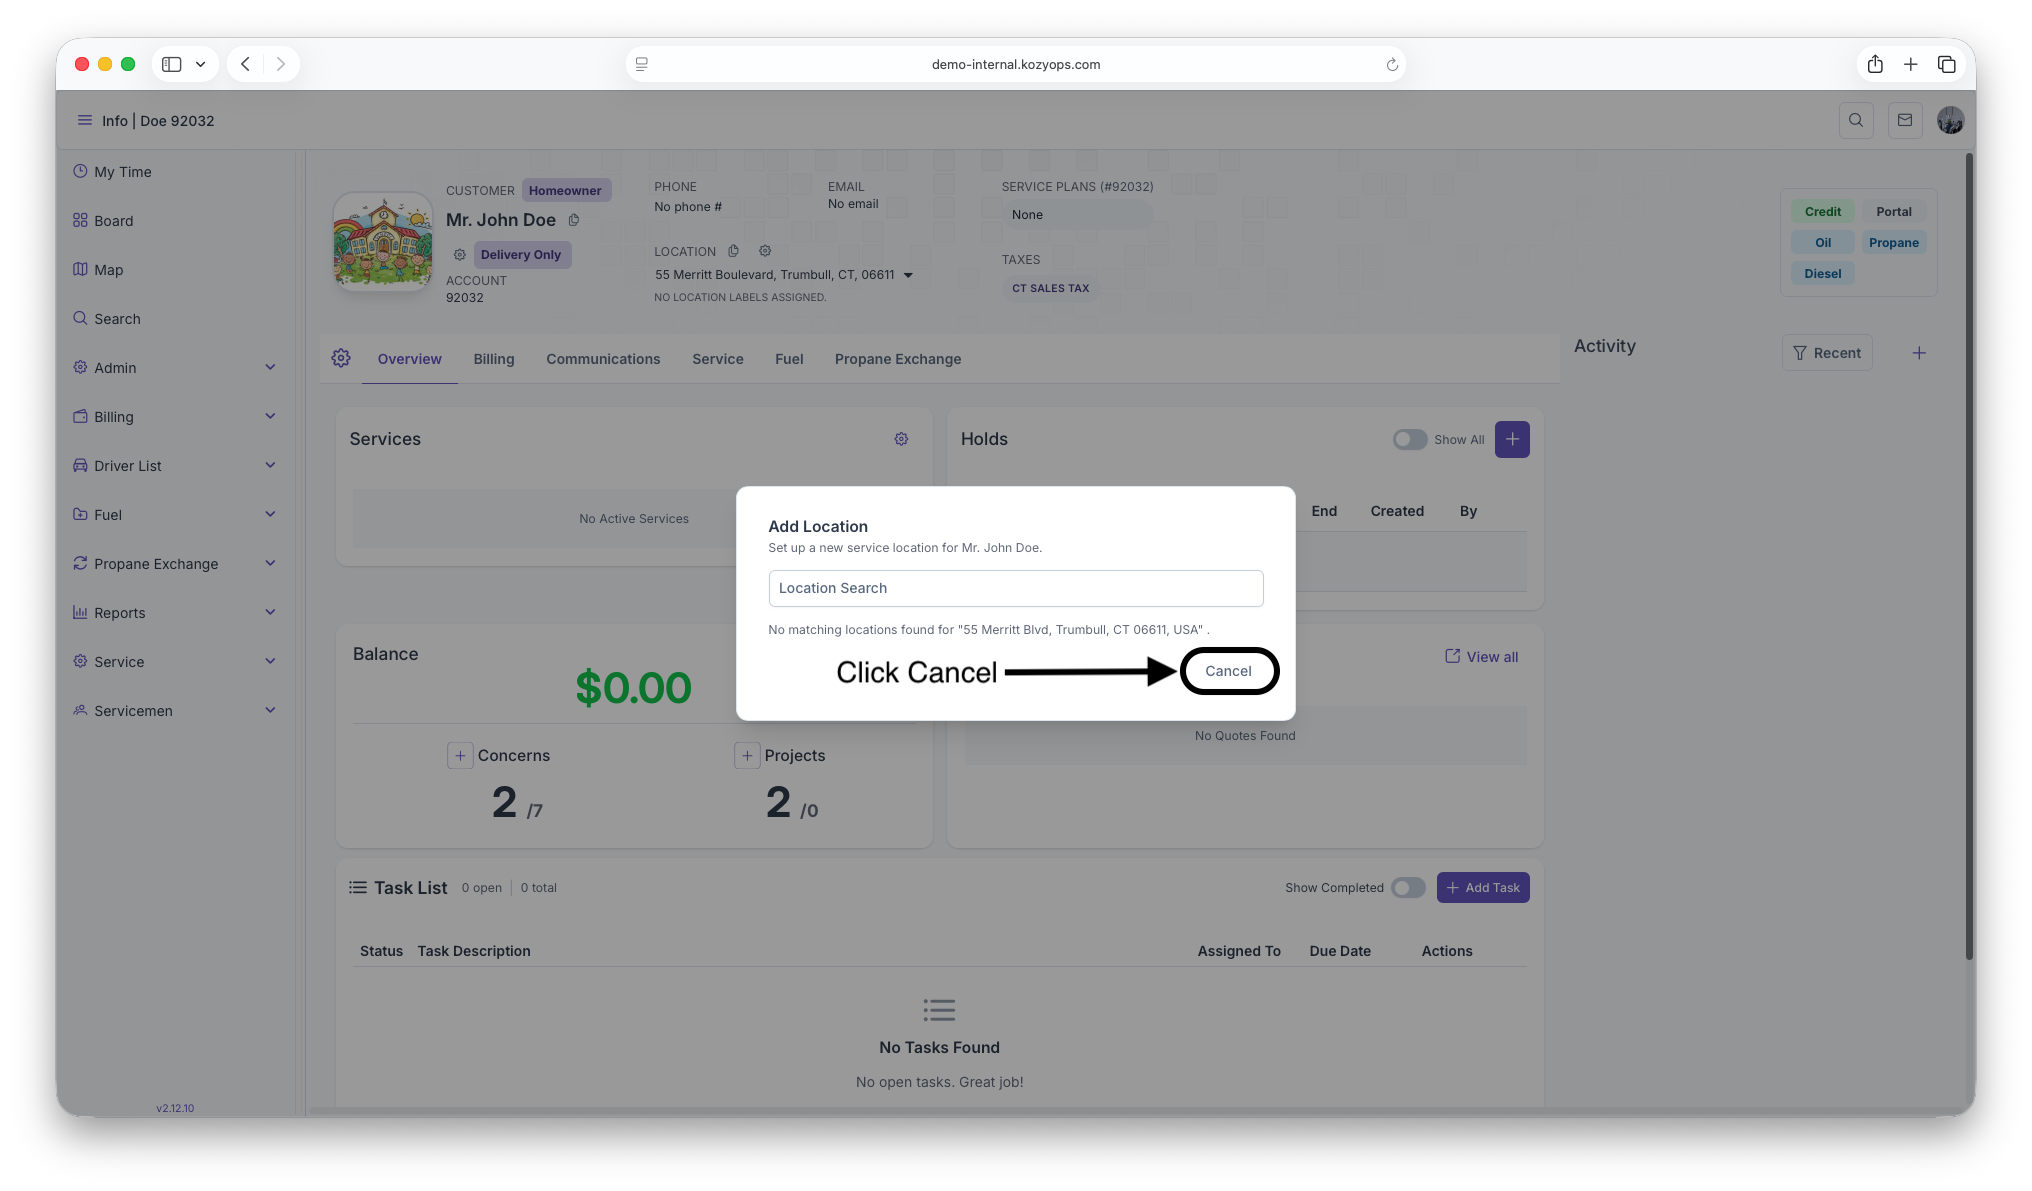
"No matching locations found" appears immediately
Cause: The address search didn't complete or returned no database matches.
Solution: This is normal for new addresses. Click "Continue with Address" to proceed with creating a new location.
Map marker won't drag
Cause: Map hasn't fully loaded or browser issue.
Solution:
- Wait a few seconds for the map to fully render
- Try zooming in/out
- Refresh the browser if problem persists
Required field validation errors
Cause: Street, City, or State fields are empty.
Solution:
- Review the error message
- Fill in all required fields (marked with *)
- Ensure no fields are blank or contain only spaces
Address fields show wrong information after Google search
Cause: Google Places parsed the address incorrectly.
Solution:
- Click "Continue with Address"
- Manually correct any incorrect fields
- Proceed with creating the location
Can't find the edit button
Cause: Looking in the wrong location.
Solution:
- Open the Location Settings dialog (gear icon next to location)
- Click the "Address" tab at the top
- The "Edit Address & Coordinates" button is in the center panel
Tips for Efficiency
- Use keyboard shortcuts: Tab through form fields quickly
- Zoom before dragging: Zoom in on the map before adjusting markers for precision
- Batch similar addresses: When adding multiple locations in the same area, adjust map zoom once and keep it
- Review matches carefully: Linking takes seconds; creating duplicates causes long-term issues
- Verify on save: Always review the success message to confirm the operation completed
Related Documentation
Last updated: October 24, 2025
Manage Location Settings
Introduction
After a location has been created, settings on the location can be edited which include, Labels, Promotions, Taxes, Customers, Service Zones, Notes and Address. If a Customer has more than one location on their account, these location settings must be adjusted for all locations as each location essentially serves as another account under the customer. With the exception of Customers, Notes and Address, the other settings are based on settings set by the company on the Settings chapter.
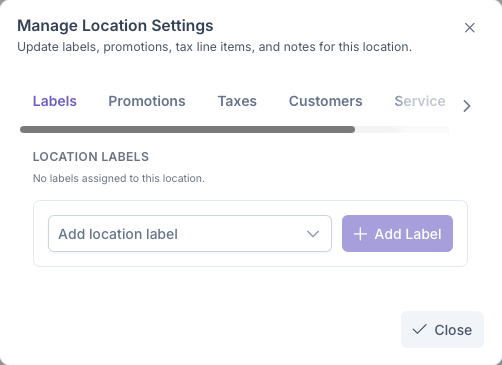
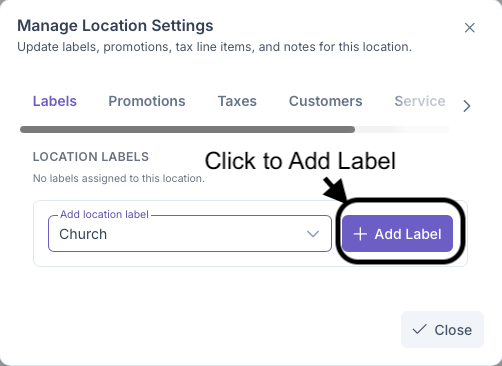
Labels
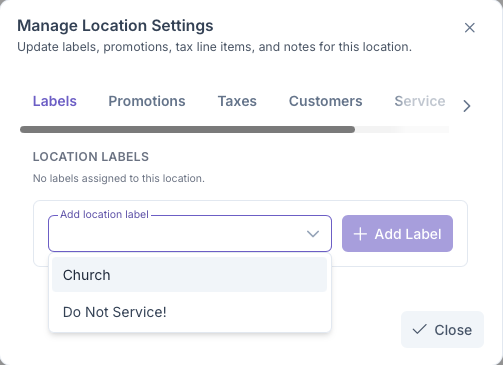
Clicking on the Labels tab will bring up the add location labels section. Here a label can be assigned to the location based on one created by the company under the Label section under Admin. Labels are primarily used to identify the type of location the customers address is, eg, a house, an appartment, a church etc. To set a label
- Click on the Add Location Label Dropdown to bring up a list of pre set labels
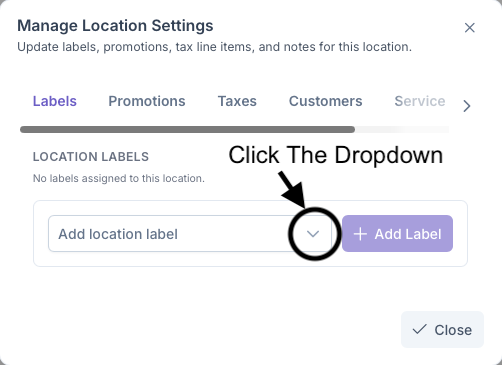
- Select a label for the location
- Click on Add Label to add label to the location
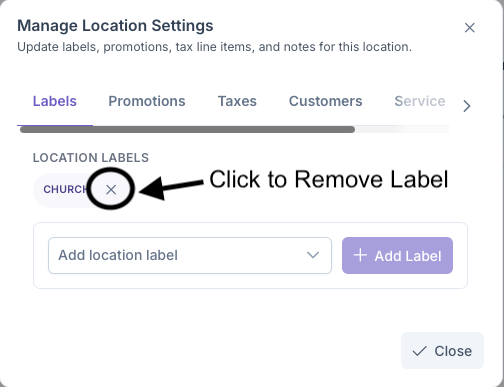
Once added, the location will now generate with a label under it. The label can be removed simply by clicking the X next to the label

Additional Labels can be created under Admin on the Settings page under Labels, a more detailed look into how to create labels can be seen on the Labels page
Promotions
Clicking on the Promotions tab will bring up the Add Promotions sections. Here Promotions can be assigned to the customers locations, such as discounts for being a first time user or being an suto pay customer. These settings are pre set in the Promotions sections under Admin, A more indepth look into how to set Promotions can be seen on the Promotions page.
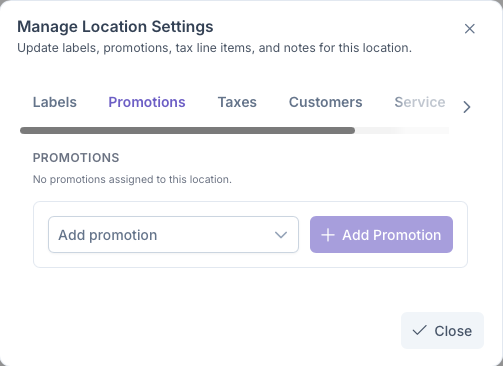
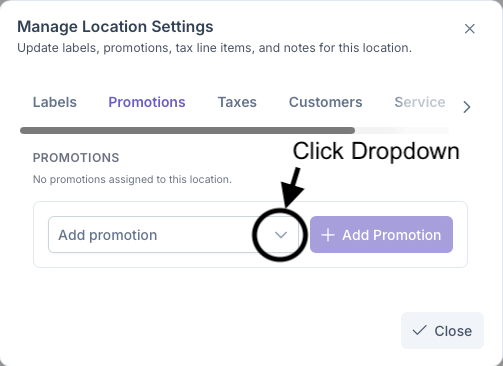
To set a Promotion
- Click on the Add Promotion Dropdown to bring up a list of pre set promotions
- Select a Promotion to attach to the address
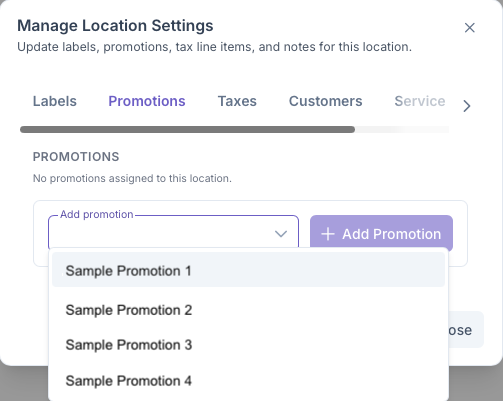
- Click Add Promotion to add The Promotion to the Address
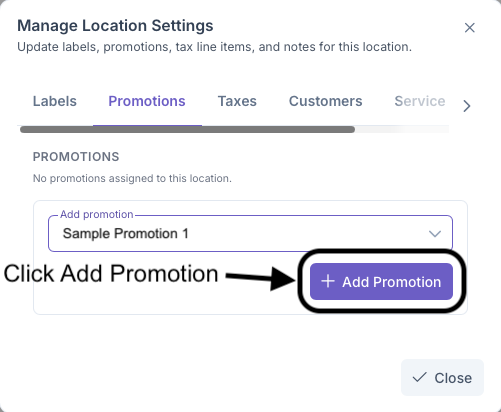
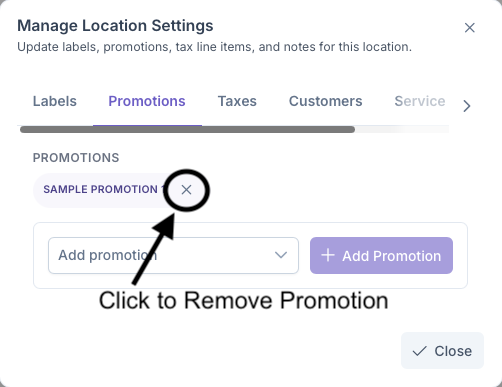
Once added, a promotion will now be applied to the customers account if they meet the criteria set when the promotion was created by the company. A promotion can deleted from the account by clicking on the X next to the promotion
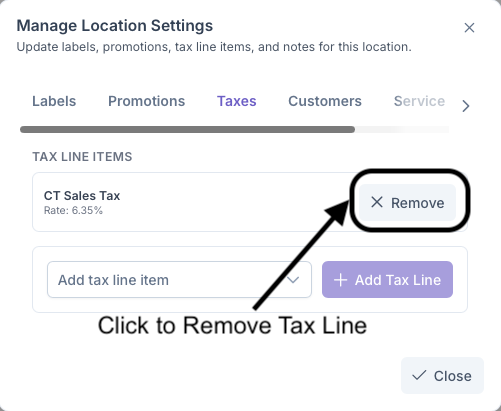
Taxes
Clicking on the Taxes tab will bring up the Taxes section. Here taxes can be added to the customers account based on what a company pre sets as taxes under taxes settings under the settings part of admin. Some Taxes can be set to be automatically applied to every new customer such as state taxes whereas others can be added on to the account as applicable. Taxes set to automatically be applied will show up on the customers account without needing to be added and can be seen on the taxes section.
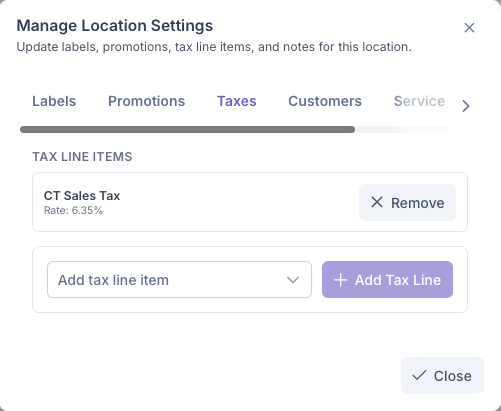
To add a tax
- Click on the Add Tax line Item Dropdown
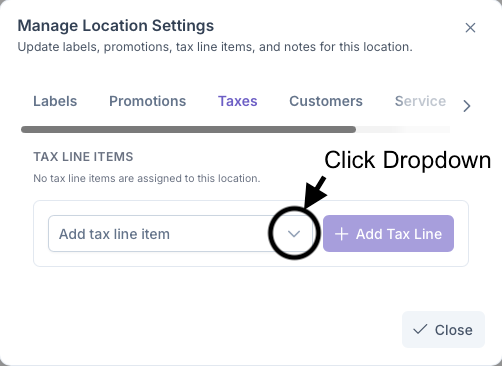
- Select a Tax
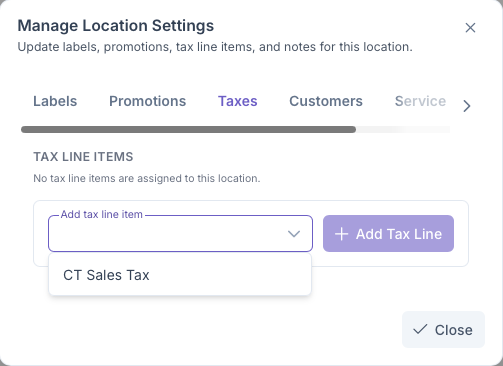
- Click Add Tax Line to add tax to address
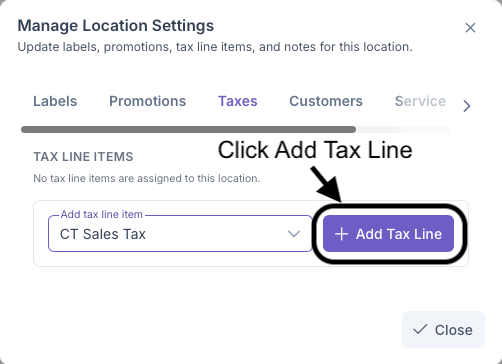
Once all set or if the Tax Line was already added, Taxes will then be added to all services selected to be taxed for the Customer. Taxes can be deleted by clicking on the X next to the Tax Line
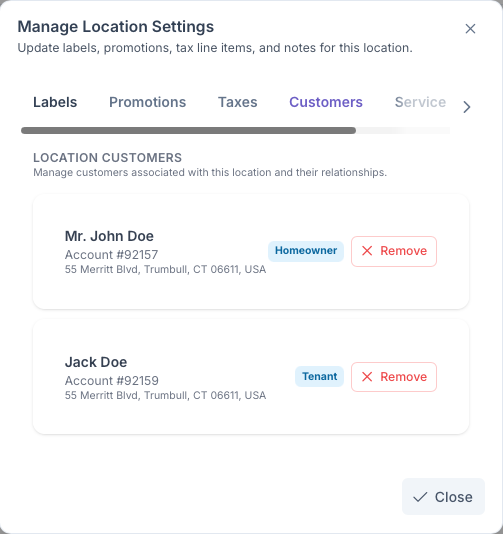
Customers
Clicking on the Customers tab will bring up the customers sections. This section here shows all customers associated with this address. A more in depth look at how customers can be linked to the same address can be seen on the Location Management page. Customers can also be removed from an address here by clicking on remove next to the customer that is going to be removed.
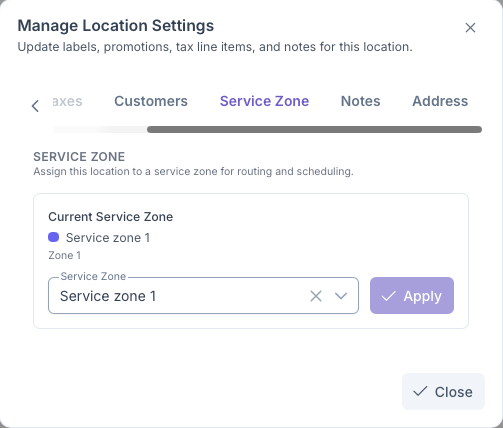
Service Zones
Clicking on the Service Zone tab will bring up the Service Zone section. Service Zones are zones created that cover a certain range with only customers that fall under that zone. Here in this scetion, Customers can be added to a zone created if they fall under that area. A more in depth look in creating zones can be seen on the Zones page. To add a zone
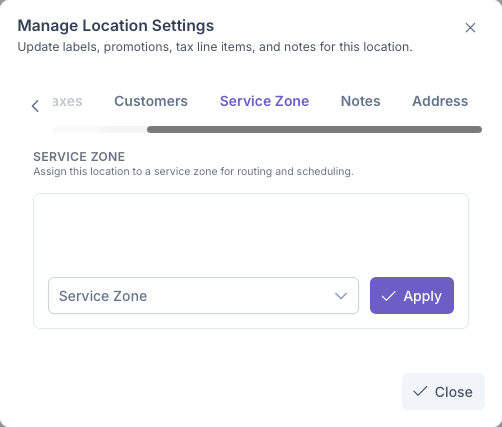
- Click on the Service Zone Dropdown
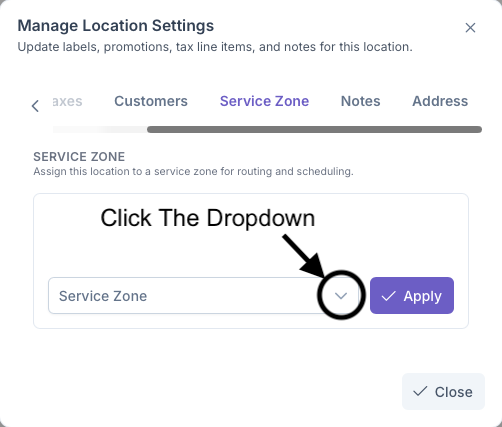
- Select A Zone
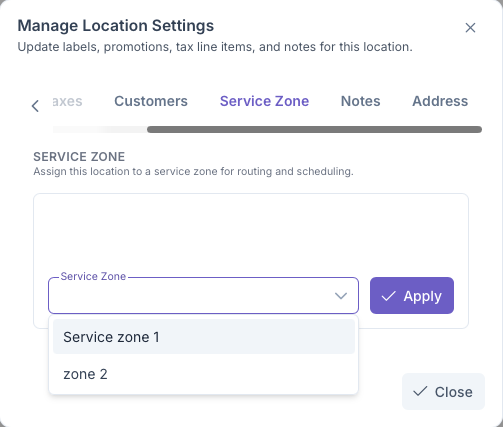
- Click Apply to add zone to Customer Location
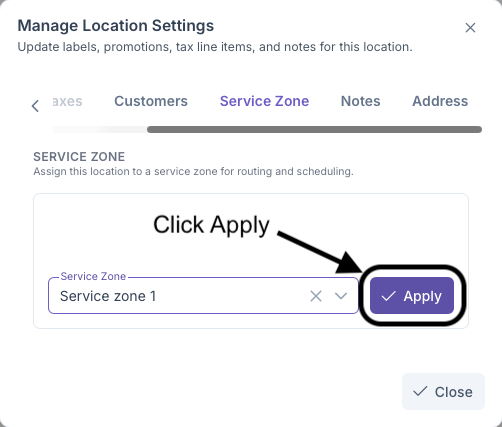
Once all set, the customers location will now be added to the zone selected
Notes
Clicking on the Notes tab will bring up the notes section of the Location Settings. Here notes can be added to the customer location to help communicate anything relating to the customers home, or if a driver needs to alerted of something. Notes can be wrtten in the following categories
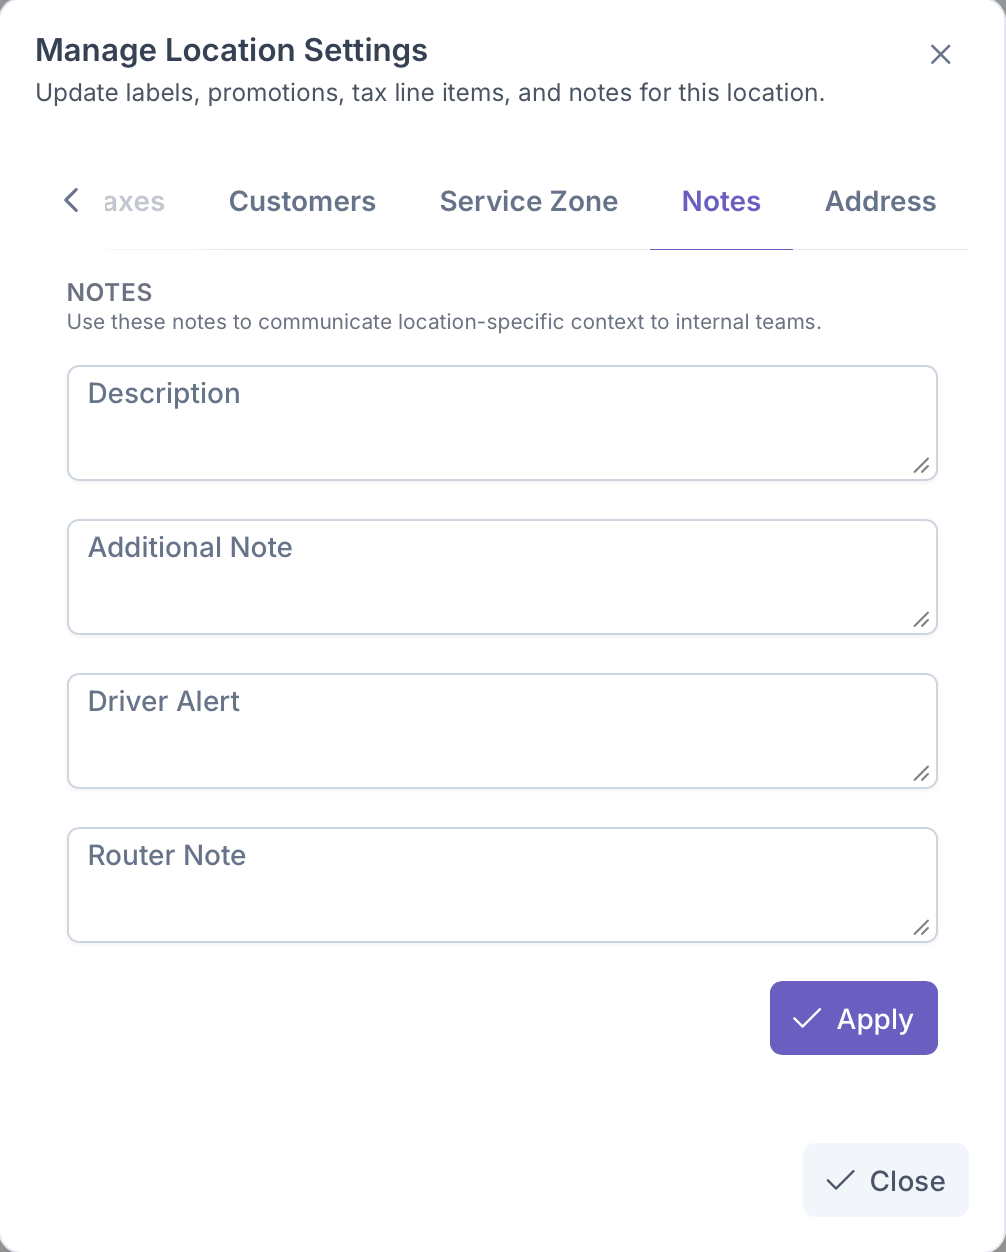
- Description - Give a brief description of the location or anything mentioned by the customer
- Additional Notes - Anything extra that could be important with regards to the location
- Driver Alert - Any alerts that the driver should informed of before delivery
- Router Note - Notes that the router should know before the location is routed for delivery
Once all set, the notes will appear here, making it important to check the customers notes before any services are provided for the customer
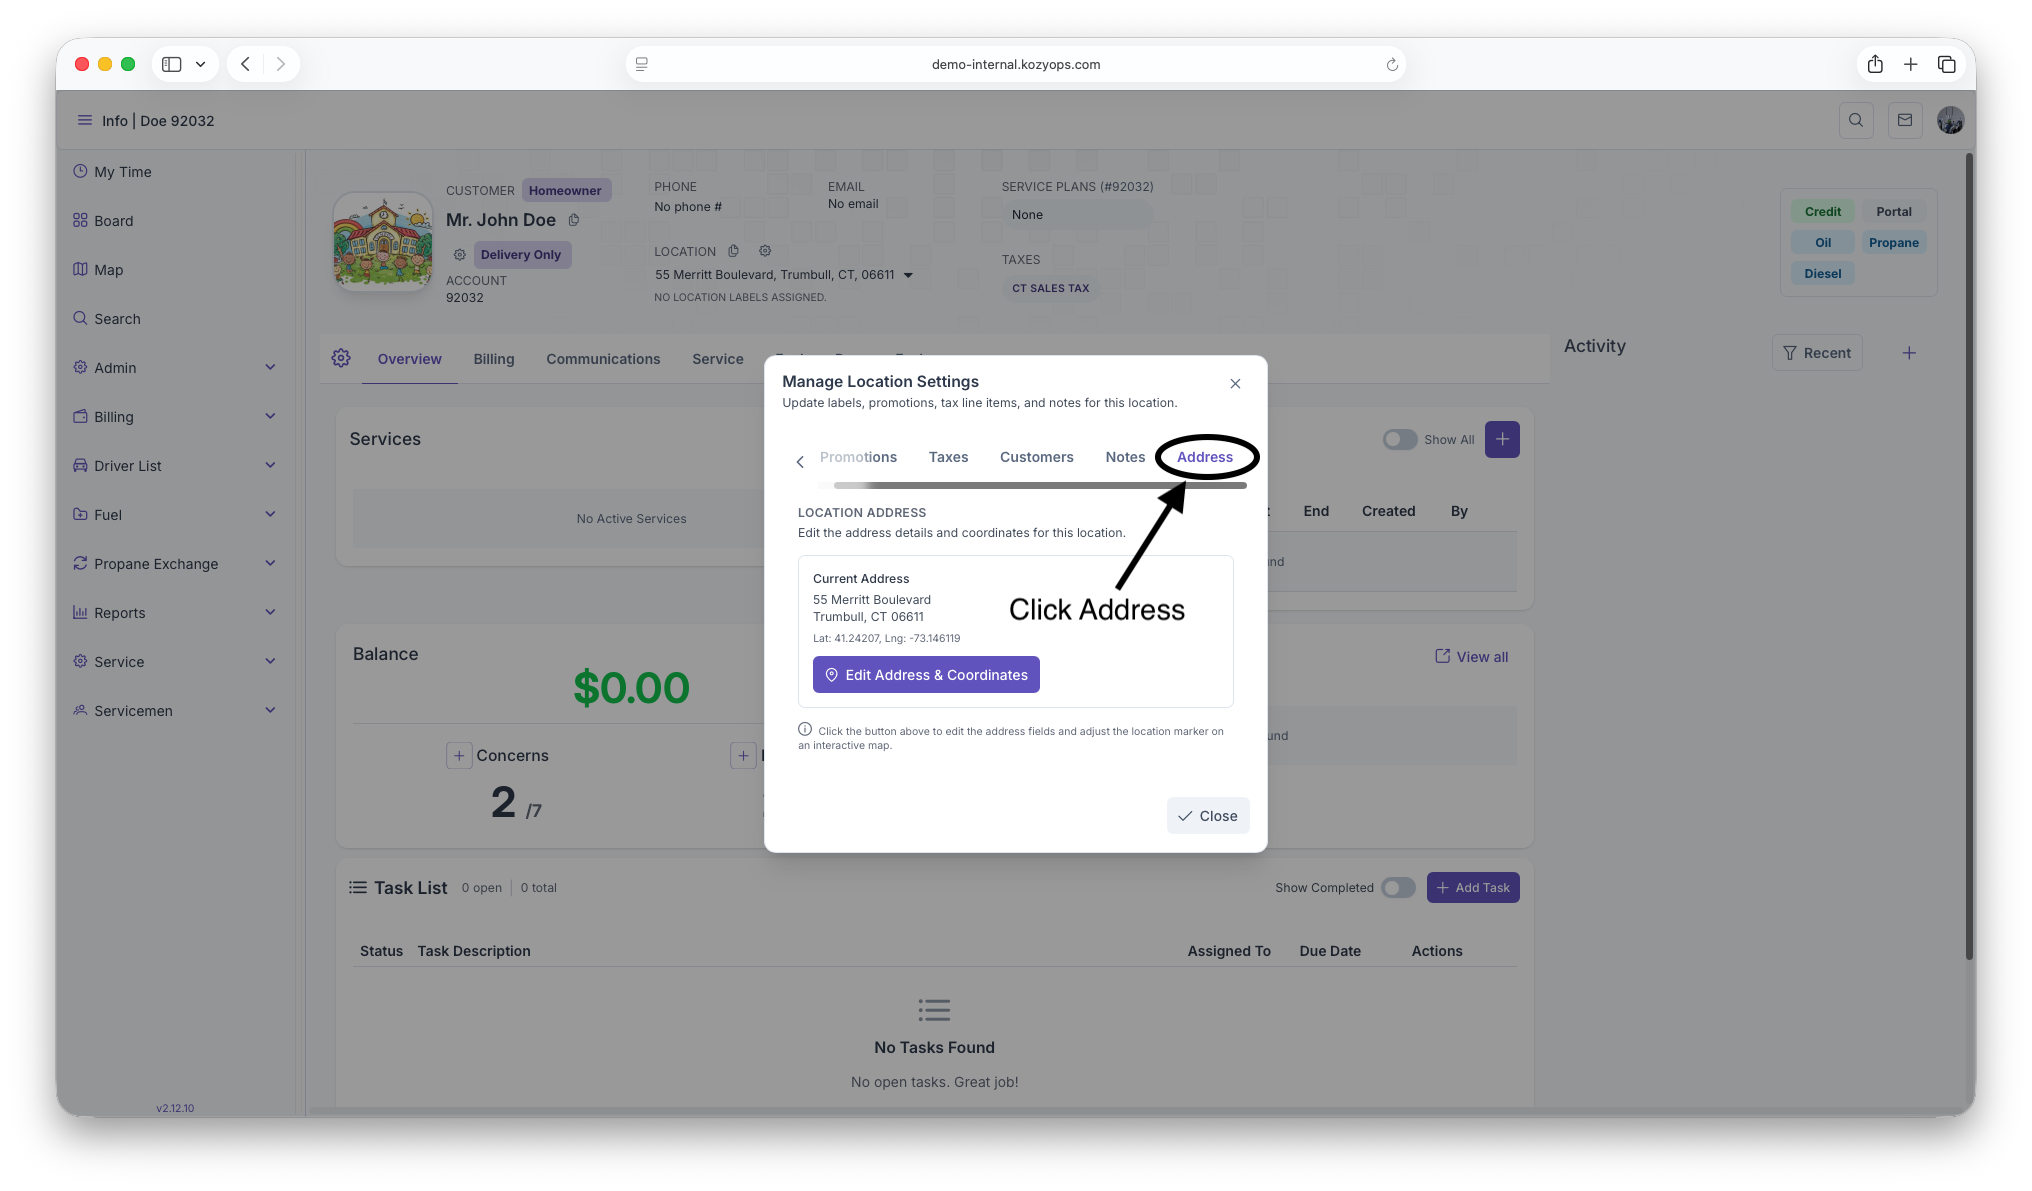
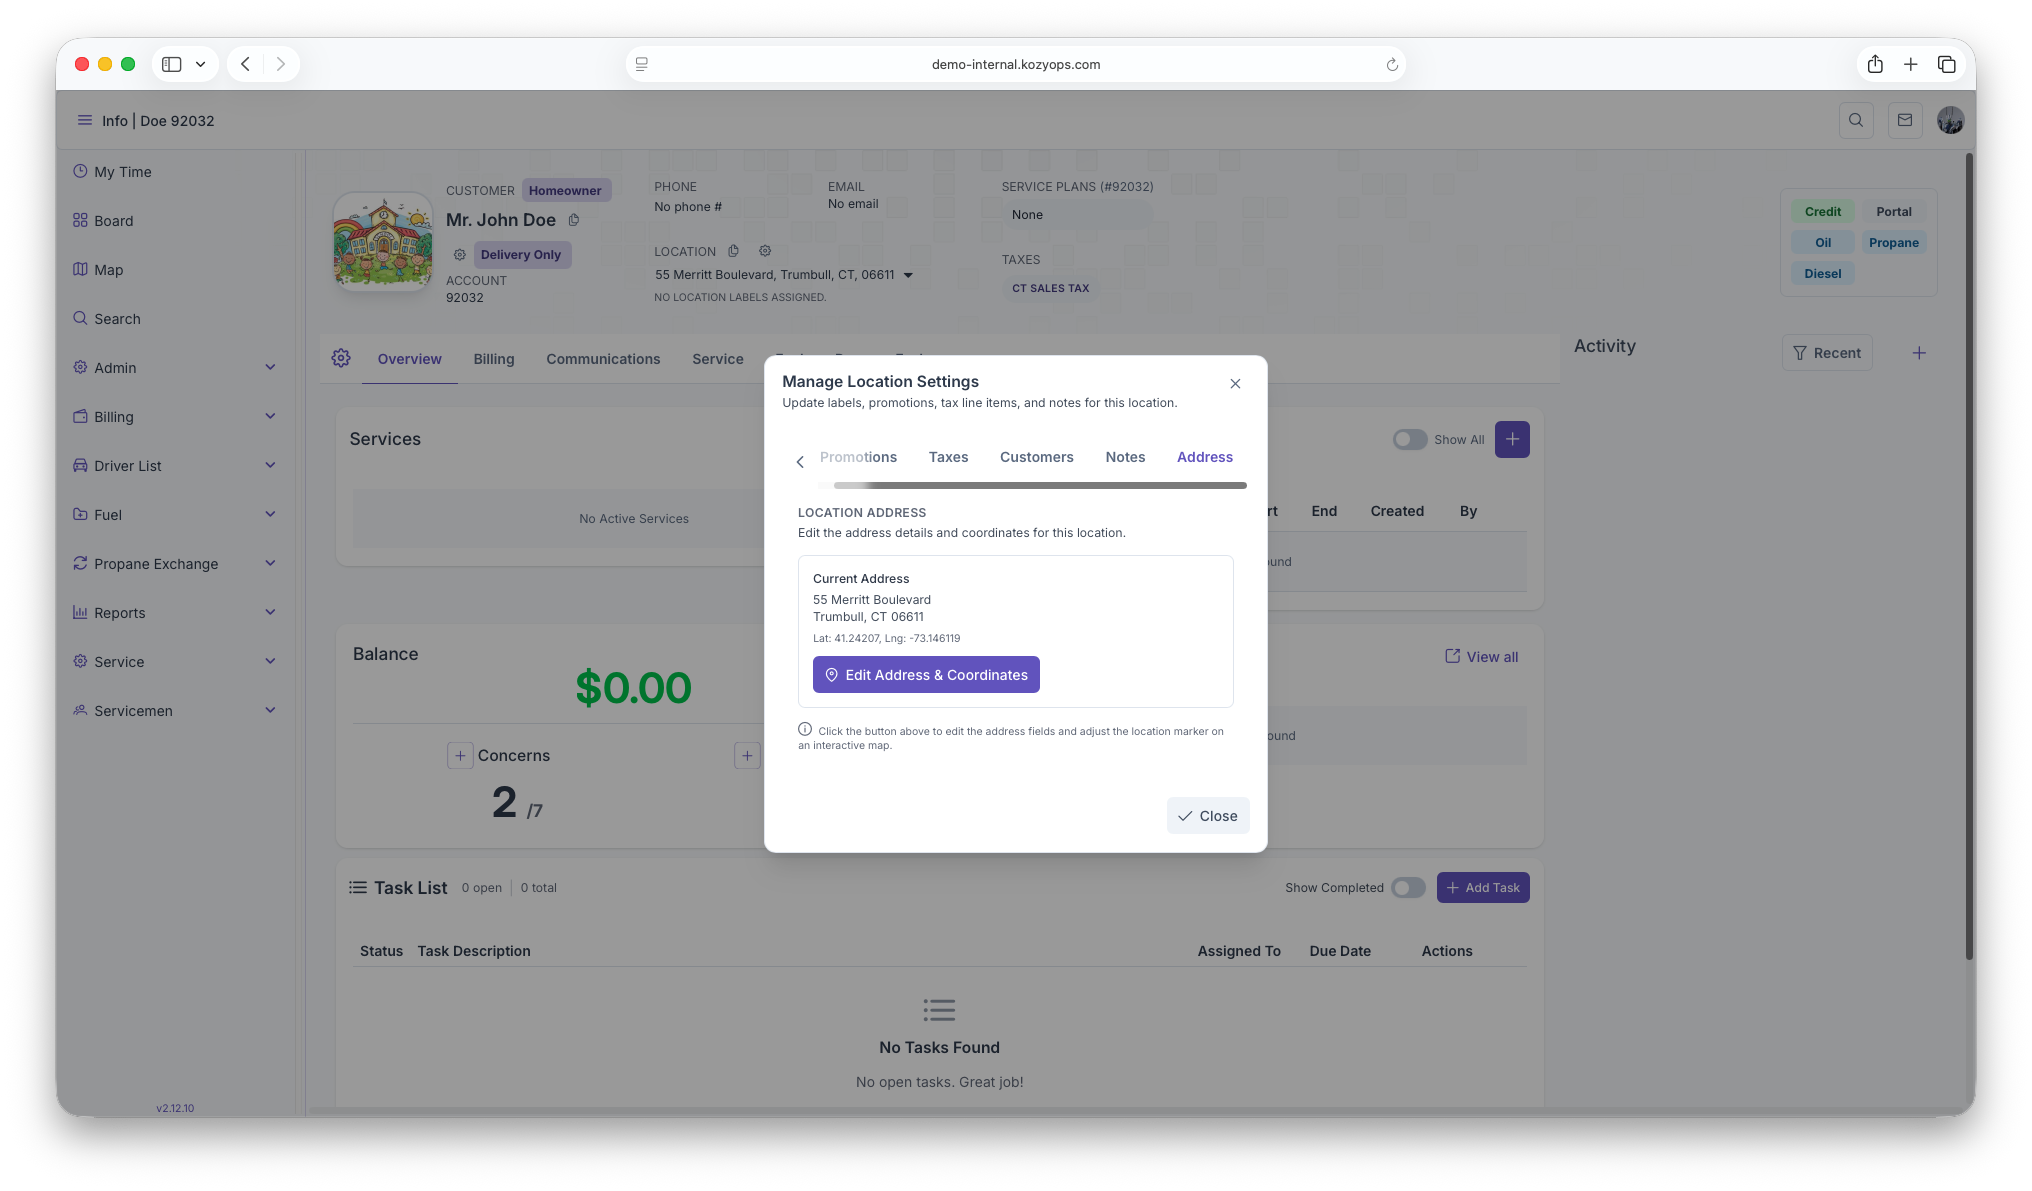
Address
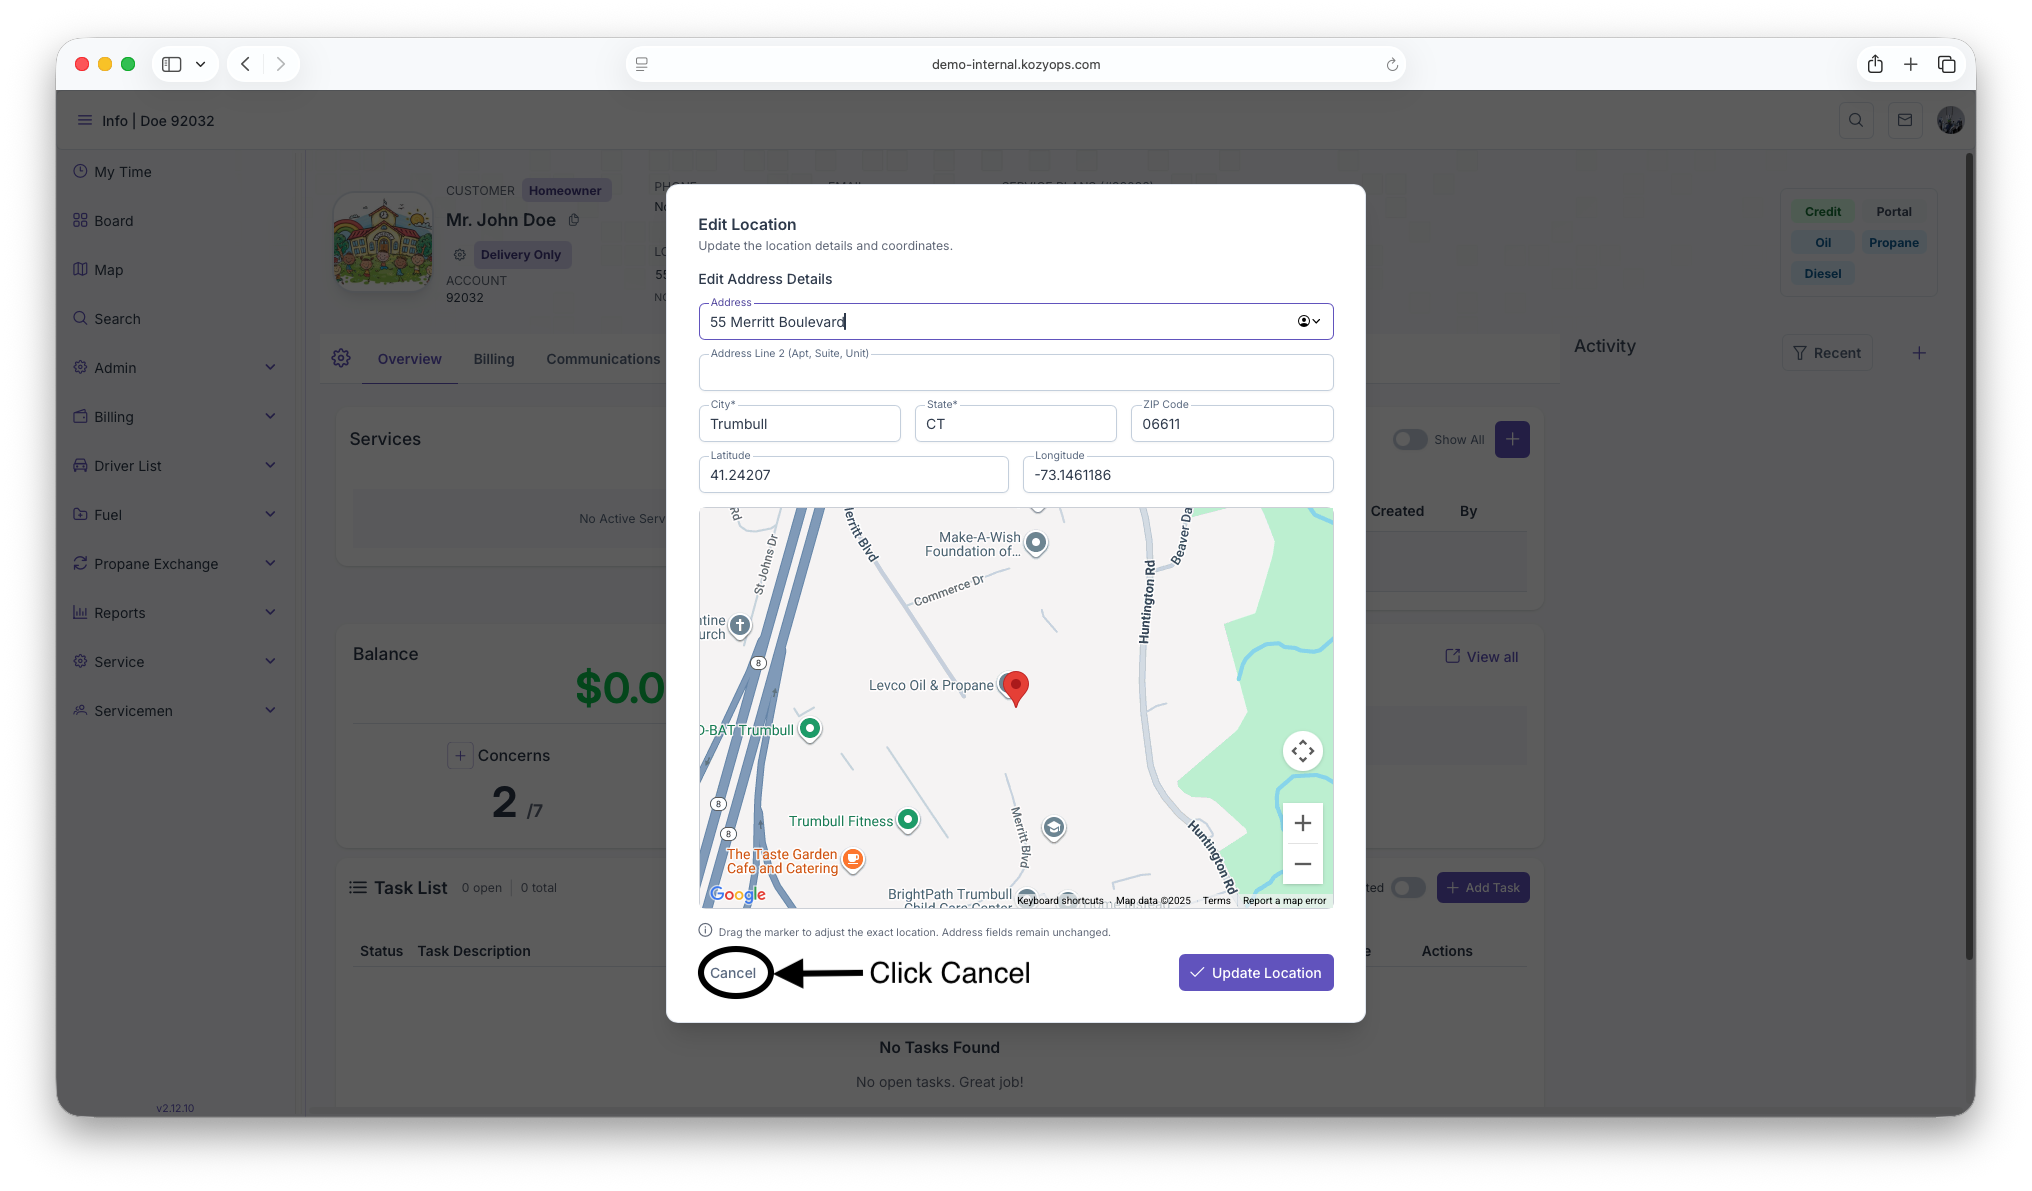
Clicking on the Address tab will bring up the Address section of the Locations seetings. Here the address and coordinates of the customer will appear. The address can also be edited here in the event of the customer moving
- Click on the Edit Address & Location Button
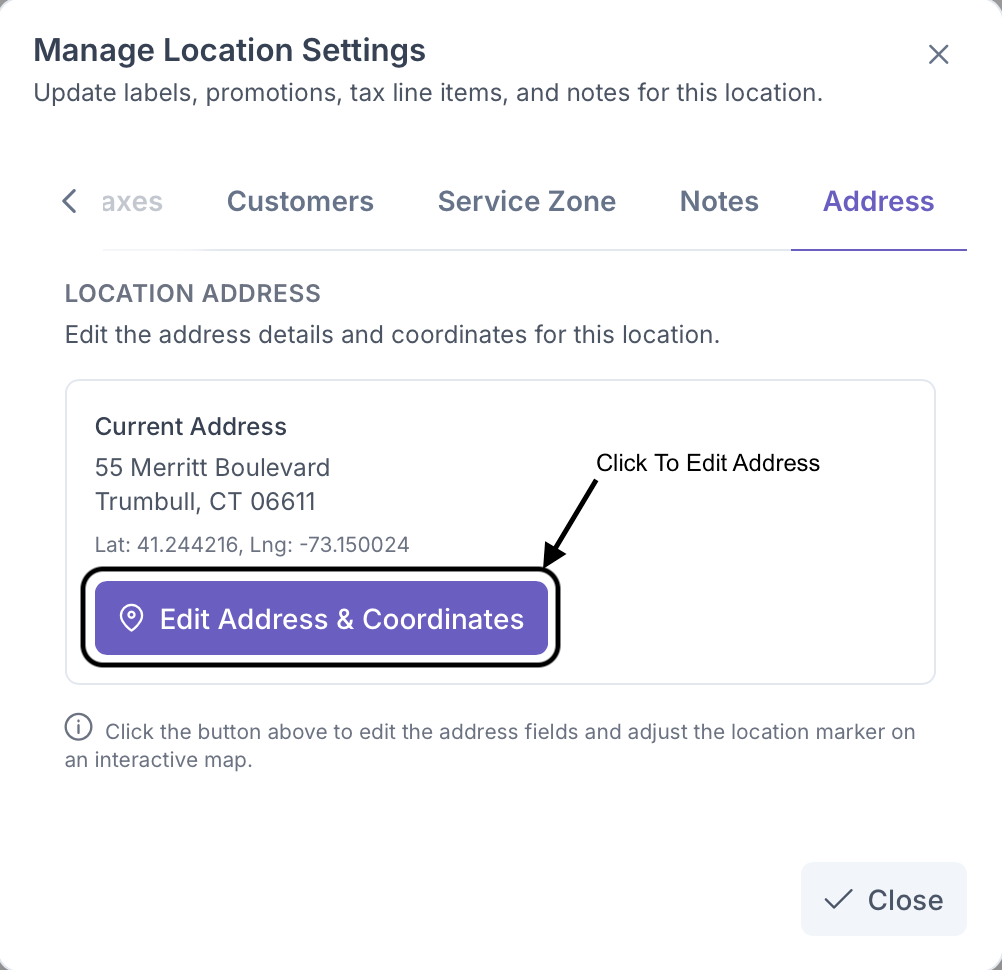
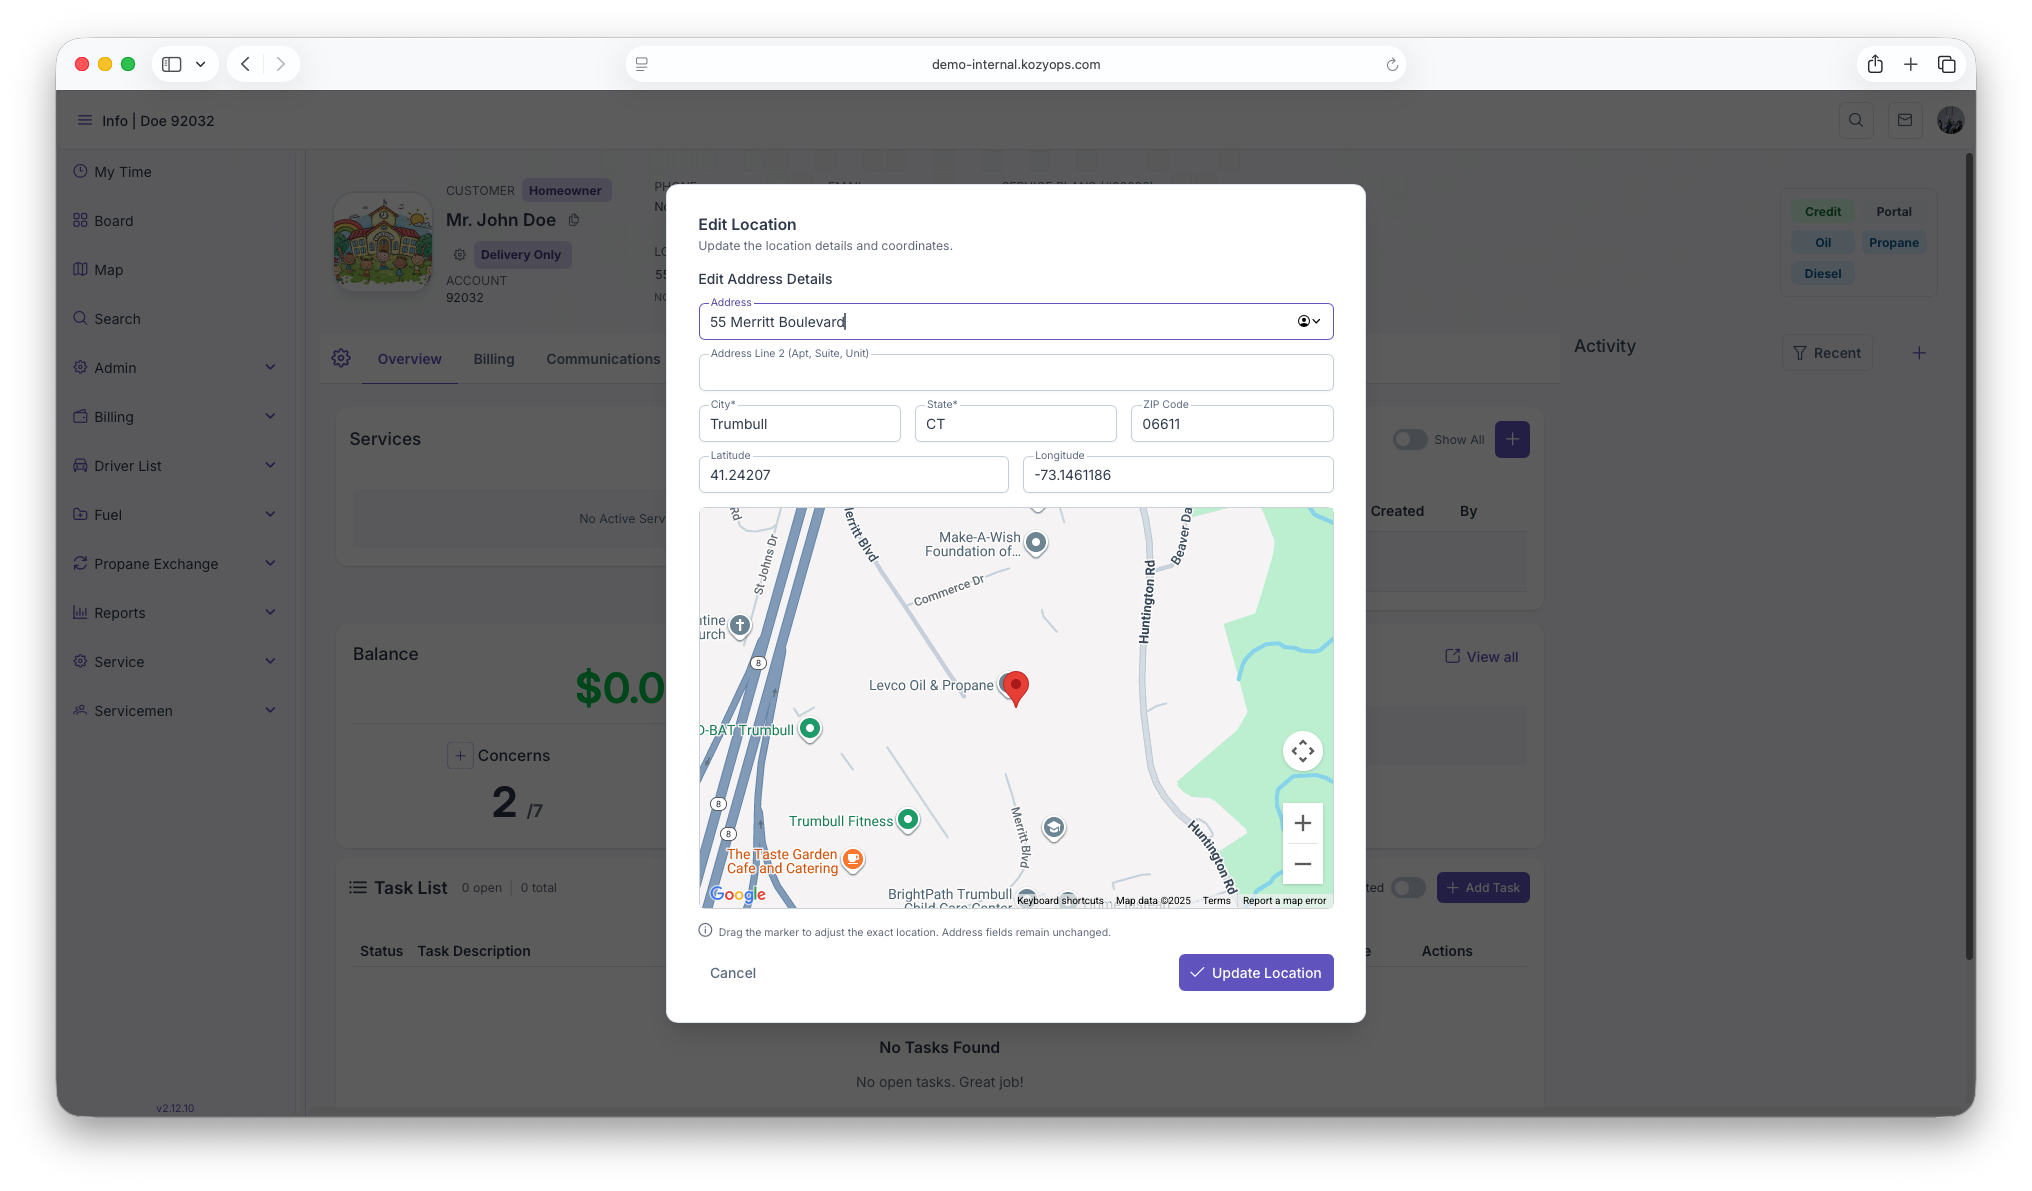
- The Edit Location popup will appear with the following fields that can be edited
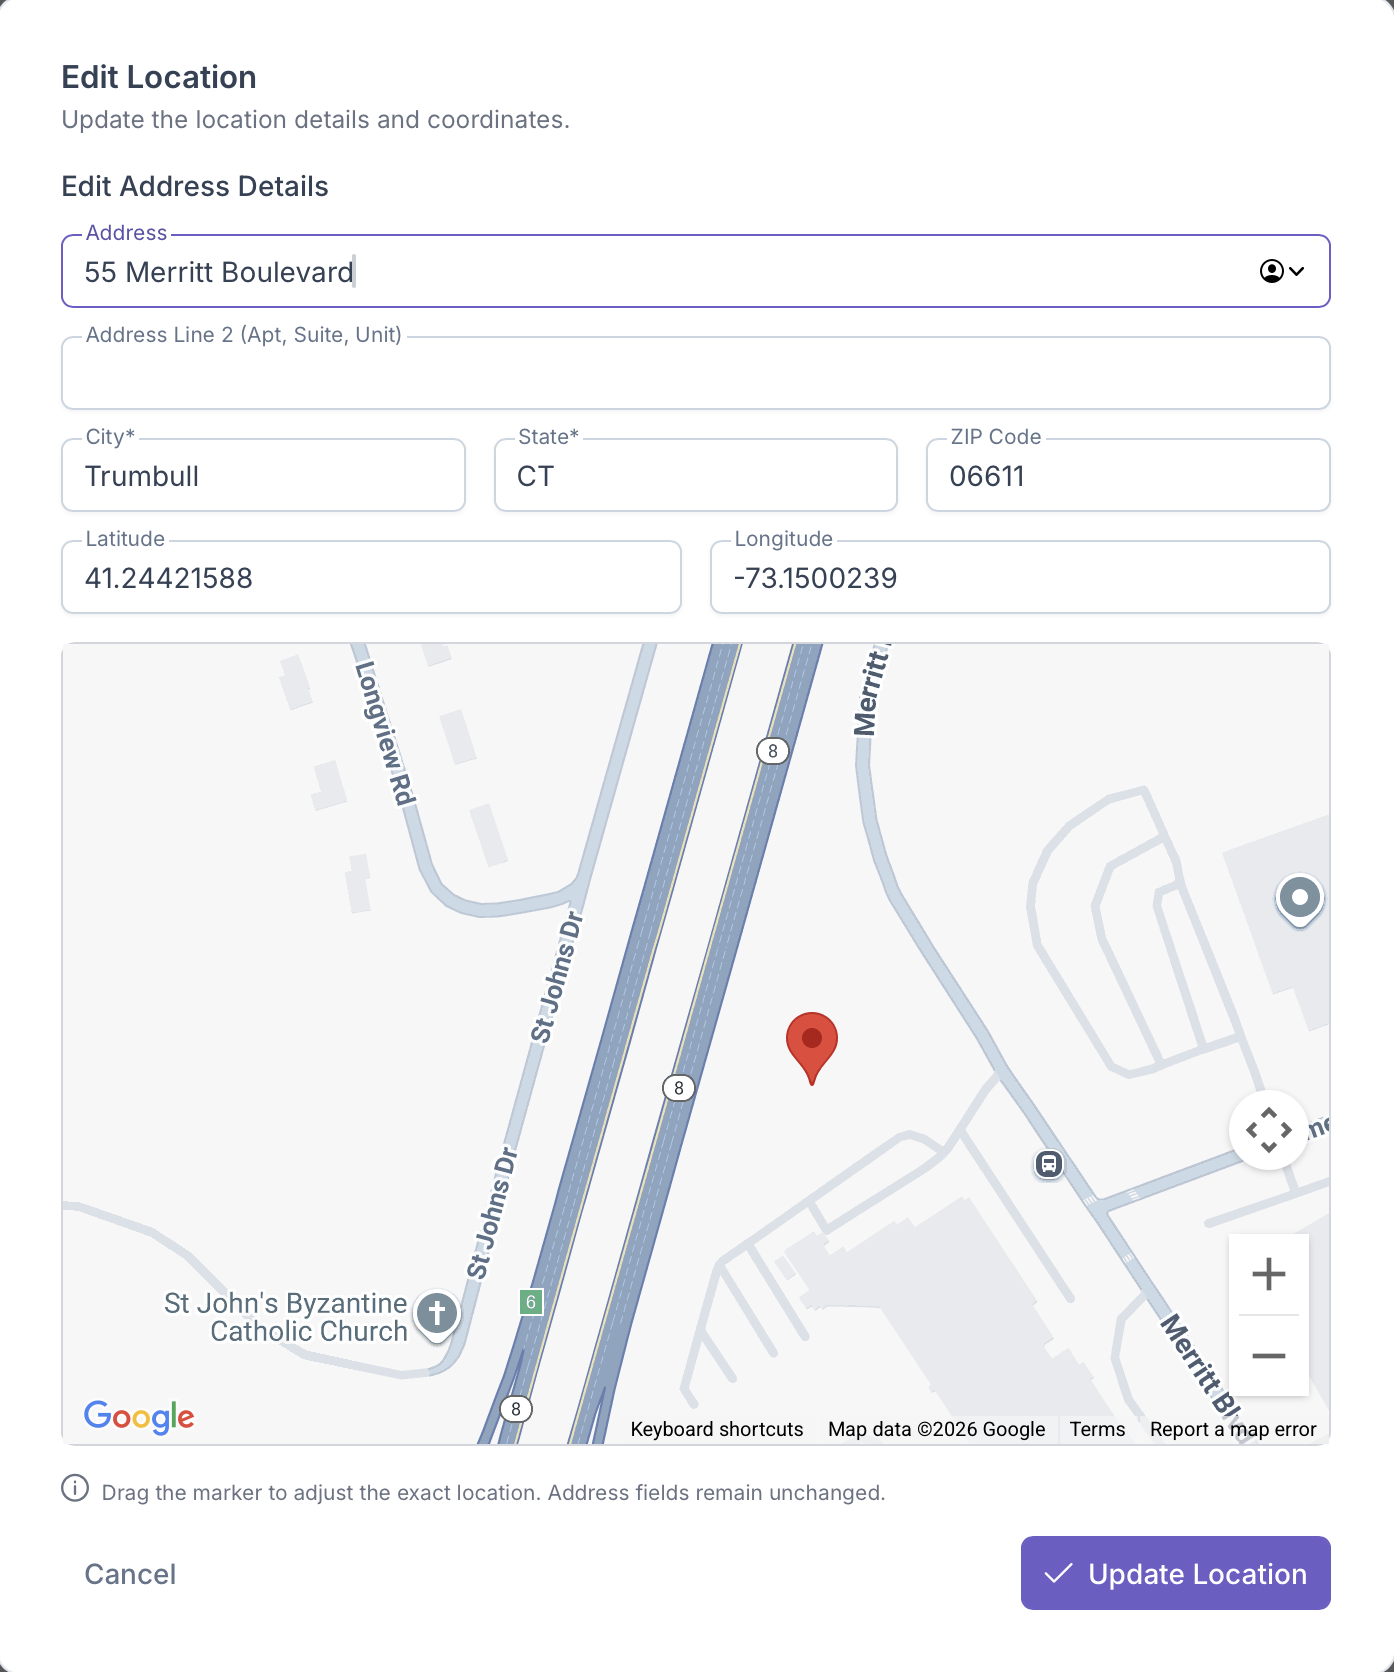
- Address
- Address Line 2
- City
- State
- Zip Code
- Lattitude and Longitude
- Coordinate Map
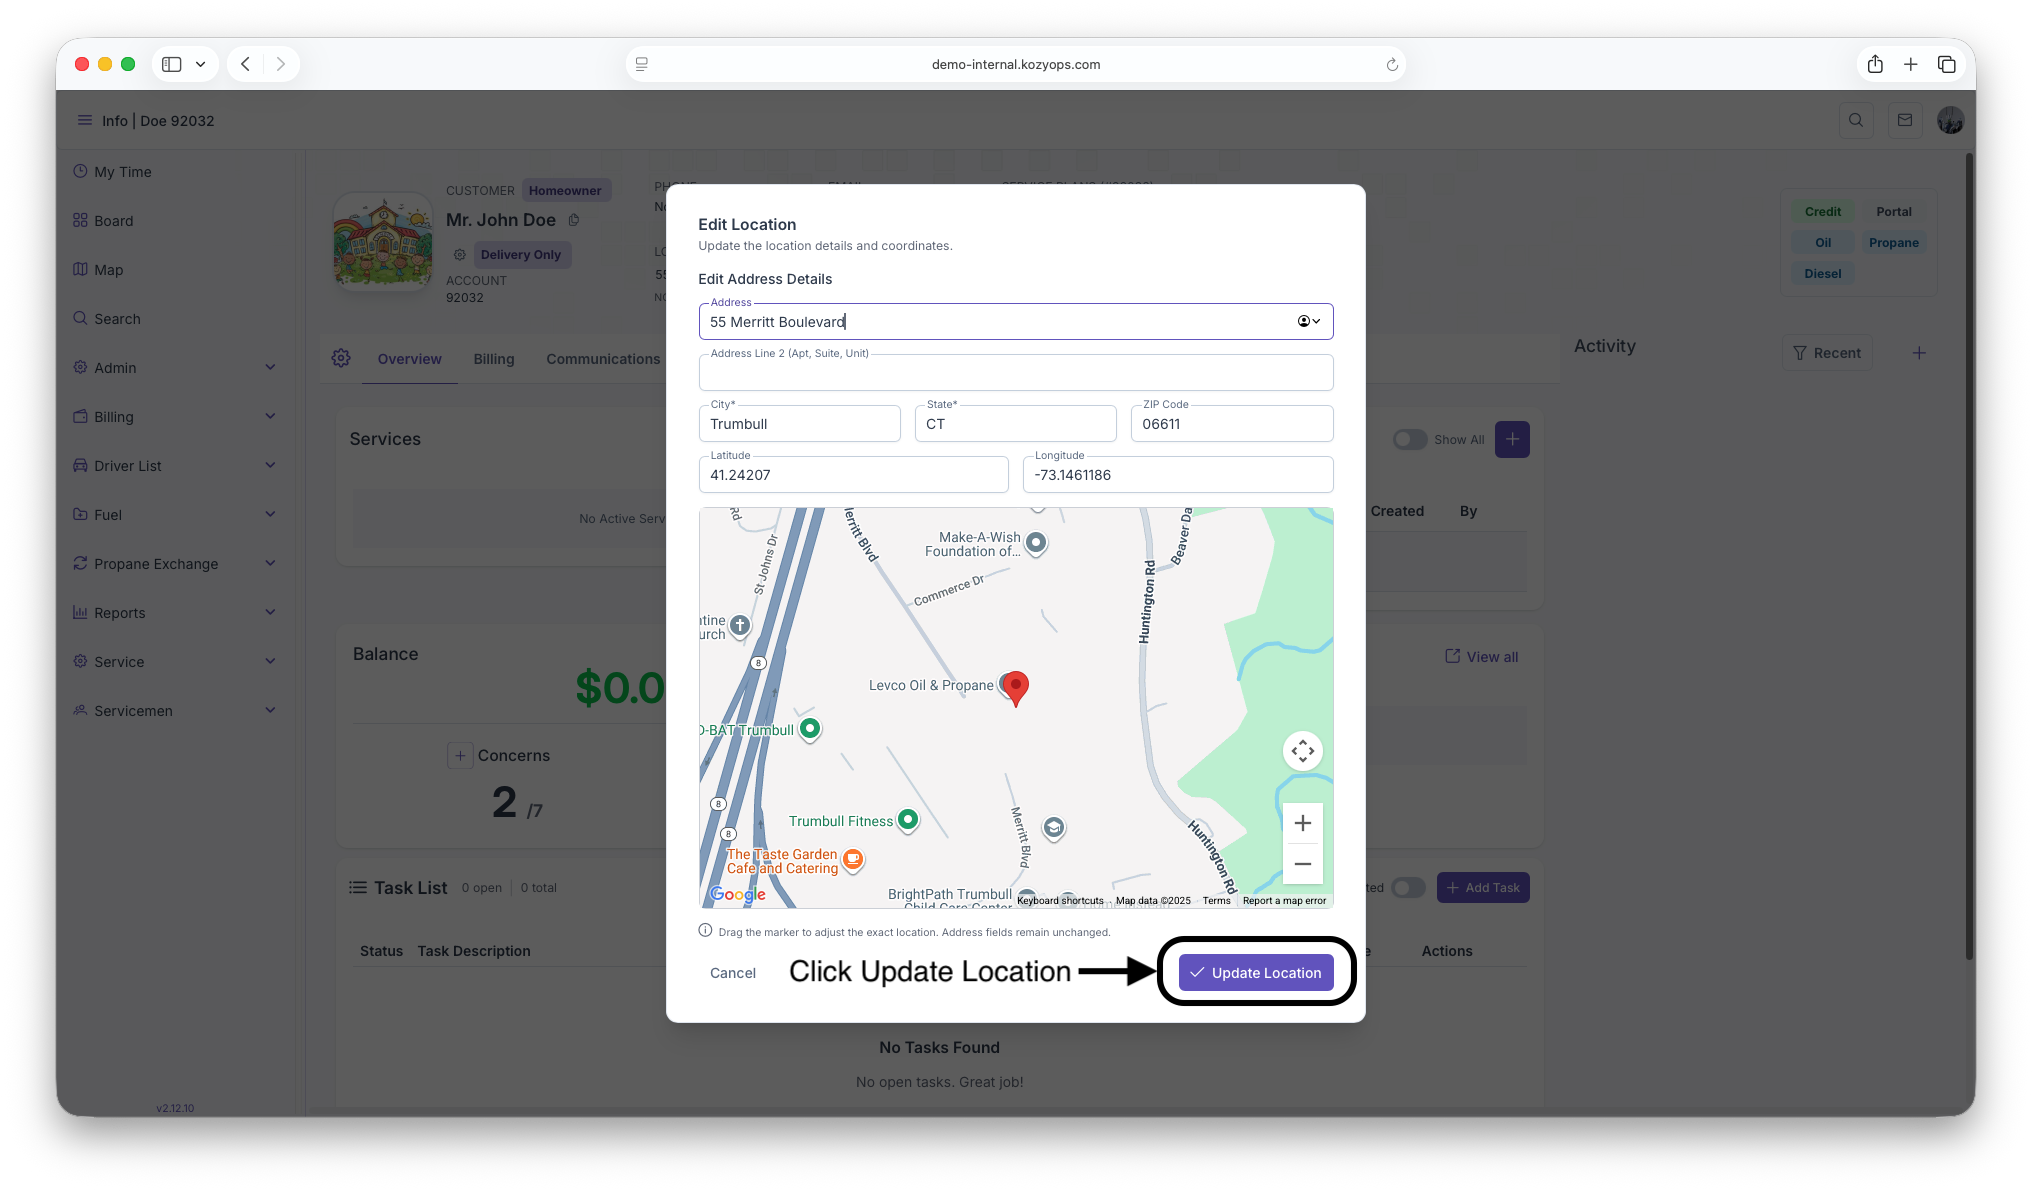
- The Lattitude and Longitude can only be edited by dragging the marker on the map itself
A more in depth look at editing accounts can be seen on the Location Management guide. Once all edits are complete, clicking on Update Location will update the customers address and coordinates