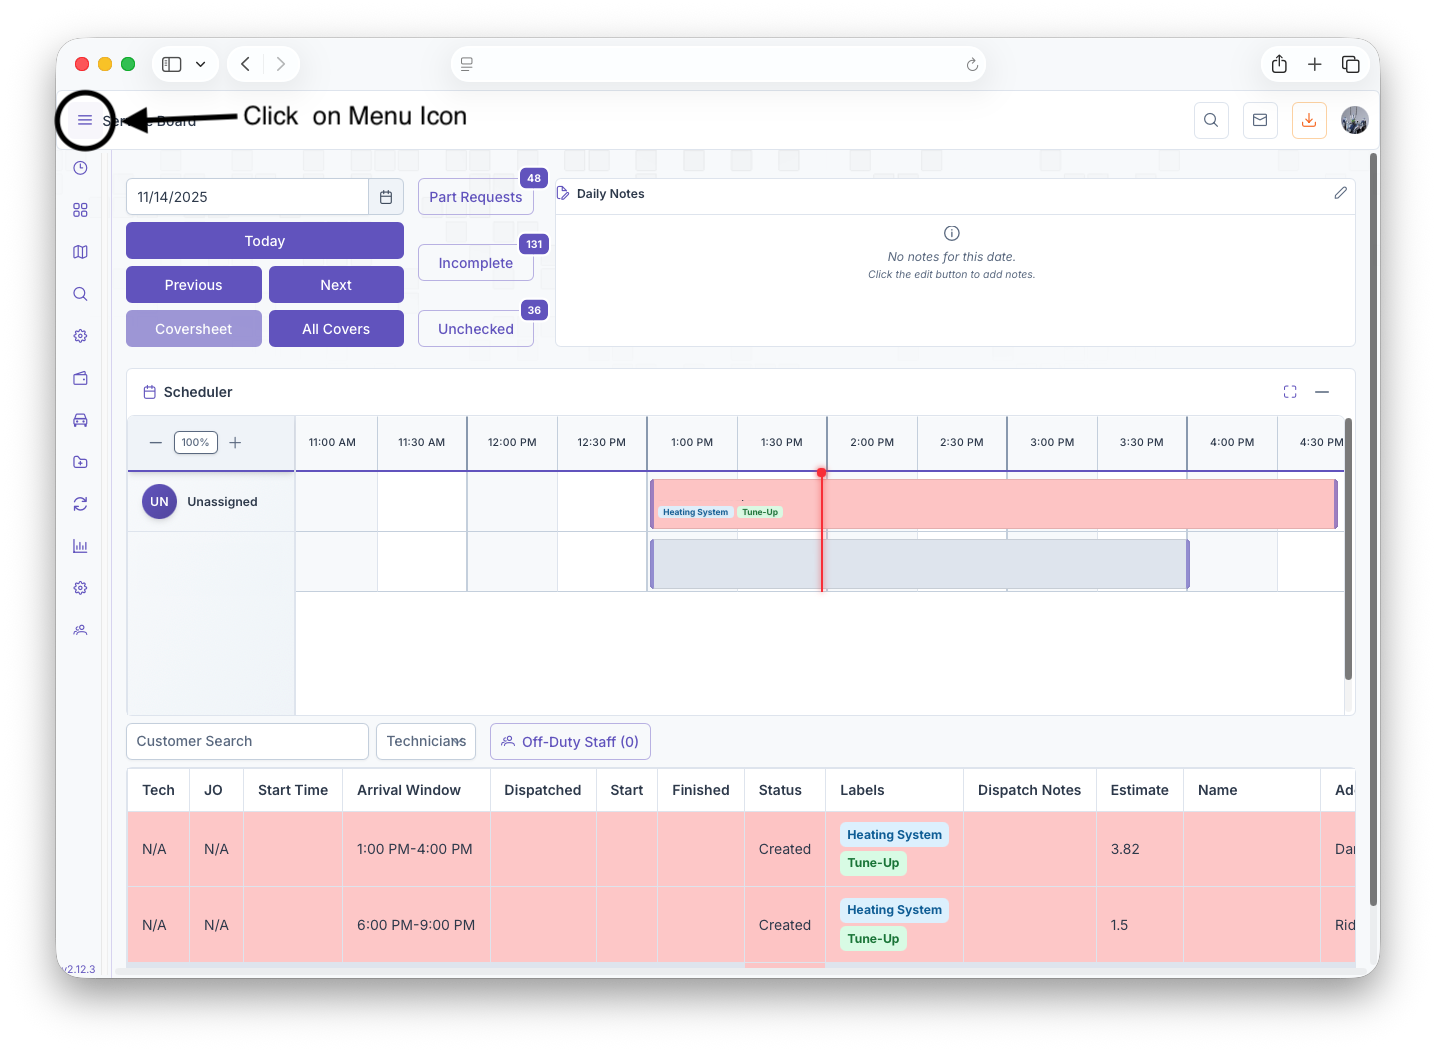
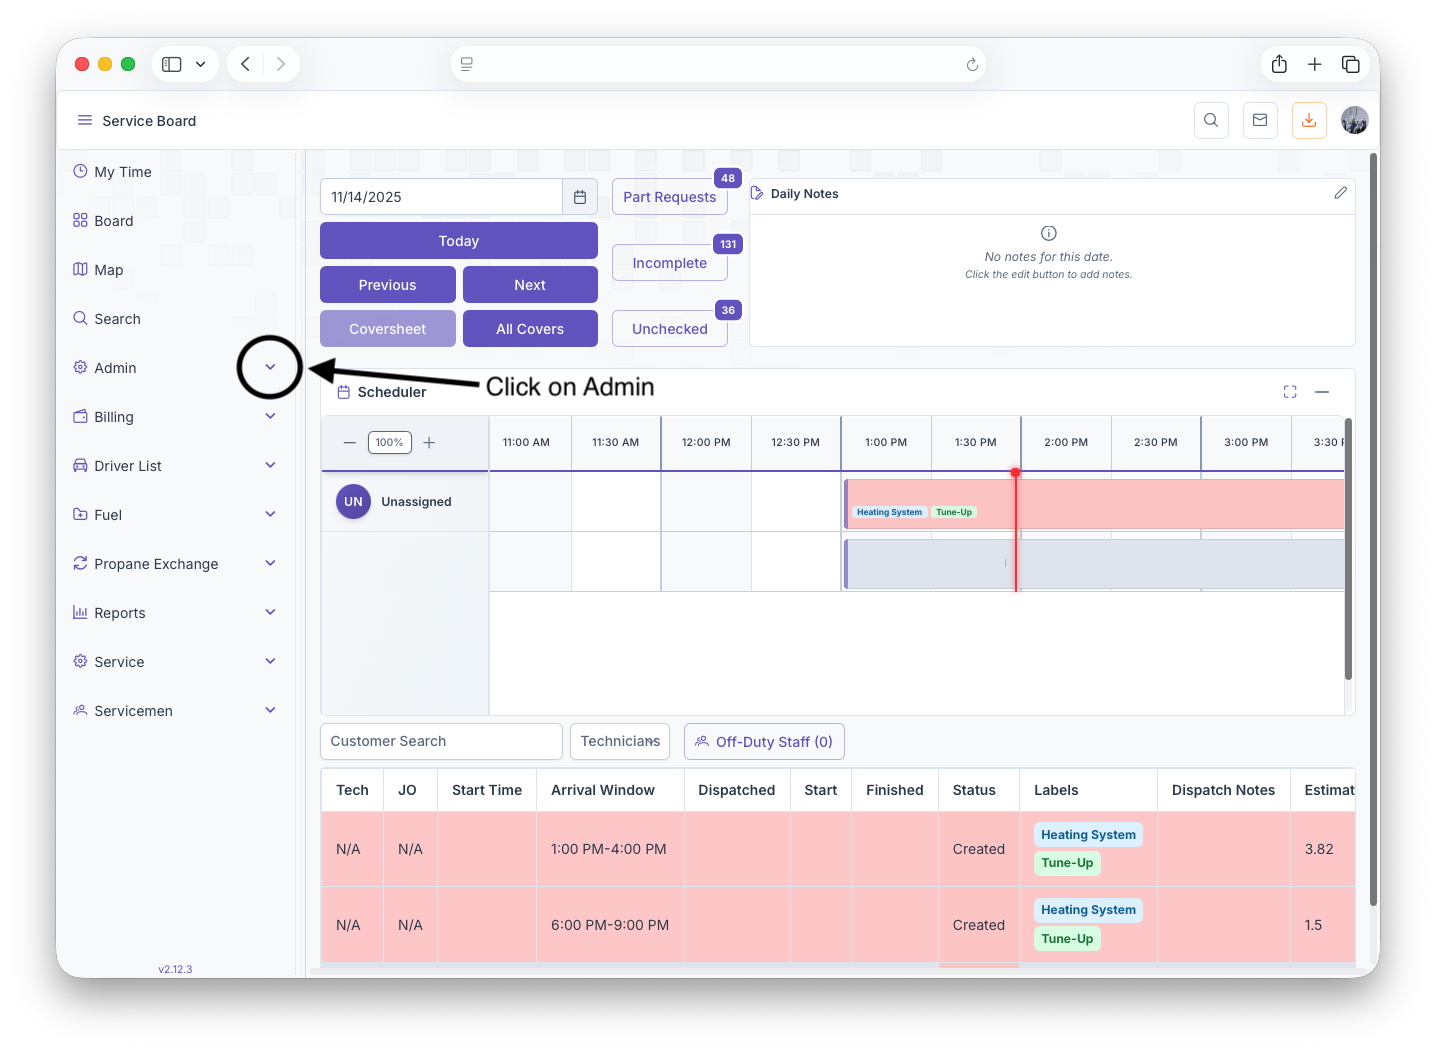
Admin
- Dashboard
- Employee Management
- Payroll
- Shift Schedules
- Settings
- Branding
- Custom Fields
- Fuels
- Invoice Code
- Invoice Subtypes
- Labels
- Promotions
- Taxes
- Terminals
- Vehicles
- Zones
- Degree Day Plan
Dashboard
Introduction
The Dashboard generates an Employee List and their status' for the current day selected. To reach this page, click on Admin on the side menu then click on Dashboard. Clicking on the three bars on the top left corner of the page expands the side menu to show more detail allowing for easier navigation. The page generates with todays date, but other days can be selected by clicking on the Previous or Next buttons next to the date. The page then shows a list of the following, Employee Name, Employee Iitials, Payroll, Schedule, Status, Clock in Time, Pay In, Resolved and Vehicle. The list is organized alphabetically by the Employees first name.
- Name - Shows the Employee Name
- Initials - Shows The Employees initials
- Payroll - Clicking on Payroll changes the page to shows the employees payroll information
- Schedule - Clicking on Shift Schedules changes the page to show the employees schedules
- Status - Shows the Employees current status -
 Employee Does Not Have a Shift,
  Has a Flexible Time but Hasn't Arrived Yet,
  Employee Does Not Have a Shift but Has Clocked In,
  Has Clocked Out for The Day,
  Employee clocked in more than three minutes after shift start time
 - Clock In Time - Shows when the Employee clocked in
- Pay In -
- Resolved -
- Vehicle - What vehicle the Employee is assigned to


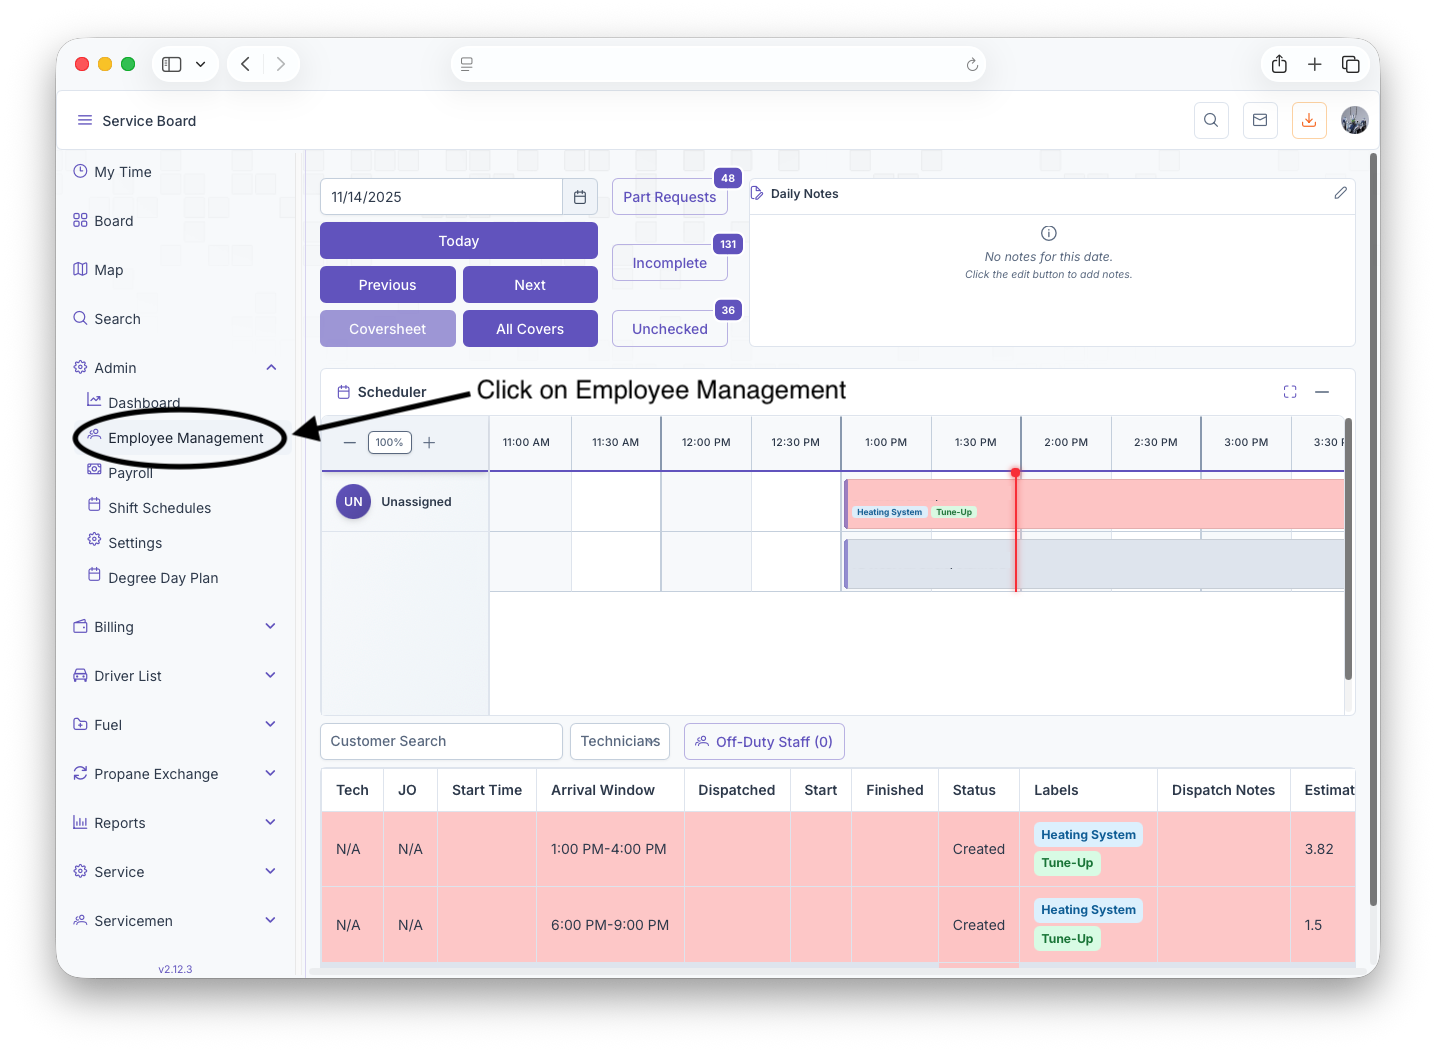
Employee Management
Editing and Adding New Employees
Introduction
The Employee Management page can be used to add a new employee to the system or edit a current one. To reach the Employee Management page, click on The Admin dropdown on the side menu then click on Employee Managaement. Clicking on the three bars on the top let corner on the page expands the side menu to show more detail allowing for Easier Navigation.
Editing or Adding a New Employee
The Employee Management page will then generate. From here clicking on the Select Employee dropdown gives the option to select a current Employee and edit their account or clicking on add Employee at the bottom of the dropdown clears all fields to allow data entry of a new employee. The page will then show the Employee Status, Their Application, Payroll, Employment and Profile Picture
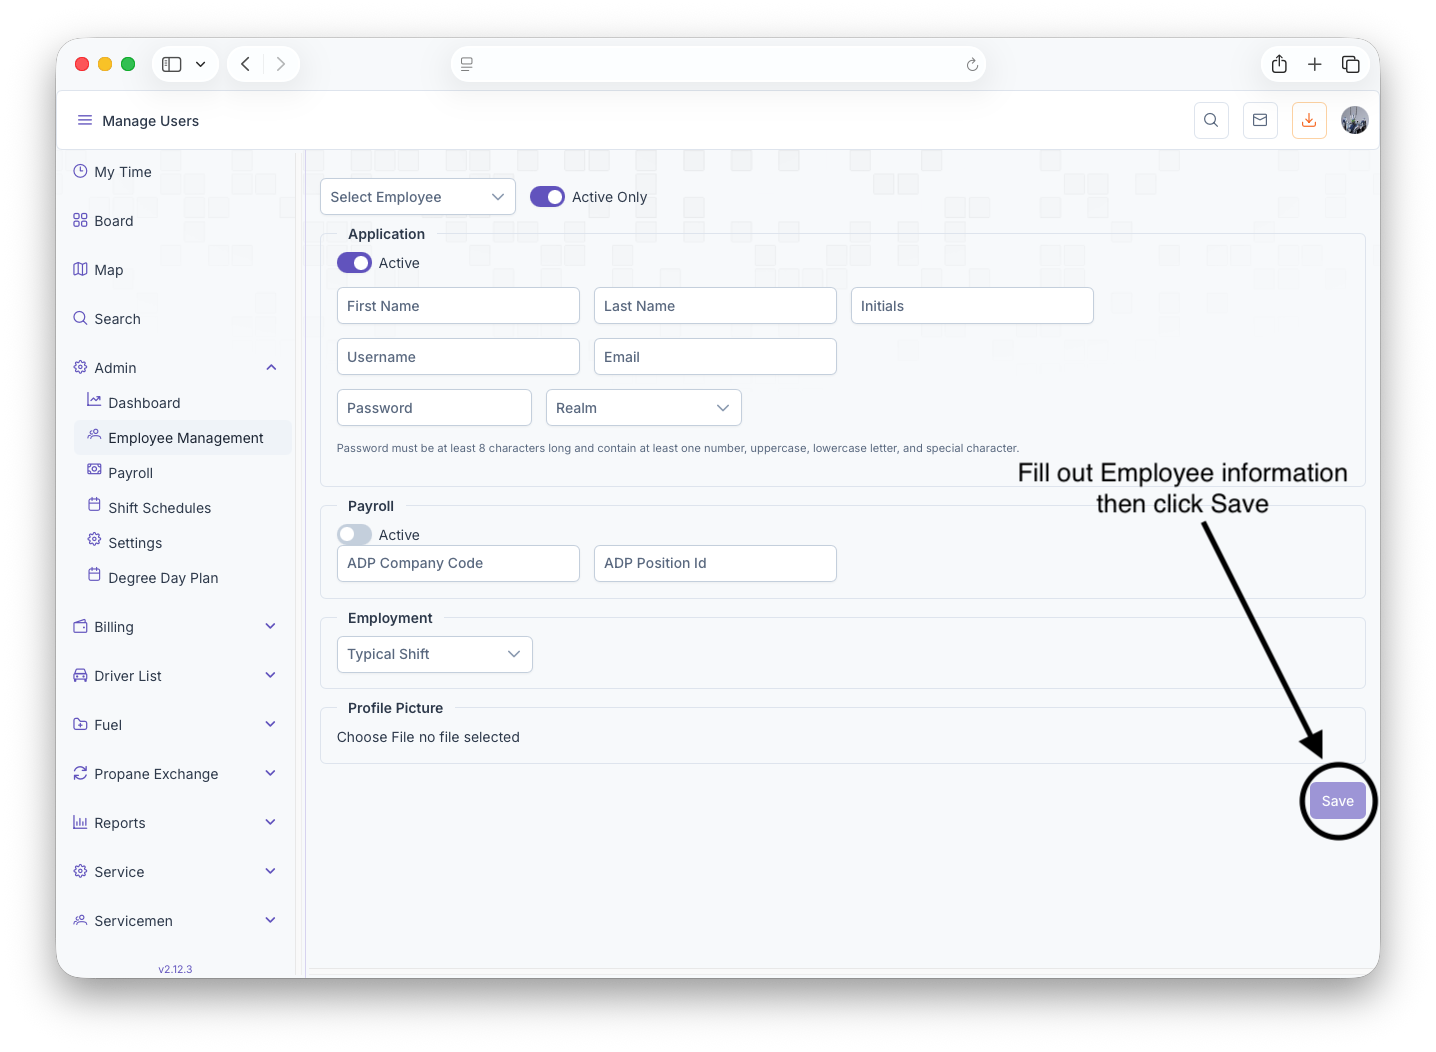
- Status: Toggling status shows if the employee is currently active or inactive\
- Application: Here is where the employees information is filled out: First Name, Last Name, Initials, Username, Email, Password and Realm
- Payroll: The Employees payroll status can be toggled to active or inactive, can fill out the ADP Company Code and the ADP Position ID
- Employment: Shows location of where the employee is working and the time
- Profile Picture: clicking on Choose File allows a picture of the employee to be uploaded to their account
Upon finishing filling out The Employees information, clicking on the Save button will save the employees information to the system. Filling out a blank page can be used to add a new employee to the system and changing the information of a currently selected employee allows the employees information to be edited
Payroll
Shift Schedules
Settings
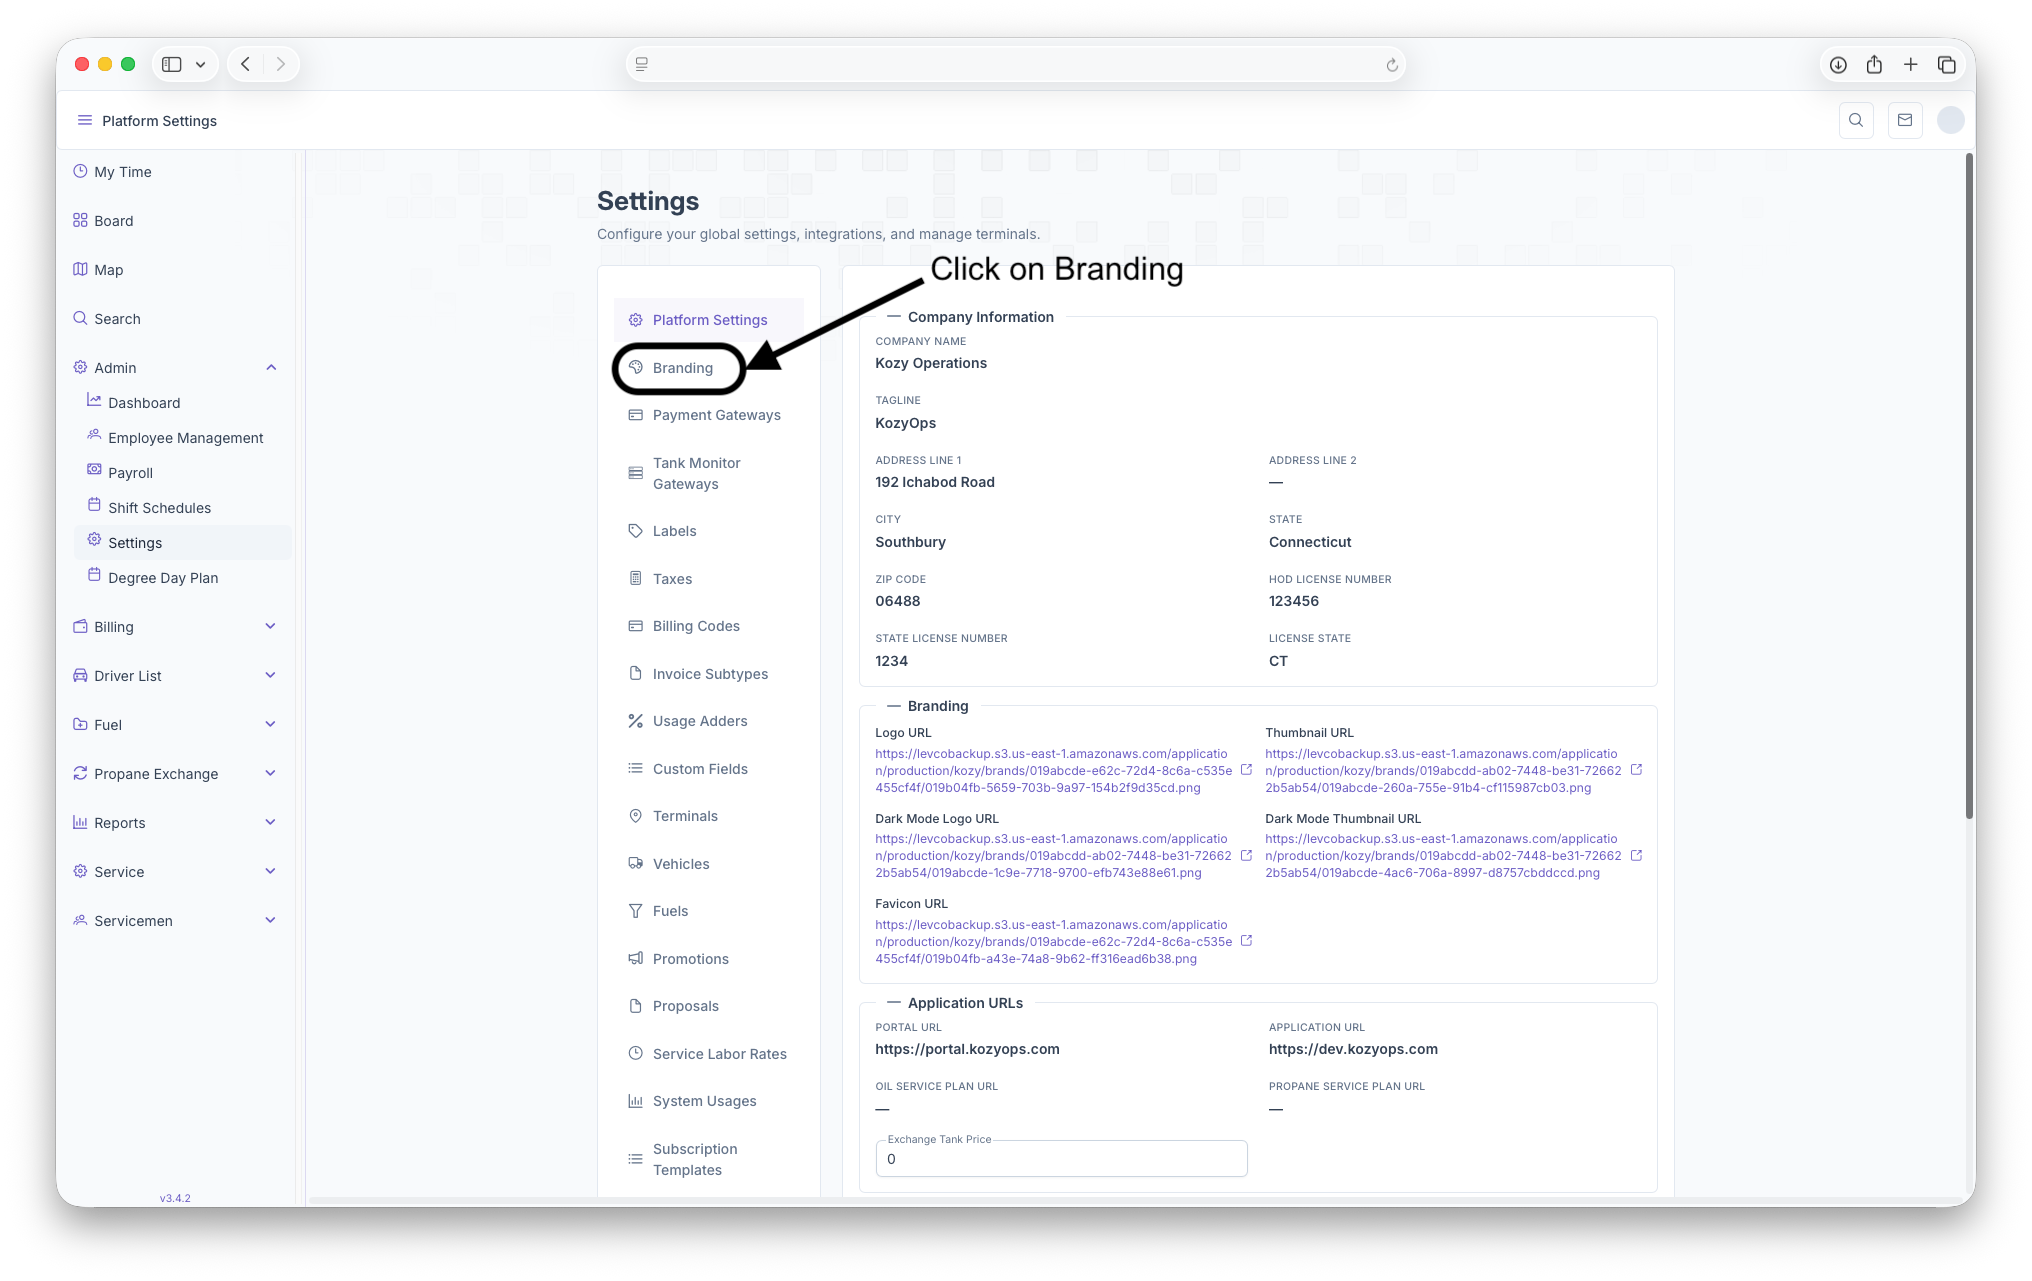
Branding
Brands
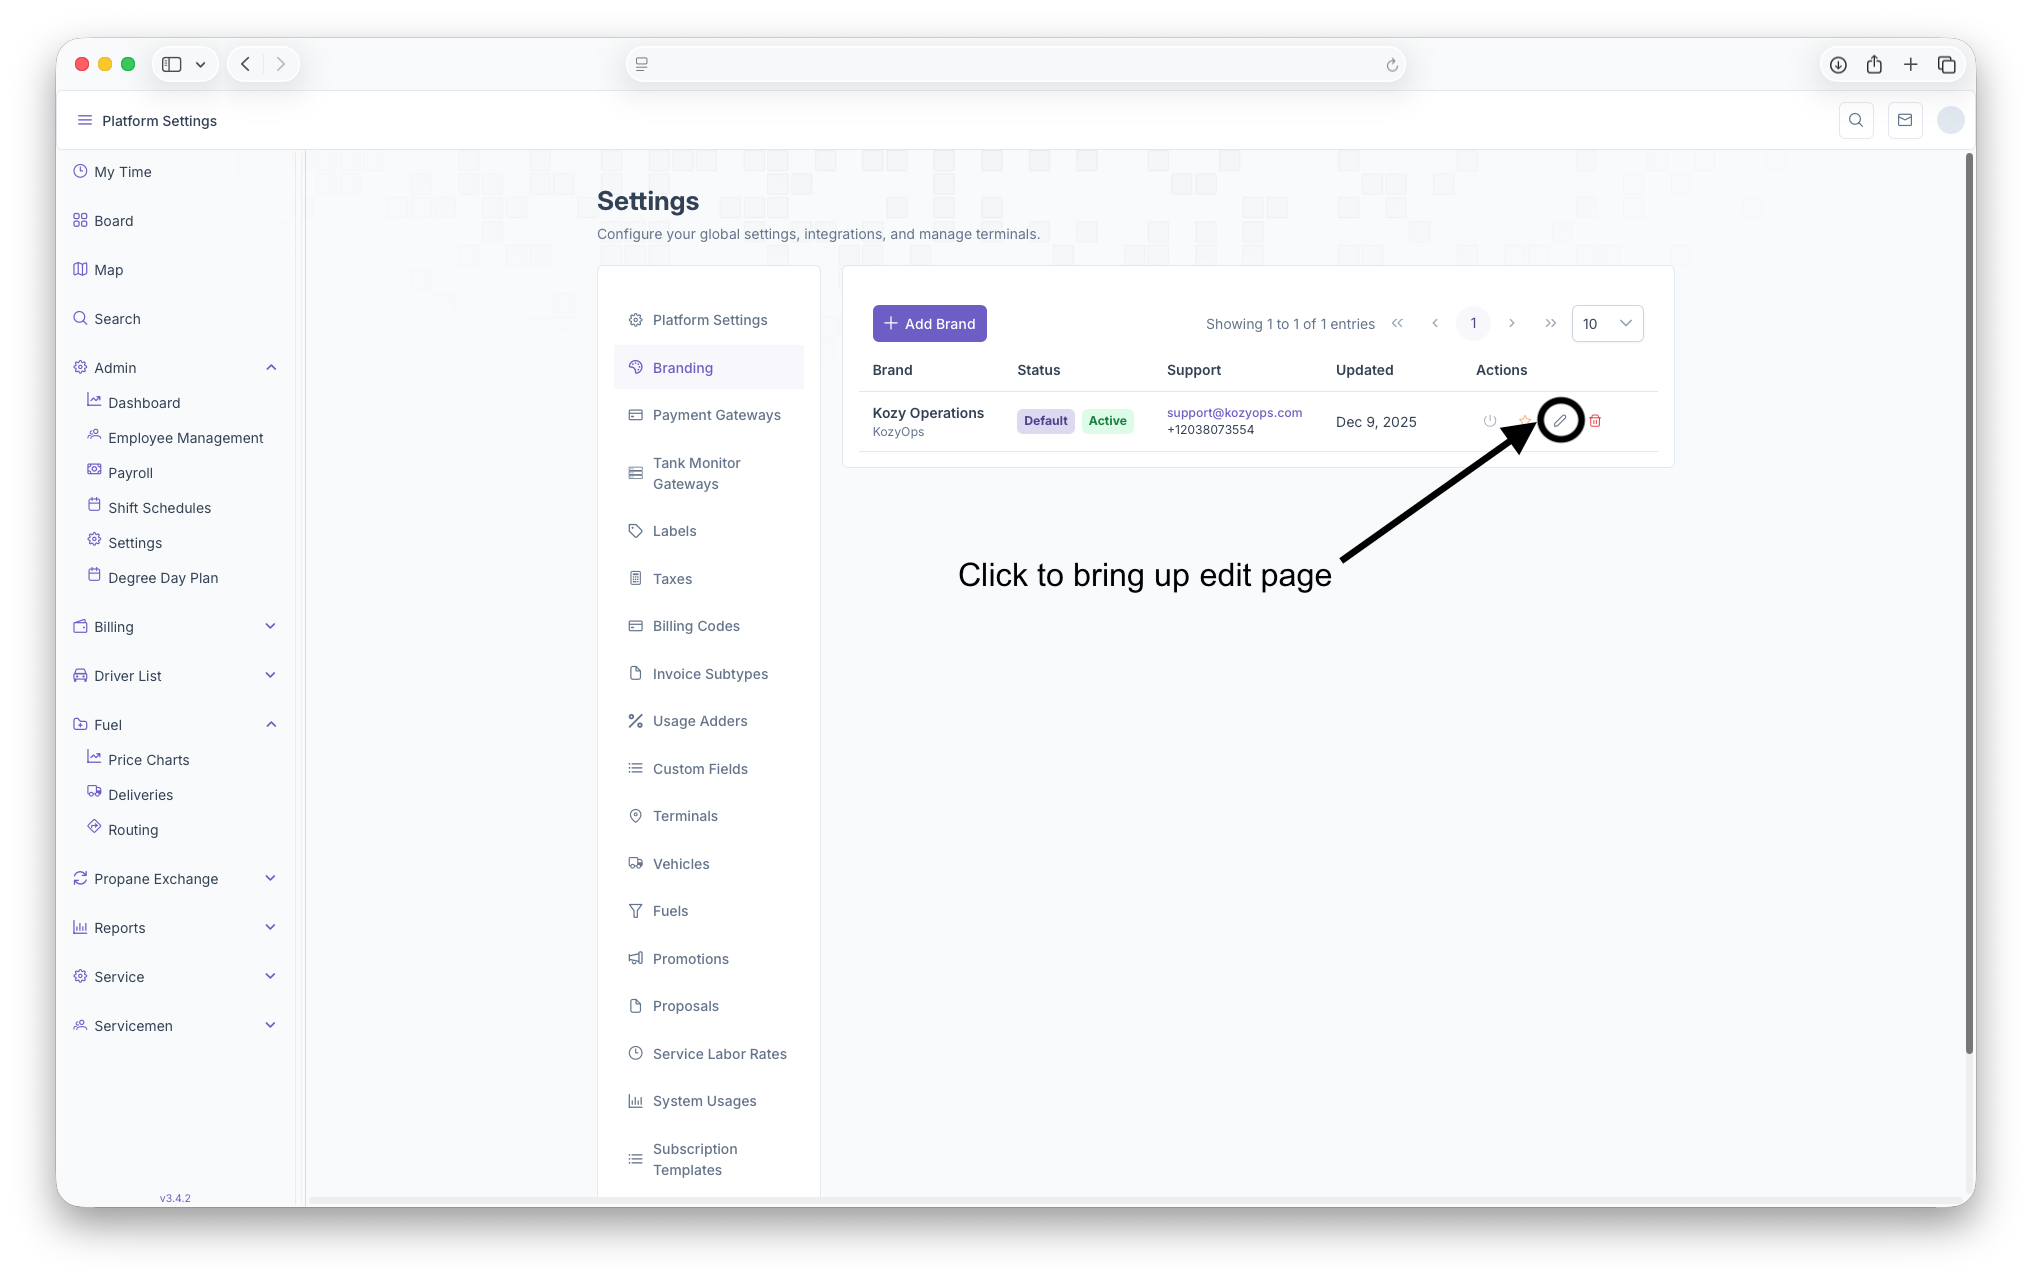
The Branding page is where brands can be created for the company or for any sub-companies owned by them. Branding is used to show The Companies Logo and Name, which are shown when sending emails or giving invoices to customers. To reach the Branding page click on the Admin Dropdown, then click on settings. Once on the Settings page, click on the Branding tab to open the page. Clicking on the three bars on the top left corner of the page will expand the side menu showing more detail for easier navigation


Branding Page
The page displays with any brands that have already been created and shows The Brand, Status, Support, when it was last Updated and Actions that can be taken on the brand. New Brands can also be added here as well.
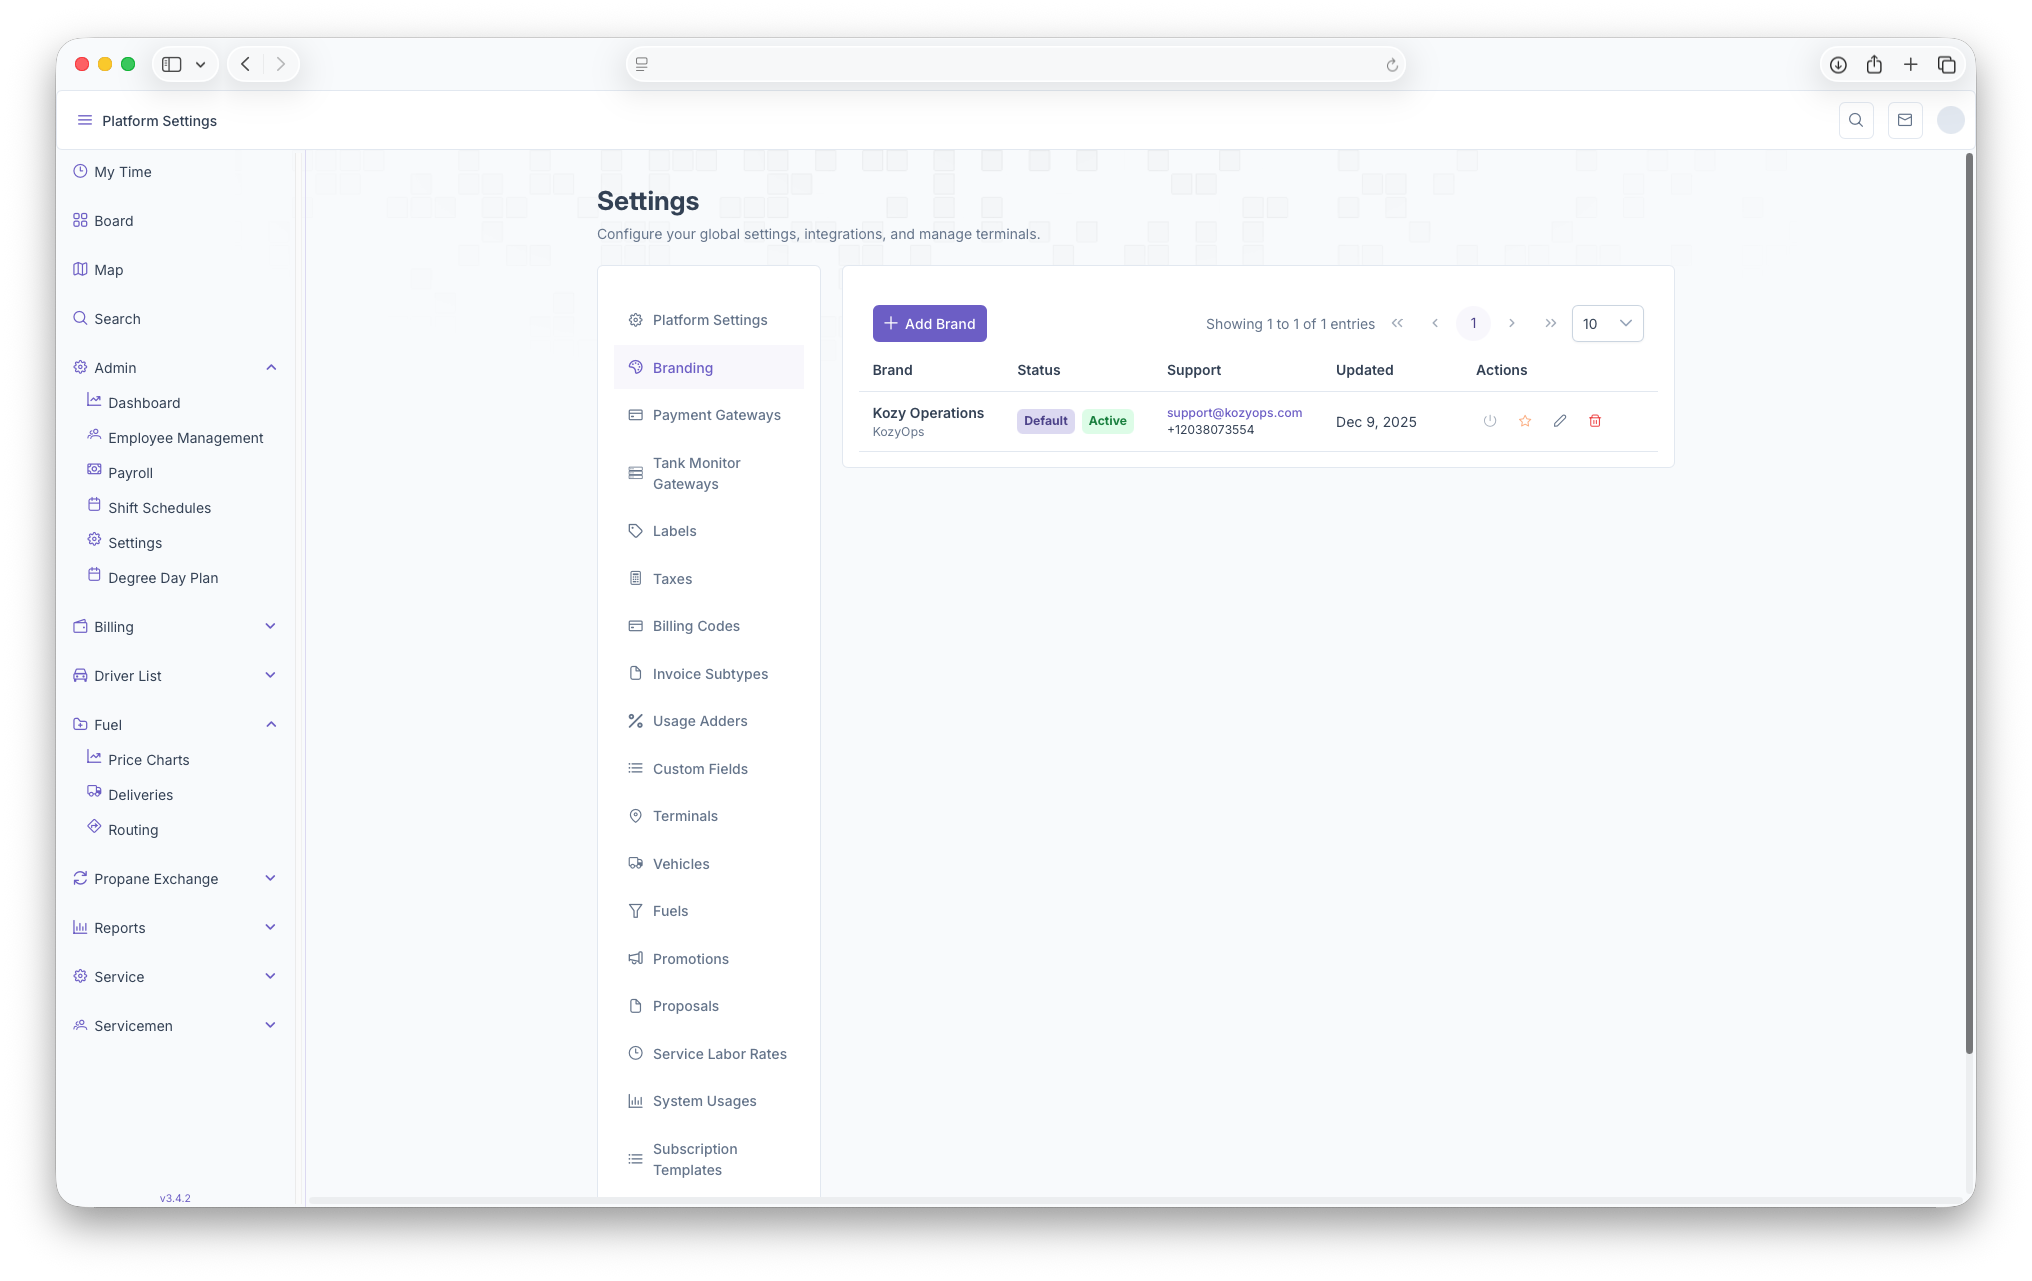
- Brand: The Name of The Company and be seen here
- Status: What the status of the brand is, whether it's active or if it's the current default brand of the company
- Support: Provides an Email and Phone number in order to reach out to the brand if any support is needed
- Updated: Shows when the brand was last updated
- Actions: Here an Account can be activated/deactivated, can be made the default brand, can be edited or can just be deleted
- +Add Brand: Clicking on Add Brand gives the option to add a brand, see below for more detail.
Adding a brand
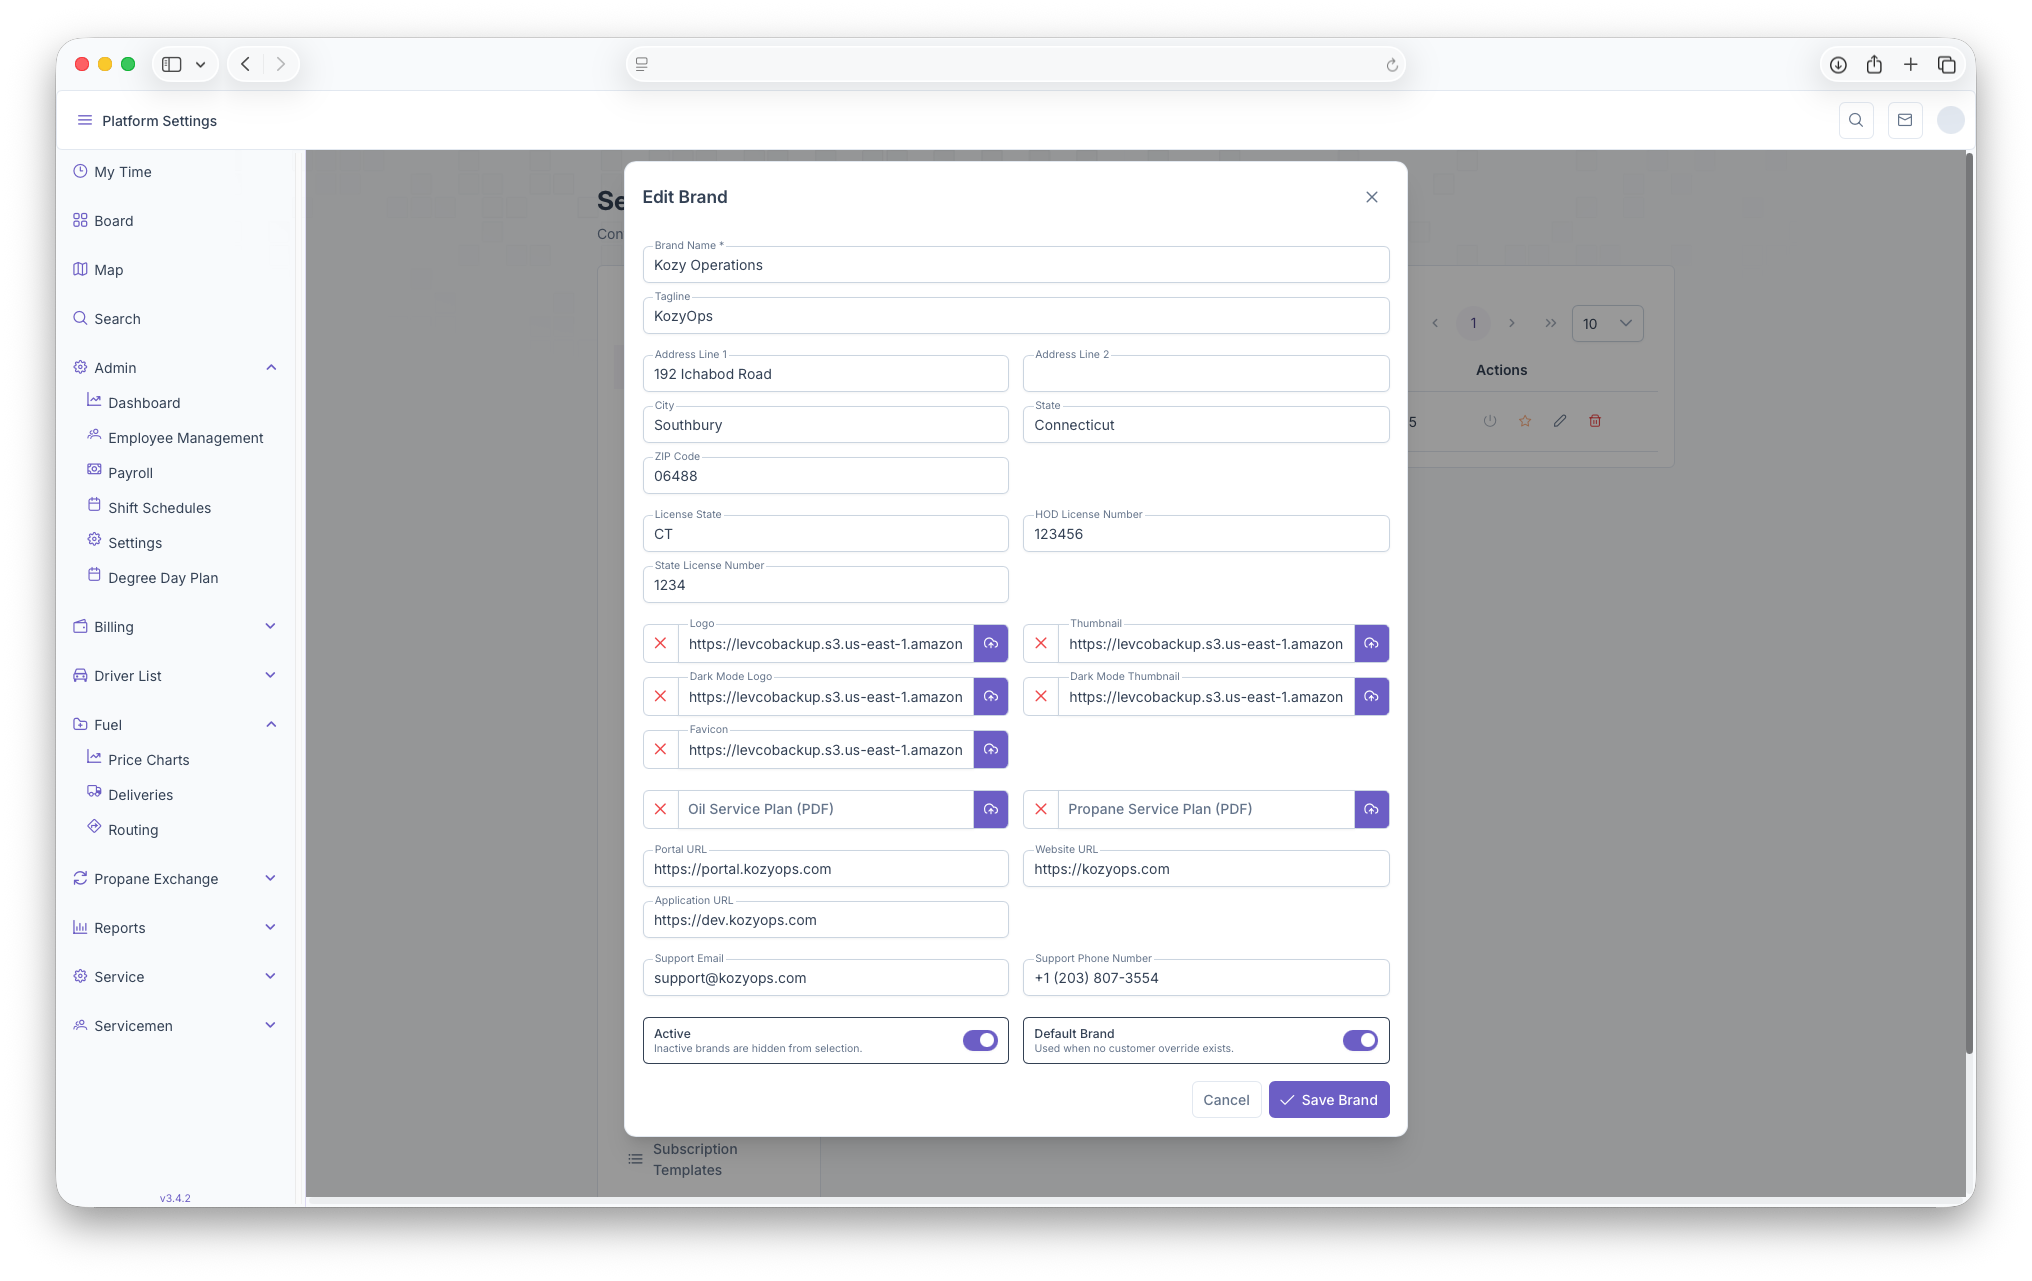
Clicking on the +Add Brand button brings up the add brand page if any brands need to be added. The page can then be filled with all the information needed in order to create a brand for the company. The Following fields will then appear to be filled out
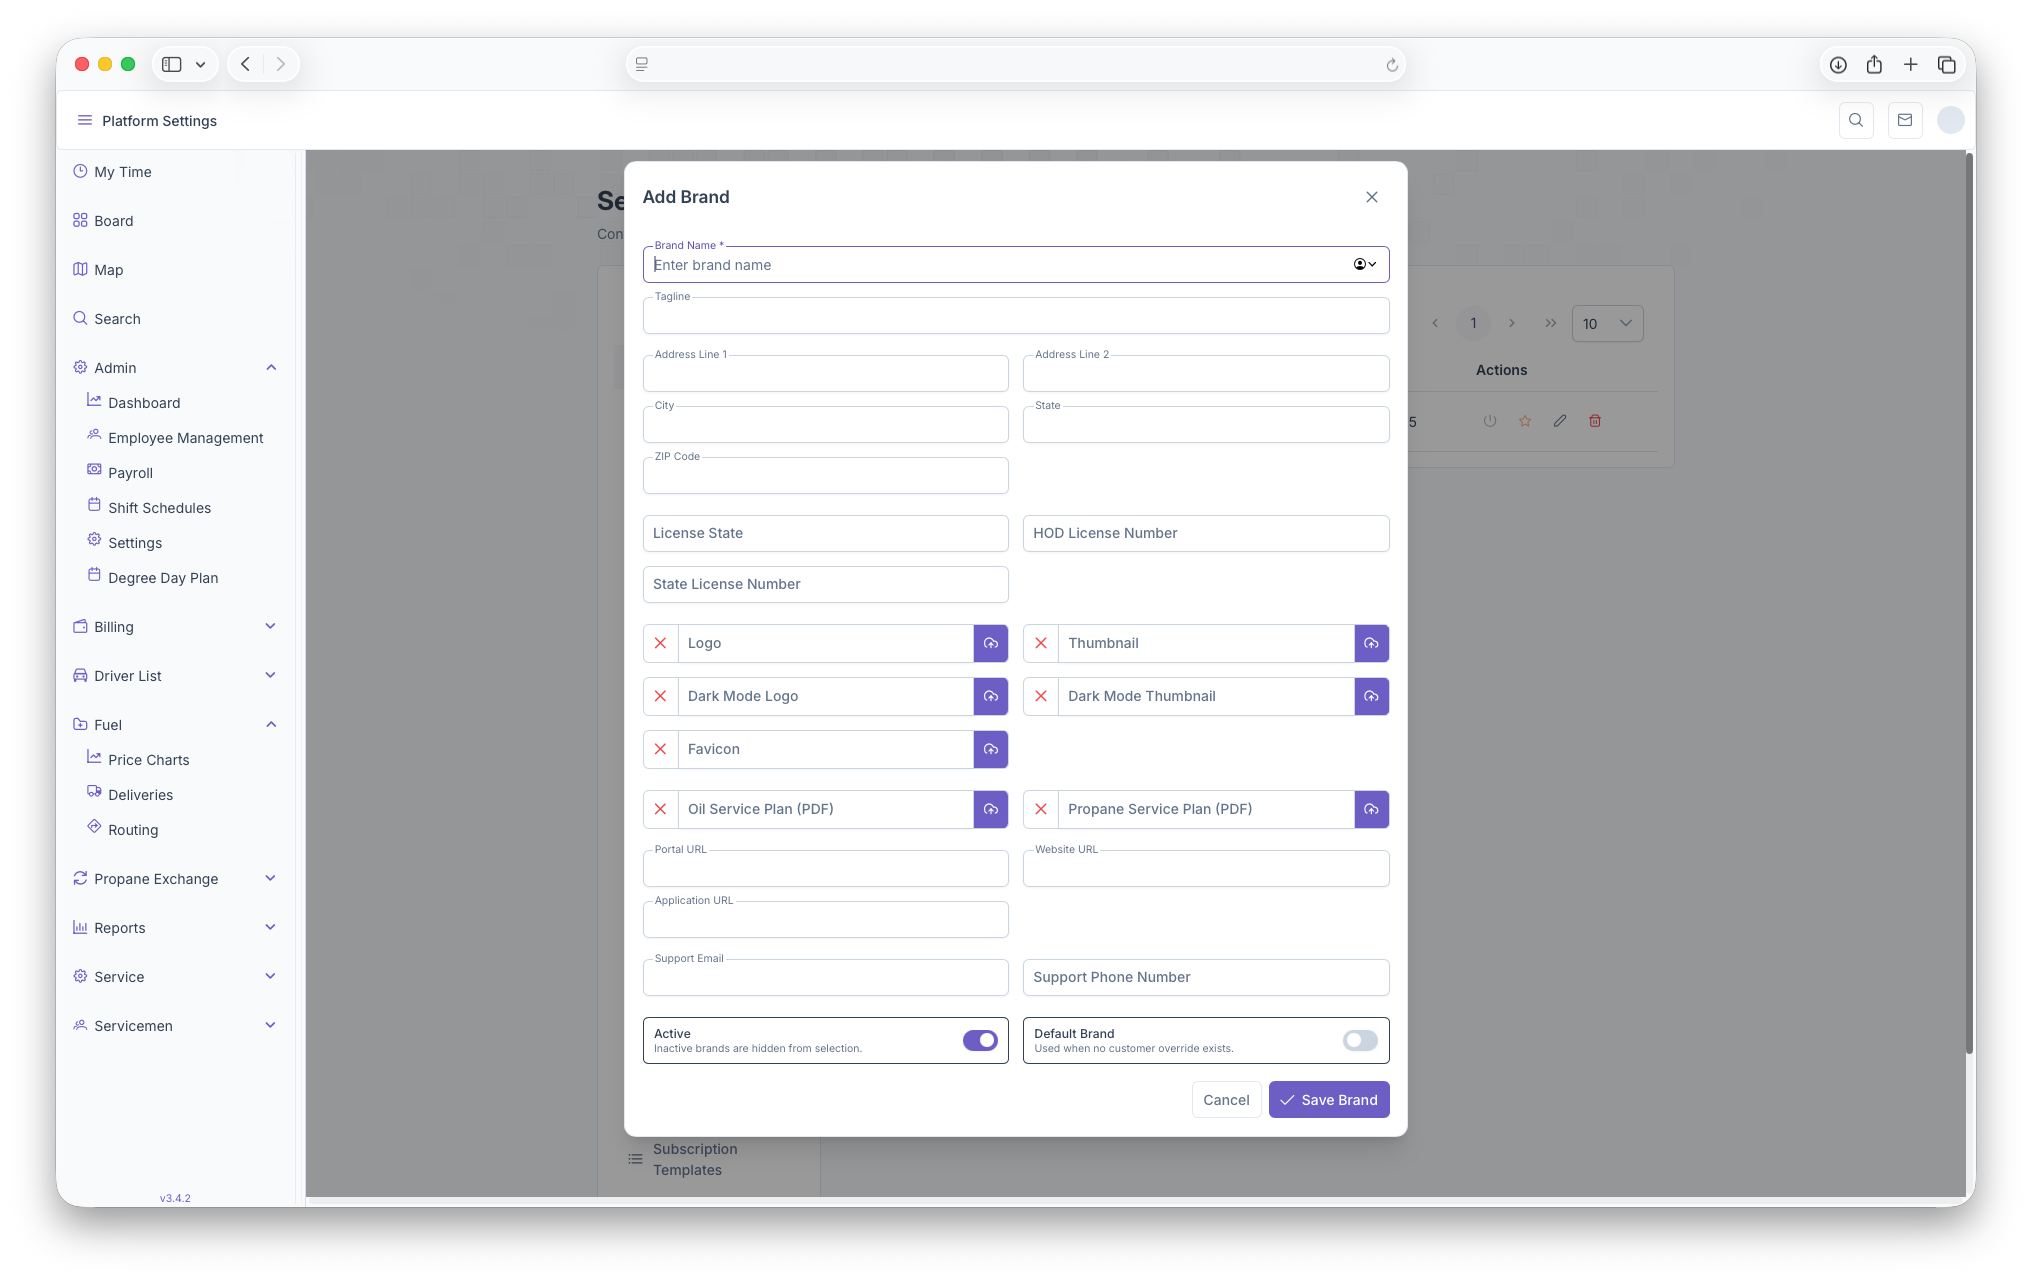
- Brand Name
- Tagline
- Address Line 1
- Address Line 2
- City
- State
- Zip
- License State
- HOD License Number
- State License Number
- Images can then be added for the Logo, Dark Mode Logo, Favicon, Thumbnail and Dark Mode Thumbnail
- Any Oil/Propane Service Plan PDF's can be added here
- The Portal URL
- Website URL
- Application URL
- Support Email and Phone Number
- Can toggle wether Active/Inactive and if it's the Default Brand or not
Once finished filling out the information, clicking on the Save Brand button will now upload the new brand for the company's use. Clicking cancel will close out the page and any information put in will be deleted.
Editing a Brand
To edit a brand, click on the edit button in the brand row in order to make any changes neccessary. The Edit page will pop up and look just like the Add Brand page, only with the fields already filled out. From here any changes can be made to the brand and saved by clicking on the Save Brand button. Hitting cancel will close the page and undo any changes that were made to the page
Custom Fields
Introduction
Custom Fields are where custom fields, that are seen when creating a system and equipment, are created and managed. To reach the Customs Fields page, open the settings page by clicking on admin then clicking on the Customs Fields. Clicking on the three bars on the top left corner of the page will expand the side menu for easier access
Custom Fields
Custom Fields are an additional field that allows for extra infomration to be added when creating a system or equipment. When arriving on the page, custom fields are shown as line items with the following columns
- Label - The label off tje field created
- Key
- Type - The type the Custom Field is being made for, eg. System, Equipment
- Subtype - The subtype that falls under the type, eg. subtype for system would be a fuel and for equipment, the subtype would be the kind of equipment
- Status - Shows if the custom field is currently active or inactive
- Actions - Actions that can be taken on the Custom Field
- Edit - Clicking allows for the Custom Fiels to be edited
- Status - Can be toggled to make Custom Field active or inactive
- Trash - Clicking will delete the Custom Fields created
Adding a Custom Field
Adding a Custom Field is simple and is done by clicking on the Add Field button. Once clicked, the Add Custom Field popup will generate and the following should be filed out
- Display Label - The Name of the Custom Field being added
- Field Key -
- Type - The type that the field is for, eg. System, Equipment
- Sybtype - Will vary based on type, eg. if System, then it'll be the type of fuel, if Equipment, the type of equipment being used
- Description - A description of the Custom Field be added
Once all the fields are filled out, clicking on Create Field will generate the Custom Field and it will appear when creating a system or equipment for the customer. Clicking on cancel will close out the popup and the Custom Field will not be added
Editing A Custom Field
in order to edit a Custom Field, start by clicking on the Edit button under the actions side of a selected Custom Field. Once clicked, the edit Custom Field popup will appear, which is the same as the Add A Custom Field popup with the exception of the fields already filled out. Once the popup appears, all fields can be edited, and once finished, clicking on Update Field will update all information that was edited to the Custom Field. Clicking on cancel will close out the popup and void out any changes that might've been made
Fuels
Introduction
The Fuels page is where Fuels are created and managed based on the fuels that the company uses. To reach the Fuels page, open the settings page by clicking on admin then clicking on the Fuels. Clicking on the three bars on the top left corner of the page will expand the side menu for easier access
Fuels
As stated above, Fuels are created and managed here. Fuels are incredibly important to create as this is the product that is primarily being sold and without Fuels in the system, deliveries can't be routed or delivered for Customers. When arriving on the page, The page will show all Fuels created as line items with the following columns
- Fuel Name - this will appear as the fuel type created, eg. Oil, Propane, Diesel, etc.
- Status - Shows if the Fuel is currently active
- Play/Pause - Clicking here will activate or deactive the selected fuel
- Trash - Clicking here will delete the selected fuel
Below that will show the Tank Size Template for the Fuel that was created and appears as follows
- Name - The name of the Tank System
- Size - The Size of the tank
- Useable - The amount of fuel that's useable, also the reccomended amount volume that can be in the tank
- Optimal Delivery - The Optimal ammount that the tank should be filled to
- Active - Toggle to make the fuel active or inactive
- Actions - Actions that can be taken on the Template
- Edit- Clicking here allows for the Template to be edited
- Trash - Clicking here will delete the template
Creating Fuels and Tank Templates
Creating a fuel is simple and is done by simply typing the name of the fuel being created in The New Fuel Name Box and clicking on the Add Fuel button. This will now add the fuel to the system and will be added as a line item to the Fuel Page. From here the fuel can be used to set up fuels deliveries, but creating a fuel can be taken a step further by adding a Tank Size Template. To add a Fuel Template, click on the Add Template button after a fuel is created, this will bring up the Add Tank Size Template popup. A general warning will first appear stating that Capacity, Recommended Volume and Optimal Volume must be greater than 0 with a small guideline at the bottom of the page. Note that this is the tank that is on the companies property or where the company gets it's fuel from for management and keeping track of how much fuel is available for delivery. The following fields should then be filled
- Name - The name of the Fuel System
- Tank Capacity - The actual size of the Tank
- Recommended Volume - The recommended max amount that should be in the tank
- Optimal Delivery Volume - The optimal amount that should be delivered to the tank
Once finished, simply click on the Create button and the Tank Template will be created and added to the Fuel. Clicking cancel will close the popup and void out any information that was filled in the fields
Editing Fuels and Tank Templates
While a created fuel cannot be edited, simple actions such as acitvating and deactivating a fuel can be done by clicking on the pause or play button. Of course the fuel can be deleted as well if need be. A Tank Size Template on the other can can be edited and is done simply by clicking on the edit button under the Actions part of the template. After clicking, the Edit Tank Size Template, which is the same as the Add Tank Size Template with the exception of the fields already filled out. The fields can then be edited and clicking on update will update the template if any changes were made and clicking on cancel will close out the window and void out any changes made.
Invoice Code
Introduction
The Invoice Codes page are where invoice codes are created and managed for service products. To reach the Invoice Codes page, open the settings page by clicking on admin then clicking on the Invoice Codes. Clicking on the three bars on the top left corner of the page will expand the side menu for easier access
Invoice Codes
Upon arrving on the Invoice Codes page, Invoice Codes will be generated in a table with each code as a line item and with the following columns
-
Code - The name asssigned to the code
-
Description - A description of the Invoice Code
-
Price - The price assigned to the Invoice Code
-
Taxable - Whether the code is taxable
-
Status - Shows the status of the code, whether active or inactive
-
Actions - Actions that can be taken on the code
- Edit - Click to edit an existing Code
- Status - Toggle if the Code is active or inactive
- Trash - Delete the Invoice Code
Creating a Invoice Code
Creating a Invoice Code is easy and is done simply by clicking on the Add Code button. Upon clicking on the code, The Add invoice Code popup will generate and the following fields need to be filled out
- Code - The name of the code being created
- Description - A description of the code being created
- Price - The price being assigned to the Code
- Taxable - Toggle to make code taxable or not taxable
- Active - Toggle to make code active or inactive
Upon filling out all fields, clicking on Create Invoice Code will generate the code for future use, clicking on cancel will close the window and delete all information filled out.
Editing a Code
Editing a code is simple and is done simply by clicking on the edit button on the actions part of the Invoice Code line item. After clicking on the code, the Edit Invoice Code popup will generate. It's the same popup as the Create Invoice Code one with the excception of the fields already filled out. From here any information that needs to be edited can be changed and once done, clicking on the Update Invoice Code will update any information changed. Clicking on the Cancel button will close the window and void out any information edited on screen.
Invoice Subtypes
Introduction
This page is where Invoice Subtypes can be created and/or managed. Invoice Subtypes are used primarily for categorizing invoices when they are generated. To reach the Invoice Subtypes, click on the Admin dropdown and click on settings, once on the settings page click on the Invoice Subtype to open the page.
Invoice Subtypes
As stated before, invoice subtypes are used to categorize invoices for easier sorting and organization. When reaching the page, all subtypes will be shown as a table with each type being a line item and with the following columns,
-
Type - The Name and Type of of the Subtype Invoice created
-
Status - The status of the type whether it be active or inactive
-
Actions - Actions that can be taken on the type such as
- Edit - Clicking here allows for subtypes to be edited
- Status - Shows the status of the subtype and clicking allows to change from active to inactive
- Trash - Clicking here deletes the the subtype
Creating an Invoice Subtype
Creating an Invoice Subtype is easy and can be done by clicking on the Add Invoice Subtype button. Once clicked, the Add Invoice Subtype popup will appear with one field needing to be filled out, the Type. The type is name of the type being created, once filled out, clicking on the create button will create the subtype. To active, just click on the status button under the actions part of the line item.
Editing an Invoice Subtype
Editing an Invoice Subtype is easy and follows the same process of adding one. To do so, click on the edit button under actions on the Subtype that needs editing. The Edit Invoice Subtype popup will appear which is the same as the Add Invoice Subtype. After editing the field, click on the Update button to update the edited page. Clicking on cancel will void out any changes and close the popup.
Labels
Introduction
The Labels section of settings is where label are created and managed and can be assigned for various purposes. A label can be attached to a Customer, Location, Employee and Service Visits to provide additional information. Examples are labels used to identify a type of customer, the type of property the loaction is, what job an employee is performing or service visits to identify ugency and type of service being performed. To reach the Labels section, click on the dropdown next to admin, click opn settings, then click on Labels. Clicking on the 3 bars on the top left corner of the page will expand the side menu for easier access. Upon landing on the Labels page, there will be 4 tabs that can be selected for creating labels
Labels
When arriving on the Labels page, There will be 4 tabs to identify what the label is being created for
- Customer
- Location
- Employee
- Service Visits
Each tab will show each label as a line item with the following columns
-
Name - Shows the label of the name
-
Type - Shows the type of the Label (Types can be created for Customer, Location and Employee, but not for Service Visits
-
Status - The status of the label, Active or Inactive
-
Actions - Actions that can be taken on the label
- Edit - Click here to edit a label
- Status - Clicking here will toggle the label between Active or Inactive
- Trash - Clicking here will delete the Label
Creating Labels
Creating Labels is simple and is done the same way for all categories with the exception of types under Service Visits. To creat a label
-
Select a tab to add a label to that category
-
Click on the Add Label button to bring up the Add Label popup
-
Add the name of the Label
-
Add the type of label
-
The type of label can be added simply by typing out what the type should be named and creating the label. Now that type will generate as part of the dropdown for types going forward. This can only be done for Customer, Location and Employee
-
Service visits only has 4 types to select from, each with it's own color attached for urgency
- Other - Blue
- Equipment - Purple
- Action - Green
- Problem - Red
-
-
Click Create to generate a label for the category
Once labels are created, they can be attached to the category the were created for
- Customer - Can be attached on the Customer Overview page, a detailed look on how can be seen on the Customer Account page
- Location - Can be attached on the Manage locations page, A detailed look on how can be seen on the Manage Location Settings page
- Employee - Can be attached on the Employee Management page, a detailed look on how can be seen on the Employee Management page
- Service Visits - Can be attached on the Customer Service Page
In order to attach a label to any of the mentioned categories, the label must be created on the settings page first.
Editing Labels
Editing Labels is simple and is done by clicking on the Edit button under the actions section of a created label. After clicking on edit, the Edit Label menu will popup and any edits can be made to the label. Once completed, clicking on the Update Label button will update the label with the new information and clicking on cancel will close out the popup and erase any changed made on the label.
Promotions
What are Promotions?
Promotions allow you to offer discounts or apply surcharges to customer invoices automatically. Once configured, promotions are applied when invoices are created, helping you run marketing campaigns, seasonal pricing, or loyalty programs without manual calculations.
Types of Discounts and Surcharges
Discount Strategies
Promotions can reduce invoice amounts in three different ways:
1. Flat Amount
- Takes a fixed dollar amount off the invoice
- Example: $10 off every delivery
- Set as a negative value (e.g., -10.00)
2. Percentage of Fuel Cost
- Discounts based on a percentage of the fuel subtotal
- Example: 5% off propane deliveries
3. Per-Unit Adjustment
- Adjusts the price per gallon or liter
- Example: $0.10 off per gallon
- Set as a negative value per unit (e.g., -0.10)
Surcharges
You can also add charges to invoices by using positive values instead of negative ones. This is useful for:
- Late payment fees
- Peak season pricing
- Delivery surcharges
- Minimum delivery penalties
- Check handling
- Convenience fees
When Promotions Apply
Application Methods
Promotions can be configured to apply in different ways:
Universal
- Applies to every qualifying invoice automatically
- Great for ongoing discounts or standard pricing adjustments
- Example: All residential customers get 3% off heating oil
Countdown
- Counts down a specific number of invoices
- When the counter reaches zero, the promotion applies once and then deactivates
- Example: "Your next 10 deliveries are free, then get $20 off the 11th"
Limited Uses
- Applies to a set number of invoices, then deactivates
- Example: "First 5 customers get 10% off"
Volume-Based
- Applies when the delivery meets certain volume requirements
- Example: "100 gallons or more gets $15 off"
- Requires volume tiers to be configured
Negative Volume
- Applies when the delivery is below a certain volume
- Example: "Small deliveries under 50 gallons have a $10 surcharge"
- Requires volume tiers to be configured
Time-Based
- Discount appears on the invoice but only applies if the customer pays within a certain number of days
- Example: "Pay within 15 days and get 5% off"
- Great for encouraging prompt payment
Filtering Which Invoices Get Promotions
By Fuel Type
You can limit promotions to specific types of fuel:
- All fuel types
- Propane only
- Heating oil only
- Other specific fuel types
By Date Range
Set when the promotion is active:
- Start Date - When the promotion begins
- End Date - When the promotion expires
- Leave blank for ongoing promotions
Example: Create a summer promotion active from May 1 to September 30 that automatically repeats each year (you'll need to update the year manually).
Applying Promotions
Promotions must be assigned to specific delivery locations to be used. This allows you to:
- Run different promotions at different delivery locations
- Have granular control of which customers get the promotions
- Easily add or remove promotions
Setting Up a Promotion
Basic Setup
Choose Your Discount Type
-
Select a Strategy:
- Flat Amount - Fixed dollar discount
- Percentage - Percent off the fuel cost
- Per-Unit - Discount per gallon/liter
-
Enter the Value:
- For discounts, use negative numbers (e.g., -10 or -0.05)
- For surcharges, use positive numbers (e.g., 10 or 0.05)
- For percentages, use decimals (5% = 0.05, not 5)
Choose How It Applies
-
Select an Application Method:
- Universal - Every qualifying invoice
- Countdown - Count down to one final discount
- Limited Uses - Fixed number of applications
- Volume-Based - Based on delivery size
- Negative Volume - For small deliveries
- Time-Based - Only if paid quickly
-
Configure method-specific settings:
- Countdown: Set how many invoices until the discount
- Limited Uses: Set total number of uses available
- Time-Based: Set the payment window in days
Set Filters (Optional)
- Choose which invoices qualify:
- Fuel Type - Leave blank for all, or select specific type
- Fuel Subtype - Further narrow by propane, oil, etc.
- Start Date - When the promotion begins (optional)
- End Date - When the promotion ends (optional)
Assign to Locations
- After creating the promotion, assign it to the locations where it should be active
- Without location assignments, the promotion won't be used
Managing Active Promotions
Viewing Promotions
You can view:
- All promotions across the company
- Promotions assigned to a specific delivery location
- Active vs. inactive promotions
- Usage statistics (for limited use and countdown promotions)
Editing Promotions
You can update most promotion settings at any time:
- Change the discount amount
- Adjust date ranges
- Toggle active/inactive status
- Modify application settings
Note: Changes apply immediately to new invoices but don't affect invoices already created.
Deactivating Promotions
When a promotion ends:
- Toggle the "Active" switch to off, or
- Delete the promotion (it will be archived, not permanently removed)
Inactive promotions won't apply to new invoices but remain in the system for reporting purposes.
Assigning to Additional Locations
To use a promotion at more locations:
- Find the promotion in the list
- Select "Assign to Location"
- Choose the location(s)
- Save
Removing from Locations
To stop using a promotion at a location:
- Find the promotion
- Select "Unassign from Location"
- Choose the location(s) to remove
- Confirm
Common Promotion Examples
Example 1: Spring Propane Sale
Goal: 5% off all propane deliveries in April, payment required within 15 days
Setup:
- Name: "Spring Propane Sale"
- Strategy: Percentage
- Value: -0.05 (5% discount)
- Method: Time-Based
- Payment Window: 15 days
- Fuel Type: Fuel
- Fuel Subtype: Propane
- Start Date: April 1
- End Date: April 30
- Assign to all locations
Example 2: New Customer Welcome
Goal: $25 off each of the first 3 deliveries for new customers
Setup:
- Name: "New Customer Welcome"
- Strategy: Flat Amount
- Value: -25.00
- Method: Limited Uses
- Uses Remaining: 3 (per promotion instance)
- Assign to customer's location when they sign up
Note: You'd create a separate promotion instance for each new customer or use a different tracking method.
Example 3: Volume Discount
Goal: $20 off deliveries of 150 gallons or more
Setup:
- Name: "Large Delivery Discount"
- Strategy: Flat Amount
- Value: -20.00
- Method: Volume-Based
- Volume Tiers: 150 gallons minimum
- Fuel Type: Fuel
- Assign to applicable locations
Example 4: Small Delivery Surcharge
Goal: $15 surcharge for heating oil deliveries under 100 gallons
Setup:
- Name: "Small Delivery Fee"
- Strategy: Flat Amount
- Value: 15.00 (positive for surcharge)
- Method: Negative Volume
- Volume Threshold: 100 gallons
- Fuel Subtype: Heating Oil
- Assign to all locations
Example 5: Summer Service Discount
Goal: 10% off all summer deliveries (June-August), applies to every invoice
Setup:
- Name: "Summer Service Special"
- Strategy: Percentage
- Value: -0.10 (10% discount)
- Method: Universal
- Start Date: June 1
- End Date: August 31
- Assign to desired locations
Example 6: Loyalty Countdown
Goal: After 12 full-price deliveries, customers get their 13th delivery free
Setup:
- Name: "Baker's Dozen Loyalty"
- Strategy: Percentage
- Value: -1.00 (100% discount)
- Method: Countdown
- Countdown Invoices: 12
- Assign when customer enrolls in program
How Time-Based Promotions Work
Time-based promotions are unique because they appear on the invoice but only actually apply when the customer pays:
At Invoice Creation
- The promotion is noted on the invoice
- Customer sees the potential discount
- Invoice shows the discounted amount
At Payment Time
- System checks if payment is within the allowed window
- If yes, the discount is applied to the ledger
- If no, the discount is removed and full amount is charged
For Automatic Payments
- Autopay system automatically applies time-based promotions if within the window
- If payment fails, the discount is automatically rolled back
- Customer can retry payment if still within the window
Example: Invoice created on January 1 with a 15-day early payment discount:
- Customer pays January 10: ✓ Discount applies
- Customer pays January 20: ✗ No discount (too late)
Tips for Success
Setting Up Percentages
- Always use decimal values: 5% = 0.05, not 5
- For discounts, make them negative: -0.05
- Double-check the math before activating
Date Ranges
- Use specific start/end dates for seasonal promotions
- Leave dates blank for ongoing promotions
- Remember to update yearly promotions when they expire
Testing Promotions
- Start by assigning to just one location to test
- Create a test invoice to verify the calculation
- Expand to more locations once confirmed working
Volume Thresholds
- Make sure volume tiers are configured before activating volume-based promotions
- Be clear about whether the threshold is gallons or liters
- Consider fuel expansion/contraction in your thresholds
Multiple Promotions
- Customers can potentially qualify for multiple promotions on one invoice
- The system applies all qualifying promotions
- Be mindful of stacking discounts that might be too generous
Communication
- Let customers know about promotions in advance
- Include promotion details on invoices when applicable
- Send reminders for time-based promotions (e.g., "Pay within 10 days to save 5%")
Troubleshooting
Promotion Not Appearing on Invoices
Check these common issues:
- Is the promotion marked as Active?
- Is it assigned to the correct location?
- Does the invoice match the fuel type/subtype filters?
- Is today's date within the start/end date range?
- For volume-based: Does the delivery meet the volume requirement?
- For limited uses: Are there uses remaining?
Wrong Discount Amount
Verify:
- The strategy matches your intent (flat vs. percentage vs. per-unit)
- For percentages, you're using decimal format (0.05, not 5)
- The value has the correct sign (negative for discount, positive for surcharge)
- For volume-based, the volume tiers are configured correctly
Time-Based Discount Not Applied
Confirm:
- Payment was made within the allowed number of days
- The invoice creation date + valid days hasn't passed
- Automatic payment processing completed successfully
- Customer's payment method was valid
Promotion Deactivated Unexpectedly
This can happen when:
- Limited uses reached zero
- Countdown completed its cycle
- End date was reached
- An administrator manually deactivated it
Check the promotion history or activity logs for details.
Getting Started
To start using promotions:
- Plan your promotion - Decide on the discount type, amount, and rules
- Create the promotion - Fill in all the details carefully
- Assign to locations - Choose where it should be active
- Test it - Create a test invoice to verify it works correctly
- Monitor usage - Keep track of how often it's applied
- Adjust as needed - Fine-tune the settings based on results
Promotions help you attract new customers, reward loyal ones, and manage pricing flexibility across your business. Set them up strategically to maximize their impact!
Taxes
Introduction
The Taxes page is where taxes can be created to be attached to any sales made that are taxable. The importance of creating taxes is that they are automatically applied to a customer's invoice once the service is completed rather than having to do them all manually afterwards and erases the need for additional calculations. This page will walk through how to create taxes and how they can be applied to customers automatically if need be. To reach the Taxes page, click on the Admin Dropdown on the side menu, then click on Settings and then Taxes. Clicking on the three bars on the top left corner of the page will expand the side menu to allow for easier access
Taxes
When reaching the tax page, it will show with each tax created as a line item and with the following columns
-
Name - The name of the tax
-
Rate - The rate of the tax
-
Rate Type - The Kind of rate such a percentage or per unit
-
Fuel - The type of fuel getting taxed
-
Description - A small description of the tax
-
Status - Whether or not the tax is active or inactive
-
Default - Setting a tax to default will make it so that it's applied to every account, even new ones
-
Actions - Actions that can be taken on the tax such as
- Edit - Clicking here will allow tax to be edited
- Status - Clicking here allows for the status to be active or inactive
- Trash - Clicking here will delete the tax
Adding Taxes
Adding Taxes is simple, in order to add one, click on the Add Tax button. Clicking on it will bring up the Add Tax Line Item popup and the following fields will need to be filled out
-
Tax Name - Name of the tax being created
-
Rate Type - Rate of the tax being created
-
Rate Value - The Value of the rate
-
Fuel - The specific fuels the tax applies too
-
Description - A small description of the tax being created
-
The Following can be toggled for taxes to be appplied
- Fuel
- Service
- Subscriptions
- Service plans
- Propane Exchange
- Default For New Locations - Toggling here allows for taxes to be applied to all locations created after enabling
After filling out all the fields and enabling the tabs to be taxed, clicking on the Create Tax button will add the tax item to be applied to sales going forward, clicking on cancel will close out the popup and all information will be deleted.
Editing Tax Item
Editing a tax line item is the same as adding one with the exception of hitting the edit button on the actions column on the tax line item that needs to be adjusted. The same popup as the Add Tax Line Item as seen above will popup and any fields that need to be edited can be edited here. Once finished updating, clicking on the Update Tax button will update the selected tax item with the new information and clicking on cancel will canel out any updates made on the popup.
Terminals
Introduction
The Terminals page is where terminals can be created and/or managed. Terminals are the origin point for Drivers where fuels are picked up, transferred and or dropped off. They can either be the same location as the company or somewhere offsite, here is where that location is set on Kozy. To reach Terminals, click on the Admin dropdown and click on settings, once on the settings page, click on Terminals to open the page.
Terminals
Terminals are the origin point of a fuel and where drivers can pick up fuels for delivery and or drop off excess or leftover fuels. Terminals can have the same origin point as the company or even have it offsite and will be displayed here as a table with each terminal a line item with the following columns
- Terminal Name - The name of the Terminal
- Fuel Type - The Fuel that's supplied by the terminal
- Status - The status of the terminal
- Location (Lat, Lng) - Shows the coordinates of the terminal
- Created - When the terminal was created in the system
- Actions - Actions that can be taken on the terminal
- Edit - Clicking here will allow the terminal to be edited
- Status - Clicking here will allow the terminal to be active or inactive
- Trash Can - Clicking here will delete the terminal from the system
Creating a Terminal
Creating a terminal is easy and can be done by clicking on the Add Terminal button. After clicking on the button, the Add Terminal popup will appear and the following fields need to be filled out
- Terminal Name - The name of the Terminal
- Fuel Type - The fuel or fuels that the terminal provides for delivery
- Status - Toggle to make the terminal active or inactive
- Terminal Location
- Location Search - Add the terminals address, a suggested address wil appear below, clicking on it will add the Coordinates of the location. If no suggestion appears, then the coordinates will need to be filled out
- Lattitude and Longitude - If no suggested address is selected, then the coordinates of the terminal must be added here
Once completed, clicking on Create Terminal will add the terminal to the system and it will appear on the list of terminals used by the company. Clicking on cancel will close the popup and delete any information filled out. With Terminals now created, prices can be set and routing can begin for drivers.
Editing a Terminal
To edit a terminal, simply click on the Edit button on the line item under the actions portion of the terminal. After clicking on edit, the Edit Terminal popup will appear, which is the same as the Add Terminal popup with the exception of the terminal information already filled out. Any edits can be made here and once finsihed, clicking on Update Terminal will update any information changed and clicking cancel will close the window and negate any changes made to the terminal.
Vehicles
Introduction
This page is where company vehicles can be created and/or managed. Vehicles are what transport the fuels from terminals to customers, or even transfer to other vehicles if need be. Vehicle's contain fuel containers and depending on the type of fuel, can carry multiple types of fuel at once. To reach the Vehicles page, click on the Admin dropdown and click on Settings, once on the Settings page, click on Vehicles to open the page.
Vehicles
As stated above, Vehicles are used to tranport fuel in containers from Terminals to customers. Vehicles will appear on this page as line items with the following columns
- Name - The name of the vehicle
- Containers - Shows how many containers are on the vehicle and by clicking on Manage Containers allows the containers to be edited
- Status - Shows if the vehicle is active or inactvie
- Actions - Actions that can be taken on the vehicle such as editing or deleting
Creating Vehicles
Creating a vehicle is easy and can be done simply by clicking on the Add Vehicle button. After clicking on the button, the Add Truck popup will appear and the Name of the truck needs to be filled out. After giving the vehicle a name, clicking on Create will create the vehicle and containers can be added next. Clicking on cancel will close the window and delete the name added. After creating a vehicle, containers will need to be added and is done by clicking on Manage Containers on the vehicle line item under containers. The Manage Fuel Containers popup will appear and the following fields need to be filled out
- Container Name - The Name assigned to the container be created
- Compatable Fuels - The fuels that can be carried in the container. Multiple Fuels can be added to the container only if the fuels are compatible
- Capacity Volume - The amount that the container can hold
After filling out the information, clicking on Create Container will add the container to the vehicle. Multiple containers can be added to a vehicle and can be done simply by clicking on Manage Containers again and adding the second containers information and clicking Creat Container. Clicking on Manage Containers also shows existing conatiners and they appear as
- Container ID - The container ID assigned by the system
- Name - The name of the Container
- Capacity - The amount of fuel the container can carry
- Fuels - Shows compatible fuels that can be loaded on the container
- Edit - Allows a container to be edited
- Trash Can - Delete an existing container
With all of that, a vehicle is now fully created in the system and is now ready for deployment.
Editing and Vehicle and Container
A Vehicles name can be edited simply by clicking on the edit button under the actions section of the a vehicle listed. Here the name of a Vehicle can be changed and clicking on update will update the name. Editing a container is easy as well and is done by clicking on Manage Containers. After the Manage Fuel Containers popup appears, simply click on the edit button next to the container that needs to be edited. The information of the container will generate below Edit Container and any information that needs to be edited can be changed here. Once all information has been edited, click on Update Container to update any information that was changed on the container
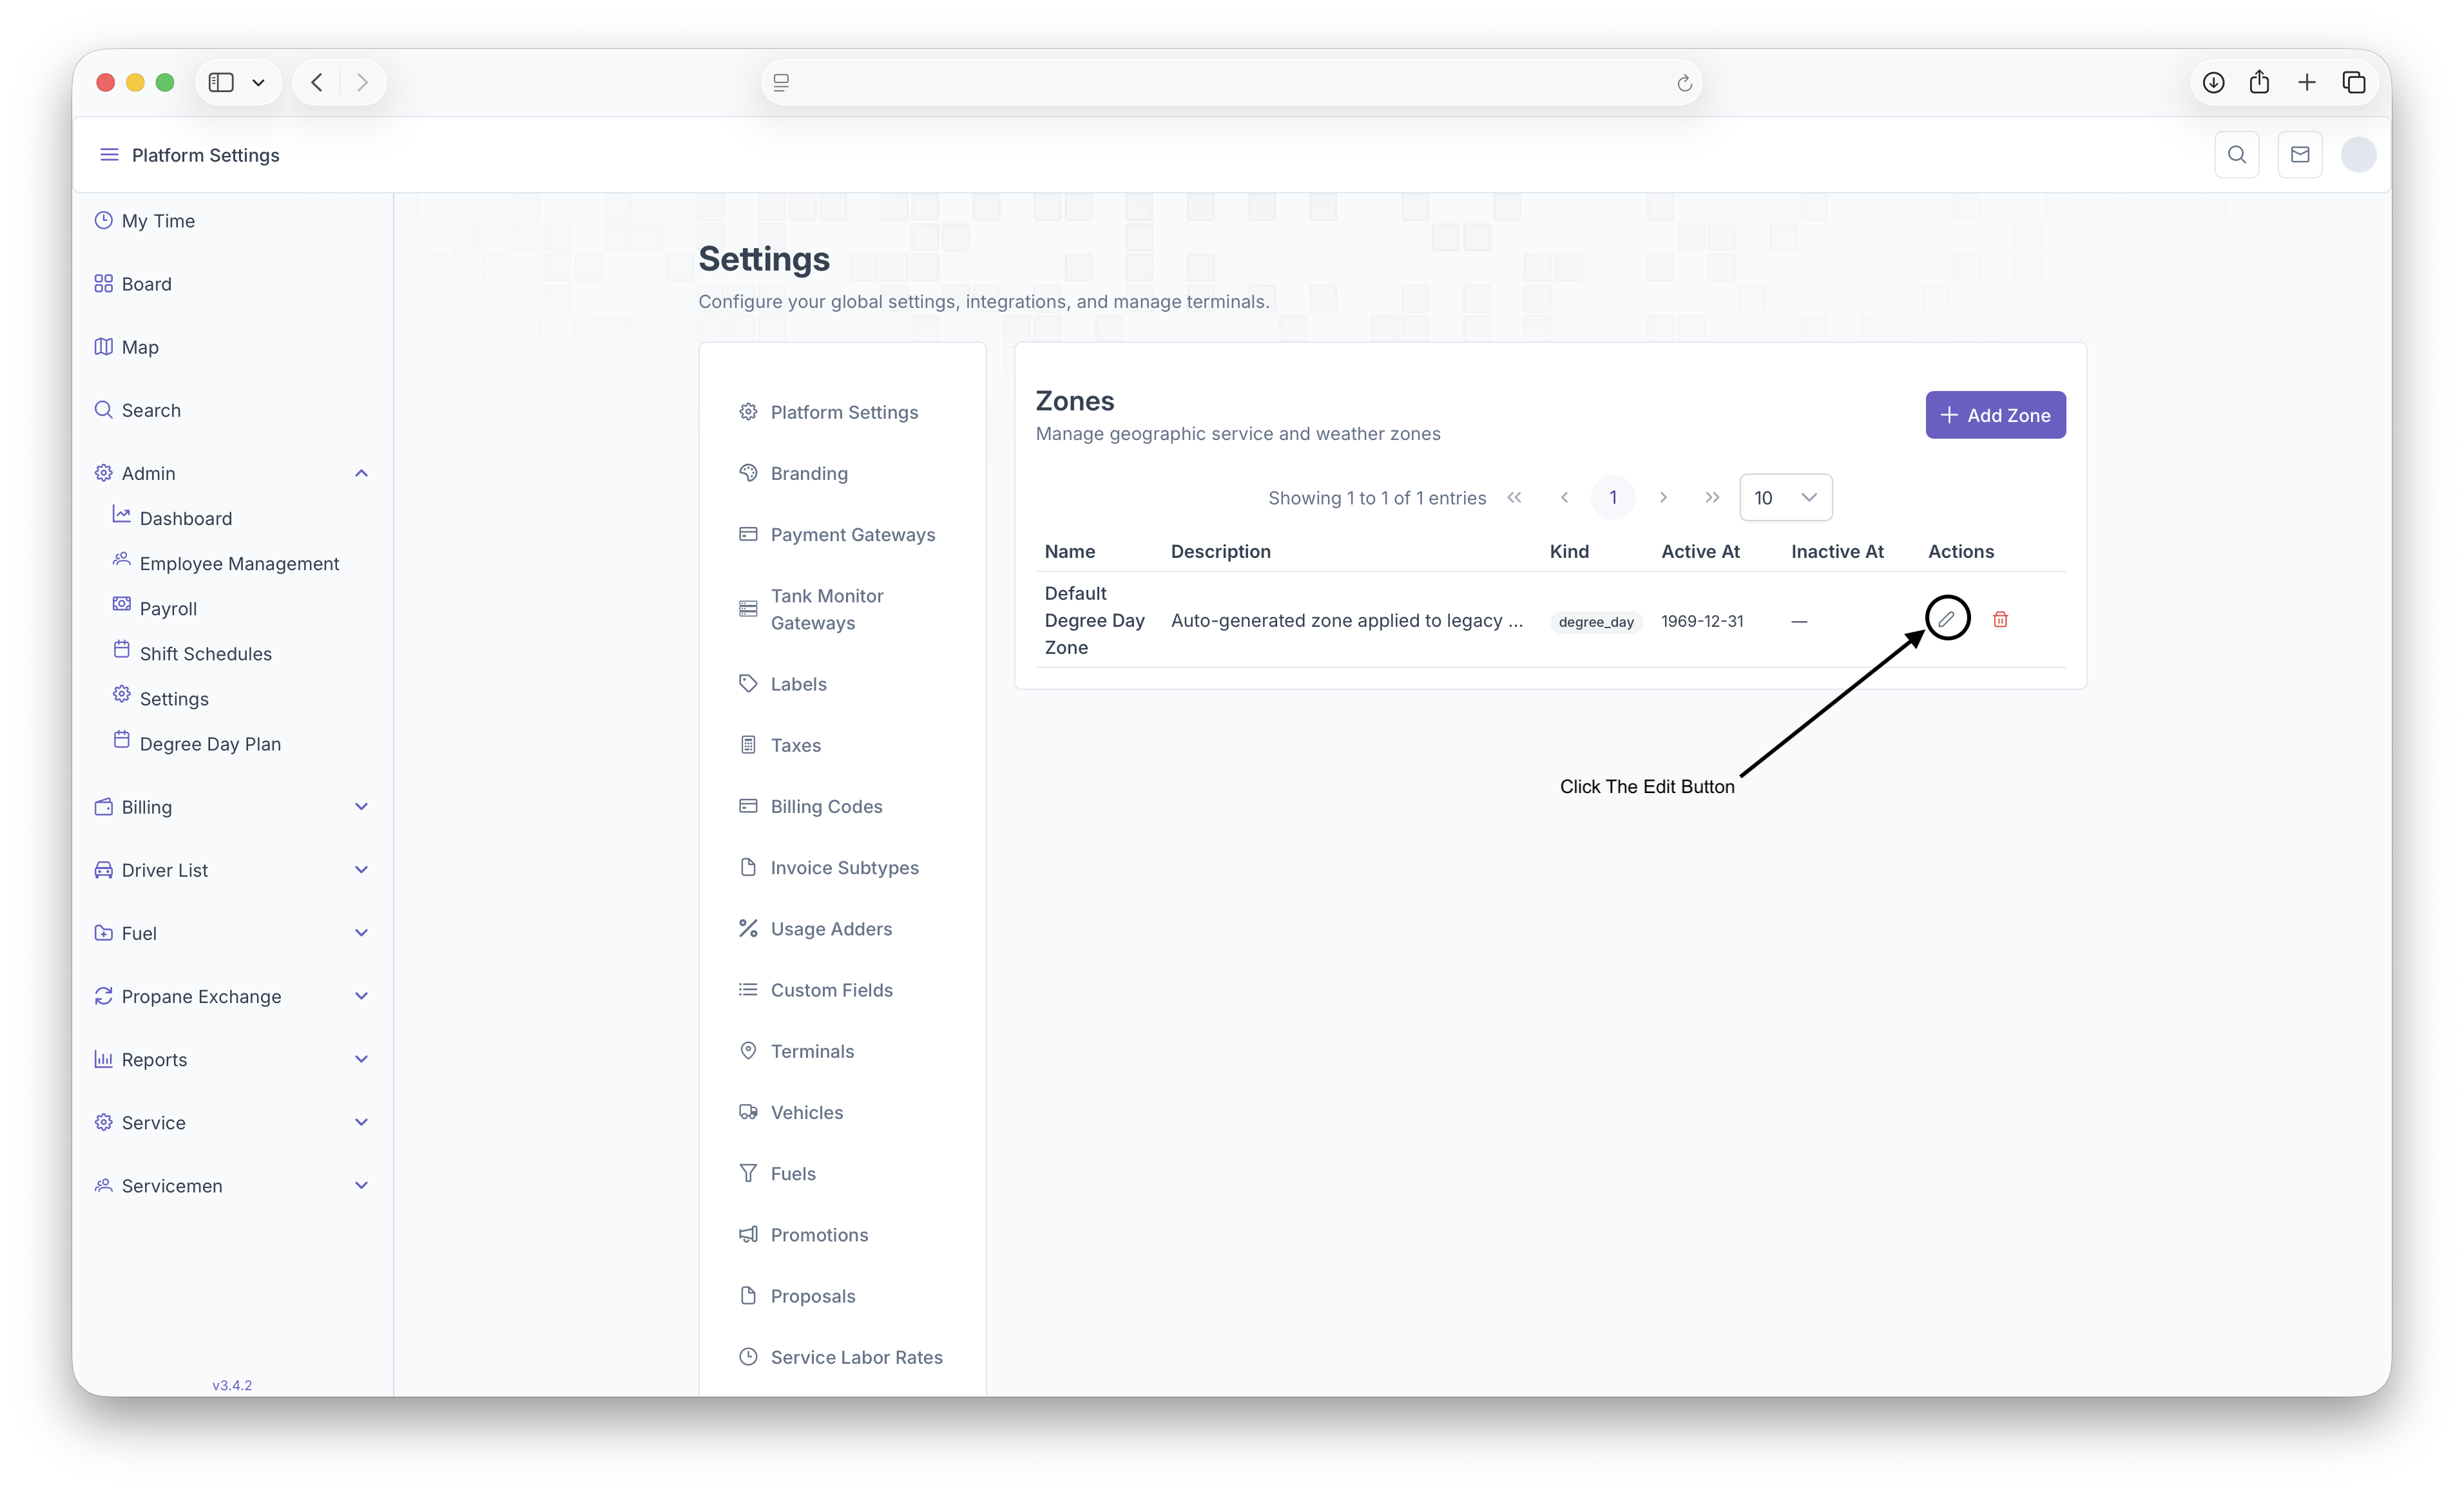
Zones
Zones
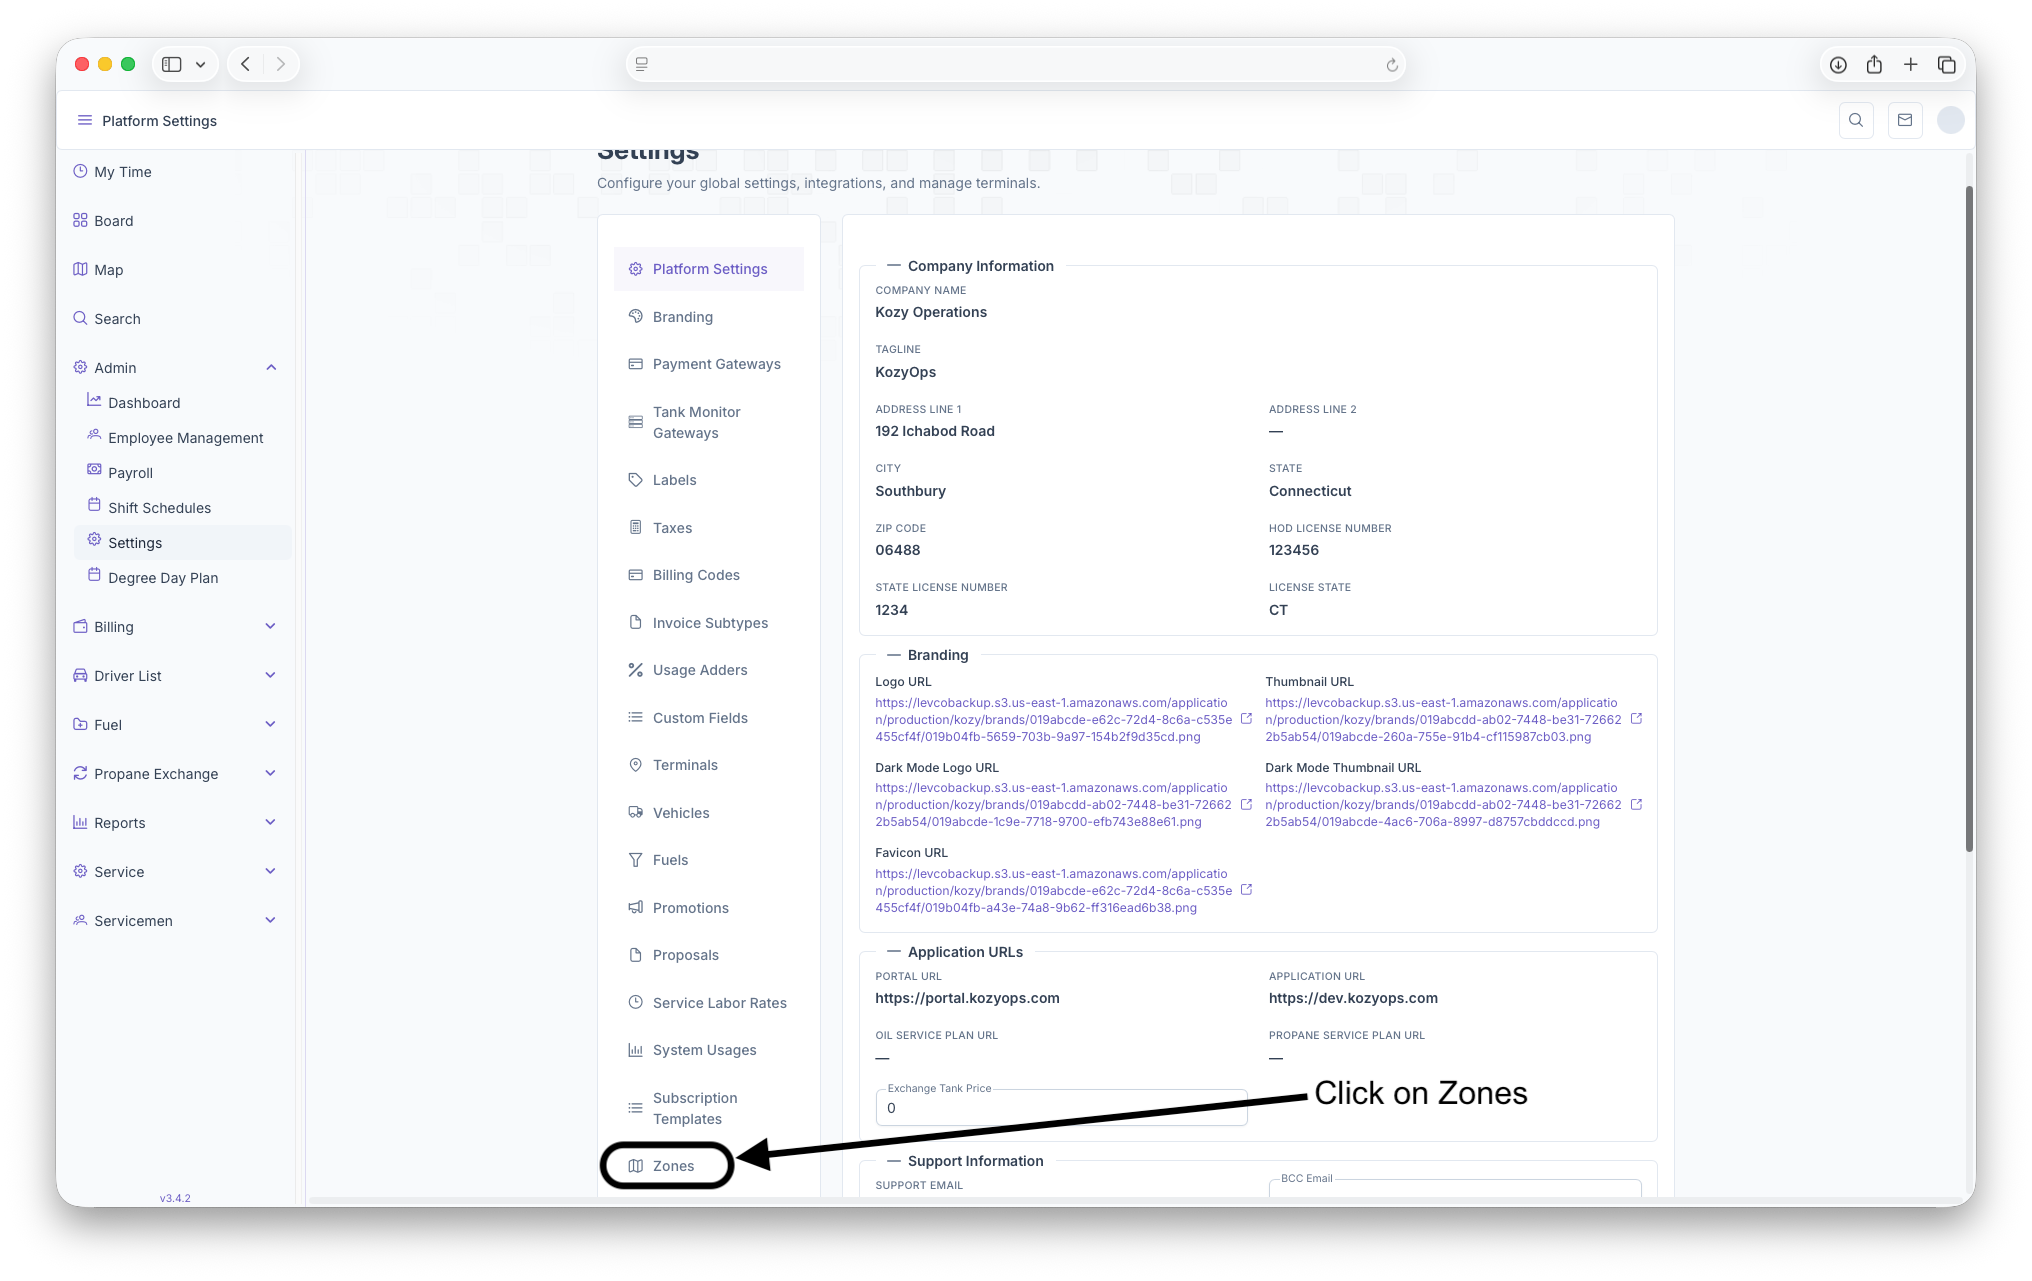
The Zones page is where Zones can be created to show locations that are covered under a specific zone umbrella. These Zones can range anywhere from being regional to what locations only use specific fuels. To reach the Zones page, click on Admin Dropdown on the side menu then click on Settings. Once on the settings page, scroll to the bottom of the page and click on Zones

Zones Page
Once on the Zones page, a list of zones already created will be generated. This list includes Name of The Zone, Description of the Zone, what Kind, when it became Active, when it became Inactive and any actions that can be taken on the Zone. Adding new Zones can also be done here
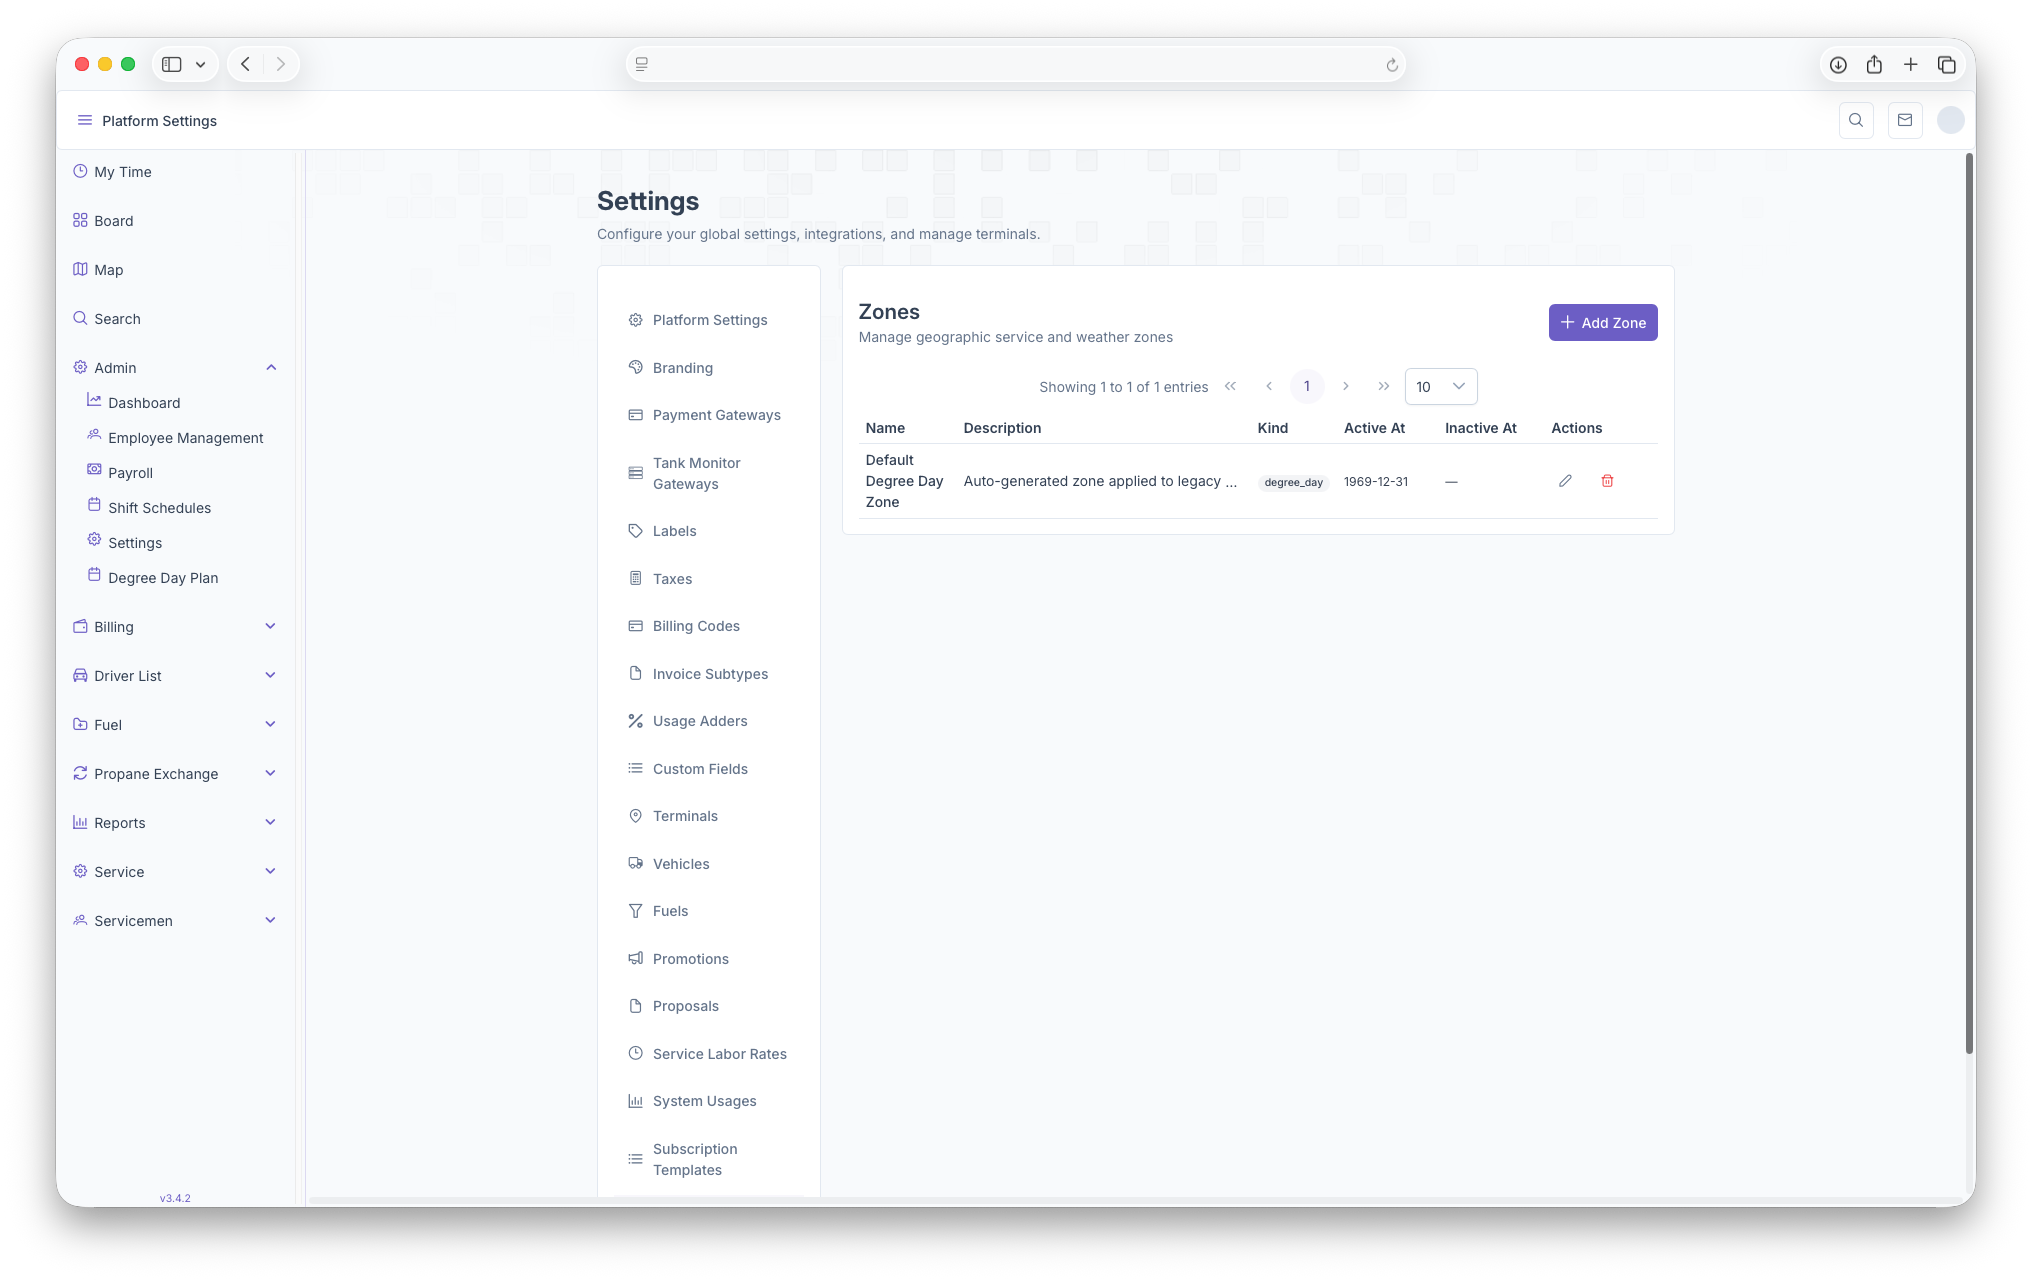
- Name: Shows the name of The Zone created
- Description: A brief description of the zone
- Kind: What Zone Type it is, such as Degree Day, Brand and Service
- Active At: When the zone became active
- Inactive At: When the zone became inactive
- Actions: Actions that can be taken on the zone such as editing or deleting
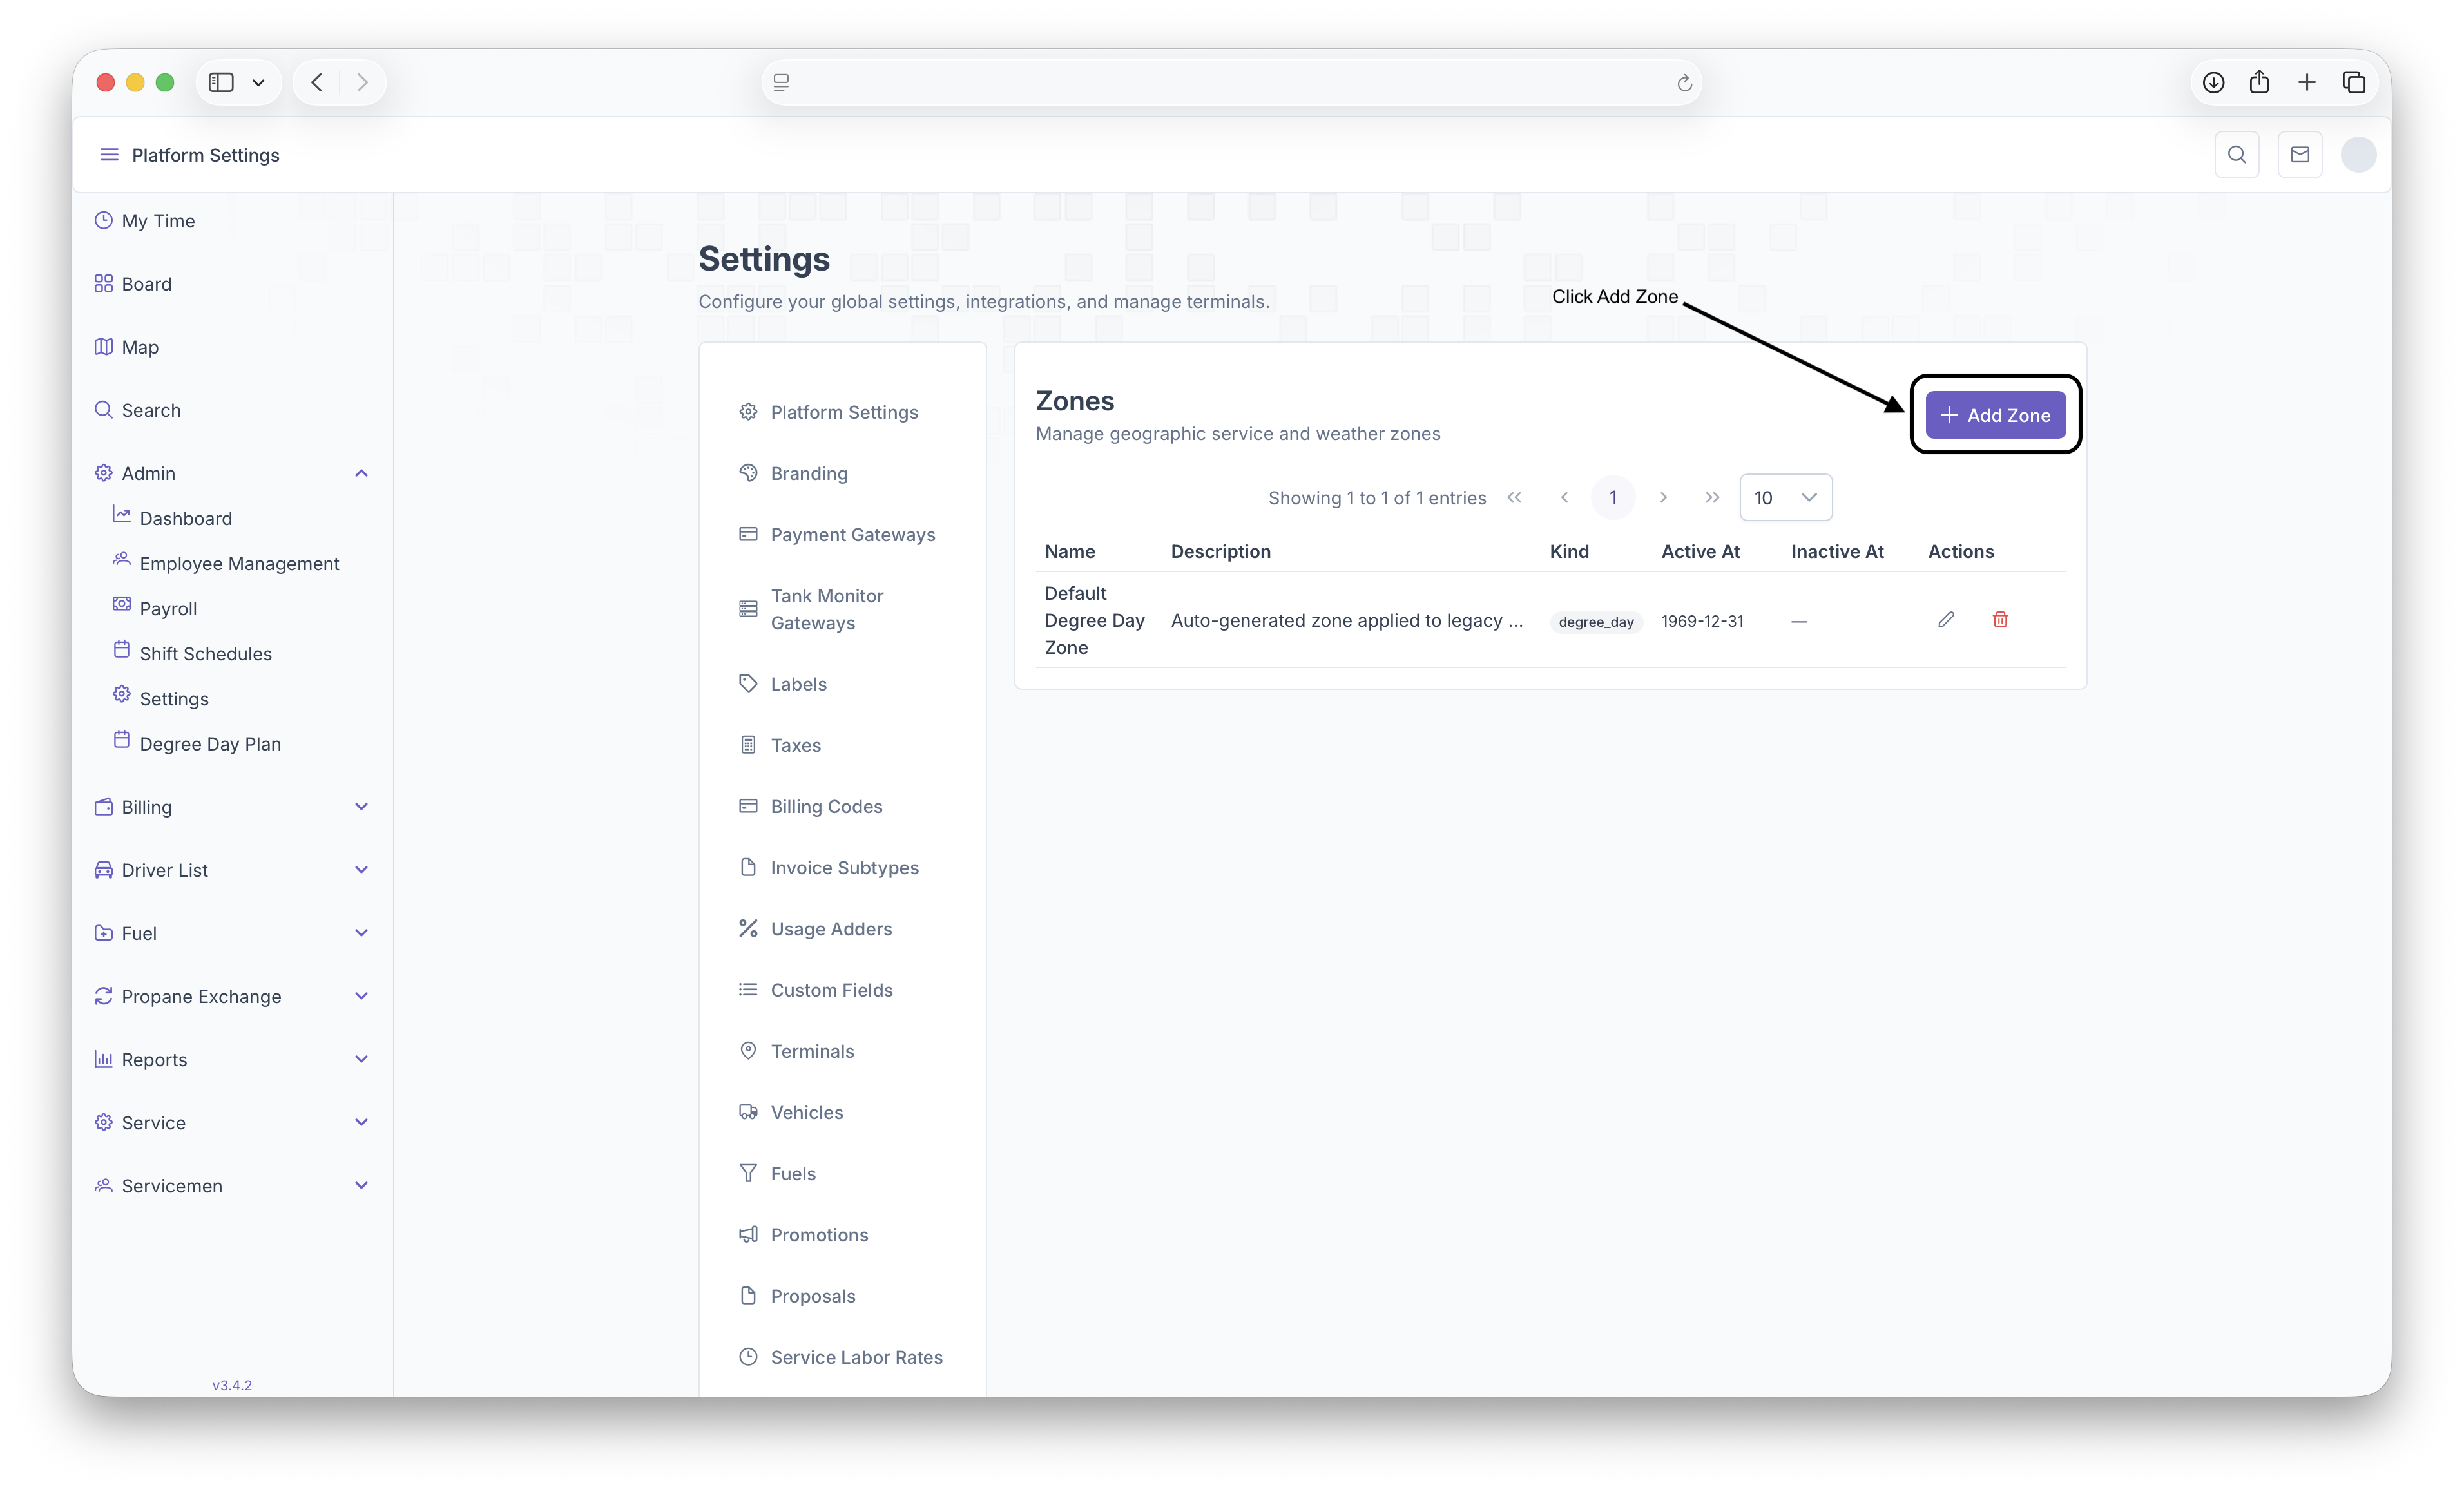
- +Add Zones: Clicking here will bring up the Add Zones page to add any additional Zones
Adding New Zones
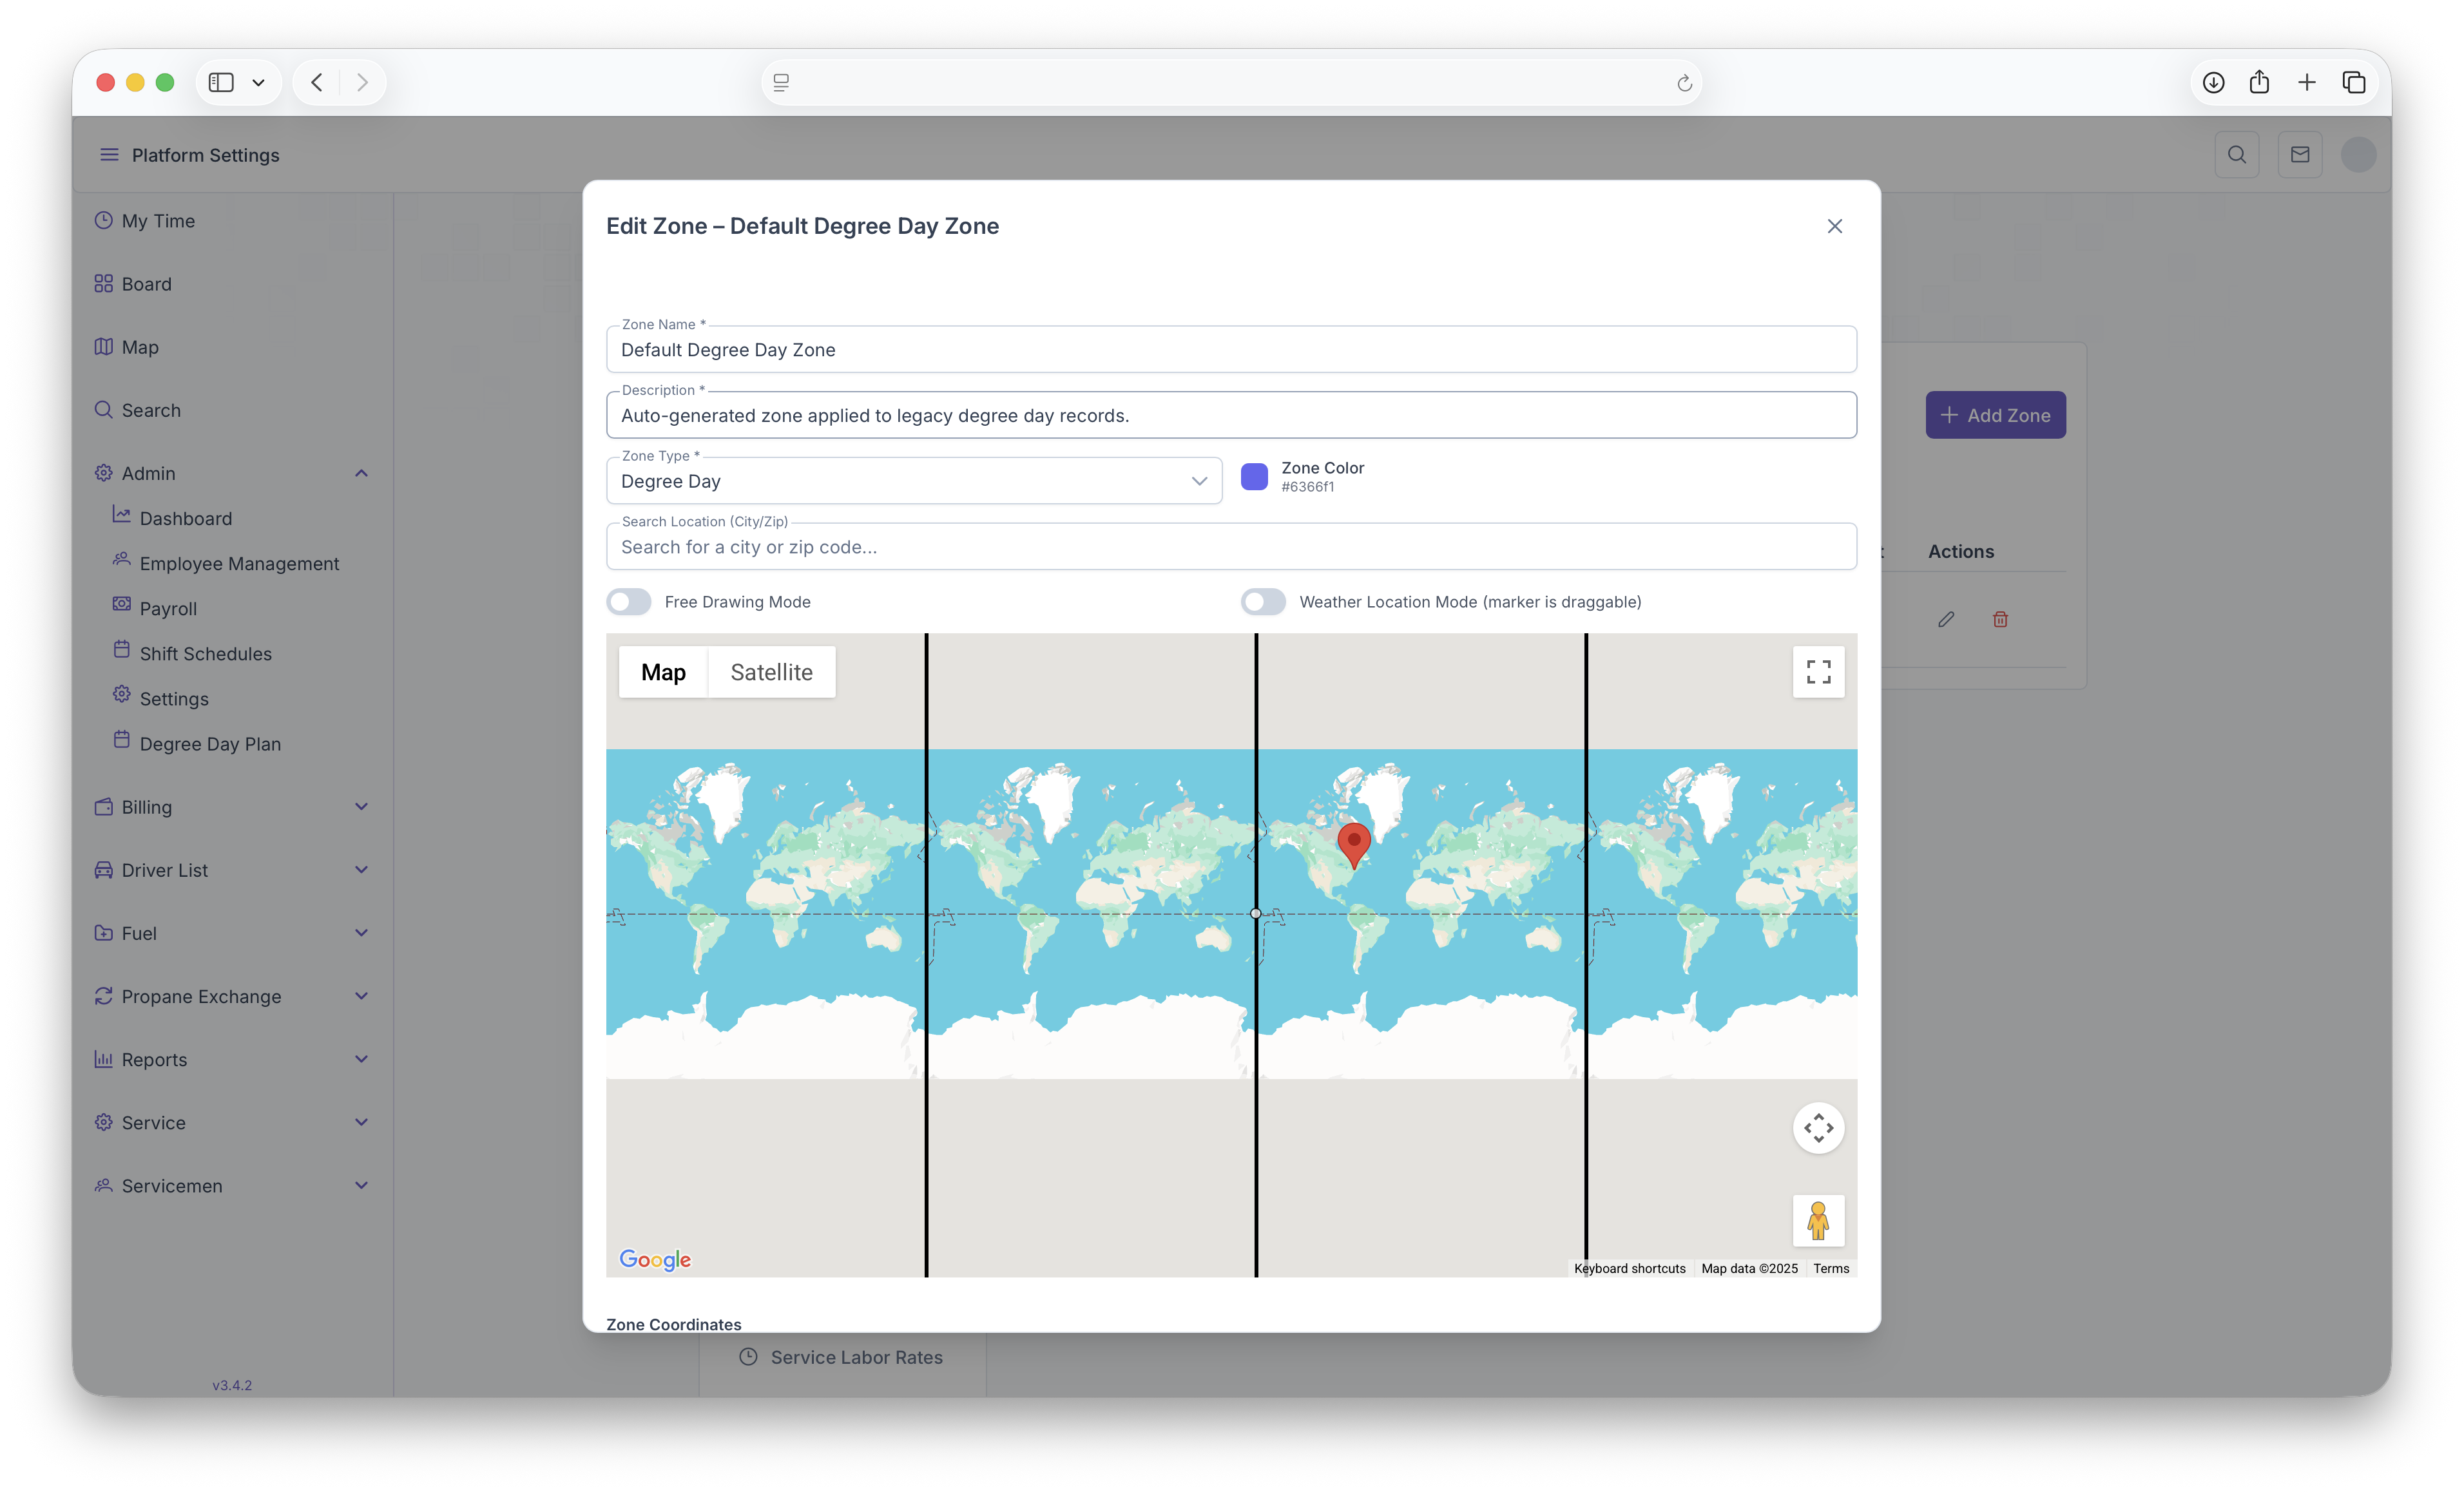
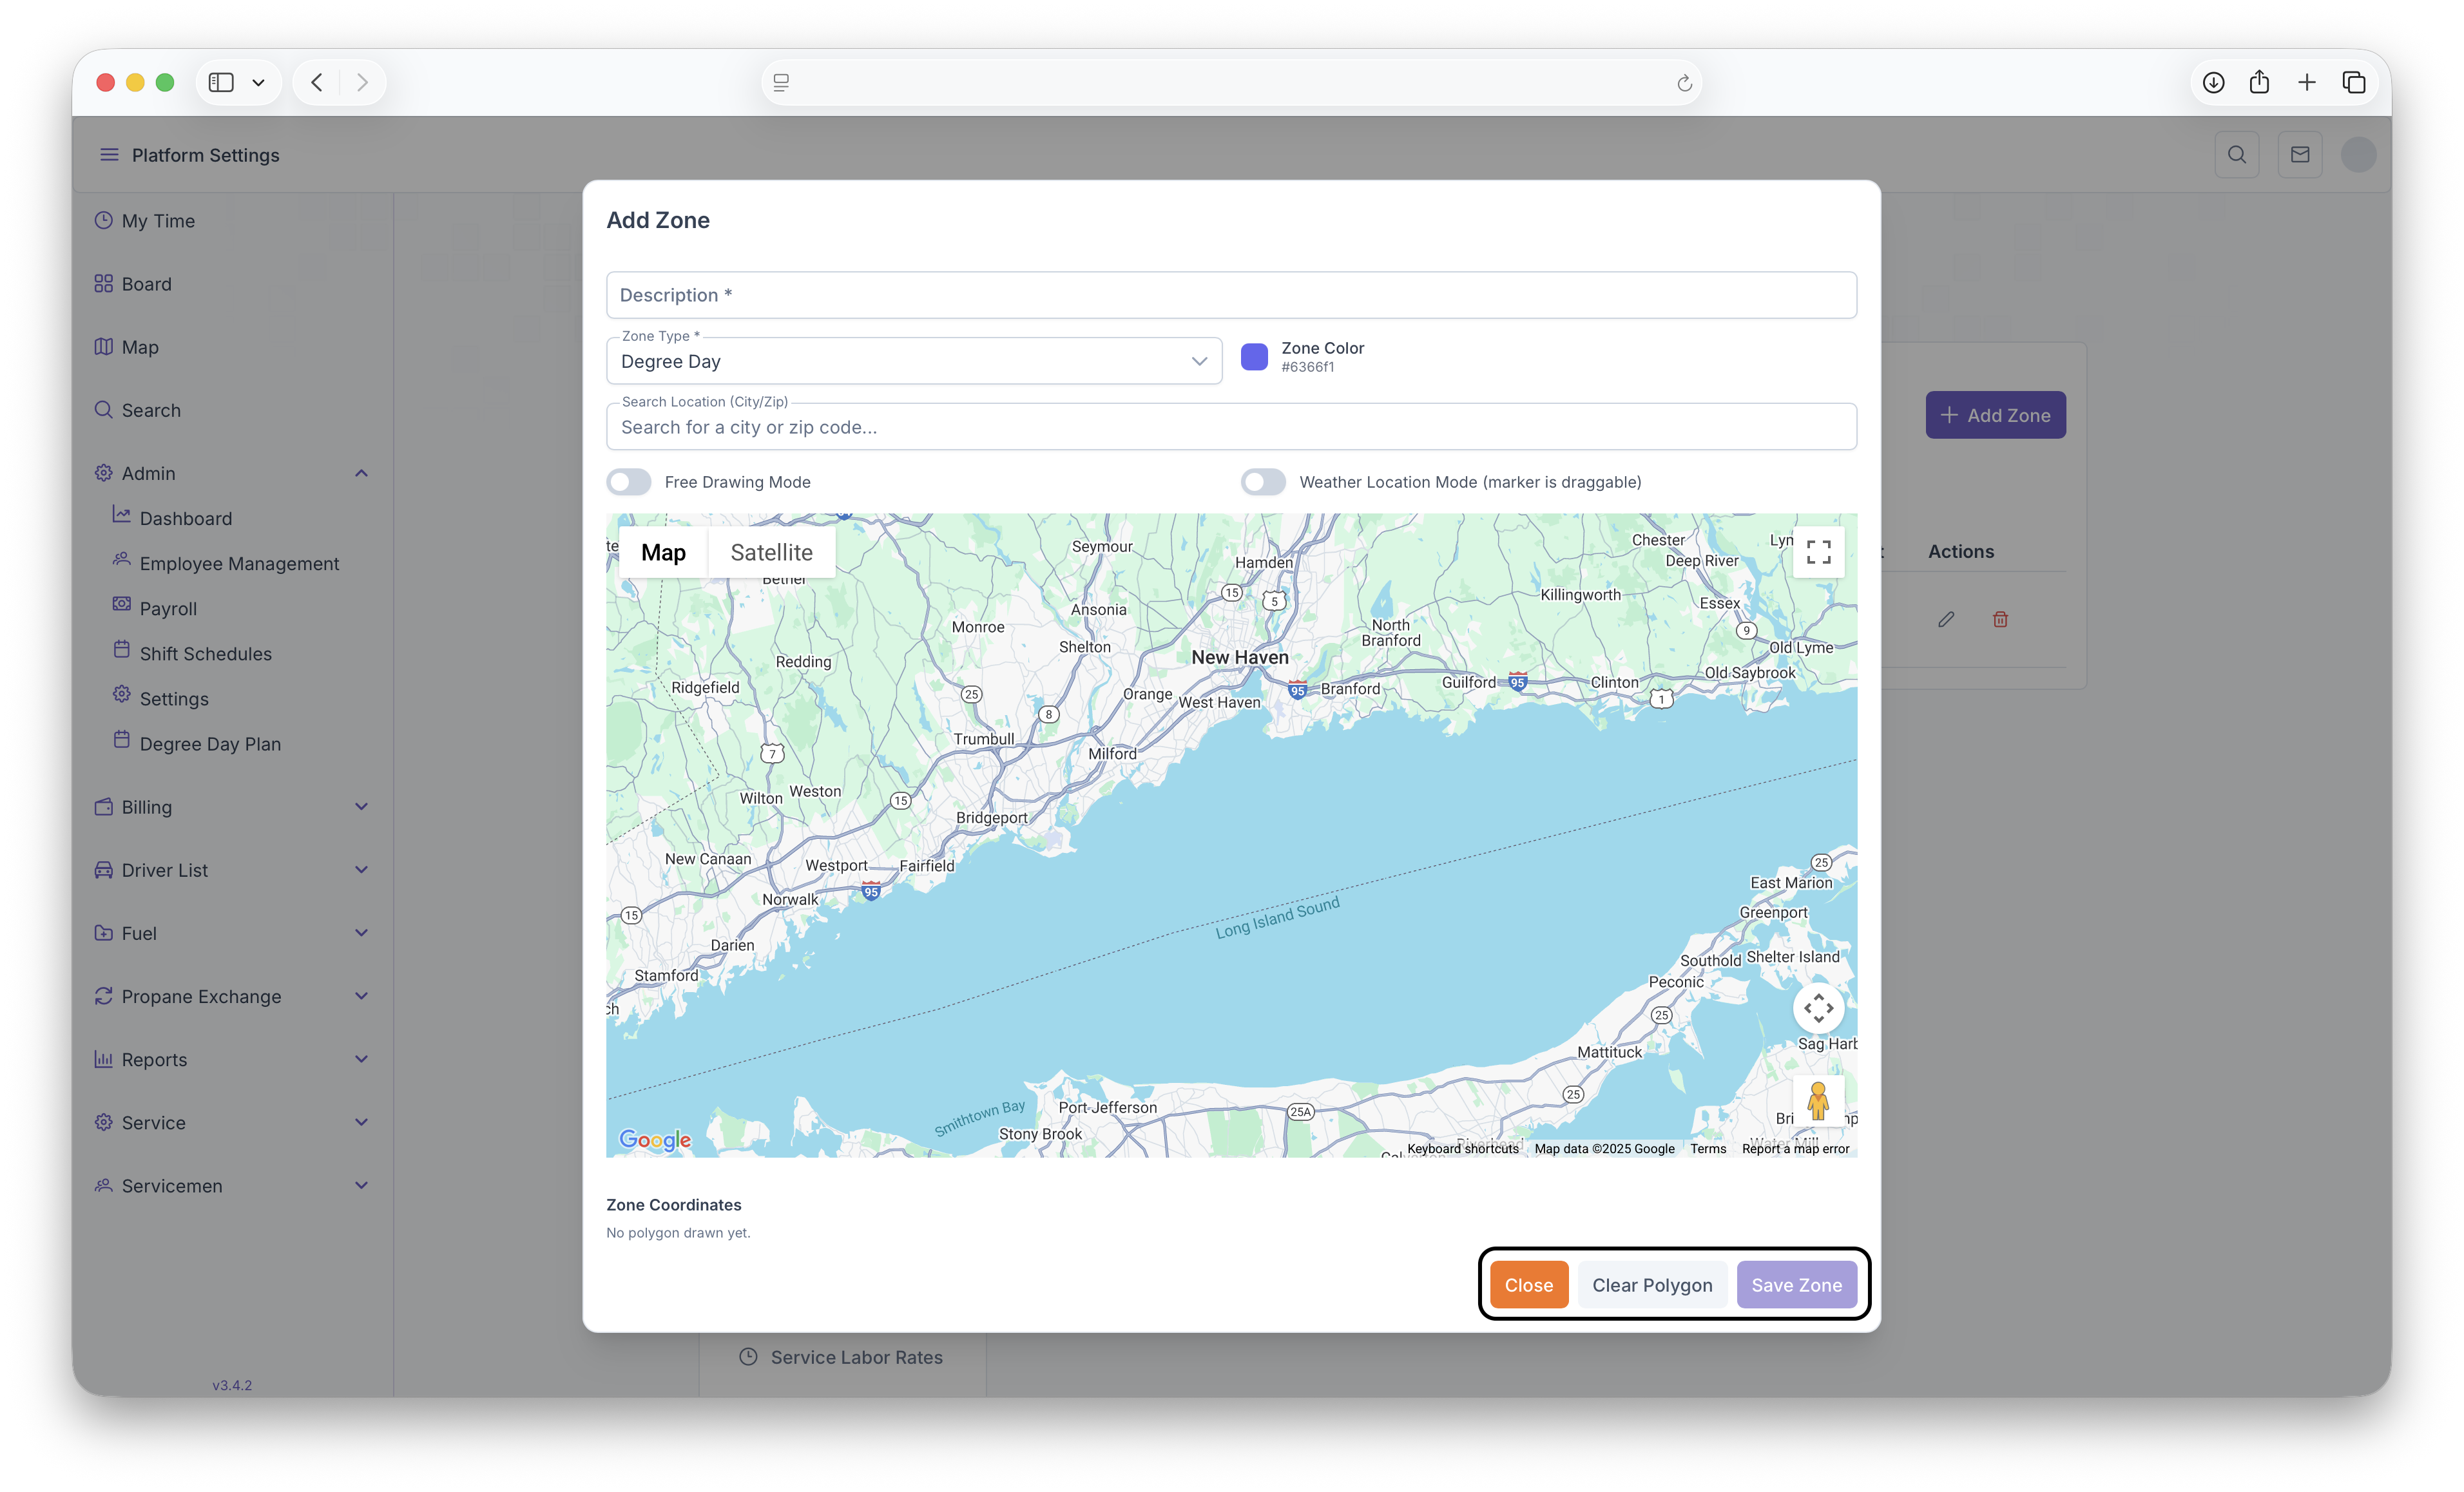
- Clicking on the Add Zones button will bring up the Add Zones page. Some fields will then be generated that need to be filled out in order to create a Zone
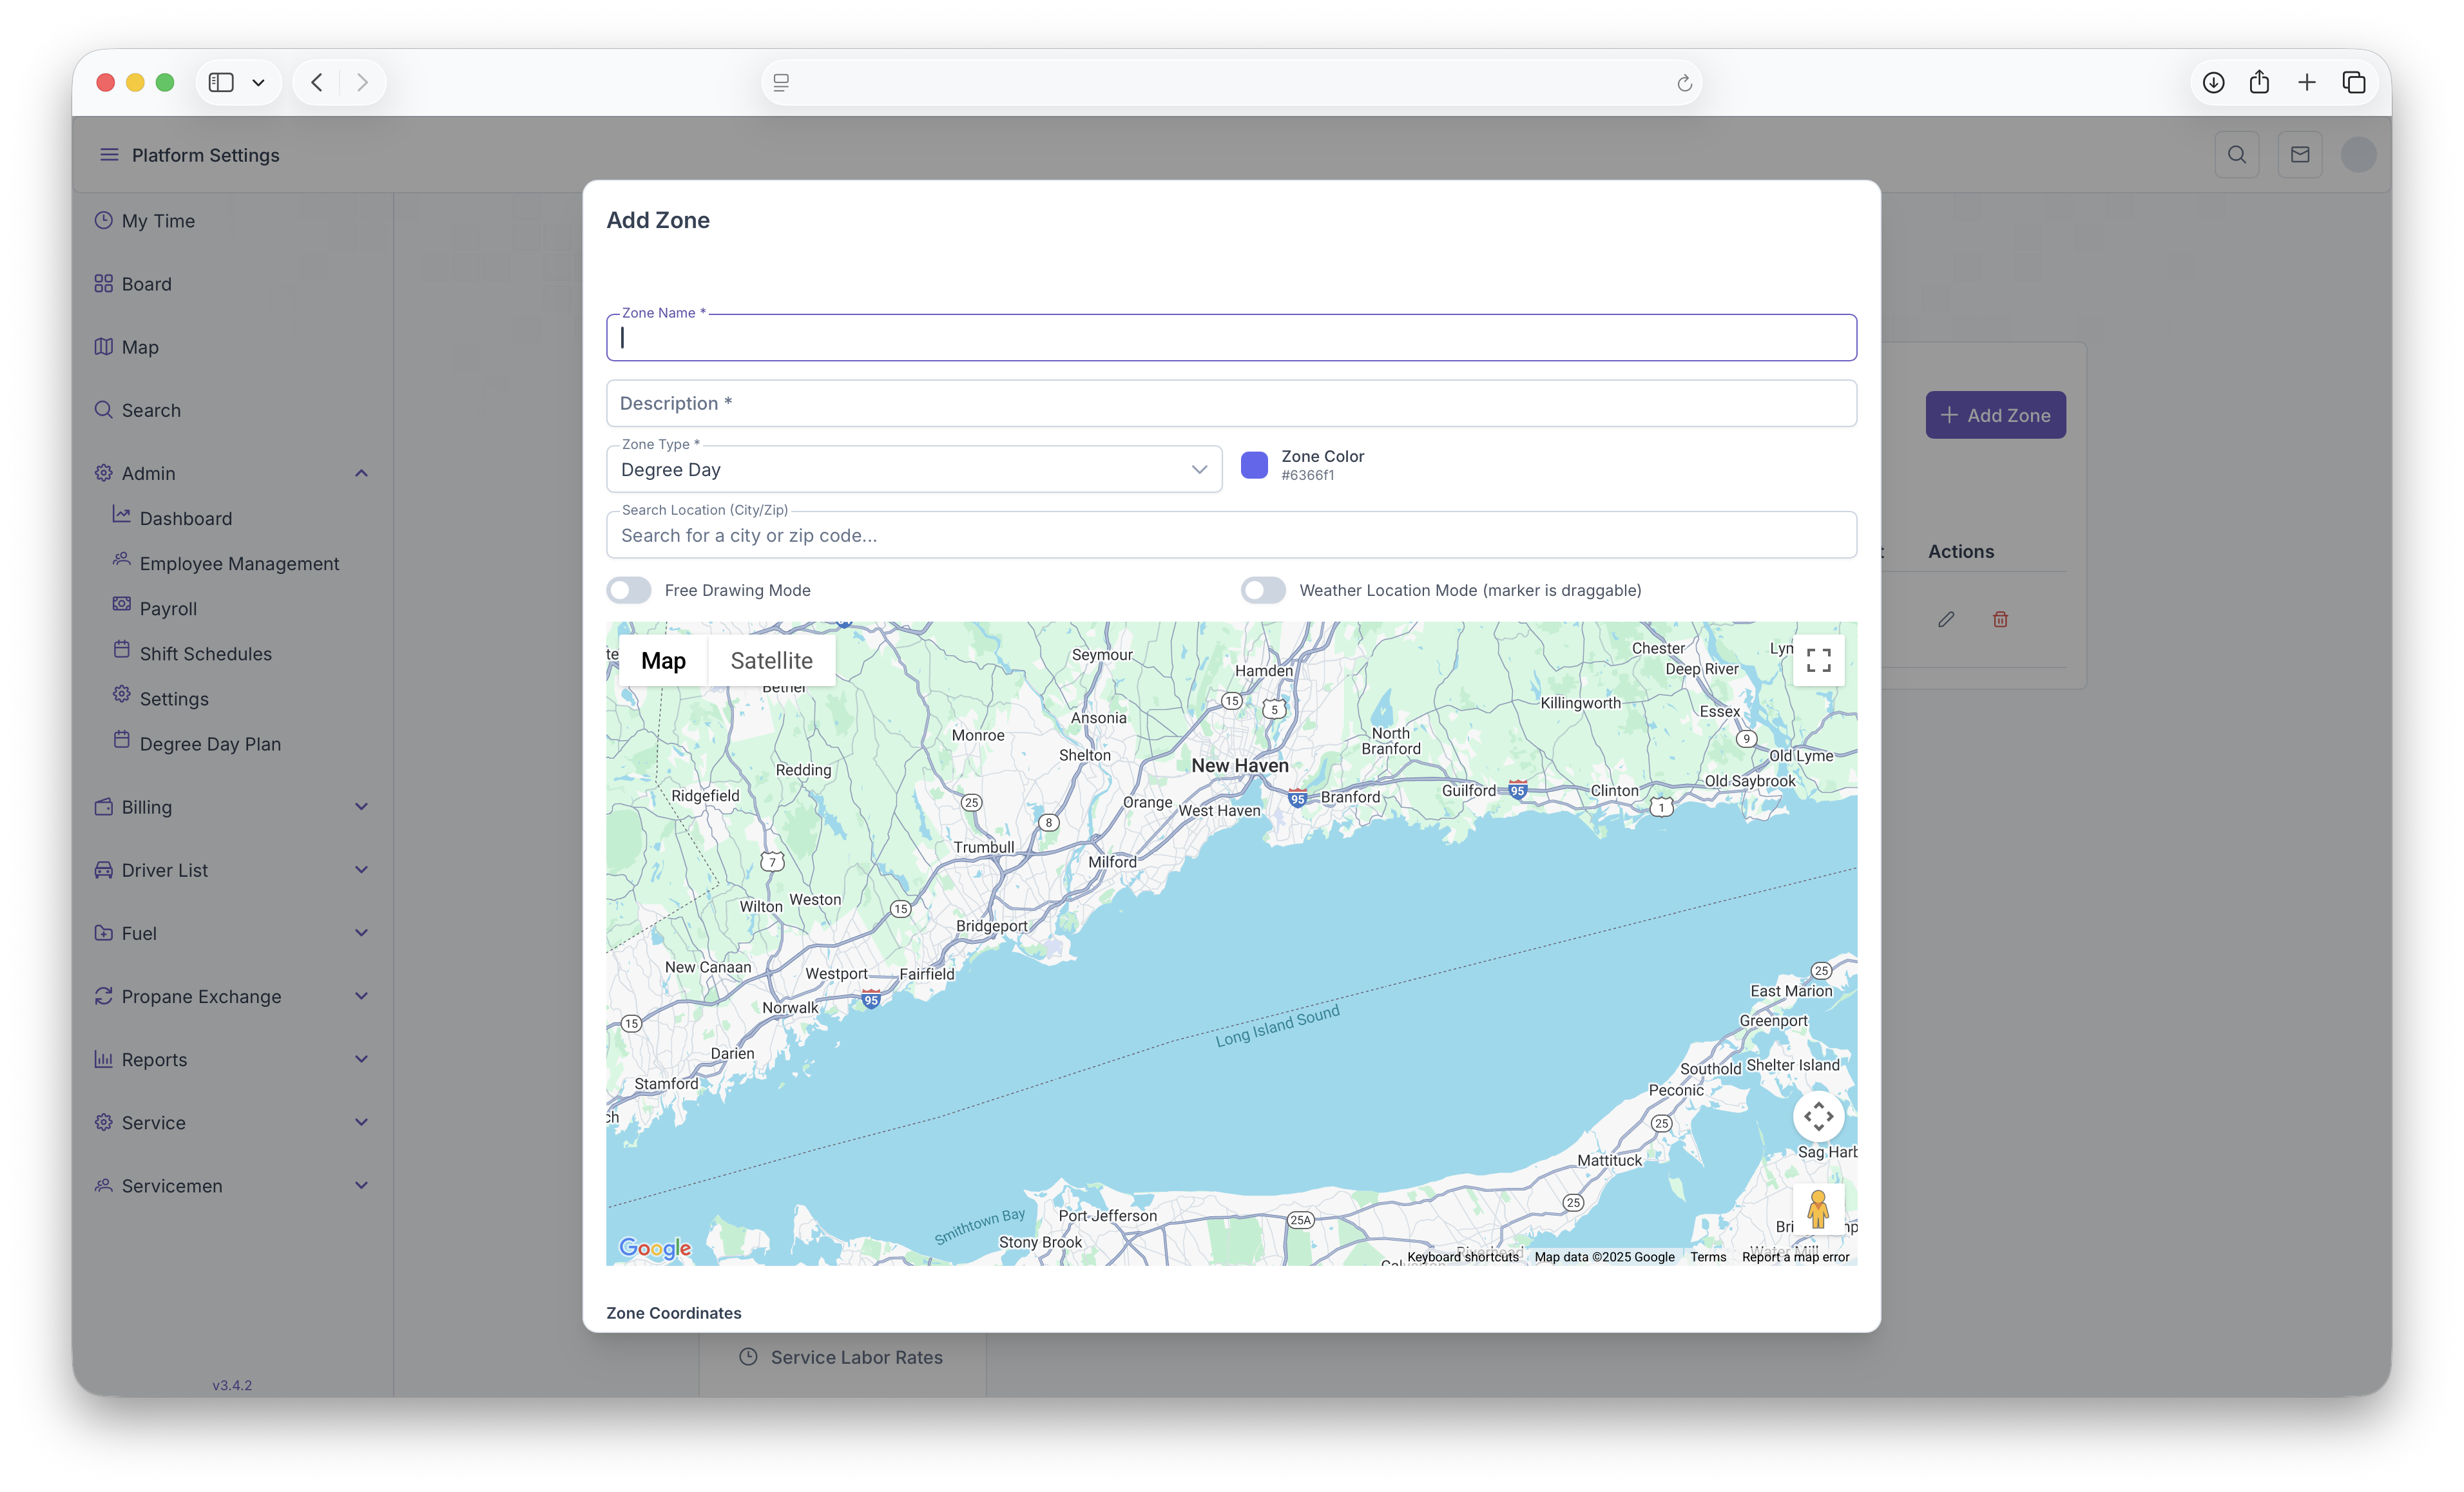
- Zone Name
- Description
- Zone Type: Dregree Day, Brand or Service
- Zone Color
- A City or Zip Code search which will auto create a zone (This can be adjusted, see below)
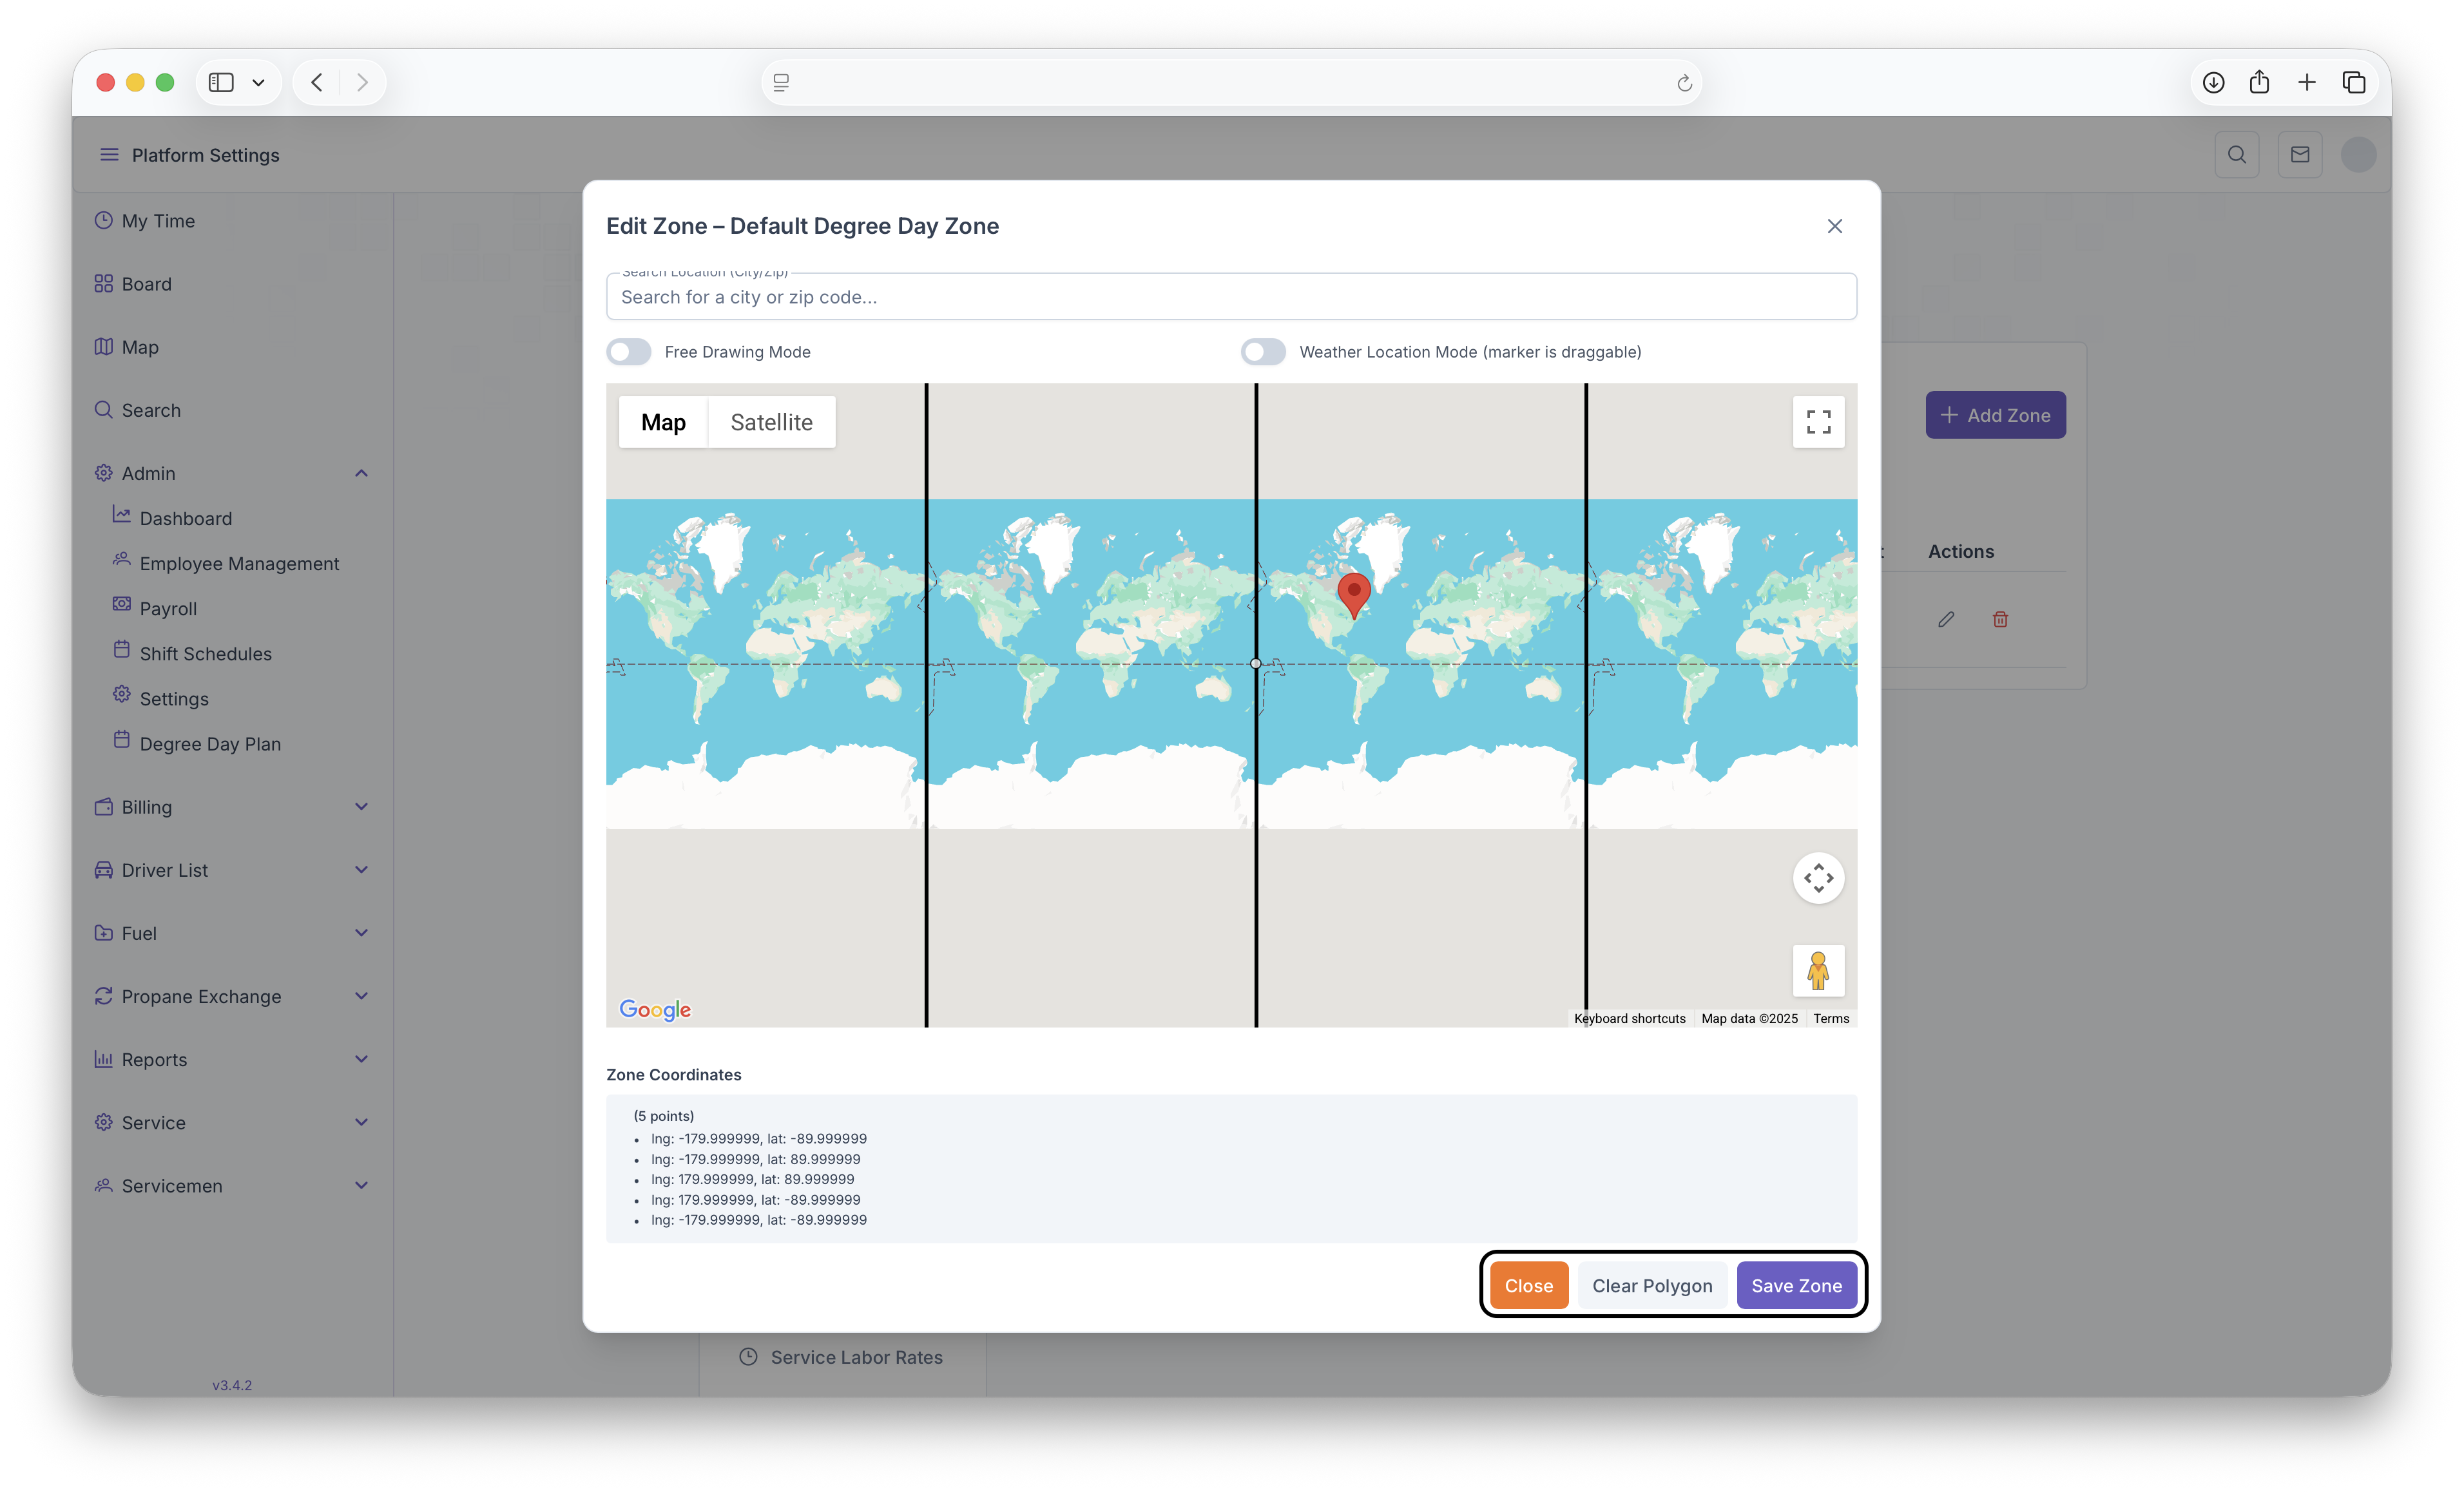
- After filling out those fields, next will be creating the zone itself on the map. Note that if a zip code or city are selected, a zone will be auto generated, this zone can be edited
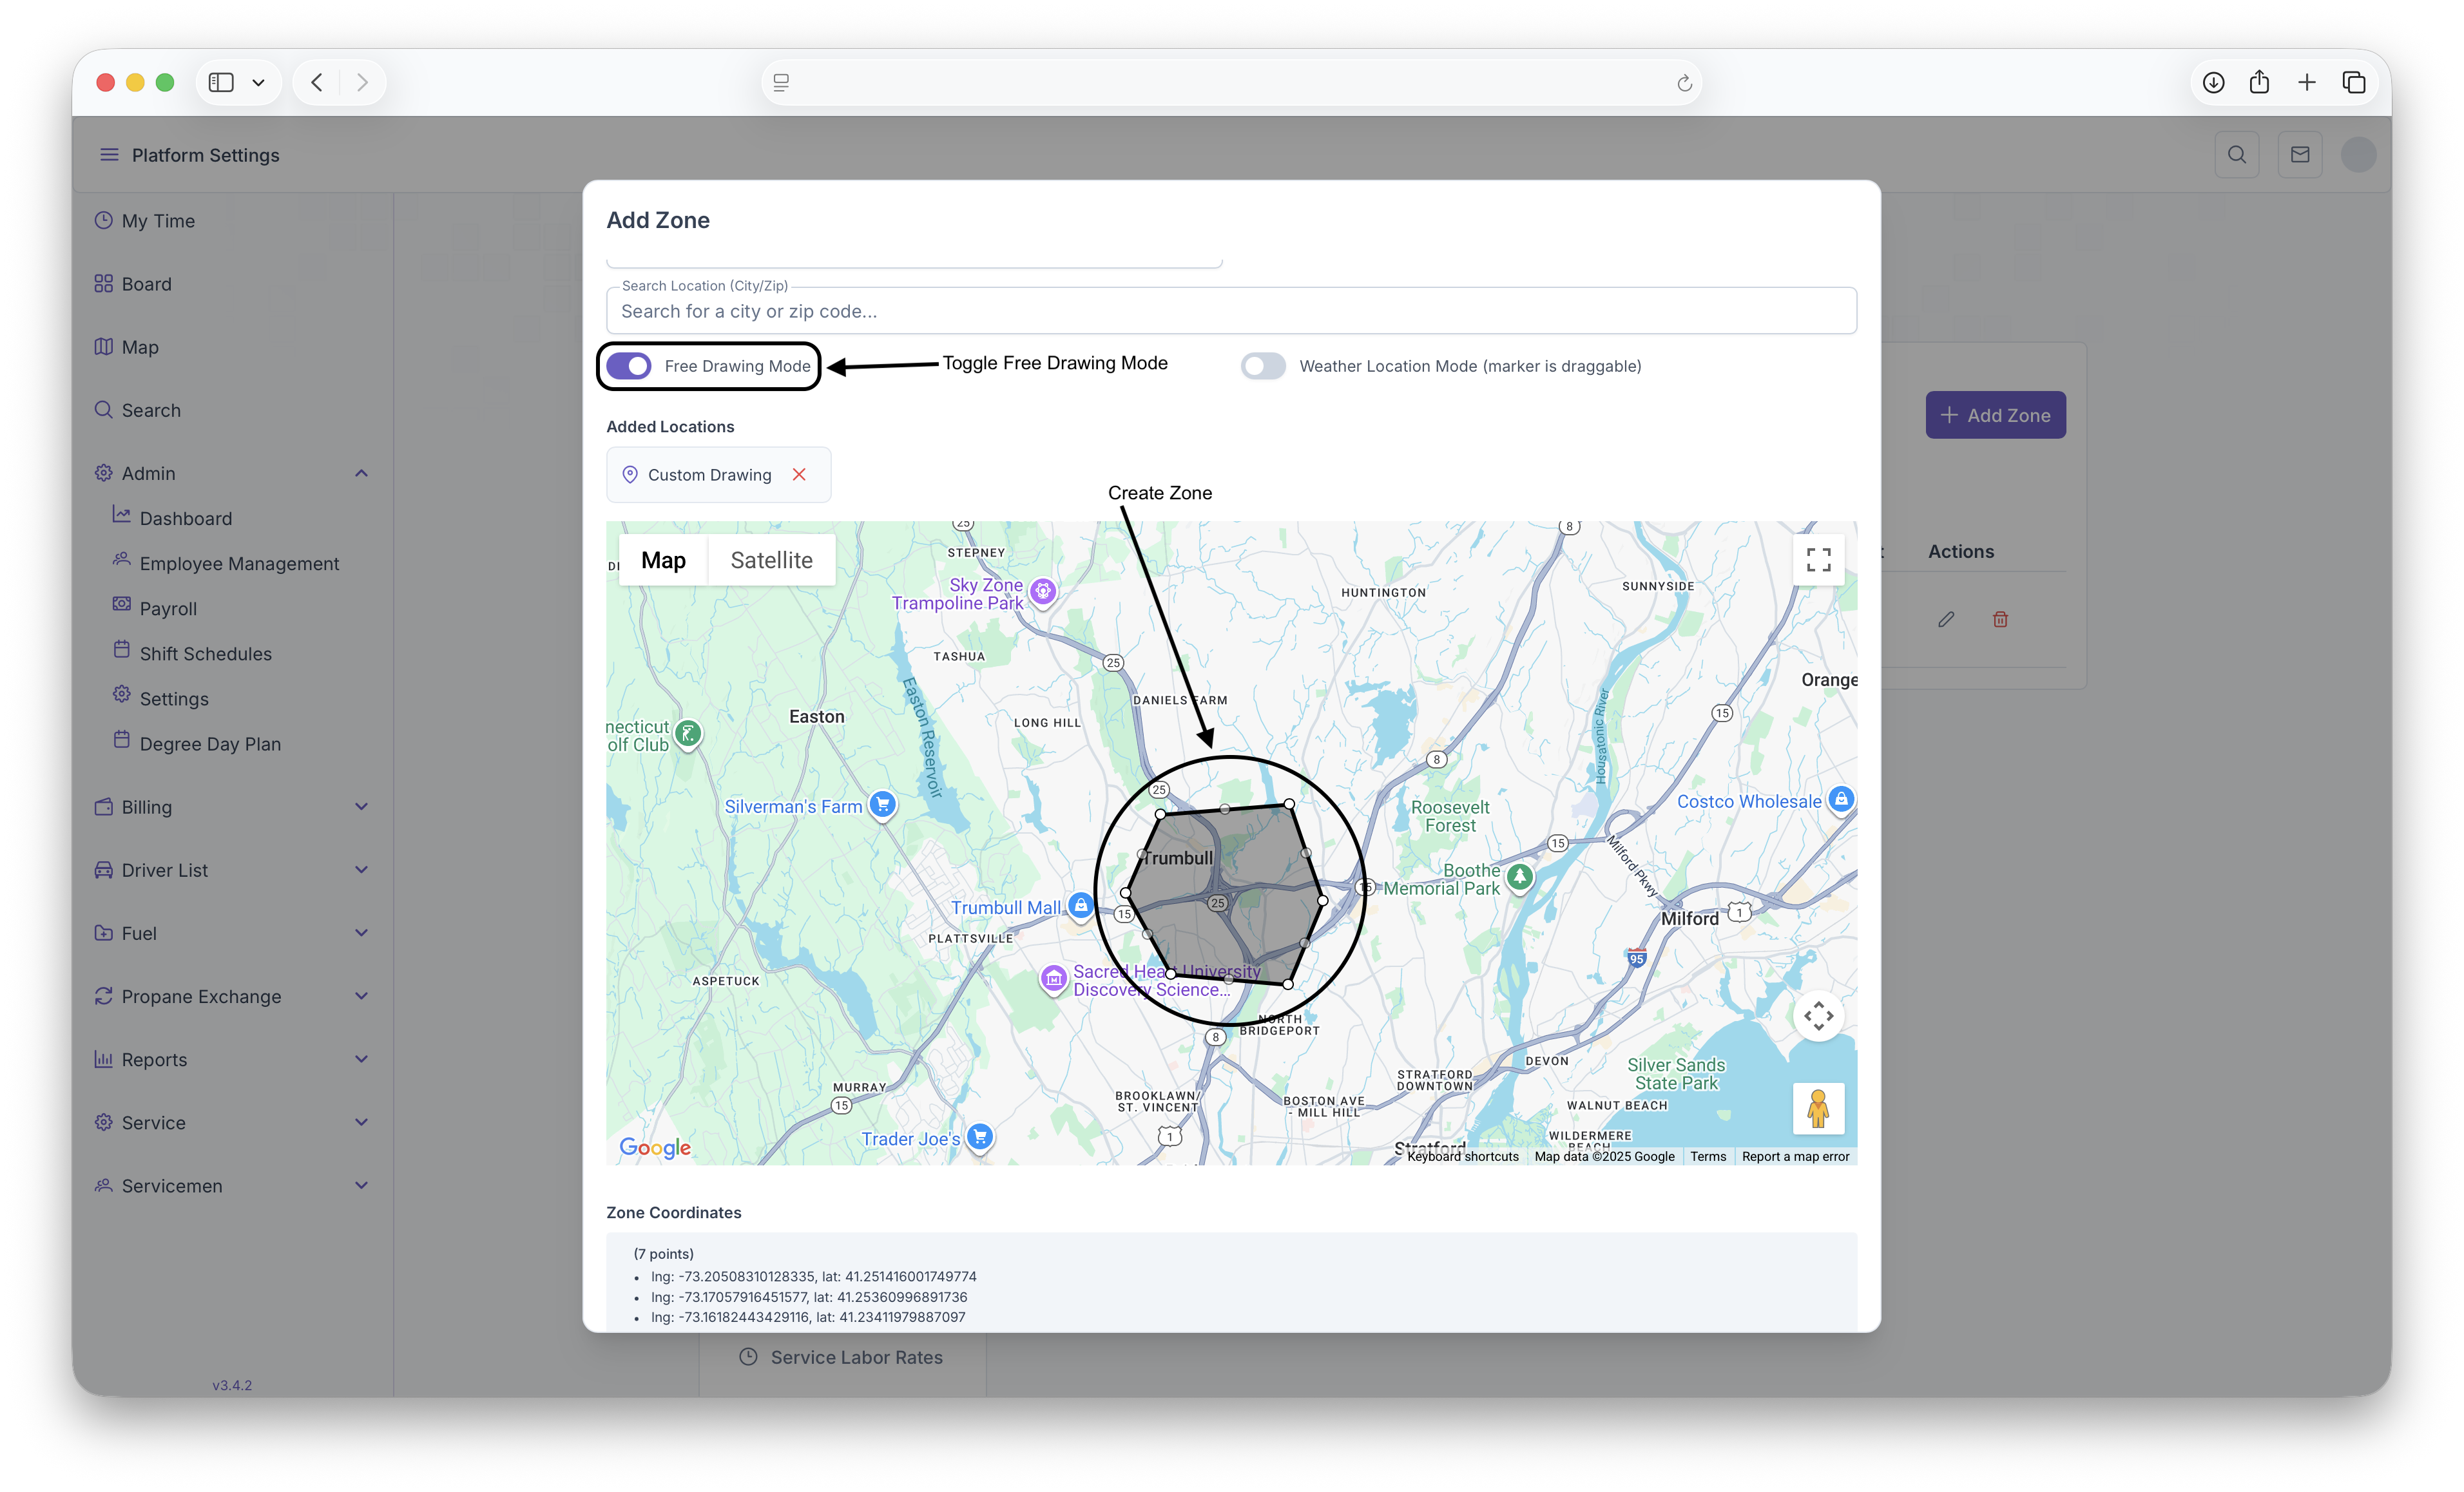
- Toggle the Free Drawing Mode to on
- From here, select points on the map to create lines until a general shap is formed to indicate that zone
- All the points can then be dragged by clicking on them, holding down the click and then dragging to desired loaction
- The Auto generated zone can also be edited by following the previous step
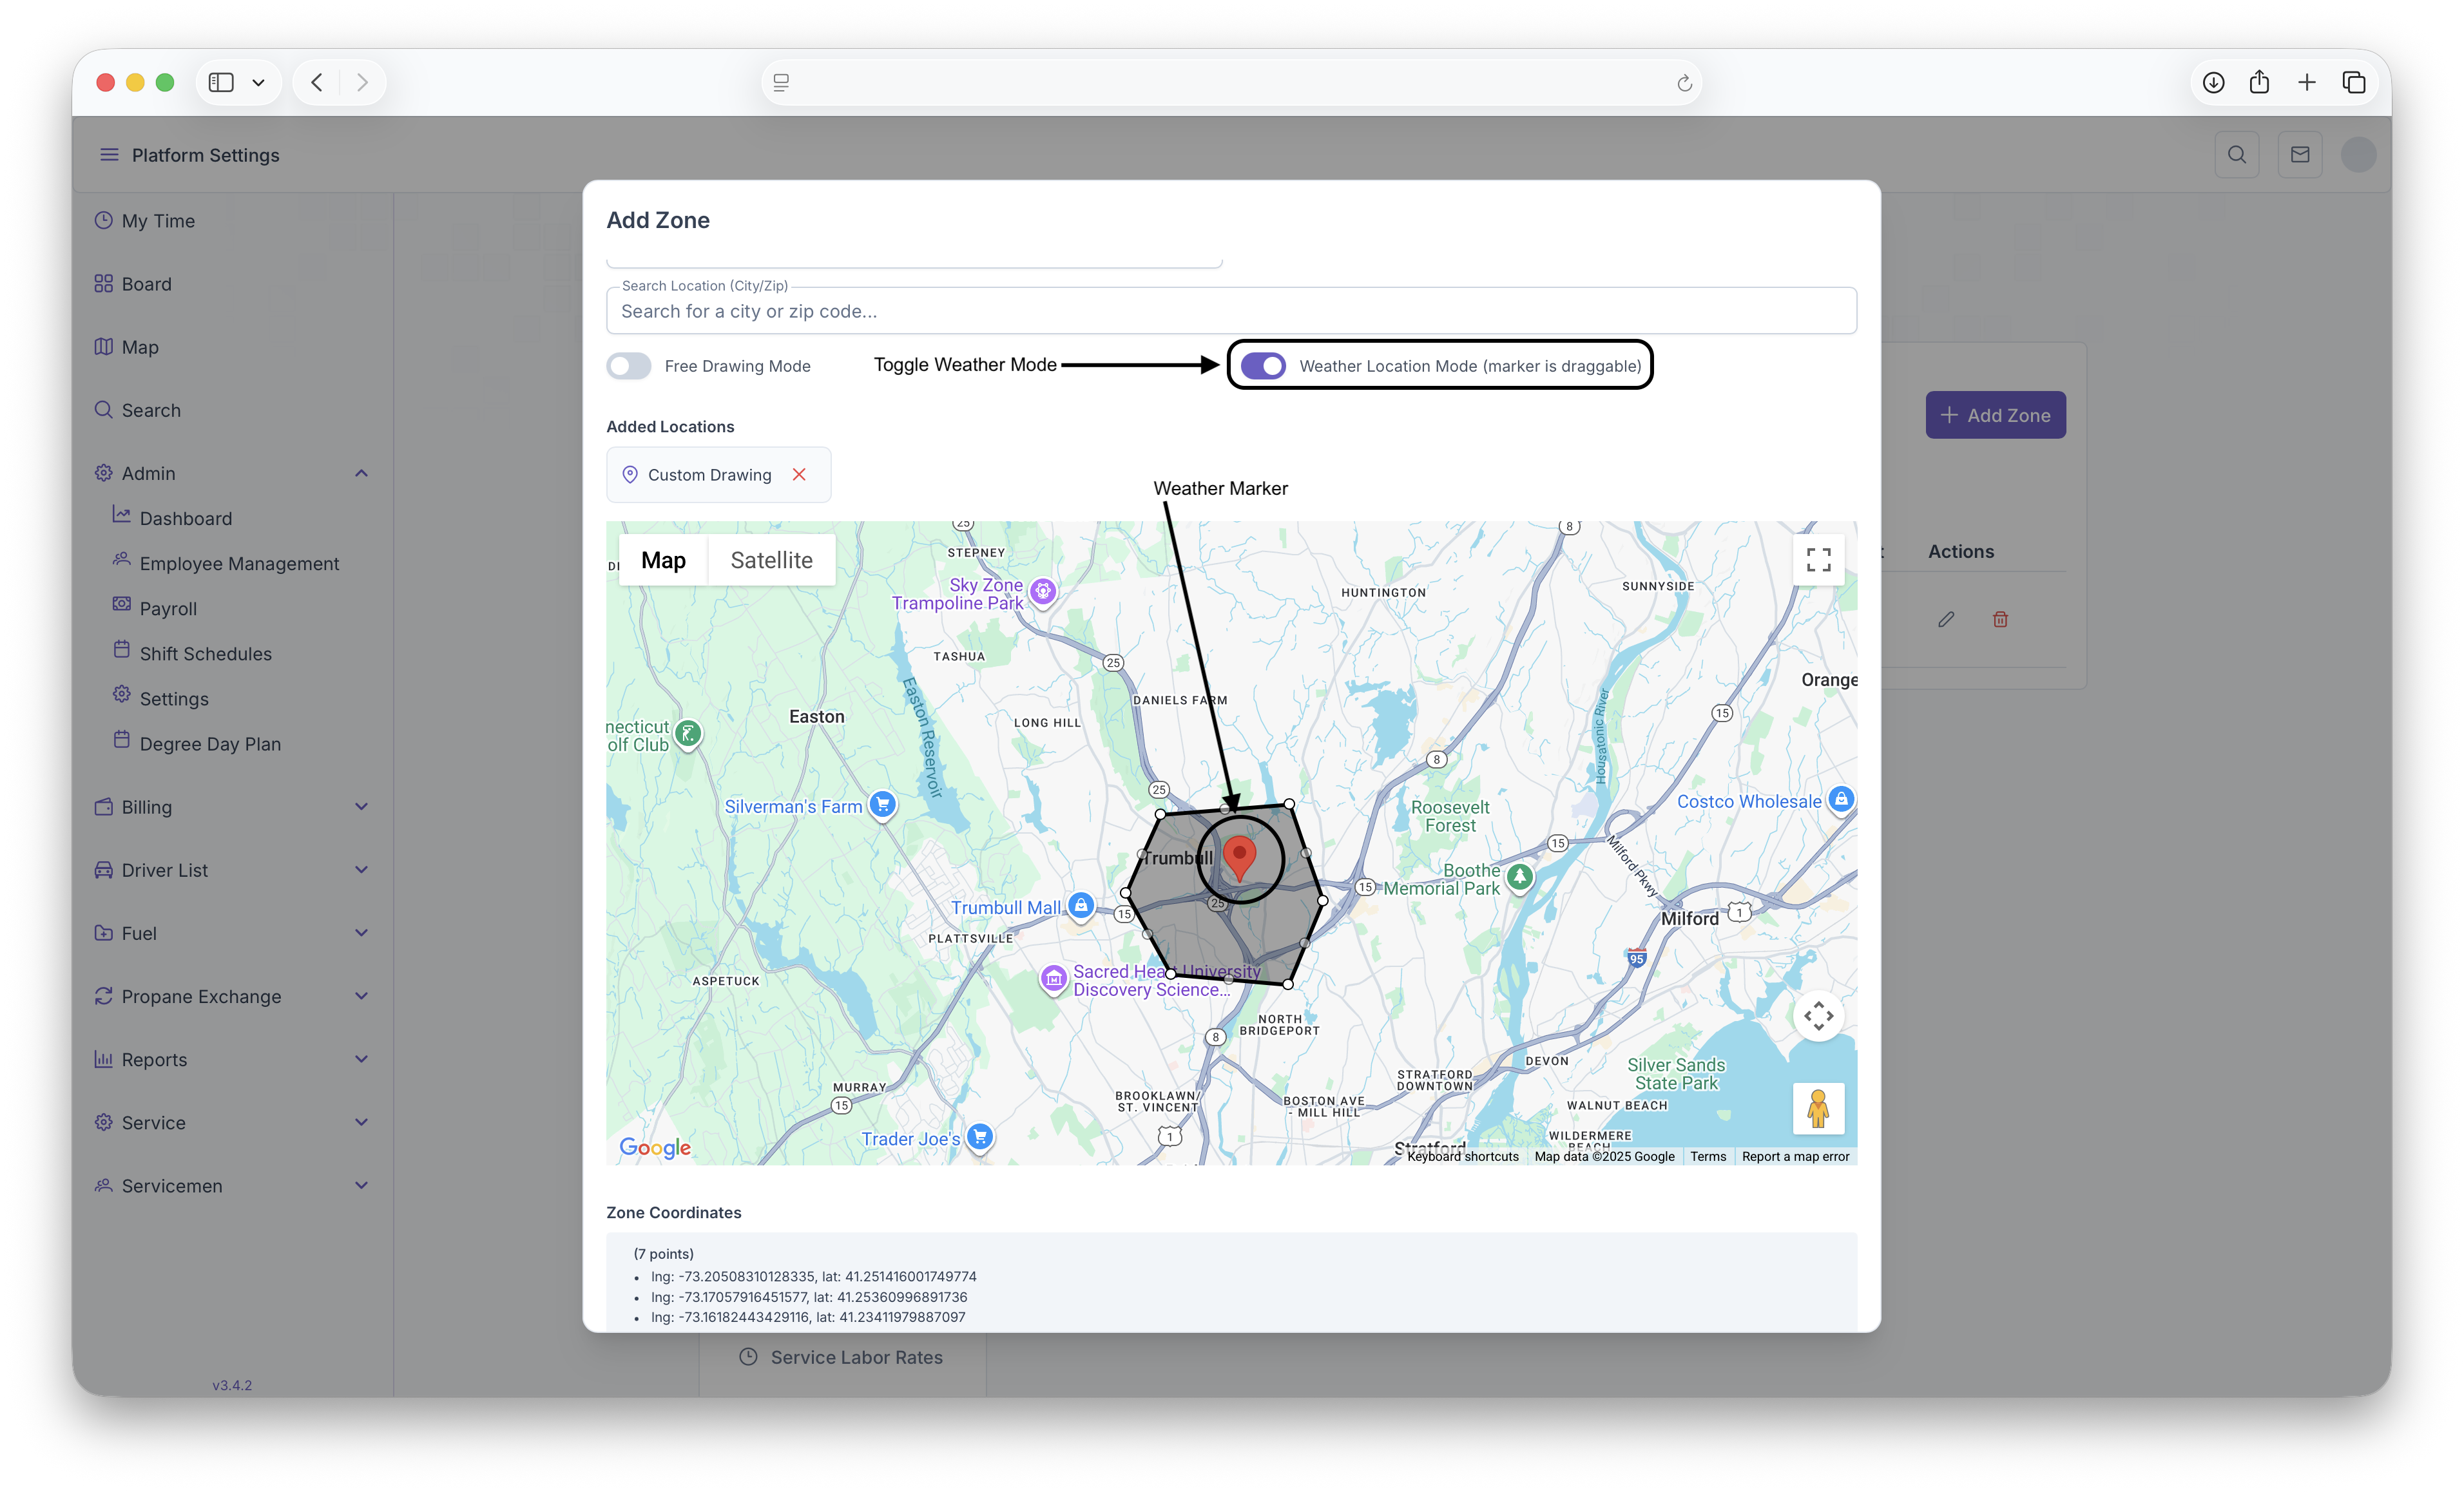
- Once desired zone is created, a Weather Location Marker must be placed on the map by toggling on the Weather Location Mode and clicking on the map.
- Once on the map, the marker can be dragged based on what weather loaction should be tied to the zone created
- Once that's all finished, Zone coordinates will be generated to shows all coordinates for every point placed on the map. Once everything is filled out and looks satisfactory, clicking on the Save Zone button will save the zone. Clicking on the Clear Polygon button will clear the ploygon to start over again and clicking Close will close the window, deleting any information that was filled out.
Editing a Zone
In order to edit a zone, when on the Zones page, click on the edit button which will be under actions in a zone row. Clicking on the edit button will bring up the Edit Zones Page. The page is the same as the Add Zones page from above with the exception of the fields already being filled out. All of the information can then be edited including changing the zone polygon. After edits are complete, clicking on Save Zone will save all the edits made to the Zones. Clicking on Clear Polygon will clear the previous zone polygon if a new one needs to be generated and clicking on Close will close the window and no edits will be saved